Download presentation
Presentation is loading. Please wait.

1
Front-Wheel-Drive (Transaxle and CV Joint) Service
Chapter 78

2
Objectives Diagnose CV joint problems Service CV joints
Replace CV joint boots Disassemble and repair transaxles

3
Introduction Removal, service, and replacement of front drive axles and constant velocity (CV) joint Lucrative service area Transaxle removal Relatively straightforward Once axle removal is accomplished

4
Transaxle and Front-Wheel-Drive Service and Repair
Checks of the axle assemblies Some can be made with the axle on the car

5
Leaking CV Joint Boot Front-wheel-drive axles
Require service as a vehicle ages Some checks and services can be made with axle on vehicle Others require removal and disassembly of components

6
CV Joint Boot Service Boots age over time Boot fails
Repeated flexing and exposure to elements Boot fails Grease leaks out If not replaced: entire joint will fail Most common problem with CV joints Replacement boot kits Come with new clamps and correct amount of high pressure grease

7
Axle Inspection and Diagnosis
Check halfshaft for obvious looseness Noises can be detected from the test drive Weight must be on the suspension when checking for a noise Questions to ask customer: What does the noise sound like? Does it occur during acceleration, deceleration, or when turning?

9
CV Joint Diagnosis Clicking sound during a turn
Indicates bad outboard joint Always check the splines on a shaft Bad plunge joint makes clunking sound Starting from a stop During deceleration Braking Excess wear Hard to detect visually

10
Axle Shaft Removal Major steps Loosen axle nut
Remove the stub shaft from the hub Remove the stub shaft Remove the axle Remove snap rings and clips Remove boot

12
CV Joint Replacement Internal circlip
Common way of retaining a fixed joint to shaft Called knock-off-type joint Different version used in some Japanese vehicles CV joint has been removed from axle Boot is removed Fixed Rzeppa joints Held to their shafts by external snap ring or internal clip

13
Fixed Joint Disassembly and Inspection
Major steps Use drift punch to move inner race to the side for a more complete inspection Wipe the parts off and look for wear Disassemble Rzeppa joint Mark all major components Remove the balls Wipe and lightly grease Install the boot and joint

14
CV Joint Boot Clamps Several types Installing small-end clamp
Universal clamp Bridge-type clamp Earless clamp Pressed-fit ring Installing small-end clamp Pull big end of the boot over CV joint and install retaining clamp Vent the small end of the boot

16
Servicing an Inner Tripod Joint
Major steps Before removing: tape shaft and joint Cut away the clamps and boot Check to see if tripod rollers come off of spider Inspect condition of inside tulip Align any marks After boot and tripod are reinstalled: grease rollers and fill boot with rest of grease

17
Double Offset Plunge Joints
Vary in how they are connected to axle shaft Most held by internal circlip Joint must be disassembled before it can be removed Other kind has a circlip that can be removed by pounding on outer housing Metal retaining ring holds parts in the housing

18
Cross Groove Joint Service and Rebuilt Halfshafts
Key points Cross groove joint is serviced in similar manner to Rzeppa joints Disassembled by turning inner race and cage perpendicular to outer cage and removing them Complete rebuilt halfshaft is a popular repair Installing rebuilt halfshafts is often in the best interest of the customer

19
Installing the Axle Major steps
To install a spline-type joint into transaxle: push in on axle while turning it to align splines After inner end is installed: position stub shaft into hub as far as it can go Do not forget to torque ball joint stud bolt When vehicle is back on ground: torque new stub shaft nut Check clearance of boot clamps before test-driving

20
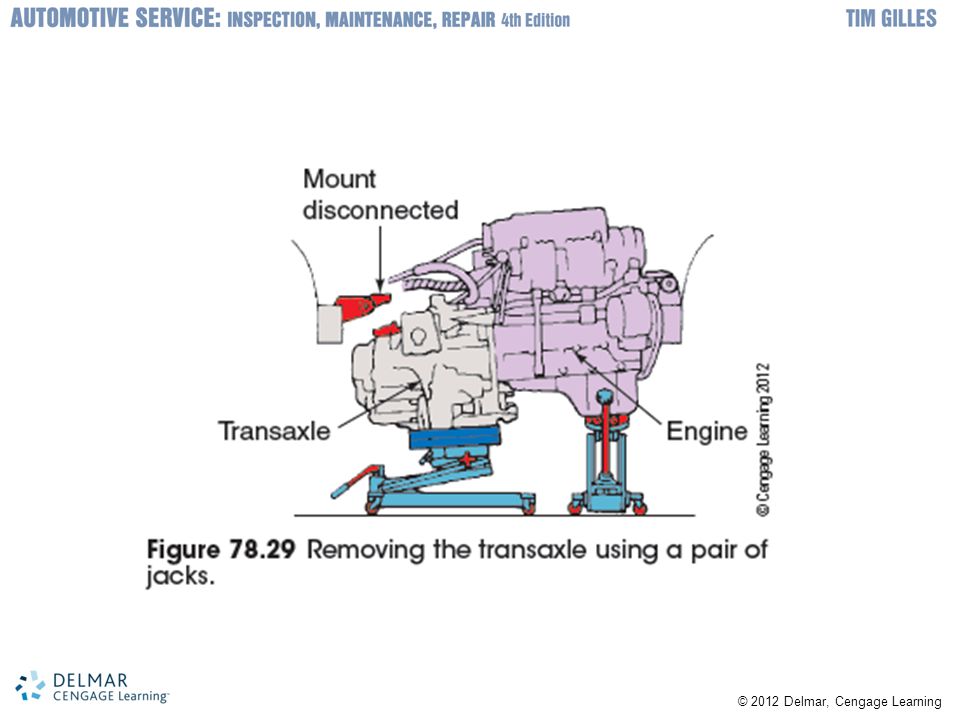
Transaxle Repair and Removal
Key points Transaxles used with transverse engines Differential gears are helical gears No pinion depth or backlash adjustments Front-wheel-drive vehicles Easier to pull engine with transaxle Support the engine if it is easier to leave it in the vehicle Unbolt transaxle from engine Axles are pulled in manner previously described

22
Manual Transaxle Repair
Key points Separate halves of case on a transaxle Check service manual for any specifics Service and assembly are similar to RWD transmissions End play of gears is checked with feeler gauge or dial indicator Thrust washers, shims, or snap rings can be used to make adjustments

23
Automatic Transaxle Repair
Same as RWD automatic transmissions Differences Gar or a chain is driven by transmission output shaft to turn differential section Automatic transaxles have a differential

24
Transaxle Differential Side Bearing Adjustment
Case halves are reassembled Differential side bearing preload is adjusted Some use special tools

25
Install the Transaxle Installation of transaxle is the reverse of removal sequence After installation: be sure to check transaxle lubricant level Some have a fill plug on the side Some have a dipstick Others require removal of speedometer gear

Similar presentations


 Fundamentals>")


