Download presentation
Presentation is loading. Please wait.

1
Stage 1: Prepare your plasmids to be cut by restriction enzymes Obtain the plasmids (pKAN and pAMP) P stands for plasmid pKAN = plasmid with antibiotic kanamycin resistance pAMP = plasmid with antibiotic ampicillin resistance Mix plasmids with restriction enzymes –B–BamH1 and Hind III –R–Restriction enzymes cut the plasmids at precise locations
 P stands for plasmid pKAN = plasmid with antibiotic kanamycin resistance pAMP = plasmid with antibiotic ampicillin resistance Mix plasmids with restriction enzymes –B–BamH1 and Hind III –R–Restriction enzymes cut the plasmids at precise locations")
2
Restriction enzyme: Hind III (cuts @ bp 234) Restriction enzyme: Bam HI (cuts @ bp 2095) Plasmid w/ kanamycin resistance (pKAN) pKAN = 4194 bp 1861 bp restriction fragment 2333 bp restriction fragment
 Restriction enzyme: Bam HI bp 2095) Plasmid w/ kanamycin resistance (pKAN) pKAN = 4194 bp 1861 bp restriction fragment 2333 bp restriction fragment")
3
Thousands of plasmids in our samples

4
K+ (digested plasmid) + means the restriction enzymes were added K– (uncut plasmid) - means the restriction enzymes not added How many plasmid fragments?
 + means the restriction enzymes were added K– (uncut plasmid) - means the restriction enzymes not added How many plasmid fragments")
5
Stage 2: Check to see if the restriction enzymes worked DNA electrophoresis –Plasmid fragments are loaded into a gel –Connected to a power supply –Separates fragments based on their sizes –Smaller fragments travel further through the gel

6
Electrophoresis: sizes DNA fragments

7
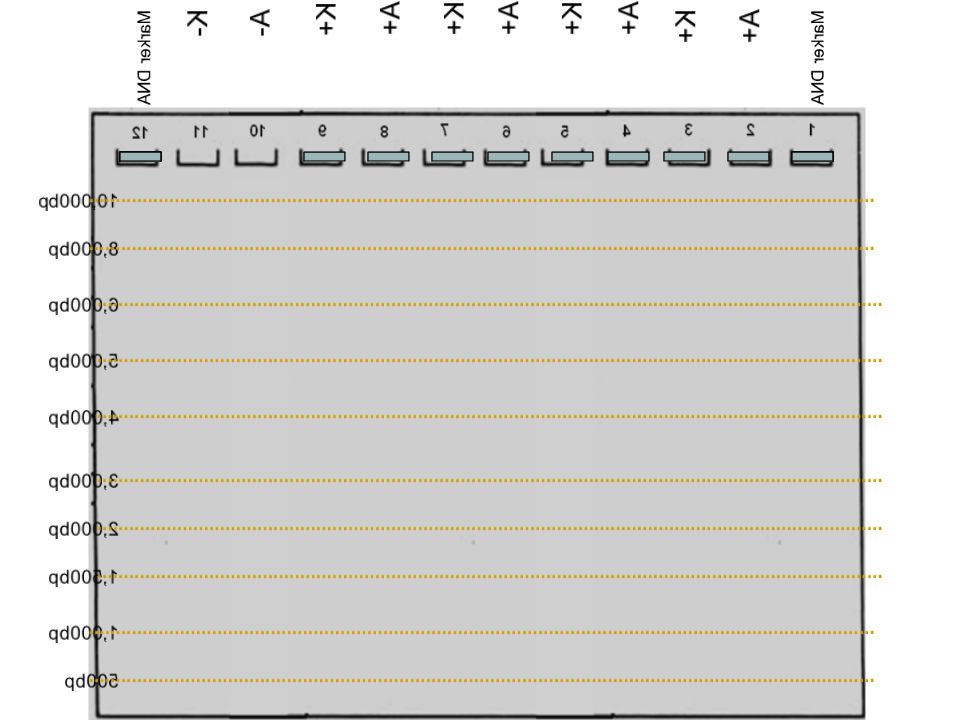
10,000bp 8,000bp 6,000bp 5,000bp 4,000bp 3,000bp 1,500bp 1,000bp Electrophoresis: sizes DNA fragments Known DNA markers K+ K-A+A- 2,000bp 500bp Look at the lab handout and let’s predict the A+ fragments

8
2008 Data/Results

9
We will then micropipette the plasmids Hold micropipette and tubes at eye level

10
Micropipette Use Twist dial to desired volume 1. Twist dial to desired volume 2. Add disposable pipette tip 3. Press plunger to first stop 4. Insert pipette tip into solution to be transferred transferred 5. Slowly release plunger to retrieve liquid 6. Move pipette tip into desired tube 7. Press plunger past first stop to second stop to transfer liquid, watch liquid stick to wall to transfer liquid, watch liquid stick to wall of tube. Remove tip, then release plunger. of tube. Remove tip, then release plunger. 8. Eject tip

11
Micropipette Use Twist dial to desired volume 1 Twist dial to desired volume 2 Add disposable pipette tip 3 Press plunger to first stop 4 Insert pipette tip into solution to be transferred transferred 5 Slowly release plunger to retrieve liquid 6 Move pipette tip into desired tube 7 Press plunger past first stop to second stop to transfer liquid, keep the plunger down to transfer liquid, keep the plunger down as you remove it from the tube. as you remove it from the tube. 8. Eject tip

12
Loading Gels: Insert pipette tip: Under buffer level Above gel well

13
Load the plasmids into an electrophoresis chamber

17
Micropipet tip should be ABOVE the well NOT IN IT!!!!

18
Micropipette tip punched right through the gel See dye under the wells

19
NICE!

20
Connect the electrophoresis to a power supply…DNA has a negative electric charge.

23
So now what??? Plasmids have been engineered for human uses. The human gene for insulin (red) can now be added to the plasmid. The bacteria will produce insulin for diabetics!
 can now be added to the plasmid. The bacteria will produce insulin for diabetics!.")
24
So now what??? The bacteria with the recombinant DNA replicates, thus passing the insulin gene onto its offspring. Each cell now will produce insulin for humans to harvest and use.

25
10,000bp 8,000bp 6,000bp 5,000bp 4,000bp 3,000bp 1,500bp 1,000bp Marker DNA K+ K-A+A- 2,000bp 500bp Marker DNA K+ A+

27
10,000bp 8,000bp 6,000bp 5,000bp 4,000bp 3,000bp 1,500bp 1,000bp Marker DNA K+ K-A+A- 2,000bp 500bp Marker DNA K+ A+

Similar presentations