Download presentation
Presentation is loading. Please wait.

1
Opt 307/407 Practical Scanning Electron Microscopy
Considerations in any microscopy: Resolution Magnification Depth of field Secondary information

2
Limits of Resolution (resolving power)
Unaided eye: 0.1mm Light microscope: 0.2um SEM: 1nm TEM: 0.2nm

3
Evolution of Resolution

5
Depth of Field

6
Light Microscope vs Electron Microscope

7
General Diagram of the SEM System

8
Light Microscopy vs Electron Microscopy
Advantages of EM: Resolution Magnification Depth of field Disadvantages of EM: Pricey Better if conductive (SEM) Maintenance Vacuum
 Maintenance. Vacuum.")
10
Opt 307/407 Vacuum Systems Why do we need a vacuum anyway?
Electrons are scattered by gas (or any other) molecules MFP at 1atm ~ 10cm MFP at 10-5T ~ 4m Some samples react with gases (O2) Helps keep things clean!
 molecules. MFP at 1atm ~ 10cm. MFP at 10-5T ~ 4m. Some samples react with gases (O2) Helps keep things clean!")
11
Opt 307/407 Vacuum Systems Terminology Pressure Units: atm, bar, mbar
Torr (mm of Hg) Pa (N/m2) 1atm=1Bar=1000mBar=760Torr=105Pa Pumping speed l/min, l/sec
 Pa (N/m2) 1atm=1Bar=1000mBar=760Torr=105Pa. Pumping speed. l/min, l/sec.")
12
Opt 307/407 Vacuum Systems

13
Opt 307/407 Vacuum Systems Quality of Vacuum Low: 760-10-2 Torr
Medium: Torr High: Torr Ultrahigh: <~10-8 Torr

14
Measuring Vacuum in EM Systems
Opt 307/407 Vacuum Systems Measuring Vacuum in EM Systems Thermocouple Gauge Pirani Gauge Cold cathode Gauge Penning Gauge Ion pump current

15
Very Broad Range of Vacuum to Measure

16
Grouped Ranges for Vacuum Gauges

17
Vacuum Gauge Choices and Working Ranges

18
Thermocouple/Pirani Gauges

19
Ionization Gauges

20
Ion Gauge Collection

21
Hot Cathode Ion Gauge

22
Penning gauge

23
Penning gauge

24
Opt 307/407 Vacuum Systems

25
Opt 307/407 Vacuum Systems Types of Vacuum Pumps
1- Rotary (Fore, Rough, Aux, Mechanical) 2- Turbomolecular (Turbo) 3- Diffusion (Diff) 4- Ion (Sputter-ion)
 2- Turbomolecular (Turbo) 3- Diffusion (Diff) 4- Ion (Sputter-ion)")
26
Opt 307/407 Vacuum Systems Rotary Pump Basics
Always in the Foreline of the system Exhausts pumped gases to atmosphere Pumping rate decreases as vacuum increases Usually has a low VP oil as a sealant to facilitate pumping

27
Opt 307/407 Vacuum Systems

28
Opt 307/407 Vacuum Systems

29
Opt 307/407 Vacuum Systems Rotary Pump Problems
Cannot pump <10-2 Torr Noisy Backstreams Vibration Maintenance

30
Direct drive electric motor-gas turbine Rotor/stator assembly
Opt 307/407 Vacuum Systems Turbo Pump Basics Direct drive electric motor-gas turbine Rotor/stator assembly Moves gas molecules through the assembly by sweeping them from one to another High rotational speed (>10,000 RPM) Very clean final vacuum
 Very clean final vacuum.")
31
Needs to be protected from solid material
Opt 307/407 Vacuum Systems Turbo Pump Problems Needs a Foreline pump Costly Can fail abruptly Whine Needs to be protected from solid material

32
Opt 307/407 Vacuum Systems Diffusion Pump Basics No moving parts
Heated oil bath and condensing chamber Jet assembly to redirect condensing gas Recycle of oil Pressure gradient in condensing chamber/Foreline pump removes from high pressure side

33
Opt 307/407 Vacuum Systems

34
Opt 307/407 Vacuum Systems Diffusion pump problems
Heat up/cool down time Needs foreline pump Can make a mess in vacuum failures/overheating Needs cooling water (usually)
")
35
Opt 307/407 Vacuum Systems Ion Pump Basics
High voltage creates electron flux Ionizes gas molecules Ions swept to titanium pole by magnetic field Titanium erodes (sputters) as ions become embedded Getters collect Ti atoms and more gas ions Current flow indicates gas pressure (vacuum)
 as ions become embedded. Getters collect Ti atoms and more gas ions. Current flow indicates gas pressure (vacuum)")
36
Opt 307/407 Vacuum Systems

37
Opt 307/407 Vacuum Systems Ion Pump Problems
Cannot work until pressure is <10-5 Torr Low capacity storage-type pump Needs periodic bake-out Hard to startup (sometimes)
")
38
Opt 307/407 Vacuum Systems Summary
All electron microscopes require a vacuum system. Usually consists of rotary-(turbo, diff)-(ion) pumps. System should provide clean oil-free vacuum at least 10-5 Torr or so. Vacuum is usually measured with a combination of TC and ion gauges. Vacuum problems are some of the most challenging to find and fix, and may even be caused by samples outgassing
-(ion) pumps. System should provide clean oil-free vacuum. at least 10-5 Torr or so. Vacuum is usually measured with a combination of TC and ion gauges. Vacuum problems are some of the most challenging to find and fix, and may even be caused by samples outgassing.")
39
Opt 307/407 Vacuum Systems

40
Opt 307/407 Vacuum Systems Typical TEM Vacuum System

42
Electron Sources and Lenses
Opt307/407 Electron Sources and Lenses

43
Types of Electron Sources
Thermionic Sources Tungsten filament Lanthanum Hexaboride (LaB6) filament CeB6 Field Emission sources Cold Schottky
 filament. CeB6. Field Emission sources. Cold. Schottky.")
44
Ideal Electron Source Characteristics
Low “work function” material so that it is easy to remove electrons from the material High melting point Chemically and physically stable at high temps Low vapor pressure Rugged Cheap

45
Thermionic Emission of Electrons
Filament material is heated with an electrical current so that the “work function” of the material is exceeded and the electrons are allowed to leave the outermost orbital. Generates a fairly broad source of electrons (cloud)
")
46
Tungsten Hairpin Filaments
Most common of all filaments in electron guns Low cost (~$20) Lots of beam current Not very intense illumination Emission temperature ~2700K Work function= 4.5ev Can last about 100 hours
 Lots of beam current. Not very intense illumination. Emission temperature ~2700K. Work function= 4.5ev. Can last about 100 hours.")
47
Tungsten Hairpin Filament Saturation

48
Tungsten Hairpin Filament

49
LaB6 (and CeB6) Filaments
Lower work function thermionic source (2.4ev) Lots brighter (~50x) than W-hairpin Relatively costly (~$700) Can be direct replacement for W-hairpin Heated to about 1700K Can last hundreds of hours
 Lots brighter (~50x) than W-hairpin. Relatively costly (~$700) Can be direct replacement for W-hairpin. Heated to about 1700K. Can last hundreds of hours.")
50
LaB6 Emitter Problems Need higher vacuum to reduce reactivity
More difficult to make Heating/cooling must be slow (brittle material) Heating is indirect through a graphite well
 Heating is indirect through a graphite well.")
51
Thermionic Gun Layout

52
Optimization of Thermionic Emitter Lifetime
Keep vacuum system in good working order Clean gun area Do not oversaturate the filament Minimize the number of heating/cooling cycles

53
Field Emission Electron Sources
Process proposed in 1954/Demonstrated in 1966 Usually a single crystal W-wire sharpened and shaped Tip radius <1.0um Usually includes a ZrO2 component to assist emission (if heated) About 10,000 times brighter than W-hairpin Small apparent source which helps obtain small probes with high temporal coherence Decreased energy spread in the beam Can last many thousands of hours
 About 10,000 times brighter than W-hairpin. Small apparent source which helps obtain small probes. with high temporal coherence. Decreased energy spread in the beam. Can last many thousands of hours.")
54
Cold Field Emitters Most intense (brightest) electron source
Tip radius very small (~0.1um) Needs very high electric field intensity Tips contaminate and need “flashing” to clean and/or anneal Expensive (~$4000) Requires ultrahigh vacuum in gun
 Needs very high electric field intensity. Tips contaminate and need flashing to clean and/or anneal. Expensive (~$4000) Requires ultrahigh vacuum in gun.")
55
Schottky Field Emitters
More stable than cold field emitters Self annealling as ions impact tip Lower work function than cold field emitters Extraction field intensity can be lower Vacuum requirements lower Still expensive (~$4000)
")
56
Typical Schottky Field Emission Sources

57
Schottky Field Emitter Diagram

58
Schottky Field Emitter Parts
Suppressor Cap: limits the electron emission to the desired area of the tip actually blocks electrons from the heater and shaft Heating Filament-tungsten hairpin: heats the tungsten tip to enhance emission (1800K) Emitter: Single crystal W-needle w/ ZrO2 coating
 Emitter: Single crystal W-needle w/ ZrO2 coating.")
59
Schottky Field Emitter Parts
Extractor Anode: applies voltage to the filament to extract electrons from the tip ( keV) Gun Lens: Electrostatic lens which forms a crossover of the electron source (acts similar to the C1 lens)
 Gun Lens: Electrostatic lens which forms a crossover of the. electron source (acts similar to the C1 lens)")
60
Optimizing Field Emission Emitter Lifetime
Keep vacuum system in good working order Leave the emitter heated Don’t over-extract Don’t overheat

61
Electron Lenses Electrostatic Gun cap (Wehnelt cylinder)
Totally inside vacuum Electromagnetic All other lenses and stigmators Partially outside of vacuum

62
Transmission Electron Microscope
Optical instrument in that it uses a lens to form an image Scanning Electron Microscope Not an optical instrument (no image forming lens) but uses electron optics. Probe forming-Signal detecting device.
 but uses electron optics. Probe forming-Signal detecting device.")
63
Electron Optics Refraction, or bending, of a beam of illumination is caused when the ray enters a medium of a different optical density.

64
Electron Optics In light optics this is accomplished when a
wavelength of light moves from air into glass In EM there is only a vacuum with an optical density of 1.0 whereas glass is much higher

65
Electron Optics In electron optics the beam cannot enter a
conventional lens of a different refractive index. Instead a “force” must be applied that has the same effect of causing the beam of illumination to bend.

66
Classical optics: The refractive index changes
abruptly at a surface and is constant between the surfaces. The refraction of light at surfaces separating media of different refractive indices makes it possible to construct imaging lenses. Glass surfaces can be shaped. Electron optics: Here, changes in the “refractive index” are gradual so rays are continuous curves rather than broken straight lines. Refraction of electrons must be accomplished by fields in space around charged electrodes or solenoids, and these fields can assume only certain distributions consistent with field theory.

67
Converging (positive) lens: bends rays toward the
axis. It has a positive focal length. Forms a real inverted image of an object placed to the left of the first focal point and an erect virtual image of an object placed between the first focal point and the lens.

68
Diverging (negative) lens: bends the light rays
away from the axis. It has a negative focal length. An object placed anywhere to the left of a diverging lens results in an erect virtual image. It is not possible to construct a negative magnetic lens although negative electrostatic lenses can be made

69
Electron Optics Electrostatic lens
Must have very clean and high vacuum environment to avoid arcing across plates

70
Electromagnetic Lens Passing a current through a single coil of
wire will produce a strong magnetic field in the center of the coil

71
Three Electromagnetic Lenses

72
Electromagnetic Lens Pole Pieces of iron concentrate lines of
magnetic force

73
Electromagnetic Lens

74
Electromagnetic Lens

75
Forces Acting on an Electron Beam as
it goes through an Electromagnetic Lens ...and the Result

76
The two force vectors, one in the direction of the electron trajectory and the other perpendicular to it, causes the electrons to move through the magnetic field in a helical manner.

77
The strength of the magnetic field is determined by the number of wraps of the wire and the amount of current passing through the wire. A value of zero current (weak lens) would have an infinitely long focal length while a large amount of current (strong lens) would have a short focal length.
 would have an infinitely long focal length while a large amount of current (strong lens) would have a short focal length..")
78
Condenser Lens: Weak and Strong Conditions

79
Lens Defects Since the focal length f of a lens is dependent
on the strength of the lens, if follows that different wavelengths will be focused to different positions. Chromatic aberration of a lens is seen as fringes around the image due to a “zone” of focus.

80
Lens Defects In light optics wavelengths of higher energy (blue) are bent more strongly and have a shorter focal length In the electron microscope the exact opposite is true in that higher energy wavelengths are less effected and have a longer focal length

81
Lens Defects In light optics chromatic aberration can be corrected by combining a converging lens with a diverging lens. This is known as a “doublet” lens

82
The simplest way to correct for chromatic aberration is
to use illumination of a single wavelength! This is accomplished in an EM by having a very stable acceleration voltage. If the e velocity is stable the illumination source is monochromatic.

83
Lens Defects LEO Gemini Lens
A few manufacturers have combined an electromagnetic (converging) lens with an electrostatic (diverging) lens to create an achromatic lens LEO Gemini Lens
 lens with an electrostatic (diverging) lens to create an achromatic lens. LEO Gemini Lens.")
84
The effects of chromatic aberration are most profound at the edges of the lens, so by placing an aperture immediately after the specimen chromatic aberration is reduced along with increasing contrast

85
Lens Defects The fact that rays enter and leave the lens field at different angles results in a defect known as spherical aberration. The result is similar to that of chromatic aberration in that rays are brought to different focal points

86
Spherical aberrations are worst at the periphery of a lens, so again a small opening aperture that cuts off the most offensive part of the lens is the best way to reduce the effect.

87
Diffraction Diffraction occurs when a wavefront encounters an edge of an object. This results in the establishment of new wavefronts

88
Diffraction When this occurs at the edges of an aperture the diffracted waves tend to spread out the focus rather than concentrate them. This results in a decrease in resolution, the effect becoming more pronounced with ever smaller apertures.

89
Apertures Disadvantages Advantages
Decrease resolution due to effects of diffraction Decrease resolution by reducing half angle of illumination Decrease illumination by blocking scattered electrons Advantages Increase contrast by blocking scattered electrons Decrease effects of chromatic and spherical aberration by cutting off edges of a lens

90
Astigmatism If a lens is not completely symmetrical objects will be focussed to different focal planes resulting in an astigmatic image

91
The result is a distorted image
The result is a distorted image. This can best be prevented by having a near perfect lens, but other defects such as dirt on an aperture etc. can cause astigmatism

92
Astigmatism in light optics is corrected by making a lens with a offsetting defect to correct for the defect in another lens. In EM it is corrected using a stigmator which is a ring of electromagnets positioned around the beam to “push” and “pull” the beam to make it more circular in cross-section

94
Electron Beam-Sample Interactions
Opt 307/407 The SEM System and Electron Beam-Sample Interactions

95
The TEM system and components:
Vacuum Subsystem Electron Gun Subsystem Electron Lens Subsystem Sample Stage More Electron Lenses Viewing Screen w/scintillator Camera Chamber

96
The SEM System and Components:
Vacuum Subsystem Electron Gun Subsystem Electron Lens Subsystem Scan Generator Subsystem Scattered Signal Detectors Observation CRT Display Camera CRT/Digital Image Store

97
SEM Scan Generation System
Sets up beam sweep voltage ramp in both X and Y directions (tells beam how far to move and the number of increments) Synchronized between beam on sample and beam on CRT display Can be analog or digital in format Includes interface to magnification module for changing the beam sweep on the sample
 Synchronized between beam on sample and beam on CRT display. Can be analog or digital in format. Includes interface to magnification module for changing. the beam sweep on the sample.")
98
Scan Generator Interface

99
Magnification control in the SEM
Beam sweep on sample is synchronized with beam sweep on display CRT CRT size never changes Sweep distance on sample can vary (using magnification module) Small distance on sample--> large magnification to CRT Large distance on sample--> small magnification to CRT Mag=CRT size/Raster Size
 Small distance on sample--> large magnification to CRT. Large distance on sample--> small magnification to CRT. Mag=CRT size/Raster Size.")
100
Magnification Control in the SEM

101
Depth of Field in the SEM
The single most important thing in making SEM images pleasing to look at and interpret Range of distances above and below the optimal focus of the final lens that produces acceptably focussed image features DOF in the SEM is a few hundred times that of the LM at similar magnifications DOF is inversely proportional to the aperture angle

102
Depth of Field and Defocus

103
DOF in the SEM

104
DOF and Aperture Size

105
Note the large depth of field which is possible with small probe semi-angle ( .

106
DOF and Sample Tilt

107
DOF and Working Distance

108
Spot Size Resolution is a direct function of (and limited by) the
final spot size of the electron beam This is a function of initial beam crossover size at the gun and the final spot formed by the beam shaping apertures and the condensing lenses Shorter focal lengths produce smaller focussed spots Short working distances have the smallest spots and the best resolution Smaller spots reduce the signals generated (S/N decreases)
")
109
Spot Size Control in the SEM

110
Signal Detectors for the SEM
Electron Beam-Specimen Interactions First thing: electrons are scattered in a near-forward direction

111
Electron Beam-Sample Interaction

112
Electron Flight Simulator Demo

113
Smorgasbord of Electron Beam Sample Interactions
Elastic Scattering Backscattered Electrons Inelastic Scattering Plasmon Excitation (coherent oscillations in free electron “plasma”) Secondary Electrons from conduction band Electron Shell Excitation (photons, characteristic x-rays and Auger electrons) X-ray Continuum (braking radiation) Phonon Excitation (thermal)
 Secondary Electrons from conduction band. Electron Shell Excitation (photons, characteristic x-rays and Auger electrons) X-ray Continuum (braking radiation) Phonon Excitation (thermal)")
114
Electron Beam-Sample Interactions

115
Backscattered (Primary) Electrons
 Electrons")
116
Backscatter Yield n= *A *A2*A *A2*A2*A2

117
Backscattered Electron Detectors

119
Backscattered Electron Image

120
Backscattered Electron Detector Placement
For either solid-state Si detectors or Robinson type

121
Secondary Electrons and Detectors

122
Secondary Electrons Inelastic collision and ejection of weakly held conduction band electrons (need only few eV to exceed work function of the sample atoms) Always low in energy (<50eV) Can also be formed from backscattered electrons. Ratio is Z dependent (SEBS/SEB increases with Z) Usually a large fraction is produced within a region defined by the primary beam
 Always low in energy (<50eV) Can also be formed from backscattered electrons. Ratio is Z. dependent (SEBS/SEB increases with Z) Usually a large fraction is produced within a region defined. by the primary beam.")
123
Some Secondary Electron Characteristics

124
Types of Secondary Electrons/Origins

125
Secondary Electrons: Edge Effects

126
Everhart-Thornley (ET) Secondary Electron Detector
 Secondary Electron Detector")
127
Photomultiplier Tube Electronics

128
Whole E-T Detector w/PMT Amplification

129
Secondary Electron Images

130
Auger Electron Generation

131
Auger Analytical Volume

132
Auger Electron Spectroscopy
Yielded inverse to BSE: lighter elements emit more Electrons are VERY specific in energy...can indicate type of bonding involved and oxidation state MFP for typical Auger energies is about 0.1-2nm Analytical volume is very small---> resolution is high Signal is pretty weak

133
X-ray Photon Production
Bremsstrahlung (Braking) radiation Characteristic X-rays
 radiation. Characteristic X-rays.")
134
Bremsstrahlung Continuum X-rays
Formed by the release of energy from the primary electron beam as it decelerates in the presence of the Coulombic field of target (sample) atoms Large energy spread (0-E0) Not very useful Forms a large portion of the x-ray spectral background
 atoms. Large energy spread (0-E0) Not very useful. Forms a large portion of the x-ray spectral background.")
135
Characteristic X-rays
Formed when inner shell electrons are ejected by the primary beam, followed by an outer shell electron falling and filling the vacancy. Energy difference is compensated by releasing a photon of “characteristic” energy, defined by the energy level differences of the orbitals, which is unique within a series of transitions.

136
Characteristic X-ray Production

137
Energy Dispersive X-ray Spectrometer

138
X-ray Spectrum from EDS Spectrometer

139
Wavelength Dispersive (crystal) Spectrometer
 Spectrometer")
140
X-ray Spectra Comparison EDS vs WDS

141
Cathodoluminescence Signal Generation
Electron beam excitation of sample valence band electrons into the conduction band (electron-hole pair production) If allowed to recombine, the annihilation of the electron-hole pair creates a photon (sometimes in the visible range) A high efficiency collector (usually a parabolic mirror) and a PMT are used to collect and amplify the signal
 If allowed to recombine, the annihilation of the electron-hole pair. creates a photon (sometimes in the visible range) A high efficiency collector (usually a parabolic mirror) and a. PMT are used to collect and amplify the signal.")
142
Absorbed Current or Specimen Current
Sample is detector IB~= ISC+ IBS + (ISE + Iph +Ietc) SC image looks like an inverted BSE image Very useful and easy to obtain Resolution not so good
 SC image looks like an inverted BSE image. Very useful and easy to obtain. Resolution not so good.")
143
Transmitted Electrons
In thin samples the beam may pass through the thickness TED is located below the sample (like BSE detectors) Sort of like TEM w/o the resolution
 Sort of like TEM w/o the resolution.")
144
Relative Sizes of the Emission Zones (looking from above)
")
146
Image Collection, Recording
and Presentation Rule-of-thumb microscope conditions -best resolution -best depth of field -best sample preservation Conventional Photographic Methods Digital Methods Presentation for: Display Publication

147
Image Collection Proper subject identification
Proper subject orientation Best selection of imaging conditions -HV -WD -Spot size (aperture) -Scan rate
 -Scan rate.")
148
Subject Identification/Orientation
Representative of the whole Image background Not too busy Important image information is centered and prominent Many times a slight tilt conveys more information

149
“Best” Imaging Conditions
High resolution -short working distance -small spot size -high accel. Voltage -high magnifications Depth of field -long working distance -low magnifications -larger spot size Low magnification -large spot

150
Selection of Scan Rate for Imaging
Sensitive samples -may need to be fast -low S/N -maybe TV integration mode Insulating (charging) samples -decrease charging with small spot and fast frame rate, maybe TV again -focus/stigmate in an area adjacent to the area recorded -use image shift function to quickly move small amounts Normally conductive samples -use slowest rate practical w/o degrading surface
 samples. -decrease charging with small spot and. fast frame rate, maybe TV again. -focus/stigmate in an area adjacent to the area recorded. -use image shift function to quickly move small amounts. Normally conductive samples. -use slowest rate practical w/o degrading surface.")
151
Old Technology Analog scan SEMs
2nd CRT for viewing the image as it scans Film based camera focused on this CRT (low persistence) Almost always a 4x5 inch Polaroid sheet film camera Very slow scan for about a 2000 line image (~3 minutes) P/N film or just an instant positive image About $3/shot now
 Almost always a 4x5 inch Polaroid sheet film camera. Very slow scan for about a 2000 line image (~3 minutes) P/N film or just an instant positive image. About $3/shot now.")
152
Generalized Photographic Processing
Needed for TEM image plates (Can be used for SEM film images too) Exposure of silver halide grains (latent image) Development (reducing basic solution---> Ag0) Rinse (water) or Stop (acid) Fix (thiosulfates) Rinse (water) Dry Scan or Print photographically Good photographic processing results in the best images and are still the images that are used to compare other (newer) techniques
 Exposure of silver halide grains (latent image) Development (reducing basic solution---> Ag0) Rinse (water) or Stop (acid) Fix (thiosulfates) Rinse (water) Dry. Scan or Print photographically. Good photographic processing results in the best images. and are still the images that are used to compare. other (newer) techniques.")
153
Newer Technology Digital raster SEMs
Frame buffer storage of image info Image processing Digital image storage -usually TIFF files so that header can contain image and microscope specific data Fully transportable formats Easy incorporation of images into documents

154
LEO 982 Specific Digital Imaging
Detectors -SEI (chamber) -SEI (column) -BSE Signal mixer -brightness -ratio Gamma correction -corrects for desired brightness and contrast Iout~=Iin -power function deviation from 1:1 1.0 darkens and enhances lower greys 1.0 lightens and enhances higher greys
 -SEI (column) -BSE. Signal mixer. -brightness. -ratio. Gamma correction. -corrects for desired brightness and contrast. Iout~=Iin -power function deviation from 1:1. 1.0 darkens and enhances lower greys. 1.0 lightens and enhances higher greys.")
155
Gamma Corrections <--- switch position 0 <--- switch position 1

156
Gamma corrections <----- switch position 3 <----- switch position 4 <----- switch position 5 <----- switch position 6

157
LEO 982 Specific Digital Imaging
Slow scan rates 1-3 continuous scan Slow scan rates 4-8 store one frame of data -dump to disk as image file (TIFF) Choose image pixel matrix density from 512x512 to 2048x2048 (lowest is usually OK) Right mouse button will interrupt any scan and store results in the buffer (incl. TV) TV rate integration of frames can reduce random noise in the final image at a fast scan rate File path and naming convention
 Choose image pixel matrix density from 512x512 to. 2048x2048 (lowest is usually OK) Right mouse button will interrupt any scan and store. results in the buffer (incl. TV) TV rate integration of frames can reduce random noise. in the final image at a fast scan rate. File path and naming convention.")
158
LEO 982 Specific Digital Imaging
Variable small raster -used to increase scan rate for image adjustment Can store multiple images in the same frame -variable frame -split screen -kind of gimmicky.....don't use for important images

159
Stereo Pair Images (Anaglyphs)
By collecting two images offset by about in tilt Display them side by side and cross eyes to converge Build a blue-red image composite and use stereo glasses -In Photoimpact program: convert images to RGB adjust color balance (red-right, blue-left) perform image calculation (difference operator and merge)
 perform image calculation (difference operator and merge)")
163
Special Scan Modes in the LEO 982
Line scan -disable Y-axis scan to see grey-level variations on a line Y-modulation -if very little Z-axis information this converts it to Y-axis deflection (not very useful) Spot scan -mostly for x-ray data acquisition
 Spot scan. -mostly for x-ray data acquisition.")
164
Additional Scanning Features of the LEO 982
Dual magnification -useful for “looking around” -don't use for important images Scan rotation -electronically rotates the raster on the sample -very useful for getting a good “presentation” Dynamic focus -use to compensate for the portions of the sample that fall outside the depth of field distance. Sets up a ramp on the focus current +- the center of the field Tilt correction -compensates for trapezoidal scan on highly tilted samples

165
Image Processing Generally use “kernels” which are arrays of arithmetic operators on a pixel Standard kernels are used to blur, average, and sharpen images. 3X3, 5x5, array of operators. Photoshop and PhotoImpact have custom and standard kernels
![]()
166
Kernel Operations for Sharpening an Image

167
Different Kernels

168
Effect of Kernel Size on Operations

169
Contrast Enhancement

170
Original kernel Average kernel
Sharpen kernel Blur kernel

171
Pitfalls of Image Processing
Images can be distorted and data lost Pixelization of images Ethical behavior dictates a minimum of processing Always better off collecting the best image and either not processing or doing it only lightly

174
Image Manipulation Erosion of edge pixels
-kernel operator to find edges -erode or erase edge pixels one layer at a time -break apart and separate touching features Dilation of edge pixels -dilate or add edge pixels one layer at a time -fuse separate features Most useful in particle and other small repeating features
![]()
175
Presentation of Micrographs
Reports -probably least critical -must convey information concisely Journal -probably most critical -size, grey-levels, resolution -must be specific and representative of the narrative Posters -most variable in format -otherwise like journal -conducive to point and discuss Web -like journal -can be interactive

176
Presentation Media Photographic paper Photo quality printer output
-dye sublimation -ink jet....getting there! -laser...maybe... -consider viewing distance in choice Include TIFF or JPEG files in reports using word processor Powerpoint for talks

177
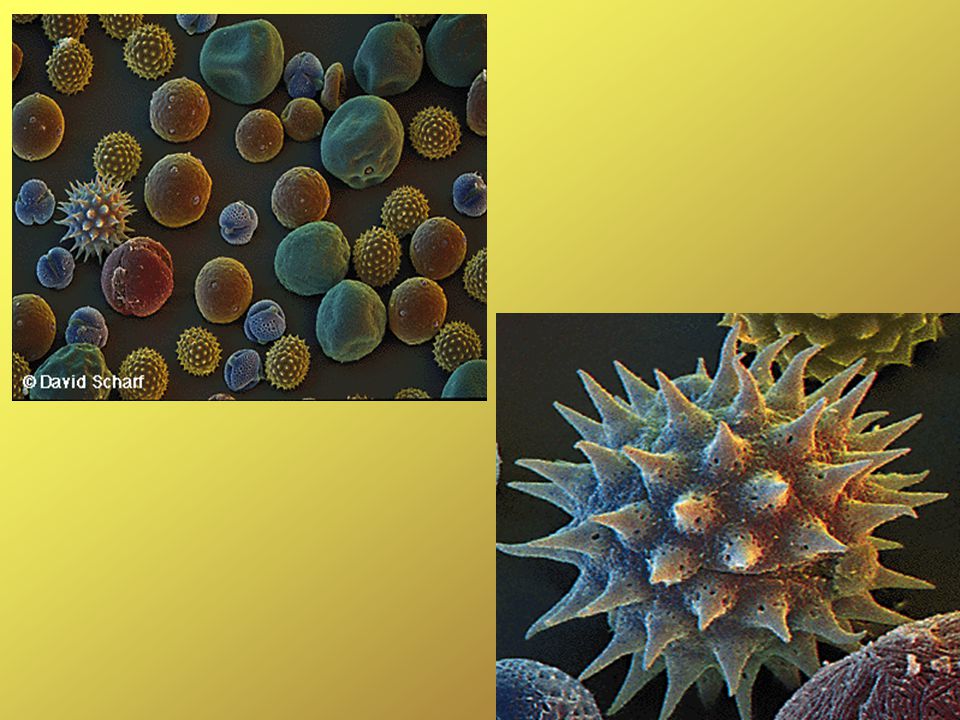
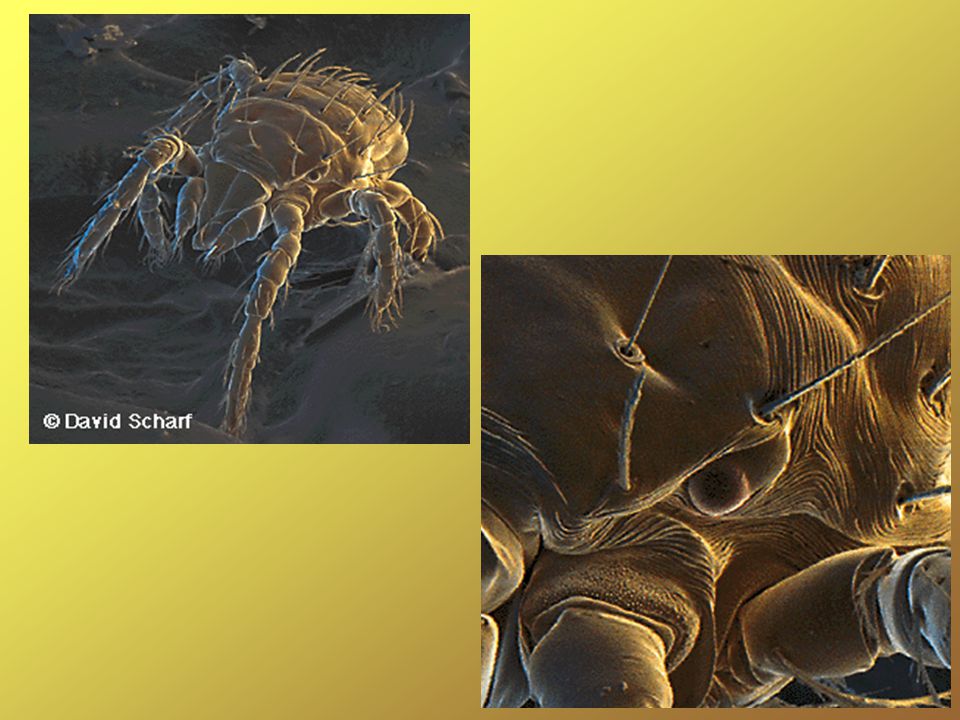
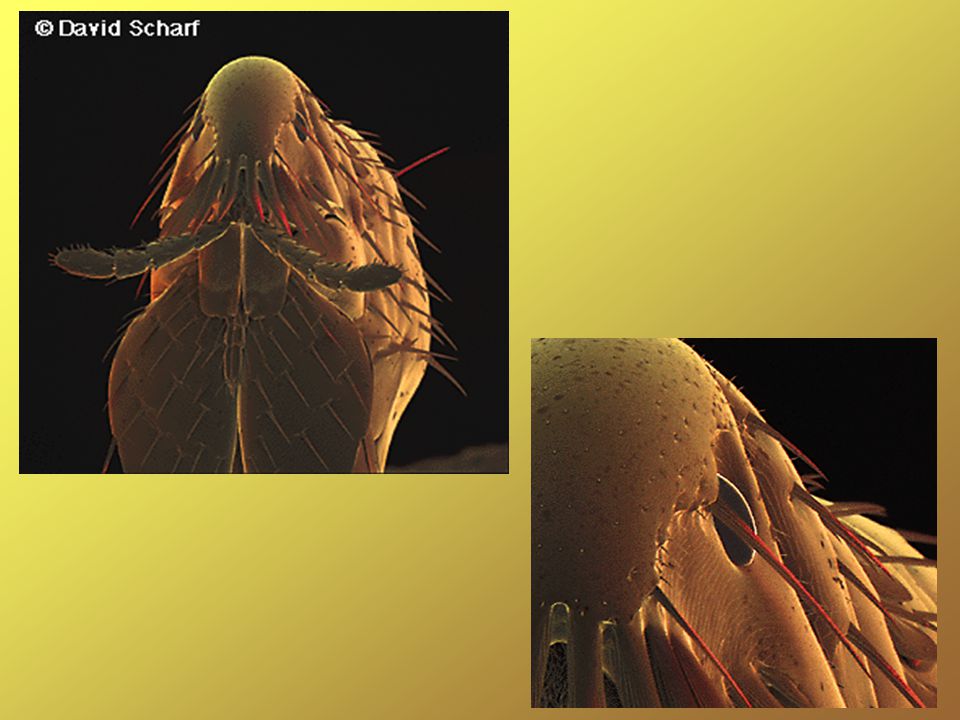
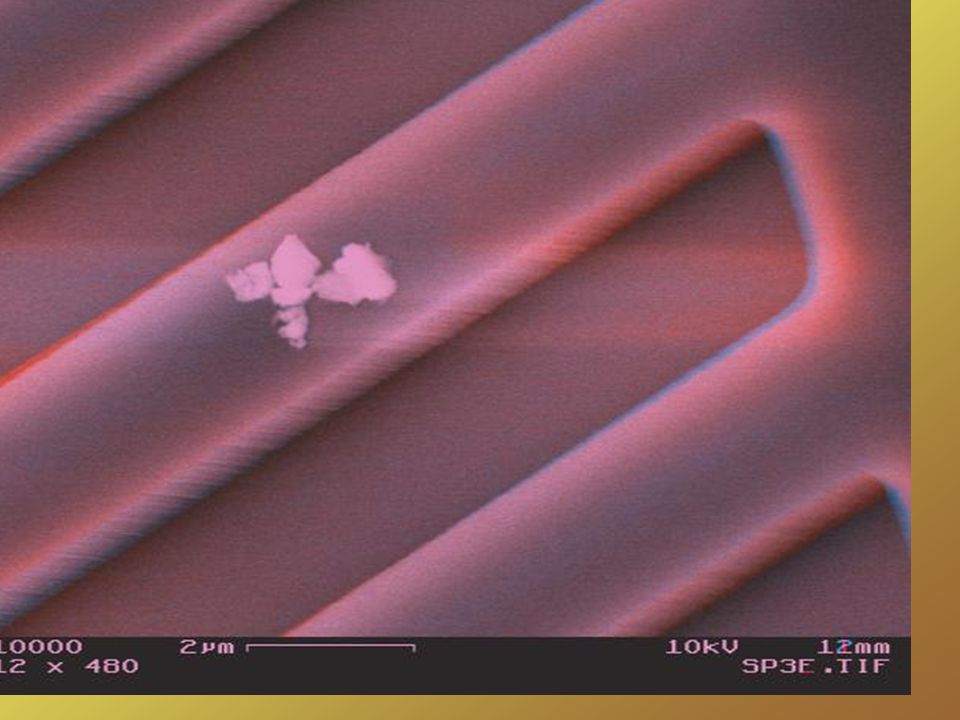
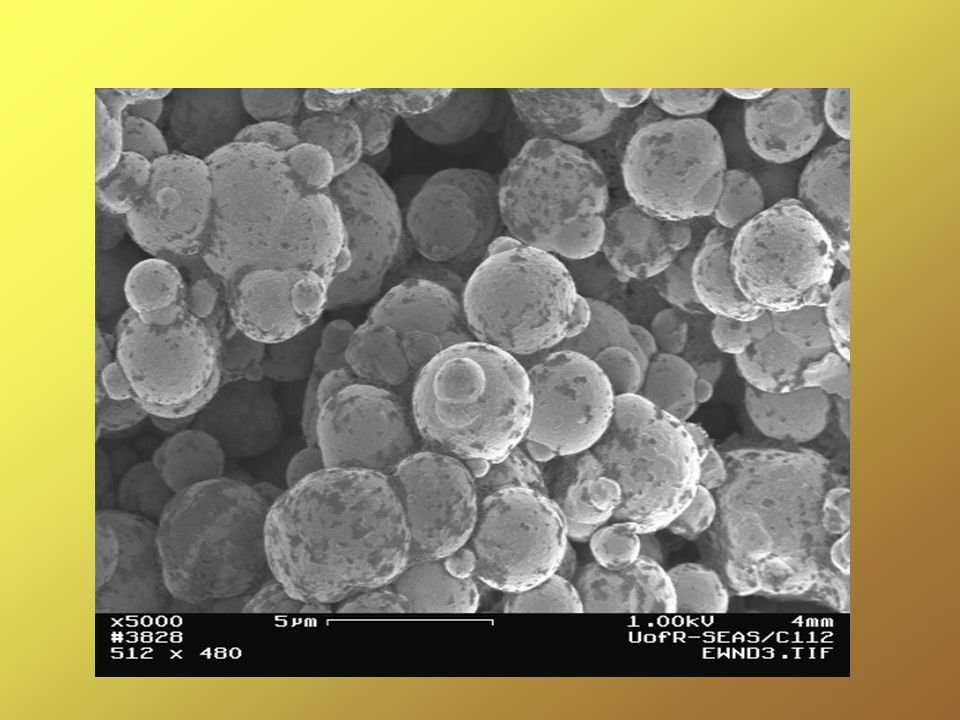
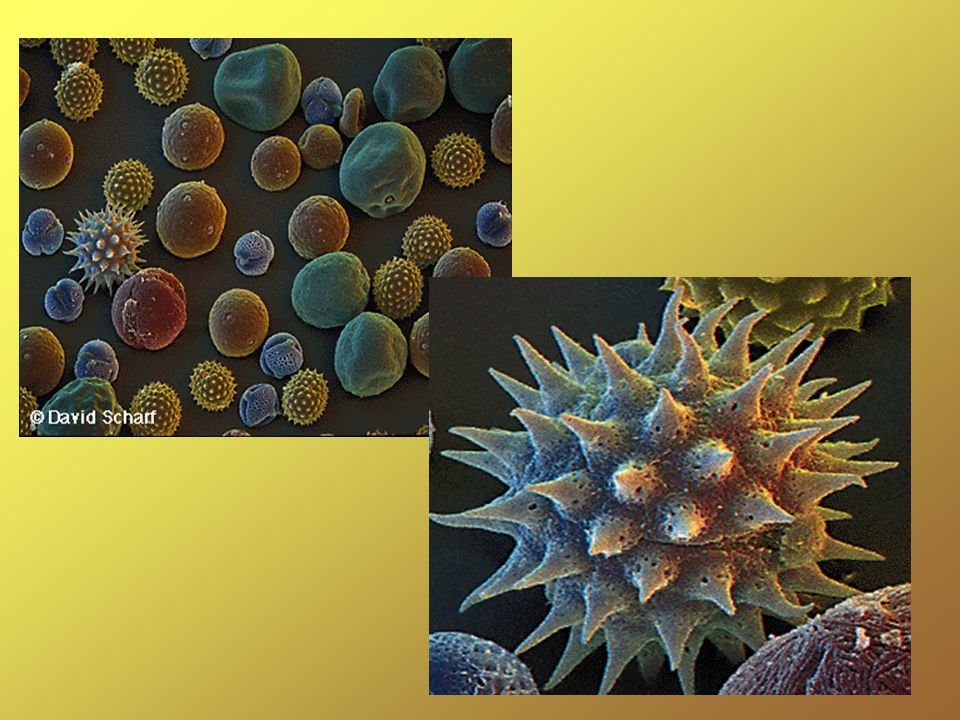
Micrographs as Art Wonders of things small
Intricacies of natural samples Subtle grey tones, like fine b/w photos Can be psuedocolored to add interest Comparisons to more familiar things Explain phenomena in a “gee-whiz” way

184
Sample Preparation for Electron Microscopy
Electrically Conductive Samples Electrically Insulating Samples Biological Samples “Odd” Samples

185
Why do samples need to be prepared???
Vacuum environment Charged particle environment Too big Components migrate in response to the beam

186
Two General Samples Types
Bulk Samples SEM only Thin Samples SEM and TEM

187
Processes Common to Many Samples
Dehydration Coating Methods to reveal interior details Stabilization of loose parts Sample resizing Methods to make similar measurements with other techniques Special imaging circumstances

188
Dehydration Why? Samples are incompatible with the vacuum
Surfaces will be disrupted while forced-drying How? Air dry Critical Point Dry HMDS Dry What sample types? Biologicals Hydrated geologicals Synthetics like polymers or solgels/aerogels

189
Air Drying Can only be used on “rugged” samples
Biologicals like tough exoskeletons Materials that won't change size/shape

190
Air Dried Sample

191
Critical Point Drying Water is replaced with miscible 2nd fluid
Transitional fluid replaces 2nd fluid Transitional fluid is driven past the “critical point” by increasing pressure and temperature Pressure is relieved as gas escapes Samples are left water, 2nd fluid, and transitional fluid dry

192
CPD Sample

193
Critical Point Dryer

194
More CPD Dried

195
HMDS drying Water is replaced with a 2nd fluid
2nd fluid is replaced with HMDS HMDS is allowed to dry leaving surfaces intact

196
HMDS Dried

197
Processes Common to Many Samples
Dehydration Coating Methods to reveal interior details Stabilization of loose parts Sample resizing Methods to make similar measurements with other techniques Special imaging circumstances

198
Sample Coating Why coat samples?
Electrical insulators need to be made conductive Increase rigidity Increase SE emission Usual coatings Metals like Au, Ag, Pt, Pd, Cr, Os or alloys Carbon Typical coating methods Sputtering Evaporation

199
Sample Coating Things to watch out for: Decoration artifacts
X-ray emission lines Sample deformation during deposition

200
Sputter Coating Samples
Usually a simple DC sputtering system Low vacuum Argon backfill inert and ionizable relatively high mass good pumping character Relatively simple time vs current rate of deposition Slower coating--->smaller islands--->smoother film Usually +-5nm is sufficient for conductivity

202
Typical EM Lab Sputtering System
Cathode Vacuum chamber Samples Vacuum gauge HV control Current monitor Timer Argon bleed

203
Sample Coating: Evaporation
Used when sputtering won't work well Carbon Making shadows Line of sight deposition

204
Processes Common to Many Samples
Dehydration Coating Methods to reveal interior details Stabilization of loose parts Sample resizing Methods to make similar measurements with other techniques Special imaging circumstances

205
Revealing Interior Portions of Samples
Why? Outside may be “weathered” Inside may have different chemistry or morphology Inside may have smaller pieces or details Inside may be immature or undifferentiated Inside may be source of problems or defects

206
Revealing Interior Portions of Samples
How? Smash it! (don't make it any harder than necessary) Cut it Saw it Grind it Fracture it Polish it (mechanical, electrochemical) Etch it
 Cut it. Saw it. Grind it. Fracture it. Polish it (mechanical, electrochemical) Etch it.")
207
Revealing Interior Portions of Samples
Tools various types of knives and blades Microtome Polishing bench and wheels Wet processing

208
Inside Structure

209
Microtomes and Microtomy
Tool with very sharp blade and a sample translation stage Ultramicrotome for EM Usually a glass or diamond knife stationary cutting edge moving sample cut pieces float off on water surface held adjacent to the blade edge Can use thin sections in TEM or cleaned bulk surface in the SEM

210
Processes Common to Many Samples
Dehydration Coating Methods to reveal interior details Stabilization of loose parts Sample resizing Methods to make similar measurements with other techniques Special imaging circumstances

211
Stabilization of loose parts
Why? Loose stuff falls off Loose stuff changes other surface details How? Use glues or tapes Use clips Make sandwiches Embed in other materials Sometimes a coating will do

212
Processes Common to Many Samples
Dehydration Coating Methods to reveal interior details Stabilization of loose parts Sample resizing Methods to make similar measurements with other techniques Special imaging circumstances

213
Sample Resizing Why? Too darned big for the system How?
Similar to revealing interiors of samples -smash, saw, cut, grind, polish, etc. Concerns: Part left over is representative of the whole You don't lose the interesting part

214
Processes Common to Many Samples
Dehydration Coating Methods to reveal interior details Stabilization of loose parts Sample resizing Methods to make similar measurements with other techniques Special imaging circumstances

215
Methods to make similar measurements
with other techniques Why? Complementary data Comparisons How? Use fiducial markings Use sample holders with a grid of numbers/letters Find a landmark Use absolute or relative stage coordinates Circle the area of interest

216
Processes Common to Many Samples
Dehydration Coating Methods to reveal interior details Stabilization of loose parts Sample resizing Methods to make similar measurements with other techniques Special imaging circumstances

217
Special imaging circumstances
Why? Want sample in particular position Need to see a certain area or side Want proximity data to/from reference material How? Be creative Mount samples so they protrude from stage Make a multi-holder Include a standard material on the stage Spring clips/tape/wire

218
Sample Preparation Flowchart

219
Individual Processing of Samples for EM Observation
Small Particles Cross-sections Insulators Conductors Biologicals “Untouchables” For automated analyses Semiconductor devices Manipulated samples High or Low temperature processing Low vacuum observation Hazardous materials “Quick-and-dirty” analyses

220
How to Prepare Small Particles
Dispersion of single particles or groupings? Mixture of sizes or monodisperse? Potential to move around on stage? Want compositional information? What about the substrate? From a solid mass, dry powder, airborne, or liquidborne? Reactive outside of their usual environment?

221
Small Particle Dispersion
Agglomeration is a problem -camphor/napthalene method -sticky dot method -dust and remove method -filter onto membranes (Nuclepore filters) Drying ring dispersions Mortar and pestle size modification
 Drying ring dispersions. Mortar and pestle size modification.")
222
Small Particles Most will stick electrostatically
Large ones may need some help to stay in place -carbon coating -metal coating -sticky dots Coatings often are not continuous -special stages for evaporators and sputter coaters

223
Individual Processing of Samples for EM Observation
Small Particles Cross-sections Insulators Conductors Biologicals “Untouchables” For automated analyses Semiconductor devices Manipulated samples High or Low temperature processing Low vacuum observation Hazardous materials “Quick-and-dirty” analyses

224
-to see interior or sub-surface details
Cross Sections Why? -to see interior or sub-surface details How? -fracture -cleaving -microtome -polishing

225
Individual Processing of Samples for EM Observation
Small Particles Cross-sections Insulators Conductors Biologicals “Untouchables” For automated analyses Semiconductor devices Manipulated samples High or Low temperature processing Low vacuum observation Hazardous materials “Quick-and-dirty” analyses

226
Electrically Insulating Materials
Four Choices: Try to view as-is w/low energy beam -small aperture -vary accelerating voltage Try a faster scan rate to limit electron dose Make it conductive w/o destroying the surface topography Use a variable pressure instrument (we don't have one)
")
227
Insulators

228
Individual Processing of Samples for EM Observation
Small Particles Cross-sections Insulators Conductors Biologicals “Untouchables” For automated analyses Semiconductor devices Manipulated samples High or Low temperature processing Low vacuum observation Hazardous materials “Quick-and-dirty” analyses

229
Electrically Conductive Samples
The best sample The most unusual sample Simply attach to sample stub and “go” Beware of contaminated surfaces

230
Individual Processing of Samples for EM Observation
Small Particles Cross-sections Insulators Conductors Biologicals “Untouchables” For automated analyses Semiconductor devices Manipulated samples High or Low temperature processing Low vacuum observation Hazardous materials “Quick-and-dirty” analyses

231
Biological Materials Generally require extensive preparation
Most important to remove water w/o destroying the surfaces May need to ruggedize (fix) tissues May be possible to freeze and view directly Given rise to “environmental” or “low vacuum” systems to obviate need to dry samples
 tissues. May be possible to freeze and view directly. Given rise to environmental or low vacuum systems to obviate need to dry samples.")
232
Individual Processing of Samples for EM Observation
Small Particles Cross-sections Insulators Conductors Biologicals “Untouchables” For automated analyses Semiconductor devices Manipulated samples High or Low temperature processing Low vacuum observation Hazardous materials “Quick-and-dirty” analyses

233
Untouchable Samples Historically significant samples Forensic samples
Samples from litigations

234
Individual Processing of Samples for EM Observation
Small Particles Cross-sections Insulators Conductors Biologicals “Untouchables” For automated analyses Semiconductor devices Manipulated samples High or Low temperature processing Low vacuum observation Hazardous materials “Quick-and-dirty” analyses

235
Preparing Samples for Automated SEM Scans
Usually a size/shape/compositional analysis Usually requires a grey-level segmentation of the image Usually needs some parameters to keep or discard data -edges -too small -too big Samples must be flat and relatively featureless except for your target Examples: gunshot residue analysis asbestos analysis bone implant analysis small particle analysis (IPA, SPOT sampler)
")
236
Gunshot Residue Analysis
When a gun is fired, small particles are generated during the explosion of the primer, and leave the gun via the smoke. The particles are deposited on parts of the body. These small particles are called gunshot residue (GSR). Particles are very characteristic, therefore presence of these particles forms evidence of firing a gun. Particles normally consist of Pb (lead), Sb (antimony) and Ba (barium).
. Particles are very characteristic, therefore presence of these particles forms evidence of firing a gun. Particles normally consist of Pb (lead), Sb (antimony) and Ba (barium).")
237
Gunshot Residue

238
Individual Processing of Samples for EM Observation
Small Particles Cross-sections Insulators Conductors Biologicals “Untouchables” For automated analyses Semiconductor devices Manipulated samples High or Low temperature processing Low vacuum observation Hazardous materials “Quick-and-dirty” analyses

239
Sample Preparation of Semiconductors
Usually Silicon Increasingly III-V or II-VI compounds Do not need conductive coatings unless a thick oxide, nitride or resist is present p-type and n-type seem to image differently due to variation in conductivity and dopant concentration Some areas may be “floating” electrically and need separate grounding

240
Individual Processing of Samples for EM Observation
Small Particles Cross-sections Insulators Conductors Biologicals “Untouchables” For automated analyses Semiconductor devices Manipulated samples High or Low temperature processing Low vacuum observation Hazardous materials “Quick-and-dirty” analyses

241
Manipulated Samples Stressed in tension or compression
Samples irradiated to simulate high dose -exposure Electron beam induced current (EBIC) Voltage contrast
 Voltage contrast.")
242
Individual Processing of Samples for EM Observation
Small Particles Cross-sections Insulators Conductors Biologicals “Untouchables” For automated analyses Semiconductor devices Manipulated samples High or Low temperature processing Low vacuum observation Hazardous materials “Quick-and-dirty” analyses

243
Temperature Controlled Viewing in the SEM
Some glasses have mobile components -Na+ -Ag+ Cooling to <-140C seems to stabilize the electromigration Some high VP or liquid samples can be frozen and viewed w/o a coating Watch the crystallization of materials from solution

244
Individual Processing of Samples for EM Observation
Small Particles Cross-sections Insulators Conductors Biologicals “Untouchables” For automated analyses Semiconductor devices Manipulated samples High or Low temperature processing Low vacuum observation Hazardous materials “Quick-and-dirty” analyses

245
Low Vacuum SEM ESEM (environmental SEM)
Differentially pumped gun/column and chamber High vacuum in former; adjustable vacuum in latter Many types of backfill gasses and vapors Up to about 1 Torr in chamber Dissipates surface charging Eliminates the need to fully dry samples

246
Individual Processing of Samples for EM Observation
Small Particles Cross-sections Insulators Conductors Biologicals “Untouchables” For automated analyses Semiconductor devices Manipulated samples High or Low temperature processing Low vacuum observation Hazardous materials “Quick-and-dirty” analyses

247
Hazardous Samples Biohazards (DNA, Viruses, Bacteria, etc.)
Radioisotopes Fine dust Toxic materials (Be metal)
")
248
Individual Processing of Samples for EM Observation
Small Particles Cross-sections Insulators Conductors Biologicals “Untouchables” For automated analyses Semiconductor devices Manipulated samples High or Low temperature processing Low vacuum observation Hazardous materials “Quick-and-dirty” analyses

249
Quick and Dirty Analyses
80% of what you'll ever know about something you learn in the first dirty experiment Stabilize sample Make it fit mechanically Protect the instrument Try it!

250
Individual Processing of Samples for EM Observation
Small Particles Cross-sections Insulators Conductors Biologicals “Untouchables” For automated analyses Semiconductor devices Manipulated samples High or Low temperature processing Low vacuum observation Hazardous materials “Quick-and-dirty” analyses Magnetic samples

251
Magnetic Sample Materials
Deflect the electron beam High mag work very difficult Low mag work approachable X-ray analysis OK Make sure pieces are stable on stage Small particles need to be FIRMLY adhered

252
TEM Sample Prep for Materials

253
Thin Sample Prep for TEM or SEM
Dispersion of small particles SEM: sticky dots, conductive tabs or glue TEM: alcohol dispersion on thin film Ultramicrotomy Mechanical thinning Chemical thinning Ion thinning

255
Image Collection, Recording
and Presentation Rule-of-thumb microscope conditions -best resolution -best depth of field -best sample preservation Conventional Photographic Methods Digital Methods Presentation for: Display Publication

256
Image Collection Proper subject identification
Proper subject orientation Best selection of imaging conditions -HV -WD -Spot size (aperture) -Scan rate
 -Scan rate.")
257
Subject Identification/Orientation
Representative of the whole Image background Not too busy Important image information is centered and prominent Many times a slight tilt conveys more information

258
“Best” Imaging Conditions
High resolution -short working distance -small spot size -high accel. Voltage -high magnifications Depth of field -long working distance -low magnifications -larger spot size Low magnification -large spot

259
Selection of Scan Rate for Imaging
Sensitive samples -may need to be fast -low S/N -maybe TV integration mode Insulating (charging) samples -decrease charging with small spot and fast frame rate, maybe TV again -focus/stigmate in an area adjacent to the area recorded -use image shift function to quickly move small amounts Normally conductive samples -use slowest rate practical w/o degrading surface
 samples. -decrease charging with small spot and. fast frame rate, maybe TV again. -focus/stigmate in an area adjacent to the area recorded. -use image shift function to quickly move small amounts. Normally conductive samples. -use slowest rate practical w/o degrading surface.")
260
Old Technology Analog scan SEMs
2nd CRT for viewing the image as it scans Film based camera focused on this CRT (low persistence) Almost always a 4x5 inch Polaroid sheet film camera Very slow scan for about a 2000 line image (~3 minutes) P/N film or just an instant positive image About $3/shot now
 Almost always a 4x5 inch Polaroid sheet film camera. Very slow scan for about a 2000 line image (~3 minutes) P/N film or just an instant positive image. About $3/shot now.")
261
Generalized Photographic Processing
Needed for TEM image plates (Can be used for SEM film images too) Exposure of silver halide grains (latent image) Development (reducing basic solution---> Ag0) Rinse (water) or Stop (acid) Fix (thiosulfates) Rinse (water) Dry Scan or Print photographically Good photographic processing results in the best images and are still the images that are used to compare other (newer) techniques
 Exposure of silver halide grains (latent image) Development (reducing basic solution---> Ag0) Rinse (water) or Stop (acid) Fix (thiosulfates) Rinse (water) Dry. Scan or Print photographically. Good photographic processing results in the best images. and are still the images that are used to compare. other (newer) techniques.")
262
Newer Technology Digital raster SEMs
Frame buffer storage of image info Image processing Digital image storage -usually TIFF files so that header can contain image and microscope specific data Fully transportable formats Easy incorporation of images into documents

263
LEO 982 Specific Digital Imaging
Detectors -SEI (chamber) -SEI (column) -BSE Signal mixer -brightness -ratio Gamma correction -corrects for desired brightness and contrast Iout~=Iin -power function deviation from 1:1 1.0 darkens and enhances lower greys 1.0 lightens and enhances higher greys
 -SEI (column) -BSE. Signal mixer. -brightness. -ratio. Gamma correction. -corrects for desired brightness and contrast. Iout~=Iin -power function deviation from 1:1. 1.0 darkens and enhances lower greys. 1.0 lightens and enhances higher greys.")
264
Gamma Corrections <--- switch position 0 <--- switch position 1

265
Gamma corrections <----- switch position 3 <----- switch position 4 <----- switch position 5 <----- switch position 6

266
LEO 982 Specific Digital Imaging
Slow scan rates 1-3 continuous scan Slow scan rates 4-8 store one frame of data -dump to disk as image file (TIFF) Choose image pixel matrix density from 512x512 to 2048x2048 (lowest is usually OK) Right mouse button will interrupt any scan and store results in the buffer (incl. TV) TV rate integration of frames can reduce random noise in the final image at a fast scan rate File path and naming convention
 Choose image pixel matrix density from 512x512 to. 2048x2048 (lowest is usually OK) Right mouse button will interrupt any scan and store. results in the buffer (incl. TV) TV rate integration of frames can reduce random noise. in the final image at a fast scan rate. File path and naming convention.")
267
LEO 982 Specific Digital Imaging
Variable small raster -used to increase scan rate for image adjustment Can store multiple images in the same frame -variable frame -split screen -kind of gimmicky.....don't use for important images

268
Stereo Pair Images (Anaglyphs)
By collecting two images offset by about in tilt Display them side by side and cross eyes to converge Build a blue-red image composite and use stereo glasses -In Photoimpact program: convert images to RGB adjust color balance (red-right, blue-left) perform image calculation (difference operator and merge)
 perform image calculation (difference operator and merge)")
272
Special Scan Modes in the LEO 982
Line scan -disable Y-axis scan to see grey-level variations on a line Y-modulation -if very little Z-axis information this converts it to Y-axis deflection (not very useful) Spot scan -mostly for x-ray data acquisition
 Spot scan. -mostly for x-ray data acquisition.")
273
Additional Scanning Features of the LEO 982
Dual magnification -useful for “looking around” -don't use for important images Scan rotation -electronically rotates the raster on the sample -very useful for getting a good “presentation” Dynamic focus -use to compensate for the portions of the sample that fall outside the depth of field distance. Sets up a ramp on the focus current +- the center of the field Tilt correction -compensates for trapezoidal scan on highly tilted samples

274
Image Processing Generally use “kernels” which are arrays of arithmetic operators on a pixel Standard kernels are used to blur, average, and sharpen images. 3X3, 5x5, array of operators. Photoshop and PhotoImpact have custom and standard kernels
![]()
275
Kernel Operations for Sharpening an Image

276
Different Kernels

277
Effect of Kernel Size on Operations

278
Contrast Enhancement

279
Original Average kernel
Sharpen kernel Blur kernel

280
Pitfalls of Image Processing
Images can be distorted and data lost Pixelation of images Ethical behavior dictates a minimum of processing Always better off collecting the best image and either not processing or doing it only lightly

283
Image Manipulation Erosion of edge pixels
-kernel operator to find edges -erode or erase edge pixels one layer at a time -break apart and separate touching features Dilation of edge pixels -dilate or add edge pixels one layer at a time -fuse separate features Most useful in particle and other small repeating features
![]()
284
Presentation of Micrographs
Reports -probably least critical -must convey information concisely Journal -probably most critical -size, grey-levels, resolution -must be specific and representative of the narrative Posters -most variable in format -otherwise like journal -conducive to point and discuss Web -like journal -can be interactive

285
Presentation Media Photographic paper Photo quality printer output
-dye sublimation -ink jet....getting there! -laser...maybe... -consider viewing distance in choice Include TIFF or JPEG files in reports using word processor Powerpoint for talks

286
Micrographs as Art Wonders of things small
Intricacies of natural samples Subtle grey tones, like fine b/w photos Can be psuedocolored to add interest Comparisons to more familiar things Explain phenomena in a “gee-whiz” way

294
Introduction to X-ray Microanalysis
Review of Physics of X-ray Generation Hardware -EDS -WDS -electron microprobe vs. SEM/EDS Software -Spectral acquisition -Spectral match -Qualitative analysis -Quantitative analysis -X-ray images (maps) -Spectral mapping -simulation of electron scattering/x-ray emission
 -Spectral mapping. -simulation of electron scattering/x-ray emission.")
295
X-ray Generation

296
Hardware for X-ray Microanalysis
WDS -Roland circle based Bragg-diffracting crystals and detector arrangement -either horizontal or vertical design EDS -cooled solid state detector -integrated FET and preamplifier Computer accumulator/conditioner of signals MCA output for energy vs intensity Some hardware facility for control of the electron beam position for mapping and DBC

297
WDS System

298
Rowland Circle in WDS Spectrometer

299
Typical EMPA

300
EDS Topics (from Notes)
Spatial Resolution Directionality of Signals Rough Surfaces Hardware/Signal Processing -dead time and time constants Microscope Parameters -overvoltage -TOA -WD (EA)
")
301
EDS Spectral Interpretation
Background Continuum Characteristic x-rays Excitation and absorption Detector efficiency Artifacts Peak ID function (qualitative analysis) Spectral matching
 Spectral matching.")
302
Structure of a Si(Li) Detector for X-rays
 Detector for X-rays")
303
Nomogram of E-beam Penetration Beam Diameter vs Beam Current

304
Quantitative EDS Analysis
Clean spectrum Standards vs. no-standards K-ratio Corrections -atomic # (Z) -absorption (A) -fluorescence (F)
 -absorption (A) -fluorescence (F)")
305
Advanced X-ray Techniques
X-ray image maps Spectral Mapping Particle and Phase Analysis

306
X-ray Image Maps Edax Imaging and Mapping program Process
-take a look at your sample with eds -look for elements of interest -setup ROI (region of interest) on the peaks -start mapping function -DBC on -dwell time -pixel density for map -maps show up line by line in different colors for each ROI (element) -color intensity is related to # of x-rays detected -can collect SE image simultaneously Qualitative x-y spatial distribution of elements Not very high resolution
 on the peaks. -start mapping function. -DBC on. -dwell time. -pixel density for map. -maps show up line by line in different colors. for each ROI (element) -color intensity is related to # of x-rays detected. -can collect SE image simultaneously. Qualitative x-y spatial distribution of elements. Not very high resolution.")
307
Spectral Mapping Sort of like previous x-ray maps
Collect full spectra at each pixel Store data in a raw form so that it can be massaged later Take “phases” and additively process the spectra of all the pixels that determine that phase -leads to pretty good quantitative analysis -averages small inhomogeneities in the phase Huge file sizes (stores greylevel and data for each pixel) ->30Mbytes
 ->30Mbytes.")
308
Particle and Phase Analysis
Similar to mapping Additional sizing information (area, feret diameters, calc. Volume...) Mixes qualitative spectral matching info and morphological info to come up with a particle or phase ID Steers the beam on the sample to collect the data for binarized “white” areas (as determined by threshold setup) Good for collecting statistically significant amount of data on feature groups
 Mixes qualitative spectral matching info and morphological info. to come up with a particle or phase ID. Steers the beam on the sample to collect the data for binarized. white areas (as determined by threshold setup) Good for collecting statistically significant amount of data on. feature groups.")
309
Imaging Artifacts What is an “artifact” Sources of Artifacts
sample preparation vacuum compatibility electron beam “issues” too low/too high KV (not really an artifact) vibrations stray magnetic fields acoustic noise
 vibrations. stray magnetic fields. acoustic noise.")
310
Micrograph Critique Session

Similar presentations


>")


 is a form of electromagnetic radiation. X- rays have a.>")


 is based upon emission of electromagnetic radiation by atoms.>")


