Download presentation
Presentation is loading. Please wait.

1
By Graham Pryke

2
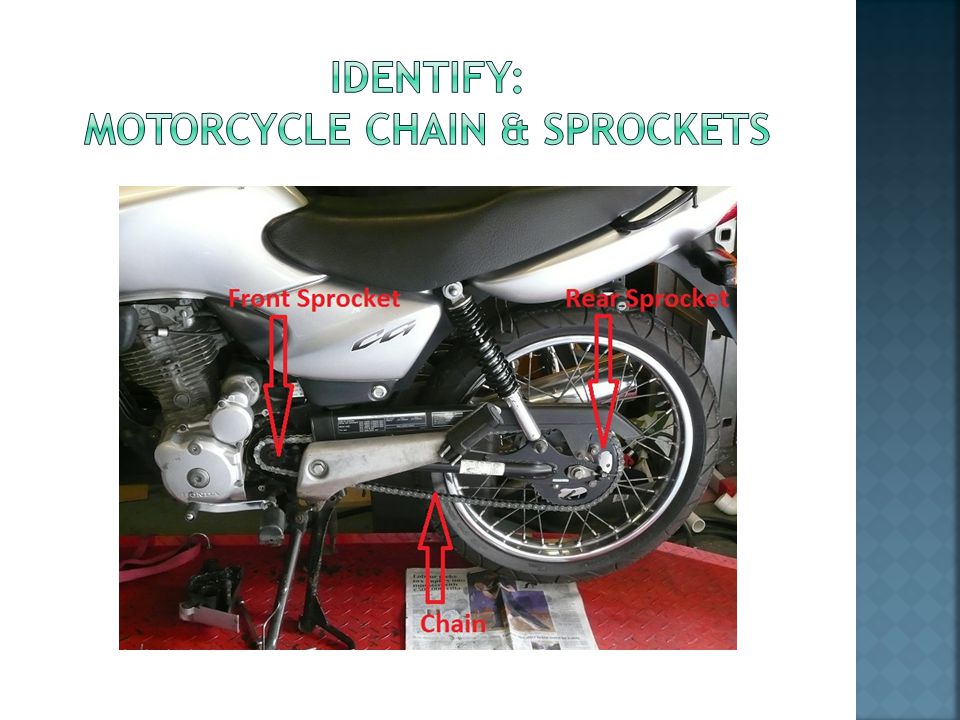
Objectives: Identify the chain & sprockets Explain why maintenance is necessary Discuss the four stages of maintenance

4
The cleaning and adjusting of the motorcycle’s drive chain is one of the most overlooked maintenance requirements on many motorcycles. Sometimes at motorcycle meeting places I will look at a line up of nicely polished motorcycles, with all sorts of extra goodies bolted on, yet all too often one or two of them will have a drooping dry chain!

5
Yes, even sealed ‘O’ ring & ‘X’ ring chains need maintenance. If a chain breaks it can cause extensive damage to the bike and/or a serious accident. A correctly maintained chain and sprockets will help reduce running costs. As a guide, you should lubricate your chain every 300-500 miles. Although in the winter you may want to do this more often!

6
The diagram below show the make up of the chain.

7
Pinch the top and bottom chain runs together to tighten the chain. Then try and pull the chain backwards at the 3 o’clock position on the rear sprocket. If you can see half a tooth or more, then your chain is worn and needs replacing. Sometimes it may be better to clean the chain before checking for wear.

8
Further information can be found here… http://dirttricks.com/measuring-chain-wearhttp://dirttricks.com/measuring-chain-wear

9
Also check for kinks in the chain… …and missing ‘O’ rings

10
When you accelerate, the top of the chain is pulled tight which causes the pins & bushes to wear thus making the chain noisy and stretched. When the chain stretches, it no longer sits in the correct position on the sprocket causing the sprocket to wear quickly too.

11
Examples of sprocket wear:

12
Worn front sprocket Worn rear sprocket

13
Once the chains and sprockets are worn, no amount of lubrication / adjustment will help. If a chain or sprockets are in need of replacement, always change them as a set. Use quality replacements and ensure the new chain has the correct tensile strength for the bike, not just the right size.

14
Use an appropriate cleaner and brush. Apply the chain cleaner onto the chain. Brush all sides of the chain and sprockets. Use caution near moving parts. Remove excess cleaner off wheel, tyre and rear brake disc when done.

15
There are several specialist chain cleaners. Can also use WD40 or Paraffin. An old toothbrush in good condition is ideal but there are special chain brushes too.

16
Apply the chain cleaner onto the chain. Work on 4-6 inches at a time so the cleaner does not dry out.

17
Use the brush on all sides of the chain to loosen the dirt, before a final blast of fresh cleaner to rinse off. Do not use a wire brush as this will damage the ‘O’ rings. Don’t forget to clean the sprockets as well.

18
When the chain is clean, finish by drying off with suitable cloth. Be careful not to get your fingers caught!

19
Check the chain slack with the manufactures specifications. Check the manual for correct procedure. Always check at the tightest spot. Ensure wheel alignment is correct after adjusting the chain slack. Use a torque wrench for axle nut tightening.

20
Ensure you check the chain slack according to instructions in the owners manual using the specified measurements. Information can sometimes be found on the bike.

21
Check the slack at the mid point between the sprockets at the tightest spot. Rotate the chain at least once to check for the tightest spot.

22
Ensure that you use the same reference point when measuring the chain slack. It is better to have the chain a little slack than too tight.

23
If you discover the chain has too much slack due to being stretched, then this needs to be adjusted by moving the rear wheel further back by use of the adjustment mechanism at the rear wheel spindle, ( see owners manual for details ). Check adjustment marks on swingarm so both sides are adjusted equally.

24
Ensure the wheel /chain alignment is correct after adjusting the chain slack. Tighten axle nut with torque wrench. Double check chain slack after tightening. Manufactures alignment marks Laser alignmentTorque wrench

25
Select a suitable lubricant. Ensure the chain is clean and dry. Apply lubricant carefully. Remove excess lubricant off wheel, tyre and brake disc.

26
There is a wide choice of lubricants suitable for chains: EP80-90 gear oil Scott Oiler Spray-on chain wax

27
Take care when spraying wax lubricant. Tip: use newspaper or cardboard to prevent over spray getting where you don’t want it.

28
Ensure you cover the top & bottom plus both sides of the chain. The lubricant will help keep the ‘O’ rings supple, keep the links moving freely, prevent corrosion and also make the chain run quieter!

29
IMPORTANT: Clean off excess lubricant from wheel, tyre and brakes!

30
Identified the chain & sprockets. Why - to help prevent damage / accidents. Stage 1 - Check for wear. Stage 2 - Clean chain & sprockets. Stage 3 - Adjust chain slack. Stage 4 - Lubricate chain. If you don’t fancy doing this work yourself, then find a local friendly motorcycle mechanic to do it for you. Knowing it has to be done & when is still an excellent achievement!

32
Ride Safe !

Similar presentations


. With practice it should only take a few minutes if.>")


>")
 this is an MoT failure.>")


