Download presentation
Presentation is loading. Please wait.

1
Beginning Beekeeping Week Two – Starting Out with a Hive

2
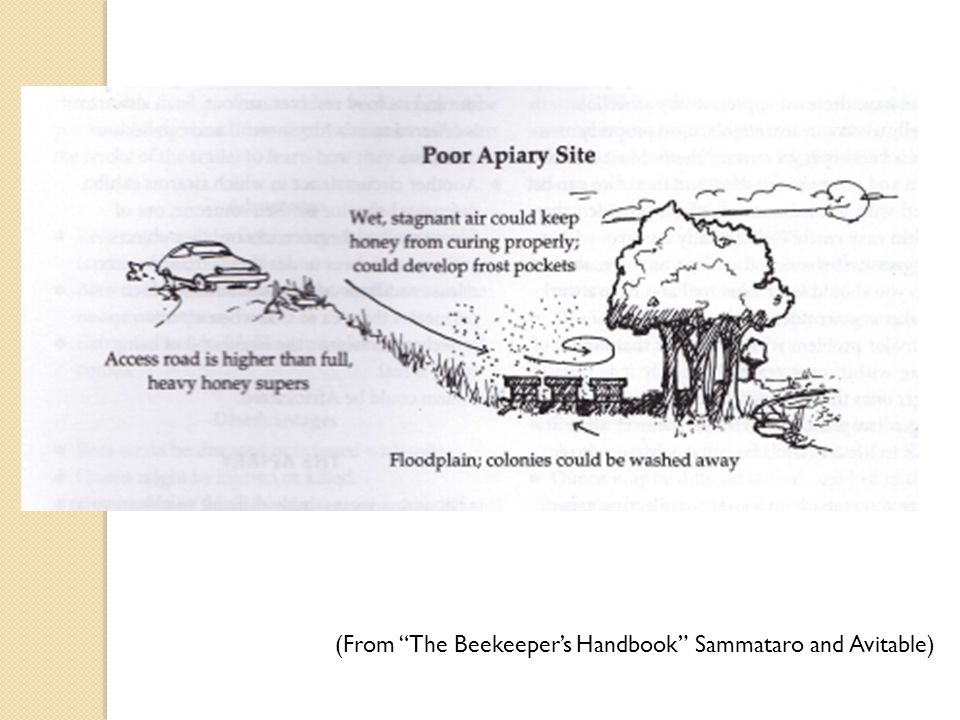
Siting Your Hive: the ideal and the real Ideal: ◦ High and Dry ◦ South/East facing ◦ Wind protected ◦ Away from property lines ◦ Accessible by car/truck ◦ Near-by storage

3
(From “The Beekeeper’s Handbook” Sammataro and Avitable)
")
5
Siting: Ideal vs. Real Real: ◦ Best for your site ◦ Read the South Portland ordinance and MSBA best practices

6
MSBA Best Practices Hive Density ◦ Up to ¼ acre: 2 hives ◦ > ¼ to ½ acre: 4 hives ◦ > ½ to 1 acre: 6 hives ◦ 1 acre + : 8 colonies Hive Placement ◦ Quiet, low traffic area ◦ Not against property line unless 6 ft barrier in place ◦ Entrance should allow bees to fly across your property if possible ◦ Use barriers to redirect flight if not possible Water Source

7
Packages vs. Nucs Advantages of packages ◦ Readily available ◦ Easy to install ◦ Slow build up provides more gradual learning curve for beginners Disadvantages of packages ◦ Where did my bees come from? ◦ Must be installed right away ◦ Possibility of queen failure ◦ Slow build-up, lower odds of 1 st year honey harvest

8
Packages vs. Nucs Advantages of nucs ◦ Real nucs vs. splits ◦ Accepted queen ◦ Established colony ◦ Over wintered, local? ◦ Faster build-up Disadvantages of nucs ◦ Harder to install, may harm queen ◦ Faster build-up

9
Write the date on newly installed frames

10
Installing a package “The Backyard Beekeeper” instructions are good Tips: ◦ Spray bottle for sugar water ◦ Install in the bottom box ◦ Place queen cage away from the center, so syrup won’t leak on her ◦ Remove wooden plug from the candy side of the cage (BE SURE IT IS THE CANDY SIDE) ◦ Flottum’s instructions on queen release are quite cautious. Many beekeepers remove the candy the day they install the queen with no adverse effect ◦ In either event, check in 3-5 days to insure queen has been released ◦ Check in a week to see if you have eggs ◦ Know your bee math

11
The package will contain a feeder can and a queen cage (and about 10-12,000 calm bees.) Mist them with a bit of 1:1 sugar syrup.
 Mist them with a bit of 1:1 sugar syrup.")
12
Remove the can – the corner of your hive tool works well for this Remove the can – the corner of your hive tool works well for this Remove the queen cage – brush the bees off into the new hive (with your hands) and check that your queen is moving around. Remove the queen cage – brush the bees off into the new hive (with your hands) and check that your queen is moving around. Place the cover back over the opening Place the cover back over the opening
 and check that your queen is moving around. Place the cover back over the opening Place the cover back over the opening.")
13
Pull out the cork from the candy end of the cage. Again, the corner of your hive tool gets the job done Attach the cage to the frame candy side up Set this frame aside

14
Thump and Dump: Mist the bees again with syrup Thump the package right side up so the bees fall to the bottom Remove the cover Pour the bees into a space left by leaving 2-3 frames out of the hive Put the package against the hive entrance so bees can crawl or fly into their new home. They’ll find the queen before nightfall. In lousy weather you can put the package inside a top hive body, above the inner cover (Click here to see a video of Erin Forbes installing a package in a hive.)
.")
15
Installing a nuc Pull out one more frame than # of frames in your nuc from the bottom box of your hive Light smoker Gently smoke the nuc Remove the nuc frames and place them in the box in the same order as they were in the nuc Replace the one missing frame on the outside Put on inner cover and feeder Cover feeder with extra empty super Outer cover on top Leave for at least 5 days before inspecting Observe the hive. You should see bees flying, doing orientation flights

17
Prop the nuc box at the hive entrance; the bees will find their way home

18
Feeding Bees When to feed ◦ Feed a new hive ◦ Feed a weak hive ◦ Feed a hive low on stores What to feed ◦ 1:1 in the summer How to feed ◦ Hive top ◦ Quail waterers ◦ Jar with holes ◦ Baggy ◦ Bucket with screen ◦ Avoid Boardman feeders (attach to front of hive). They promote robbing.

19
Make a few slits or pin holes on the top of the bag. On top bars works great for keeping syrup warm but be careful not to leave that space on for too long or they’ll build comb in unhelpful ways. Sandwich or snack bags above the inner cover work well for small amounts

20
Bucket feeders are useful if you can’t be at your hive on a regular basis. Be careful not to let the plug come loose and flood your colony On cold nights this becomes a big chiller on top of your hive through the next day

21
Boardman feeders are convenient, cheap, and easy to keep an eye on, but...

22
... they can promote robbing like crazy. Always use an entrance reducer (and consider a robbing screen) If you’re feeding one hive, put feeders on all other hives in the area
 If you’re feeding one hive, put feeders on all other hives in the area.")
23
How is my hive doing? Healthy queen Eggs Larvae Brood Drawing Comb Bringing home pollen = brood rearing

26
Bee Math Worker: ◦ Egg for 3 days ◦ Larva for 6 days ◦ Capped for 12 days Queen ◦ 3, 5, 8 Drone ◦ 3,7, 14 (See Bushfarms.com – Here’s the link)– Here’s the link
– Here’s the link")
27
When to stop feeding Overfeeding can promote swarming 2/3 drawn comb, add a box Once brood boxes are drawn, add honey super and stop feeding (Bushfarms.com also has a very thorough discussion of feeding – here’s the link)here’s the link
here’s the link")
Similar presentations


Fred/Gail Pollard After the bees arrive (nucs vs pkg. of bees) Installing the bees & queen Early care.>")
 Hive tool Bee brush Smoker and fuel (probably not needed, but best to be prepared) Misting bottle filled with.>")


