Download presentation
Presentation is loading. Please wait.

1
Chapter 6: MICROTOMY Learning Objectives:
At the end of this chapter, each student should be able to; 1. Define microtomy. 2. Know the parts of microtome. 3. Name, describe, and differentiate the types of microtome. 4. Discuss rotary and sliding microtome operation. 5. Understand the care of microtome. 6. Discuss paraffin block or “chuck” preparation and properties before cutting and sectioning.

2
Chapter 6: MICROTOMY Learning Objectives:
7. Discuss the cutting or sectioning process. 8. Describe tissue ribbon. 9. Discuss the clearance angle. 10. Describe floatation bath and discuss its importance. 11. Know Mayer’s egg albumin. 12. Discuss the problems encountered in section cutting, causes, and solutions.

3
Chapter 6: MICROTOMY Microtomy is a technique which yields thin tissue sections for microscopic examination of internal structure. After embedding routine histological sections are cut using the microtome.

4
All microtomes have the following major parts;
Block holder; in which the tissue is held in position Knife carrier and the knife Adjustment screws and rachet device (feed wheel); that line up the tissue in proper relation to the knife and feed the proper thickness of tissue for successive sections. The microtome feeding mechanism is graduated in microns (um).
; that line up the tissue in proper relation to the knife and feed the proper thickness of tissue for successive sections. The microtome feeding mechanism is graduated in microns (um).")
5
Rotary microtome The rotary microtome is preferred for getting serial sections. It is delicate and designed to cut extremely thin sections. It is found in most laboratories where routine paraffin and frozen sections are the only requirements. It is also the microtome found in most cryostats. Cryostat with rotary microtome inside

6
The most rotary microtome operates with a screw feed; the block moves up and down, and the block advances a preset number of micrometers with each revolution of the wheel, one section is cut.

7
Rocking microtome The use of rocking microtome is common in developing countries. It is relatively inexpensive, simple to operate, practically maintenance free, and it has the ability to produce tissue sections of high quality.

8
Sliding microtome The celloidin-embedded sections and large paraffin blocks are cut by sliding microtome. It is not used in routine histopathology. Sliding microtome holds the block, and the knife is moved along the horizontal plane past the block face. As the knife is returned to the starting position, it completes each section cycle and a screw feed causes the block to be raised toward the knife at a predetermined thickness.

9
Frozen section Frozen sections do not need to be embedded. Soft specimens are cut in frozen condition which gives the necessary hardness for the section cutting. This method is useful for rapid diagnosis during an operation or to examine the sections for substance (e.g. fat) or structure that would otherwise be destroyed by preparing the sections in the routine way.
 or structure that would otherwise be destroyed by preparing the sections in the routine way.")
10
Freezing microtome The freezing microtome is used in cutting frozen sections. A chuck (block) with an attached supply of carbon dioxide allows for horizontal freezing of the tissue section. The knife is kept cold. Sections must be removed from the knife edge and floated in a dish of distilled water. It is relatively portable and can be fixed on the table top. It has been replaced by cryostat.
 with an attached supply of carbon dioxide allows for horizontal freezing of the tissue section. The knife is kept cold. Sections must be removed from the knife edge and floated in a dish of distilled water. It is relatively portable and can be fixed on the table top. It has been replaced by cryostat.")
11
Cryostat The cryostat is a refrigerated chamber containing usually a rotary microtome. The microtome knife usually stays warm in the freezing microtome. After used, it should be wrapped carefully to exclude air and then stored in a -70 degrees Celsius freezer.

12
Care of the microtome Dust accumulation must be prevented by putting a cover when not in use. Wipe the moving parts regularly with good neutral oil (e.g. coconut oil) to lubricate and avoid rust. After cutting, clean frequently from accumulated paraffin using a soft brush with xylene. Never adjust the screws too tightly that they may cause binding.
 to lubricate and avoid rust. After cutting, clean frequently from accumulated paraffin using a soft brush with xylene. Never adjust the screws too tightly that they may cause binding.")
13
Section Cutting Paraffin block (“chuck”) Trimming
The paraffin block is trimmed before the actual cutting using a hand razor or sharp knife. It should be as small as possible, the sides must be parallel, and the tissue should be 1 – 3 mm from the edge on all sides. Return the shavings to the wax oven and use again. The block face should be parallel, and is finally trimmed using the microtome. It should expose all the tissue desired on the slide and without scratch marks.

14
Sectioning/Cutting Cutting
For routine procedures, sections are usually cut between 4 – 6 u in thickness. The center of the knife (blade) is the most desirable place to cut. Many technicians cool the block face with an ice cube. The cutting rhythm rate should be regularly maintained.
 is the most desirable place to cut. Many technicians cool the block face with an ice cube. The cutting rhythm rate should be regularly maintained.")
15
Tissue ribbon (ideally, the center ribbon)
Each time the block hits the knife it leaves behind a cut section which will slide onto the knife, pushing the previous one ahead to produce a “ribbon”. The top and bottom edges of the block should be parallel, otherwise the ribbon would curve. The clearance angle (angle between knife and block face) set for best cutting is 5 – 10 degrees.
 set for best cutting is 5 – 10 degrees.")
16
Attaching the tissue on a slide
Creased sections The sections tend to crease slightly (wrinkle) on cutting; therefore they are first flattened before they are attached on the slide.
 on cutting; therefore they are first flattened before they are attached on the slide.")
17
The slide maybe treated with adhesive,
(L to R) Tissue ribbon floated on flotation bath, attaching the flattened tissue on a slide The tissue sections are floated on flotation bath – a device with warm shallow water maintained at about 46 degrees Celsius (10 degrees Celsius below melting point of paraffin wax). This will float and flatten the ribbon. The slide maybe treated with adhesive, not to remove the sections from the slide during staining. The most common adhesive is Mayer’s egg albumin. Tissue sections on the slides
 Tissue ribbon floated on flotation bath, attaching the flattened tissue on a slide. The tissue sections are floated on flotation bath – a device with warm shallow water maintained at about 46 degrees Celsius (10 degrees Celsius below melting point of paraffin wax). This will float and flatten the ribbon. The slide maybe treated with adhesive, not to remove the sections from the slide during staining. The most common adhesive is Mayer’s egg albumin. Tissue sections on the slides.")
18
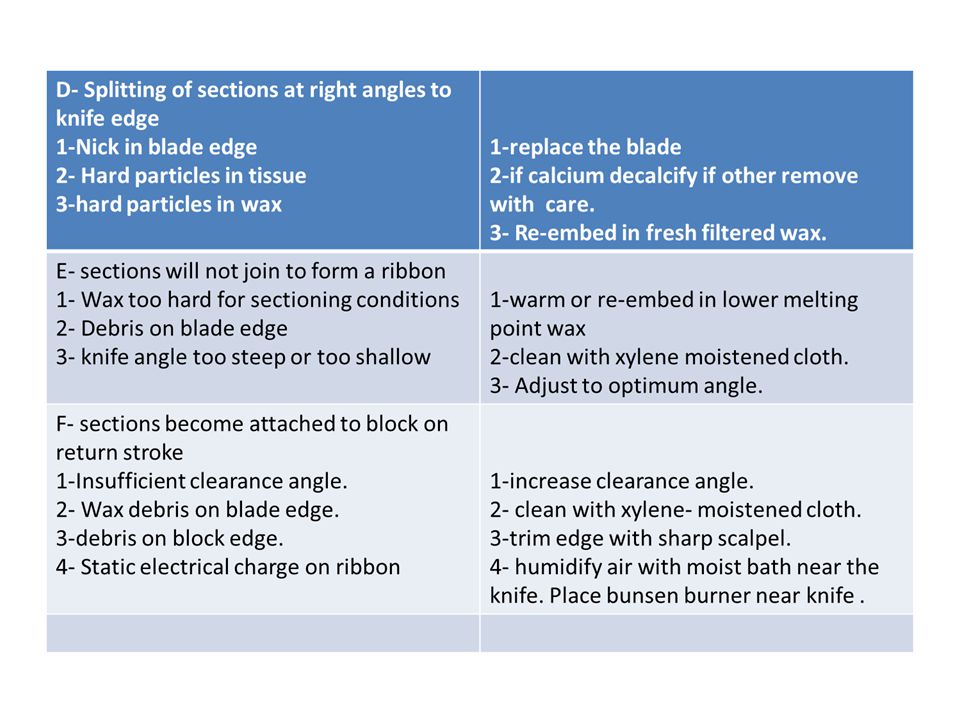
Problems in Section Cutting

Similar presentations


 Magnification Focus Coarse Advance Knob Handwheel.>")


 Tissue processing.>")


