Download presentation
Presentation is loading. Please wait.

1
1. symphony 2. instrument 3. cd 4. movie

3
Angle Triangle Radius Diameter Parallel Perpendicular Square Centerline R C L

4
1. With a compass 2. With a triangle

5
Given line AB With points A & B as centers and any radius greater than ½ of AB, draw arcs to intersect, creating points C & D Draw line EF through points C and D

6
Bisect a Line w/ a Triangle AB Given line AB Draw line CD from endpoint A E F Draw line EF from endpoint B C D G H Draw line GH through intersection

7
Bisect an Arc Given arc AB With points A & B as centers and any radius greater than ½ of AB, draw arcs to intersect, creating points C & D Draw line EF through points C and D

8
Bisect an Angle With point O as the center and any convenient radius R, draw an arc to intersect AO and OB to located points C and D With C and D as centers and any radius R 2 greater than ½ the radius of arc CD, draw two arcs to intersect, locating point E Given angle AOB Draw a line through points O and E to bisect angle AOB

9
1. True 2. False

10
A B C D Given lines AB and CD Construct parallel lines at distance R Construct the perpendiculars to locate points of tangency With O as the point, construct the tangent arc using distance R R R O

11
Construct an Arc Tangent to Two Lines at an Obtuse Angle C D Given lines AB and CD Construct parallel lines at distance R Construct the perpendiculars to locate points of tangency With O as the point, construct the tangent arc using distance R R A B R O

12
Construct an Arc Tangent to Two Lines at Right Angles Given angle ABC With D and E as the points, strike arcs R 2 equal to given radius A B C R1R1 R2R2 R2R2 With B as the point, strike arc R 1 equal to given radius O E D With O as the point, strike arc R equal to given radius

13
Construct an Arc Tangent to a Line and an Arc Given line AB and arc CD AB C D Strike arcs R 1 (given radius) R1R1 R1R1 Draw construction arc parallel to given arc, with center O O Draw construction line parallel to given line AB From intersection E, draw EO to get tangent point T 1, and drop perpendicular to given line to get point of tangency T 2 E T1T1 T2T2 Draw tangent arc R from T 1 to T 2 with center E
 R1R1 R1R1 Draw construction arc parallel to given arc, with center O O Draw construction line parallel to given line AB From intersection E, draw EO to get tangent point T 1, and drop perpendicular to given line to get point of tangency T 2 E T1T1 T2T2 Draw tangent arc R from T 1 to T 2 with center E")
14
Construct an Arc Tangent to Two Arcs Given arc AB with center O and arc CD with center S S D C O B A Strike arcs R1 = radius R R1R1 R1R1 Draw construction arcs parallel to given arcs, using centers O and S Join E to O and E to S to get tangent points T E T T Draw tangent arc R from T to T, with center E R

15
Prism ◦ Right Rectangular ◦ Right Triangular

16
Cylinder Cone Sphere

17
Pyramid Torus

18
1. Torus 2. Sphere 3. Cylinder 4. Pyramid

19
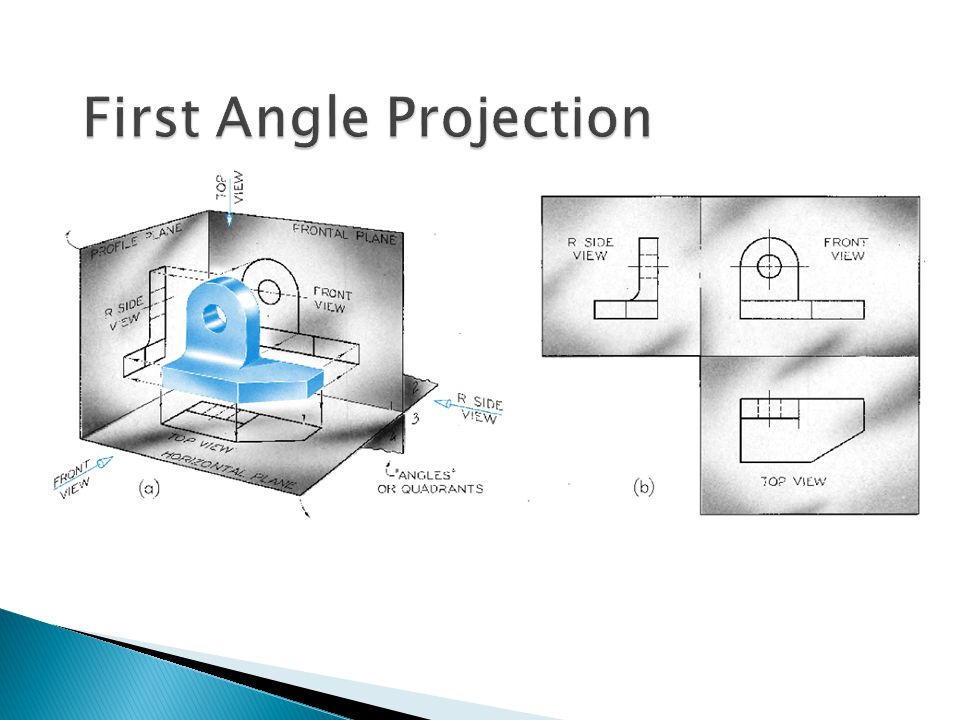
An alternative postion for the side view is rotated and aligned with the top view.

21
Third angle projection is used in the U.S., and Canada

22
1. First Angle projection 2. Second Angle projection 3. Third Angle Projection

23
The six standard views are often thought of as produced from an unfolded glass box. Distances can be transferred or projected from one view to another. Only the views necessary to fully describe the object should be drawn.

24
Review

25
1. R I F G 2. U Z D P 3. I F B H 4. E B H B

26
1. peach 2. fig 3. apricot 4. prune

27
1. Carthage 2. Rome 3. Jerusalem 4. Babylon

28
The advantage of oblique pictorials like these over isometric pictorials is that circular shapes parallel to the view are shown true shape, making them easy to sketch. Oblique pictorials are not as realistic as isometric views because the depth can appear very distorted.

29
1. 30/30/120 2. 60/60/40 3. 90/60/30

30
Oblique drawings of objects having a lot of depth can appear very unnatural due to the lack of foreshortening.

31
Perspective drawings produce the view that is most realistic. A perspective drawing shows a view like a picture taken with a camera There are three main types of perspective drawings depending on how many vanishing points are used. These are called one-point, two-point, and three-point perspectives.

32
Orient the object so that a principal face is parallel to the viewing plane (or in the picture plane.) The other principal face is perpendicular to the viewing plane and its lines converge to a single vanishing point.
 The other principal face is perpendicular to the viewing plane and its lines converge to a single vanishing point.")
33
1. Where all the lines converge together. 2. Where the earth ends. 3. Where the view point comes together.

34
A review of some ideas, That are both relevant to calculus and drafting.

35
The physical tools for drawing the figures are: ◦ The unmarked ruler (i.e., a ‘straightedge’) ◦ The compass (used for drawing of circles)
 ◦ The compass (used for drawing of circles)")
36
Given any two distinct points, we can use our straightedge to draw a unique straight line that passes through both of the points Given any fixed point in the plane, and any fixed distance, we can use our compass to draw a unique circle having the point as its center and the distance as its radius

37
Given any two points P and Q, we can draw a line through the midpoint M that makes a right-angle with segment PQ P Q M

38
Given a circle, and any point on it, we can draw a straight line through the point that will be tangent to this circle

39
Step 1: Draw the line through C and T C T

40
Step 2: Draw a circle about T that passes through C, and let D denote the other end of that circle’s diameter C T D

41
Step 3: Construct the straight line which is the perpendicular bisector of segment CD C T D tangent-line

42
Any other point S on the dotted line will be too far from C to lie on the shaded circle (because CS is the hypotenuse of ΔCTS) C T D S
 C T D S")
44
Given an ellipse, and any point on it, we can draw a straight line through the point that will be tangent to this ellipse F1F2

45
Step 1: Draw a line through the point T and through one of the two foci, say F1 F1F2 T

46
Step 2: Draw a circle about T that passes through F2, and let D denote the other end of that circle’s diameter F1F2 T D

47
Step 3: Locate the midpoint M of the line- segment joining F2 and D F1F2 T D M

48
Step 4: Construct the line through M and T (it will be the ellipse’s tangent-line at T, even if it doesn’t look like it in this picture) F1F2 T D M tangent-line
 F1F2 T D M tangent-line")
49
Observe that line MT is the perpendicular bisector of segment DF2 (because ΔTDF2 will be an isosceles triangle) F1F2 T D M tangent-line
 F1F2 T D M tangent-line")
50
So every other point S that lies on the line through points M and T will not obey the ellipse requirement for sum-of-distances F1F2 T D M tangent-line S SF1 + SF2 > TF1 + TF2 (because SF2 = SD and TF2 = TD )
")
51
When we encounter some other methods that purport to produce tangent-lines to these curves, we will now have a reliable way to check that they really do work!

52
1. Yes 2. No

53
A cone is generated by a straight line moving in contact with a curved line and passing through a fixed point, the vertex of the cone. This line is called the generatrix. Each position of the generatrix is called element The axis is the center line from the center of the base to the vertex

55
Conic sections are curves produced by planes intersecting a right circular cone. 4-types of curves are produced: circle, ellipse, parabola, and hyperbola. A circle is generated by a plane perpendicular to the axis of the cone. A parabola is generated by a plane parallel to the elements of the cone.

56
An ellipse is generated by planes between those perpendicular to the axis of the cone and those parallel to the element of the cone. A hyperbola is generated by a planes between those parallel to the element of the cone and those parallel to the axis of the cone.

58
1. Circle 2. Ellipse 3. Parabola 4. Hyperbola

59
1. Circle 2. Ellipse 3. Parabola 4. Hyperbola

61
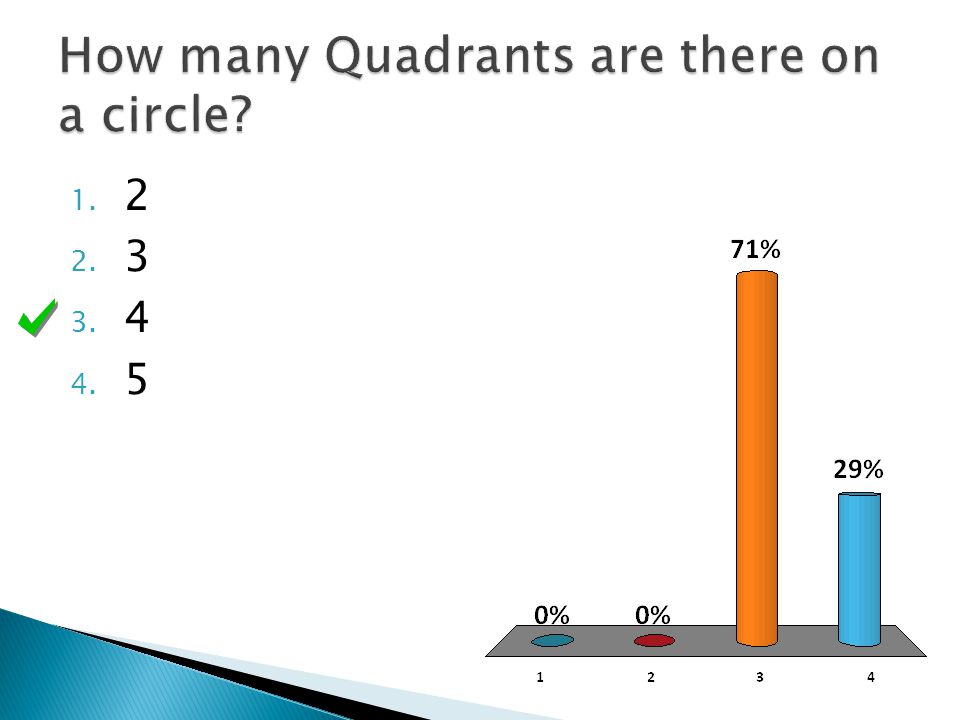
1. 2 2. 3 3. 4 4. 5
62
If a circle is viewed at an angle, it will appear as an ellipse. This is the basis for the concentric circles method for drawing an ellipse. Draw two circles with the major and minor axes as diameters.

64
Draw any diagonal XX to the large circle through the center O, and find its intersections HH with the small circle.

66
From the point X, draw line XZ parallel to the minor axis, and from the point H, draw the line HE, parallel to the major axis. Point E is a point on the ellipse. Repeat for another diagonal line XX to obtain a smooth and symmetrical ellipse.

68
Along the straight edge of a strip of paper or cardboard, locate the points O, C, and A so that the distance OA is equal to one-half the length of the major axis, and the distance OC is equal to one-half the length of the minor axis.

69
Place the marked edge across the axes so that point A is on the minor axis and point C is on the major axis. Point O will fall on the circumference of the ellipse.

70
Move the strip, keeping A on the minor axis and C on the major axis, and mark at least five other positions of O on the ellipse in each quadrant.

71
Using a French curve, complete the ellipse by drawing a smooth curve through the points.

73
1. Splitting a line in 3 rd ’s 2. Splitting a line in 4ths 3. Splitting a line in Half

74
1. Trammel 2. Concentric Circles

75
1. Yes 2. No

Similar presentations


 - 331 Block 3. You will be guided through the practical.>")


 Engineering Geometry and Construction.>")


>")
