Download presentation
Presentation is loading. Please wait.

1
Creating User Interface Chapter 6
Dr. Shady Aly

2
Introduction مقدمه Once a database model has been designed and implemented in a DBMS (i.e., in ACCESS), the analyst must consider the design of screens that will allow users to work with the database. This is often referred to as the design of the “user view” or “user interface” واجهة المستخدم Designing the user view begins by identifying a function or set of related functions that the screens will service. Following this, the screen layout is designed and reviewed with the user to determine whether or not it meets its intended purpose. Finally, the screens are implemented.
, the analyst must consider the design of screens that will allow users to work with the database. This is often referred to as the design of the user view or user interface واجهة المستخدم. Designing the user view begins by identifying a function or set of related functions that the screens will service. Following this, the screen layout is designed and reviewed with the user to determine whether or not it meets its intended purpose. Finally, the screens are implemented.")
3
The Functional/entity Interaction matrix مصفوفة العلاقه بين العمليه و البيانات
Each function in the functional model uses data from the entities that were defined in the informational model. The way in which each function uses data when interacting with the informational model, as implemented in database tables, can be specified in four categories: 1. Insert. If a user is allowed to create new records in the database tables. For example, a purchasing agent will create new records each time he or she creates a purchase order. 2. Delete. If a user is allowed to remove a record from a table. For example, if a purchase order time item is concealed, the purchasing agent may remove the record in the PO_DETAIL table. 3. Update. If the user is allowed to change the value of an attribute in the table. For example, when an open purchase order line item is closed out, the purchasing agent must be allowed to change the STATUS attribute value. 4. Read only. If the user is allowed to access the information in a table but is not allowed to change it.

4
The functional/entity interaction matrix
The functional/entity interaction matrix is a tool that the analyst uses to summarize the allowed actions that a particular function can have on the entities it uses .

5
The functional/entity interaction matrix
For example, in the Confirm Validity of Shipment function, the receiving clerk needs access to the purchase order information in order to confirm that the material being received is part of an open purchase order. Therefore, this function has read-only access to the PURCHASE_ORDER and PO_DETAIL tables. During the function Receive Materials, the receiving clerk is inserting a new record into the tables for MATERIAL_LOT and WAREHOUSE, indicating the location at which the lot is stored. To do so, the clerk must also view the VENDOR_MATL_XREF, which relates the vendor’s material ID to the material ID used by the enterprise for the same material.

6
Screen design تصميم الشاشه لواجهة المستخدم (النماذج و التقارير
There are basically two kinds of electronic documents for which the analyst develops screen designs. These are called forms and reports A form is a computer screen that allows a user to view data and, possibly, change or add data. It allows the functions of insert, delete, update, and read only, as described in the previous section. A report is any document that retrieves information from the database and formats it for presentation. A report, as opposed to a form, does not allow the user to manipulate or change data.

7
Form specification توصيف النموذج
It is natural to look at the paper forms being used by the enterprise in order to get some idea of what the screen design should look like. The form specification needs to address several issues. The first issue is the layout of the data on the screen. Once again, this can be facilitated by reference to existing documents. However, given the size limitations of the computer screen, the analyst may need to consider multiple pages.

8
Form specification- Cont.
A second issue is the relationship of different blocks on the screen. In many cases, forms are organized as master/detail records on a screen, usually referred to as a master/detail form. The master record is usually based on one table. The detail record is based on another table with a foreign key relationship to the table on which the master record is based. Such is the case, for example, with a purchase order. The master information from the table PURCHASE_ORDER is laid out on the screen as a contiguous block of data. The detailed line items from the table PO_DETAIL are shown in a detail block. Whenever a particular master block record is retrieved, there must be coordination between these two blocks to ensure that the detail data retrieved are related to the master record.

9
Form specification- Cont.
A third issue is data integrity صحة البيانات requirements. When an individual is using the form for the purpose of entering data, all efforts should be made to ensure that the data being entered are correct. For example, when the receiving clerk is filling out a receiving report, she or he must enter the material ID. It is always possible that the user could enter an incorrect ID. Since the allowable material IDs are known to the database, any material ID that does not appear in the table MATERIAL should not be allowed. An integrity check on fields inserted or updated by a user can be designed into a form.

10
Form specification- Cont.
The fourth issue in the design of forms is form navigationالتنقل عبر أجزاء النماذج . In many cases, form elements are related to each other in some manner. Also, some forms have multiple pages. It is important to design into each form the navigation keys or controls that will allow a user to move from one form element or one page to another in the easiest fashion.

11
Form specification- Cont.
The fifth important issue is user interaction تفاعل المستخدم(i.e., the operations that will be made available to the user on the form). Recall that different levels of data access are allowed: insert, update, delete, and read only. The form should provide an authorized user with a way of selecting and executing the appropriate operation and should restrict those who are not allowed.
. Recall that different levels of data access are allowed: insert, update, delete, and read only. The form should provide an authorized user with a way of selecting and executing the appropriate operation and should restrict those who are not allowed.")
12
Form specification- Cont. ملخص

13
Report specification توصيف التقارير
A report is for information purposes only. it is natural to look at the reports already being used by the enterprise as a starting point. The first issue of report specification is the layout of the report. A key element of the layout is the size in terms of rows and columns. Remember, reports are usually printed out, and some consideration has to be given to the printer and paper size alternatives. Another consideration concerns interaction with tables (i.e., the tables used in the data retrieval). One option in designing a report is to create a single table that contains all the records to be printed. However, it saves retrieval time, especially if the report is long. When the data are to be retrieved from many tables and the data fields have to be coordinated, extensive data retrieval time may be encountered. Finally, some consideration must be given to derived data القيم المحسوبه أو المشتقه من قيم الجداول. Reports usually have subtotals, totals, and other summary information.
. One option in designing a report is to create a single table that contains all the records to be printed. However, it saves retrieval time, especially if the report is long. When the data are to be retrieved from many tables and the data fields have to be coordinated, extensive data retrieval time may be encountered. Finally, some consideration must be given to derived data القيم المحسوبه أو المشتقه من قيم الجداول. Reports usually have subtotals, totals, and other summary information.")
14
Report specification- Cont. ملخص توصيف التقرير

15
A single table form إنشاء نموذج ذات الجدول الواحد
A form may be based on one or more tables or queries. The single table form using the table VENDOR. The purpose of this form is to: Provide a screen that can be used by the purchasing agent for inserting and updating vendor information. Provide a screen that others can use for viewing (read-only) vendor information.
 vendor information.")
16
A single table form design تصميم النموذج
Vendor form screen design.

17
Redesigned form

18
Implementing a single table form
Creating a Default Form

19
Implementing a single table form
A default form consists of labels and text boxes. The labels, shown on the left side of the form, default to the attribute name. The text boxes are “windows” for viewing each record of the attributes in the table. The navigation button, shown at the bottom, allows the user to move through each record of the table.

20
Implementing a single table form
Tailoring a Default Form: Form design view

21
Implementing a single table form
There are three sections of the form template. They are the form header, detail, and form footer. The form header is the region where the title information will appear. The designer adds title information in this region during the design process. The form detail is the area of the form template where the data elements are placed. The form wizard has populated this area with text boxes and labels. Interaction with the database is coded in the detail area. The form footer can be used to display instructions on how to use the form and can be used for certain Visual Basic for Applications (VBA) control elements. The form header, detail, and form footer sections can be enlarged by placing the cursor on the section boundary and dragging the boundary to the desired height.
 control elements. The form header, detail, and form footer sections can be enlarged by placing the cursor on the section boundary and dragging the boundary to the desired height.")
22
Implementing a single table form
In the Access DBMS world, forms are thought of as objects. An object is an abstract representation of a real-world entity that has a unique identity, embedded properties, and the ability to interact with other objects. Access defines four classes of properties in relation to a form object. They are the layout properties, data properties, event properties, and other properties.

23
Implementing a single table form
The properties of all sections of the form can be changed through the property sheet In order to arrange the label and text boxes as the required design of the form, it necessary to work with the form “design view”, and select “removed” (not “Tabulated” nor “Stacked”) option from the access Arrange menu
 option from the access Arrange menu.")
24
Providing user interaction التحكم في النموذج بإضافة التفاعل مع المستخدم

25
Providing user interaction- Cont.
Adding functionality When a form is displayed, it will be available only for reading. The form will appear without the insert, delete, and save buttons displayed If a user wishes to insert, delete, or update a record, she or he will click on the Login command button. Depending on the functions that are allowed for that particular user, either the full function set will appear, a subset of the function buttons, or a message indicating that “read only” is available to the user. The user can then utilize the operations that are allowed.

26
Using the design toolbox

27
Adding Command Buttons
The two objects label and the command button: When a user wants to display text on a form there are two choices: a text box or a label. The text box is appropriate when the user wishes to display data from the database. The label is an appropriate way to display titles that the user will not be allowed to modify at run time. Labels will be used to place titles over the command buttons.

28
Adding Command Buttons- cont.
The command button is an object that carries out a command when the user clicks on it with the mouse. The command button may be user programmed or it may contain default code that is already programmed by Access.

29
Adding Command Buttons- cont.

30
Adding Command Buttons- cont.

31
Adding Command Buttons- cont.

32
Adding labels for command buttons

33
Using Login Command إضافة زر الدخول لإستخدام النموذج
When a form is opened, it should default to the read-only mode From the read-only mode, a user will be able to gain access to the function only if he or she is allowed access. This will be done by clicking on the Login command button.

34
Creating Login Command

35
Locking text boxes for read-only mode قفل صناديق نصوص النموذج لوضع القراءه فقط
In order to open in a read-only mode without accessing the form’s text boxes, We set the default “Locked” property to “Yes” as below:

36
Addressing Form Objects برمجة أجزاء و أشياء النموذج
To implement the requirement that a user must log in before being able to change or add data to the database, we must first describe how Access code can be written to address various objects on a form. To refer to a particular form, the following expression is used: Forms![Form name] The Forms! command indicates to Access that the argument that follows is the name of the form the user wishes to address. Forms![Vendor] is the expression used to address the Vendor form.

37
Addressing Form Objects- Cont.
In writing code, the designer usually wants to address some specific object or property of the form. The syntax for addressing an object on the form is as follows: Forms![Form Name]![Form Object] Thus, in order to address the Vendor_ID text box on the form Vendor, the expression would be: Forms![Vendor]![Vendor_ID]

38
Addressing Form Objects- Cont.
Finally, it is often the case that the designer wants to address some property of the object: Forms![Form Name]![Form Object].Property = Desired Property Thus, in order to address the Visible property of the Insert Record button with the objective of making the object visible, the following expression would be used: Forms![Vendor]![Insert_button].Visible = True

39
Addressing Form Objects- Cont.
The name assigned to the Insert Record button was Insert_button. Access requires that an object is referred to by the exact name as it appears in the Name property.

40
Programming the Login button

41
Adding the procedure to the event “on click” of Login button

42
Adding the event procedure to the Login button
The first block of instructions make the function keys and their labels visible to the user. The object names used are particular to the names assigned to each object when it was created. The second block of instructions unlocks the fields on the form for editing. With these changes added you should go to the forms view and run the form. Note that no field can be changed before you enable the Login button. After clicking on the Login button, the fields are available for editing.

43
Using Command Buttons for Insert, Function

44
Updating records

45
Deleting records

46
Implementing data integrity requirements
Ensures that a data entry made by a user is correct. This is referred to as data validation (صلاحية البيانات). The VENDOR_ID attribute always begins with “V” followed by a number code. Hence, when a new vendor ID is entered, a simple check can be made on the existence of the correct letter before the number. If the number is limited to a specific number of fields, this can be checked also. The V_STATE is limited to a specific set of alternatives, which include the abbreviations of the various 50 states. So, for example, we can ensure that the state is represented by a text field that appears within that legal set. Finally, the telephone and fax numbers are 10-digit numbers with hyphens.
. The VENDOR_ID attribute always begins with V followed by a number code. Hence, when a new vendor ID is entered, a simple check can be made on the existence of the correct letter before the number. If the number is limited to a specific number of fields, this can be checked also. The V_STATE is limited to a specific set of alternatives, which include the abbreviations of the various 50 states. So, for example, we can ensure that the state is represented by a text field that appears within that legal set. Finally, the telephone and fax numbers are 10-digit numbers with hyphens.")
47
Implementing data integrity requirements- Cont.
Access has provided a Validation Rule field as part of the Text box properties. This is a facility that makes it easy to implement the integrity checks mentioned earlier. In addition, Access has a Validation Text property that allows the user to enter an error message that will be given to the user when a data entry violates the validation rule. The “Like” operator is a good choice to use in the validation rule. For example, Like “???-???-????” indicates a text string of length 12 with hyphens. The specified string length must be identical to the character length assigned to the attribute when the table was created. For a string of unspecified length beginning with “V”, use Like “V*,” where the asterisk is a wildcard. This validation rule would be appropriate for validating the VENDOR_ID.

48
Implementing data integrity requirements- Cont.
When the validation rule specifies an expression from a set of possible entries, the “In” operator is appropriate. For example, to specify that V_STATE should be In the set of legitimate abbreviations, the validation rule would be as follows: In (“AL”, “AK”, “AZ”, “AR”, “CA”, “CO”, “CT”, “DE”, “FL”, “GA”, “HI”, “ID”, “IL”, “IN”, “IA”, “KS”, “KY”, “LA”, “ME”, “MD”, “MA”, “MI”, “MN”, “MS”, “MO”, “MT”, “NE”, “NV”, “NH”, “NJ”, “NM”, “NY”, “NC”, “ND”, “OH”, “OK”, “OR”, “PA”, “RI”, “SC”, “SD”, “TN”, “TX”, “UT”, “VT”, “VA”, “WA”, “WV”, “WI”, “WY”)
")
49
Implementing data integrity requirements- Cont.

50
Implementing data integrity requirements- Cont.

51
Form navigation بعض أساليب التنقل خلال النموذج
Form navigation can include anything from providing a user with a method of moving between multiple pages on a multiple page form to allowing the user to move from text box to text box on a form. One area of application that is useful to consider even in a single table form is how to provide the user with a facility for moving quickly among the records in the table on which the form is based. Consider the case of the Vendor form. One can imagine the user trying to locate a particular vendor record.

52
Form navigation – Cont. One way of implementing such a help facility is with a pull-down menu that lists key information from which the user may select the record for which she is looking. Such a facility is implemented on the Vendor form as a combo box. A “Combo Box” combines a text box with a list box. It allows the user to select an item from a drop-down list. The form designer determines what fields will be shown in the combo box.

53
Record navigation using a combo box

54
Record navigation using a combo box- Cont.
The Vendor form of previous slide’s figure shows the vendor name (V_NAME). If the list of vendor names is long, scroll bars will be placed alongside of the combo box, allowing the user to quickly scroll through the list until she finds the correct vendor name. By clicking on the vendor name, a selection is made for the record to be shown on the form.
. If the list of vendor names is long, scroll bars will be placed alongside of the combo box, allowing the user to quickly scroll through the list until she finds the correct vendor name. By clicking on the vendor name, a selection is made for the record to be shown on the form.")
55
Record navigation using a combo box- Cont.

56
Implementing the password إدخال كلمة السر لإستخدام النموذج
In this section, we will create our own password protection. This section has multiple purposes. One purpose is to illustrate a method for filtering user access at the form level. Another purpose is to introduce the reader to some useful Visual Basic for Applications (VBA) objects and methods that can be used in a variety of situations. A third purpose is to show how VBA can be used to write programs that retrieve data from the database for evaluation. To provide users with some facility to write code for Access forms, Microsoft provides a subset of the Visual Basic Programming Language called Visual Basic for Applications (VBA). VBA gives the user the tools to write program control statements, such as “If then else,” “Do while ,” and so on. It also provides a set of built-in objects and methods that can be used to achieve a specific result.
 objects and methods that can be used in a variety of situations. A third purpose is to show how VBA can be used to write programs that retrieve data from the database for evaluation. To provide users with some facility to write code for Access forms, Microsoft provides a subset of the Visual Basic Programming Language called Visual Basic for Applications (VBA). VBA gives the user the tools to write program control statements, such as If then else, Do while , and so on. It also provides a set of built-in objects and methods that can be used to achieve a specific result.")
57
Implementing the password: 1 Input Box
In this section, two new useful VBA objects are introduced, the input box and the message box. An input box is a VBA object that accepts user input in a text string format and assigns it to a string variable. A typical input box is shown in Figure: It consists of the following elements: Title bar User prompt string Text input area OK button Cancel button

58
Implementing the password: 1 Input Box- Cont.
An input box is created in VBA code using the following syntax: VariableName = InputBox(“User prompt string”, “Title bar”) When this line of code is encountered in a program, the input box object appears on the screen and further execution of the program stops. When the user enters a text string into the text input area and clicks on the OK button, the text string is assigned to the variable name and execution of the program continues. The value entered by the user can be referred to and recalled by reference to the variable name. For example, when the VBA program encounters the line: Request = InputBox(“Enter your password”, “PASSWORD REQUEST”) The input box shown previously appears. When the user enters the password and clicks on the OK button, the password becomes the current value of the variable “Request.” The input box is a simple way to gather user information interactivity. However, it does not support the security of hiding the password by substituting an asterisk for the typed letter.
 When this line of code is encountered in a program, the input box object appears on the screen and further execution of the program stops. When the user enters a text string into the text input area and clicks on the OK button, the text string is assigned to the variable name and execution of the program continues. The value entered by the user can be referred to and recalled by reference to the variable name. For example, when the VBA program encounters the line: Request = InputBox( Enter your password , PASSWORD REQUEST ) The input box shown previously appears. When the user enters the password and clicks on the OK button, the password becomes the current value of the variable Request. The input box is a simple way to gather user information interactivity. However, it does not support the security of hiding the password by substituting an asterisk for the typed letter.")
59
Implementing the password: 2 Message Box
Whereas the input box is used to assign user input to a variable, a message box is used to display a programmed message (output) to a user. A typical message box for the current application appears in Figure 6.16. A message box has four components: Title bar Message ICON OK button A message box is created in VBA code using the following syntax: VariableName = MsgBox(“Message”, ICON number, “Title bar”) When the VBA program encounters the preceding line of code, the message box appears on the screen. The user acknowledges (clears) the message by clicking on the OK button.
 to a user. A typical message box for the current application appears in Figure A message box has four components: Title bar. Message. ICON. OK button. A message box is created in VBA code using the following syntax: VariableName = MsgBox( Message , ICON number, Title bar ) When the VBA program encounters the preceding line of code, the message box appears on the screen. The user acknowledges (clears) the message by clicking on the OK button.")
60
Implementing the password: 2 Message Box – Cont.
There are standard icons in VBA that can be used to message. The icon number in the message box statement is a number that refers to the icon. The message box of the shown figure is created with the following code. Response = MsgBox(“You have Read Only permission”, 48, “PERMISSION DENIED”)
")
61
Retrieving a Database Record
The input box and the message box will be used to confirm that the user has the permission level to use the insert, delete, and update functions. Recall that the Login command button of our vendor form application will be the control for enabling this action. Therefore, the new code for checking the password will be part of the “on_click” procedure of the Login command button.

62
Retrieving a Database Record – Cont.
One of the tables for the applications that is used to compare passwords is PASSWORD table. The table contains a record for each user who will be allowed full functionality of the Vendor form. Any user whose password does not appear in this table has read only permission. Since each potential user will enter his or her password via the input box, a subroutine must be written that compares the variable “Request” with each password entry in the table. If a match is found, permission will be granted. If a match does not exist, the message box will be returned to the user indicating that the permission is denied. In order to accomplish these ends, the VBA code must first open the PASSWORD table. Following that, a subroutine must search the entries for a match.

63
Connecting VBA to the database
Before writing the complete password code, make sure that you check the following options: From Access main menu, choose Tools⇒Macro⇒Visual Basic Editor. From the Visual Basic Editor main menu, select Tools⇒References: A checkmark should be placed in the check box for Microsoft DAO Object Library Click OK to close the window, and then close the VBA Editor window and return to Microsoft Access.

64
Connecting VBA to the database- Cont.

65
VBA code for password making

66
Password making code (Flowchart)
")
67
VBA code for password making
A listing of the code that should be placed in the on-click event procedure of the Login command button (See previous slides). After opening the database, a recordset is retrieved. All search operations are performed on the recordset, not the database table. In this case, the only operation is to read the entries in the PASSWD field from the beginning to the end of the recordset, assigning the values to the string variable “Allowed.” The variable “Request” is compared to “Allowed” and a “true” comparison results in setting a variable called “Flag.” If Flag has been set, the insert, delete, and update functions are enabled. If Flag is “false,” permission is denied. Finally, the recordset is closed and the database is closed. The recordset must be closed first while the database is still open.
. After opening the database, a recordset is retrieved. All search operations are performed on the recordset, not the database table. In this case, the only operation is to read the entries in the PASSWD field from the beginning to the end of the recordset, assigning the values to the string variable Allowed. The variable Request is compared to Allowed and a true comparison results in setting a variable called Flag. If Flag has been set, the insert, delete, and update functions are enabled. If Flag is false, permission is denied. Finally, the recordset is closed and the database is closed. The recordset must be closed first while the database is still open.")
68
Forms based on more than one table
The term master/detail form is used to describe a form based on more than one table that shows one record of a given table (the master) together with associated records in one or more other tables (the details). The master/detail form is used to show related records in more than one table on a user screen. A good example of this is the purchase order, which naturally recommends itself to a master/detail format. If the reader looks at next slide figure , it is clear that the principal tables involved are PURCHASE_ORDER and PO_DETAIL. These entities have a 1:M relationship based on the foreign key PO_NUMBER. Note that the purchase order also contains information from the VENDOR table and the EMPLOYEE table. PURCHASE_ORDER is related to these tables by the foreign keys VENDOR_ID and EMPLOYEE_ID, and PURCHASE_ORDER is the M side of these relationships. Therefore, to construct a purchase order form there are several tables involved.
 together with associated records in one or more other tables (the details). The master/detail form is used to show related records in more than one table on a user screen. A good example of this is the purchase order, which naturally recommends itself to a master/detail format. If the reader looks at next slide figure , it is clear that the principal tables involved are PURCHASE_ORDER and PO_DETAIL. These entities have a 1:M relationship based on the foreign key PO_NUMBER. Note that the purchase order also contains information from the VENDOR table and the EMPLOYEE table. PURCHASE_ORDER is related to these tables by the foreign keys VENDOR_ID and EMPLOYEE_ID, and PURCHASE_ORDER is the M side of these relationships. Therefore, to construct a purchase order form there are several tables involved.")
69
Forms based on more than one table

70
Forms based on more than one table- Cont.
The term block is used to refer to the data and text on a form that corresponds to one table or query of a database. The term page is used to define the part of a form that is displayed on a screen at one time. A single form may consist of one or more pages, and a single page may consist of one or more blocks. The previous figure shows a four-block master/detail form that is based on the following tables: PURCHASE_ORDER, VENDOR, EMPLOYEE, and PO_DETAIL. Taken together, these tables are used when a new purchase order is created. When the purchasing agent creates a new purchase order, she or he inserts new information into the PURCHASE_ORDER and PO_DETAIL tables and uses the VENDOR and EMPLOYEE tables for read-only purposes.

71
Establishing relationships in access
Before designing a master/detail form, it is necessary to establish the relationship between tables that will be used in designing the form. Since there is more than one table involved in a master/detail form, it is first necessary to specify the relationship between tables using the Access Relationship Builder. This is a facility that allows the user to graphically define the data model of the database. The following exercise will establish that data model in the database manufacturing database.

74
Designing a form based on its purpose
The design of a form should reflect the purpose for which the form is to be used. In the case of the purchase order form, one can imagine at least two purposes. The first purpose would be to enter new purchase orders into the database. The second purpose would be to present the purchase order in a format that can be printed and sent to a vendor.

75
Designing a master/detail form for data entry
When a form is used for data entry, it is important to distinguish between data that are being newly committed to the database and data that are on the form for viewing only Next figure illustrates the issue for the case of the Purchase Order form. the fields of the PURCHASE_ORDER table (block 1) and the PO_DETAIL table (block 4) must be entered in order to establish a new purchase order. This includes the VENDOR_ID and EMPLOYEE_ID Fields in block 1. The data from the VENDOR (Block 2) and EMPLOYEE (Block 3) tables are related to block 1 by the foreign keys of VENDOR_ID and EMPLOYEE_ID and do not represent new data. By using the foreign keys of VENDOR_ID and EMPLOYEE_ID in block 1 to retrieve the existing records in block 2 and block 3, the only new records that will be created when the form is saved are those of the purchase order and its detail. In general, when a foreign key attribute exists in the table on which the form is based, that foreign key points to the primary key in another table that can be used for display on the form.
 and the PO_DETAIL table (block 4) must be entered in order to establish a new purchase order. This includes the VENDOR_ID and EMPLOYEE_ID Fields in block 1. The data from the VENDOR (Block 2) and EMPLOYEE (Block 3) tables are related to block 1 by the foreign keys of VENDOR_ID and EMPLOYEE_ID and do not represent new data. By using the foreign keys of VENDOR_ID and EMPLOYEE_ID in block 1 to retrieve the existing records in block 2 and block 3, the only new records that will be created when the form is saved are those of the purchase order and its detail. In general, when a foreign key attribute exists in the table on which the form is based, that foreign key points to the primary key in another table that can be used for display on the form.")
76
Purchase order form for data entry

77
Designing the Master Form

78
Designing the Master Form- Cont.
Open Purchase Order Master Form in design view, enlarge the form, and rearrange the text boxes and labels (select arrange from the upper menu and also the “remove option in order to more text boxes and labels”) so that they appear as shown in next figure. Put the form in form view and note the existence of the “record selector” arrow on the left-hand side, which does not appear in the next figure, and the scroll bar on the right-hand side that does not appear in next figure. These are unnecessary in our form design. They can be removed by first putting the form in design view, selecting the form (click on the upper left hand box), then opening the properties window and selecting “No” for the Format property “Record Selectors” and “Neither” for the Format property “Scroll Bars.” Return to the form view to confirm that the record selector and scroll bar are removed.
 so that they appear as shown in next figure. Put the form in form view and note the existence of the record selector arrow on the left-hand side, which does not appear in the next figure, and the scroll bar on the right-hand side that does not appear in next figure. These are unnecessary in our form design. They can be removed by first putting the form in design view, selecting the form (click on the upper left hand box), then opening the properties window and selecting No for the Format property Record Selectors and Neither for the Format property Scroll Bars. Return to the form view to confirm that the record selector and scroll bar are removed.")
79
Main form for purchase order data entry

80
Designing the Master Form- Cont.
Now add the header labels. In design view, open the header area to make room for the header information. Using the toolbar, select labels and insert them into the header area, adding the header information. When this is complete and the form is opened in form view, it should appear as shown in previous figure. Save and close Purchase Order Master Form.

81
Designing Sub-forms The VENDOR table and EMPLOYEE table information are for display only. Their blocks are created as sub-forms and linked to the main form using the master and child fields.

82
Designing Sub-forms Open the form in form view in order to confirm that it is functional. Leave the Vendor Subform in the default layout. Note the existence of the record selector on the left, the navigation button on the bottom, and the dividing line at the bottom of the display area. Put the Vendor Subform in design view and use the appropriate Format properties to remove these elements, as previously made with Purchase order form . When this is completed, the Vendor Subform should appear as shown in next figure when placed in form view.

83
Vendor subform

84
Binding the subform to the main form
Now the Vendor Subform will be bound to the Purchase Order Master Form to make a master/detail form. Close Vendor Subform and open Purchase Order Master Form. There are two steps involved in binding the subform to the main form. First, the subform is placed on the main form. Next the referential integrity is established between the two forms so that their records are coordinated. This is all explained in next Access Exercise and figures.

85
Binding the subform to the main form-Cont.

86
Binding the subform to the main form-Cont.

87
Linking child and master fields

88
Main form and subform in form view

89
The Employee subform Using the same procedure as previous Access exercise implement the EMPLOYEE subform. Select the fields: EMP_FIRST_NAME, EMP_LAST_NAME, and EMP_DEPT_PHONE. Name the form“Employee Subform.” Bind it to Purchase Order Master Form. Use EMPLOYEE_ID to link the subform to the main form. Eliminate the record selector, navigation button, and dividing line. When this is completed, the Purchase Order Master Form, when placed in form view, should appear as shown in the next figure.

90
Purchase Order Master Form with subform blocks 2 and 3

91
Adding combo boxes It is natural to imagine that the user of Purchase Order Master Form for data entry would appreciate some assistance in locating vendor and employee IDs from existing information in the database. For this reason, combo boxes are added as shown in Figure The reader will add the combo box for vendor information in Access the next exercise. Repeat the steps shown in the next Access exercise for the Employee List combo box. Choose the fields EMPLOYEE_ID and EMP_LAST_NAME. When this is complete, Purchase Order Master Form, when opened in form view, should appear as shown in the next figure.

92
Adding Vendor & Employees combo boxes

93
Adding Vendor & Employees combo boxes- Cont.

94
Experimenting with the PO form
At this point, Purchase Order Master Form can be used for data entry into the PURCHASE_ORDER table. To experiment with the partially completed form, the reader should put Purchase Order Master Form into the form view. Move to a new record using the navigation button at the bottom of the form. Add the following data in this order: PO_NUMBER 9999 RELEASE_DATE 8/1/06 PO_AMT 0 PO_STATUS OPEN From the combo boxes, select: Employee list Swartz Vendor list Spices Unlimited Note that the combo boxes have eased the completion of the form by adding VENDOR_ID and EMPLOYEE_ID in block 1 and displaying detail information for blocks 2 and 3 when the user chooses the vendor name and employee name from the combo boxes. On closing the form, the data is saved. Once the form is closed, the reader should open the PURCHASE_ORDER table and confirm that the new record has been added.

95
The PO_DETAIL SUBFORM The purchase order detail block should now be created and added to Purchase Order Master Form. The PO Detail Subform will be used to add and display all the detail records associated with a particular PO number. Therefore, the navigation buttons should be retained on this subform. The record selector, dividing line, and scroll bars should be removed at this time.

96
The PO_DETAIL subform- Cont.

97
Adding Vendor Material lookup combo box
The last remaining item on the PO master/detail form is the combo box titled “Vendor Material Code Lookup.” The process of ordering materials from vendors begins with a requisition. A requisition is a request sent from a department of the enterprise to the purchasing department to buy a certain amount of a material on its behalf. From the requisition, the purchasing agent completes a purchase order for the materials. The material requisition will include the material description and may include the material ID. The purchasing agent will have to correlate that information with the vendor list to see which vendors can provide the material. As we previously pointed out, the vendor item code, not the enterprise Material ID, will appear on the purchase order sent to the vendor. Therefore, a Material List combo box will be used to ensure that the enterprise material ID has a corresponding vendor item code for the vendor to whom the purchase order will be sent.

98
Adding Vendor Material lookup combo box- Cont.

99
Completed PO Master Detail Form

100
Testing the PO form The data entry form for purchase orders is now complete. The form can be tested by using the navigation button to move to the last record, PO_NUMBER Make the following entries in the detail section:

101
Designing a subform based on a query
The design of a form should reflect the purpose for which the form is to be used. The design of the previous master/detail form was for data entry based on the principle of blocks. However, for printable forms like that in the next figure shows information from more than one table. For example, the material description is in the MATERIAL table and the vendor item code is the table VENDOR_MATL_XREF. Thus, the PO Detail Subform block will have to retrieve data from more than one table. When encountering a situation such as this, it is often better to base the form on a query.

102
Purchase Order Form for printing

103
Establishing the Query
Previous figure shows a form for the purpose of printing a purchase order to send to a vendor. The printable purchase order is based have already been entered into the database, there is no need to have combo boxes, which have been deleted. There is also no need to have visible text boxes, such as vendor ID and employee ID, information that would not appear on a printed form for ordering material. Also, instead of a columnar form layout, which shows only one PO line item at a time, the printable purchase order shows all the line items. This layout is called a datasheet layout. The data items that come from tables other than PO_DETAIL are the material description and the vendor item code. Therefore, the SQL command for the subform must retrieve data from PO_DETAIL, MATERIAL, and VENDOR_MATL_XREF tables. In addition, the records must be coordinated with the master using the foreign key PO_NUMBER.

104
Creating the Subform from the Query
Create an appropriate SQL statement for retrieving the recordset. Name it PO_DETAILQuery.

105
Creating the Subform from the Query- Cont.

106
Creating the Subform from the Query- Cont.

107
Binding the PO_DETAILS QUERY Subform to the Master Form
Close Printable PO_Detail Subform. Open Purchase Order Master Form in design view. Delete the PO_Detail Subform that is currently on the master form. Also, delete the three combo boxes as they are not needed. Hide the text boxes for vendor ID and employee ID by changing their Visible properties to “No.” Change the Header label to “Purchase Order” as shown in printable purchase order form figure. Save the resulting form under the name “Printable Purchase Order Form.” With Printable Purchase Order Form in design view, drag Printable PO_Detail Subform onto the master form and bind it by linking the child and master with the foreign key attribute PO_NUMBER. Place the form in form view and arrange fields until it looks like purchase order form figure.

108
Adding Derived Attributes to a Form
A derived attribute is one that is computed from other attributes. There are no derived attributes in printable purchase order form. However, on an actual purchase order there is usually a “Total Cost” column in the detail section that is computed as QUANTITY times UNIT_COST. To print the printable purchase order form, the user should go to the form view and select File ⇒ Print from the main menu. Choose “Selected Records” and Landscape layout from Properties. Click “OK.” The printed document will appear as the printable purchase order form figure, but without the navigation button.

109
Adding Derived Attributes to a Form- Cont.

110
Some additional access tools: Macros and actions
If a user wishes to have functionality in a form beyond just displaying data, it is necessary to have code behind a command button to make that functionality occur. Access has some predefined VBA code that can be used directly in an application by just selecting it. This is like the VBA code behind command buttons for the insert, delete, and save operations that were used on the Vendor form.

111
Macros and actions Access provides 45 functions, called actions. Each action is a VBA subroutine. Typical actions are Close, DeleteObject, FindRecord, GoToRecord, and OpenForm, among others. A complete description of each action and the syntax for its use can be obtained from the Access Help menu. Here we will use a few actions to illustrate their use in a macro. A macro is a block of code that a user can create or that is assembled from available Access actions. Once a macro is created, it becomes an object and can be called by its object name. It can be used over and over again in various applications to automate actions. We shall create a simple macro in the following Access Exercise.

112
Macro design exercise

113
Macro design window

114
Using Macro Macros can be used at all levels of a form. For example, at the form level, a macro can be inserted into the On_Open or On_Load event property. When the form is opened or loaded, the macro will automatically run. At the form element level, it can be inserted into one of the event properties of an object such as the On_Click property of a command button. To illustrate, we shall add a command button to close Purchase Order Master Form using MacroClose in following Access exercise

115
Using Macro

116
Adding close button to purchase order

117
Macro with sequence of actions
The use of a macro is a convenient way to execute a sequence of actions. In the preceding example, a single action, Close, was used. It is useful to illustrate a macro with more than one action step explicit in the macro design. One can imagine the user of Purchase Order Master Form entering a new record for a purchase. Once the record is entered, the next logical step would be to review the format of the PO to be sent to the vendor (i.e., the Printable Purchase Order Form). The user can then print the form and send it. Based on this scenario, we will add two more actions to MacroClose. The two actions to be added are shown in next figure. The OpenForm action has been added to MacroClose. In the argument pane, the form that will be opened is Printable Purchase Order Form. Therefore, when MacroClose executes, Printable Purchase Order Form will be opened. Since Printable Purchase Order Form is just for viewing and printing, the data mode when the form is opened will be read only.
. The user can then print the form and send it. Based on this scenario, we will add two more actions to MacroClose. The two actions to be added are shown in next figure. The OpenForm action has been added to MacroClose. In the argument pane, the form that will be opened is Printable Purchase Order Form. Therefore, when MacroClose executes, Printable Purchase Order Form will be opened. Since Printable Purchase Order Form is just for viewing and printing, the data mode when the form is opened will be read only.")
118
Macro with sequence of actions- Cont.
The GoToRecord action determines which record of Printable Purchase Order Form will be displayed when it is opened. One can imagine thousands of purchase order records in the database. When a form is opened, the default record is the first record. By choosing “Last” in the “Record” argument, Printable Purchase Order Form will open to the last record. Presumably, this is the record we just created and want to review and print. Finally, the Close action will occur in which the current record on Purchase Order Master Form is saved and the form is closed. The Close action has been placed last in the action order for a specific reason. Recall that the Close_button is a command button on Purchase Order Master Form. Since Close_button executes the code to open Printable Purchase Order Form and to move to the last record, it is appropriate to retain Purchase Order Master Form in the open state while these actions are completed. At this time, go to the database window, click on the Macro tab, open MacroClose in design view and make the additions shown in the following figure. Close MacroClose, and then open Purchase Order Master Form. After clicking on the Close button, Printable Purchase Order Form will open and Purchase Order Master Form will close. The last record will be displayed in readonly mode. This illustrates one way to program so that the user can navigate between forms automatically.

119
Macro with sequence of actions- Cont.

120
UNBOUNDED TEXT BOXES Text boxes can be used more generally to display any information on a form, even when it is not related to a specific table. This is done by using an “unbounded” text box. An unbounded text box is not bound to a particular data source when it is created. Programming it to display or handle a particular entry can control its contents. In this section, we illustrate some uses for unbounded text boxes that will enhance the readers’ ability to create interesting Access applications. For example, consider the last Purchase Order Master Form figure. The detail, or subform, lists the items to be ordered and their unit costs. The total value is $4300. Note that this is the total amount on the master, or main form. To enter a new purchase order, the user enters each line item on the form detail and then must compute the total cost and enter that amount in the PO_AMT text box on the main form. This is necessary because the PO_AMT text box on the main form is bounded to the PO_AMT record in the PURCHASE_ORDER table and it must be entered explicitly by the user.

121
UNBOUNDED TEXT BOXES- Cont.
This raises two observations. The first observation is that the user should not have to total up the cost on the detail, since this can be done automatically. The second observation is that the user may sum the total cost incorrectly and introduce an error into the table by entering the wrong value for PO_AMT. This is an excellent case for using an unbounded text box to automatically compute the PO_AMT from the data entered in the purchase order detail. We will illustrate the use of unbounded text boxes for the purpose of automatically computing and displaying the purchase order amount. There are a couple of steps in doing this. First, a new (unbounded) text box must be added to the subform in order to sum the “Total Cost” column of PO_Detail Subform. Second, a text box must be added to the main form to display the purchase order amount. The two step will be illustrated in the incoming two Access Exercises.
 text box must be added to the subform in order to sum the Total Cost column of PO_Detail Subform. Second, a text box must be added to the main form to display the purchase order amount. The two step will be illustrated in the incoming two Access Exercises.")
122
UNBOUNDED TEXT BOXES- Cont.

123
UNBOUNDED TEXT BOXES- Cont.

124
UNBOUNDED TEXT BOXES- Cont.
At this point, the automatic computation of the total amount on the purchase order detail has been implemented. Henceforth, there will be a running total of all the items that are added to the purchase order. However, it will not be reflected on the main form. To do this, an unbounded text box must be added to the main form, and it must be linked it to the Total Amount text box on the subform. Access allows an object on a main form to refer to an object on a subform. The syntax is as follows: [Subform Name].Form![Subform Object Name] The first element is the name of the subform on which the object is located. This is followed by the command “Form!” which indicates to Access that the argument that follows is the name of an object on the form. This is not to be confused with the command “Forms!” that we used earlier in which the argument was the name of a form. Finally, the name of the form object being referenced is given. So, for example, to refer to the Total_Amount text box on the PO_Detail Subform, the syntax is as follows: [PO_Detail Subform].Form![Total_Amount] This syntax will be implemented in the following Access Exercise.

125
UNBOUNDED TEXT BOXES- Cont.

126
UNBOUNDED TEXT BOXES- Cont.

127
UNBOUNDED TEXT BOXES- Cont.
Two important uses of the unbounded text box have been illustrated. The first use is to compute derived data on a form. The second use is to retrieve data for the current form (Purchase Order Master Form) from another form (PO_Detail Subform). The PO_AMT text box on the main form, which is bounded to the PO_AMT field in the PURCHASE_ORDER table, still must be filled in by the user because this is the value that will be saved in the database table. It would be preferable to have the already computed Total_PO_ Amount automatically entered into the PO_AMT field. This can be done in two steps. First, the value in Total_PO_Amount can be copied into the PO_AMT text box. Then the contents of the form can be saved, which will insert the entire record into the table. This is the subject of the next Access exercise.
 from another form (PO_Detail Subform). The PO_AMT text box on the main form, which is bounded to the PO_AMT field in the PURCHASE_ORDER table, still must be filled in by the user because this is the value that will be saved in the database table. It would be preferable to have the already computed Total_PO_ Amount automatically entered into the PO_AMT field. This can be done in two steps. First, the value in Total_PO_Amount can be copied into the PO_AMT text box. Then the contents of the form can be saved, which will insert the entire record into the table. This is the subject of the next Access exercise.")
128
UNBOUNDED TEXT BOXES- Cont.

129
Code for Close button

130
IMPLEMENTING A REPORT A report is designed to provide a summary view of data as a read-only document, most often on paper. Unlike a form, it is not used for updating or inserting information. A typical report shows rows and columns of grouped data and has summary totals where relevant

131
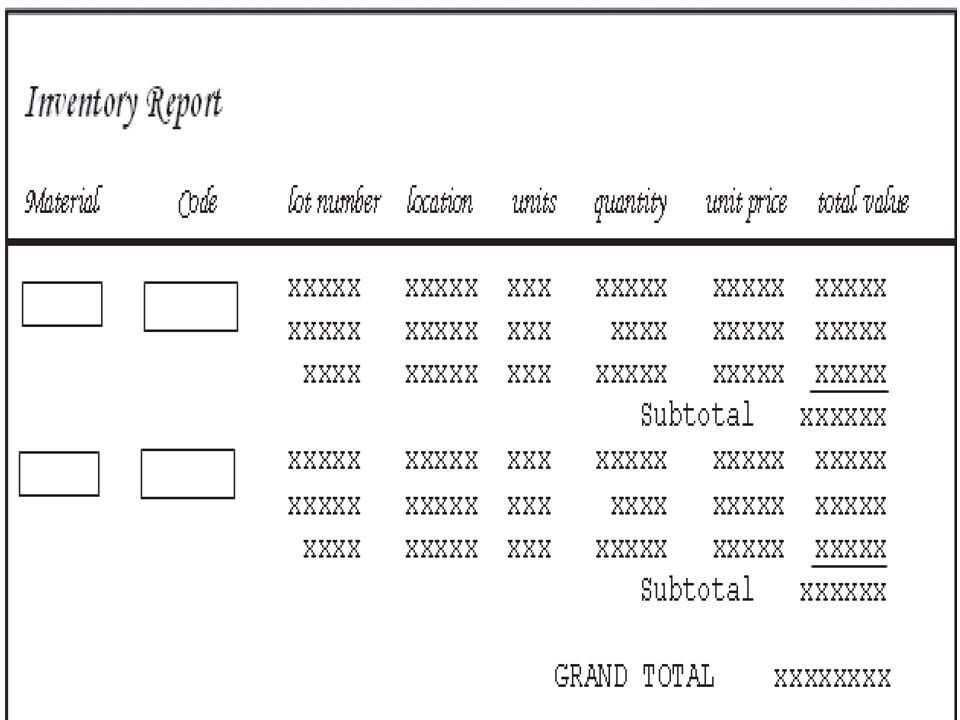
LAYOUT OF THE REPORT This is usually done by making a sketch of how the report will appear. Example: The next figure shows a report on the current inventory of the enterprise, and we want to view it by each material. The report is sketched out so that it shows the placement of the different fields. Recordsets are to be grouped by the material name and code (MATERIAL_ID). The group of records will be listed by lot number. Thus, it will be possible for the user to review the status of each material by its lot number, the quantity remaining of that lot number, and where it is physically located in storage. Next figure 6.43 provides the template for designing the report.
. The group of records will be listed by lot number. Thus, it will be possible for the user to review the status of each material by its lot number, the quantity remaining of that lot number, and where it is physically located in storage. Next figure 6.43 provides the template for designing the report.")
133
INTERACTION WITH TABLES
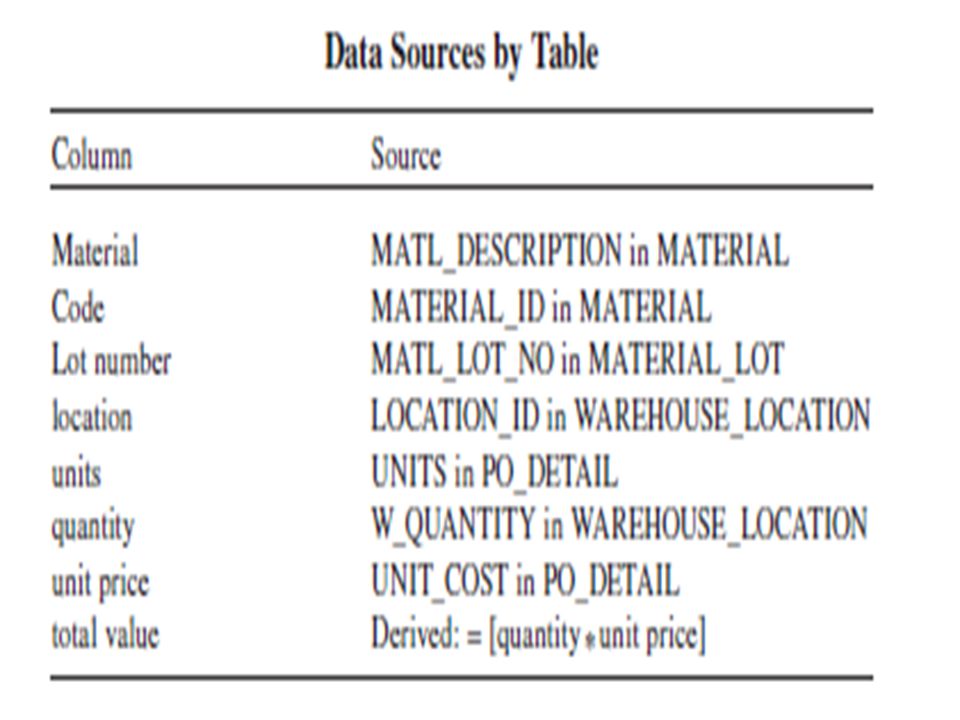
Each of the attributes of the inventory report will be queried from tables. In fact, the report is constructed by first assembling the data from tables into a recordset and then sorting the data into the report format. Therefore, the sources of the data for each attribute must be specified by table. Next table specifies the source of each column of data. The column name is as it appears in the template shown in Figure The source is the attribute and table name in the database. Note that the last column is a derived attribute.

135
DERIVED ATTRIBUTES derived attributes, such as totals and averages, are typical in such reports Next figure shows derived attributes across rows (total value) and down columns (subtotal, grand total). Other derived attributes could have been added, such as average unit price and subtotals at the bottom of each page Each derived attribute has a computation time associated with it. Each time the report is generated, the values of these attributes are computed. Therefore, the report designer should consider the minimum requirements for achieving the objectives of the report
 and down columns (subtotal, grand total). Other derived attributes could have been added, such as average unit price and subtotals at the bottom of each page. Each derived attribute has a computation time associated with it. Each time the report is generated, the values of these attributes are computed. Therefore, the report designer should consider the minimum requirements for achieving the objectives of the report.")
136
IMPLEMENTING A REPORT IN ACCESS
The report wizard is a way of quickly building a report. However, the designer does not have much control over shaping the design of the report. The designer can completely customize a report by starting with a blank report and adding labels, text boxes, and other controls to the report. A report can be based on either a table or a query. Reports that use data from more than one table require a query to assemble the data into a recordset. The first step in creating a report is to create the underlying relationships among tables used in the query.

137
Creating the report Query
The underlying tables for the previous report of are MATERIAL, MATERIAL_LOT, WAREHOUSE_LOCATION, and PO_DETAIL. The query we wish to create will return a recordset consisting of the desired attributes as specified in the table. This can be accomplished by writing the query in SQL, or using query-by-example. Here we will use the Access simple query wizard to create the SQL code for us.

139
Creating the query using wizard

140
Creating the Report Based on the Query

141
The inventory report upon executing the excercise

142
Inventory report design view

143
Report format In design view, there are six kinds of sections: Report header, Page header, Group header, Detail, Page footer, and Report footer: Report header: This section prints its contents once at the beginning of the report. Therefore, it is used for a title that references the entire report. Page header. This section prints at the top of each page. It is used for titling columns that refer to data on the entire page. Group header. This section prints the instances of group data. Detail. This section prints each record of the recordset. Page footer. This section prints at the bottom of each page. It usually contains summary information by page. It contains the current date (= Now()) and the page number (= “page” . . .). Report footer. This section prints once at the end of the report.
) and the page number (= page . . .). Report footer. This section prints once at the end of the report.")
144
Template for inventory report by sections

145
Adding Derived Attributes for the report

146
Adding subtotal in the group footer

147
Sorting and grouping window
Select from the design view, above select the design tab, then select Group & Sort The Group & sort footer will appear below. Click on the “Group on Material_ID” option, and click “More”, to let other options set appears. Then, select “with footer section” Now, the group footer section should appear on the inventory report.

148
Adding report subtotal and grand total

149
Organizing forms and reports into applications
Once the forms and reports have been created, it is often better to make the application for the user such that she or he interfaces with a simple menu instead of the database. The menu hides the details of the application and prevents the user from directly accessing the underlying tables. It presents the user with a simple menu interface Such a simple menu interface called a switchboard. It is composed of a number of command buttons and their labels that describe the functions of the buttons The On_Click event property of each command button is programmed by the database designer. Typically, clicking a command button will open the selected document for reading, editing, or printing. A switchboard is nothing more than another form composed of command buttons and labels. It is designed using facility called switchboard manager.

150
Menu design for purchase order application

151
The switchboard manager

152
Implementing a switchboard

153
Implementing a switchboard- Cont.
The switchboard manager has created two objects in the database. The reader can view them in the database window. The first object is a form titled “Switchboard,” which can be found under the Forms tab. The second object created by switchboard manager is a table titled “Switchboard Items.” This table contains the organization of the switchboard menu. It can be found under the Tables tab of the database window. A database application can be programmed to launch any form automatically when it opens. To launch the switchboard, it must be set as the default startup form when the database is opened. T he procedure for doing this will be illustrated in the following Access Exercise 6.33. At this point, the switchboard is the interface to the application. It will remain so until the designer goes to the startup menu and removes the switchboard as the default startup screen. The Startup window in the following Figure can also be used to remove other elements of the database window, for example, the toolbars and status bar can be eliminated at startup. If you wish to bypass the default screen and open the database window at startup, do this by holding down the Shift key on the keyboard while you are opening the database. Doing this will bypass the default switchboard and open the database window instead.

154
Startup window

155
Implementing a switchboard- Cont.

156
Database password security
Database management systems usually provide a facility for declaring user privileges at several levels without the need to write programming code Data security and integrity are of great concern to the enterprise using a DBMS One approach to maintain database security is to define “user groups,” which are classes of users who have common requirements for accessing data. That is to say, they have read, insert, update, and delete requirements for the same tables, forms, and reports. In this way, database privileges are defined as group rights.

157
Database password security- Cont.
Individual users are then assigned to be members of a user group, with all the privileges and rights that pertain to the group. Each user is given (or creates) a unique password. The password is required when accessing the database. The password identifies the user and, by association, the user group The privileges granted to the group are made available to the individual In Microsoft Access, the process of defining groups, users, and privileges is done by setting user-level security. Access provides a user-level security wizard to assist in this process. In order to apply user-level security, you must have administrative privileges
 a unique password. The password is required when accessing the database. The password identifies the user and, by association, the user group The privileges granted to the group are made available to the individual. In Microsoft Access, the process of defining groups, users, and privileges is done by setting user-level security. Access provides a user-level security wizard to assist in this process. In order to apply user-level security, you must have administrative privileges.")
158
Database password security- Cont.
If the owner of a database application running on Access wishes to protect his or her database from being used by others, Access has provided a simple password security facility that prevents the database from being opened without the password The owner can set his or her own password protection from the Access main menu. Anyone trying to open the database must use the password If the database owner forgets the password, there is no way to recover it and the database cannot be opened. Therefore, it is necessary on the owner to maintain a record of the password The next access exercise shows the process of setting password authorization.

159
Database password security- Cont.

Similar presentations