Download presentation
Presentation is loading. Please wait.

1
Map Reading & Navigation
Prepared by: The Expedition Company Limited

2
Introduction This clear and simple tool is designed to provide you with the basic skills with which to learn to map read. Using a step by step process, you can progress comfortably at your own pace, with practical exercises and illustrations in every section to help you learn. Prepared by: The Expedition Company Limited

3
Equipment requirements are simple.
You will need a: Ordnance Survey Map Silva Compass Sharp pencil Plain Paper Fine String Prepared by: The Expedition Company Limited

4
Course Content Route Planning & Safety The Compass Maps Components
North True Grid Magnetic Map & compass work Maps A brief History Components Type/Scale Symbols Plotting a location Measuring distance Relief Route Planning & Safety Prepared by: The Expedition Company Limited

5
Definition Map .noun. Flat representation of the earth or some part of it with its physical or political features or of the heavens Prepared by: The Expedition Company Limited

6
History Ever since man has been able to write and draw there is evidence to also show that he has recorded routes on land and sea. Where maps were originally shown on clay tablets and papyrus, we can now display them on paper and even CD Rom! Prepared by: The Expedition Company Limited

7
The Ordnance Survey Map
Ordnance Survey maps come in a variety of different formats and this guide will show you how to choose which one is best suited for your own use. Prepared by: The Expedition Company Limited

8
Types of Map The importance of choosing the right map.
Prepared by: The Expedition Company Limited

9
Symbols We interpret both man made and natural features on the map, through a system of symbols. Every Ordnance Survey map has a key showing the definition of each symbol to help you. We will look at a few of the more common symbols. Prepared by: The Expedition Company Limited

10
Symbol examples Prepared by: The Expedition Company Limited

11
Symbol examples Prepared by: The Expedition Company Limited

12
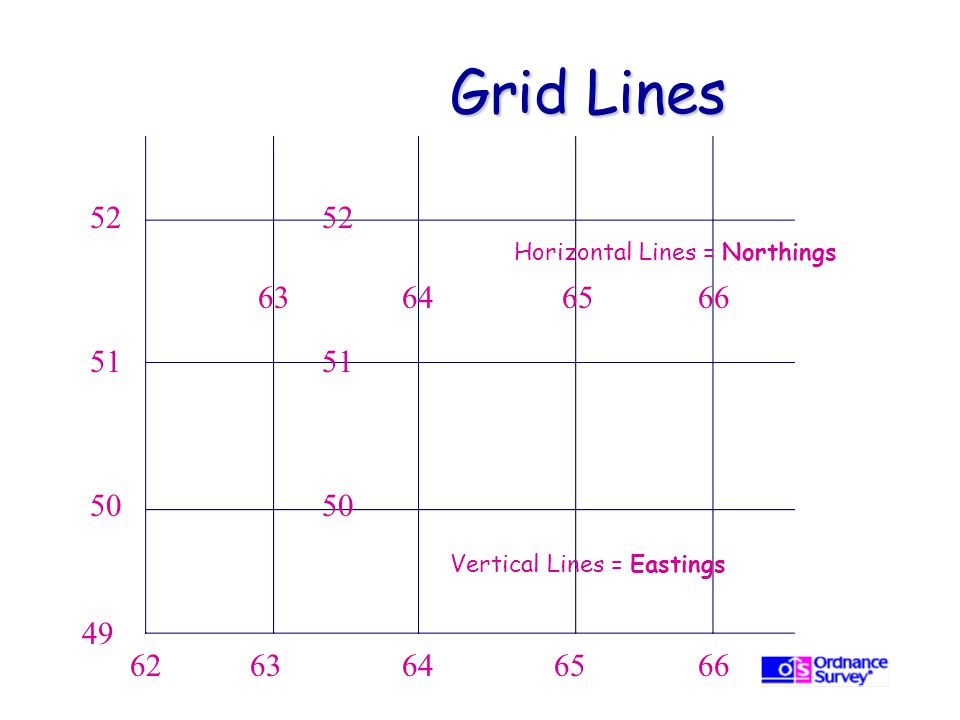
Grid lines Every Ordnance Survey map is covered in a series of grids.
By learning to use these grids we are able to locate a particular point on a map. Prepared by: The Expedition Company Limited

13
Distance Grid lines on all Ordnance Survey Maps are spaced 1km apart, regardless of scale. This makes it easy to judge the rough distance between points by counting squares. 1.5 km 1 km Prepared by: The Expedition Company Limited

14
Grid Lines 52 52 Horizontal Lines = Northings 63 64 65 66 51 51 50 50 Vertical Lines = Eastings 49 62 63 64 65 66
15
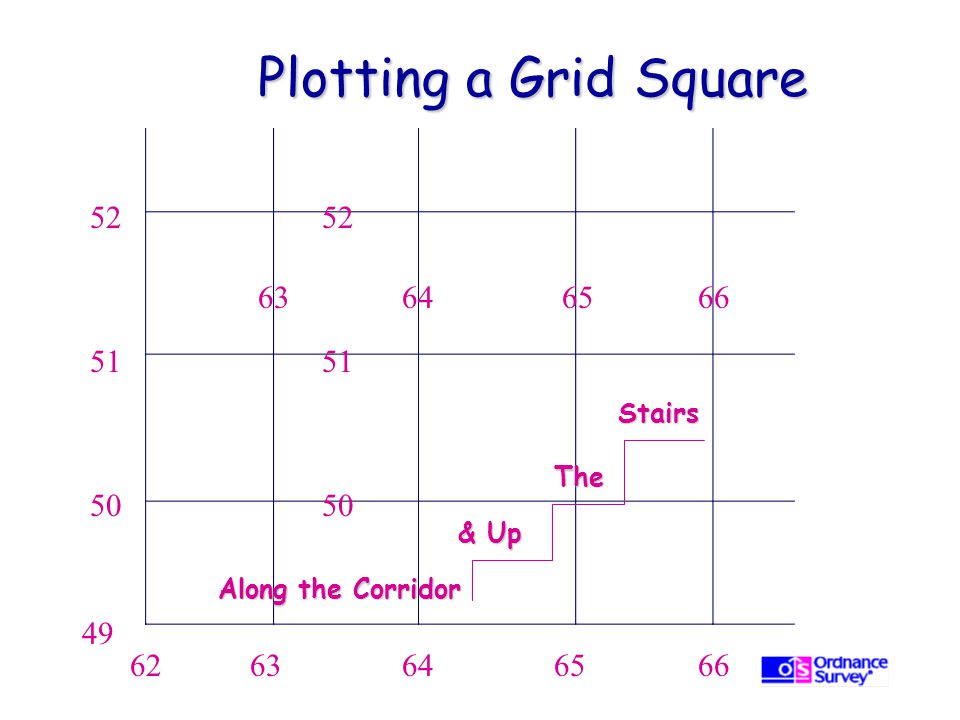
Reading a Grid Reference
Grid references should be read in the following order: Eastings - Along the Corridor Northings - Up the Stairs Prepared by: The Expedition Company Limited

16
Plotting a Grid Square 52 52 63 64 65 66 51 51 Stairs The 50 50 & Up Along the Corridor 49 62 63 64 65 66
17
Plotting a Grid Square 52 52 63 64 65 66 51 51 Grid: 64 50 50 50 49 62 63 64 65 66

18
Accurate Plotting Having plotted the grid Square (1km x 1km) you will often need to establish the accurate location of a point or feature within the Square. This is achieved by dividing the square into a further ten Eastings (Vertical lines) & Northings (Horizontal lines). These additional lines are read in exactly the same manner as before. Prepared by: The Expedition Company Limited
 you will often need to establish the accurate location of a point or feature within the Square. This is achieved by dividing the square into a further ten Eastings (Vertical lines) & Northings (Horizontal lines). These additional lines are read in exactly the same manner as before. Prepared by: The Expedition Company Limited.")
19
Accurate Plotting (One Grid Square)
1 km 9 8 7 6 5 1 km 4 3 2 1 50 1 2 3 4 5 6 7 8 9 64

20
Plotting an accurate location 100 metre accuracy
62 63 64 65 66 52 Grid: 51 50 49

21
Measuring Distance By using the scale at the bottom of each Ordnance Survey Map you can easily convert a measurement in centimetres into a real distance on the ground. Prepared by: The Expedition Company Limited

22
Measuring Distance using a Silva Compass
Nearly all compasses have a centimetre scale which proves an effective tool for measuring the distance between two points. Prepared by: The Expedition Company Limited

23
Measuring Distance using a Piece of String
Trace your route on the map with a piece of string and mark the points at which the route starts and finishes on the string. Place the string against the scale on the map and read off the equivalent distance on the ground. Prepared by: The Expedition Company Limited

24
Measuring Distance using a Map Measurer
Map measurers are purposefully designed for measuring distances on a map. Trace your route with the small wheel at the bottom of the measurer and it will automatically tell you the distance on the ground via a rotating scale. Prepared by: The Expedition Company Limited

25
Relief Relief refers to the way in which height is displayed on a map.
This is shown by a system of lines called ‘Contours’. Prepared by: The Expedition Company Limited

26
Contour Lines Contour lines link points of equal height on the map at ten metre intervals. Contours display how many metres land is above sea level. Prepared by: The Expedition Company Limited

27
Definition Compass .noun. Instrument showing user the direction of north and other points of the ~ by means of magnetic needle Prepared by: The Expedition Company Limited

28
The Compass There are a variety of different compass styles available to you. We suggest that to begin with, you use a Silva compass similar to the one pictured here. Prepared by: The Expedition Company Limited

29
The Compass They were originally discovered by the Chinese 5000 years ago. They are made in a variety of forms for use on land, above and below the sea and in the air. Examples of activities in which they are used are: Hillwalking - Mountaineering Cycling - Surveying Driving - Military Sailing - Scuba Diving Flying - Orienteering Prepared by: The Expedition Company Limited

30
Cardinal Points (Compass Points)
North 0º & 360º North West : 315º North East : 45º West 270º 90º East South West : 225º South East : 135º 180º Prepared by: The Expedition Company Limited South

31
Bearings are taken in degreesº- The cardinal points are divided up into 360º & measured clockwise.
North 0º & 360º North West : 315º North East : 45º West 270º 90º East South West : 225º South East : 135º 180º Prepared by: The Expedition Company Limited South

32
Parts of the Compass The compass can be broken down into various components. We will look at each component separately to define its use. Prepared by: The Expedition Company Limited

33
Base Plate & Compass Housing
The Base Plate is the mounting for the housing and displays a variety of information eg. Scale ruler. The Compass Housing contains a magnetic bar, called the Needle and defines the points of the compass on a rotating bezel. Compass Housing Base Plate Prepared by: The Expedition Company Limited

34
The Compass Needle The needle is suspended in liquid which enables it to move freely, always settling with the red end pointing North. Some needles are Luminous to help navigation in the dark. Needle Prepared by: The Expedition Company Limited

35
Direction of Travel Arrow
The Direction of Travel Arrow indicates the direction along which you wish to travel or take a bearing. The arrow is fixed within the base plate. The sides of the base plate run parallel to the arrow. Direction of Travel Arrow Prepared by: The Expedition Company Limited

36
The Index Line The Index Line is a fixed line within the Compass Housing and is in line with the direction of travel arrow. The Index Line marks the bearing you set by rotating the bezel. Index Line Prepared by: The Expedition Company Limited

37
Orienting Lines These are displayed within the rotating Compass Housing and are designed to be aligned parallel with the Eastings on a map. The orienting lines on some compass models show one half of the lines in red to depict north. Orienting Lines Prepared by: The Expedition Company Limited

38
Compass Scale Nearly all compasses have a centimetre scale along the edge of the base plate to enable you to measure distances. Used in conjunction with the scale at the bottom of the map, the compass scale enables you to calculate the distance on the ground. Compass Scale Prepared by: The Expedition Company Limited

39
Points to Note Stand clear of metal objects when using the compass. They will cause the needle to deviate and create inaccurate bearings. Objects as small as watches can make a difference. Hold the compass as flat as possible to allow the needle to move freely. Look after your compass - try to avoid dropping or knocking it. Store away from other compasses and electrical equipment. Your compass may need replacing if a large air bubble forms in the Compass Housing. Prepared by: The Expedition Company Limited

40
True / Grid / Magnetic North
True North and South are at the geographical poles. Grid North is the direction to which all Ordnance Survey Maps are oriented. We take our map bearings using Grid North. Magnetic North is the direction a compass points to and in the UK it is located approximately 5º West of Grid North.

41
Magnetic Variation True North The difference in degrees between Magnetic (Mag) North and Grid North is referred to as the Magnetic Variation (usually 5º West in UK.) Grid North Magnetic North 5º
 North and Grid North is referred to as the Magnetic Variation (usually 5º West in UK.) Grid North. Magnetic North. 5º.")
42
Magnetic Variation True North It is important to understand the relationship between Grid & Mag north as this will become important when we start to convert bearings to and from a map. Grid North Magnetic North 5º

43
Map & Compass Work Having looked separately at both the Ordnance Survey Map & Silva Compass the following example will demonstrate how they are used together. If you are unsure about anything which has been covered in the previous slides, look back now before you progress to the next section.

44
Map & Compass Work When working from the map we deal with Grid Bearings. When following a compass on the ground we work with Magnetic Bearings. There is a simple system which enables us to convert Grid to Mag and Mag to Grid. The system refers to whether we add or subtract the magnetic variation to convert the bearing.

45
Map & Compass Work Mag to Grid…………. GET RID Grid to Mag………….ADD
(usually 5º West in UK)
")
46
Map to Ground Grid to Mag………….ADD

47
Map to Ground Select a start and finish point on the map.
Line up the edge of the compass with the line along which you intend to travel. Keeping the base plate static - rotate the compass housing until the orienting lines are parallel with the Eastings and the red ‘N’ is pointing to North on your map.

48
Map to Ground Read the bearing shown on the housing from the index line. Remember - Grid to Mag……Add. Add the magnetic variation shown at the top of the map (usually 5º West in UK.) You now have your magnetic bearing of the course you have chosen. The next step is to orientate yourself.
 You now have your magnetic bearing of the course you have chosen. The next step is to orientate yourself.")
49
Orientating Hold your compass level and steady.
Turn your body until the red end of the needle is in line with the Red ‘N’ on the Housing. The direction of travel arrow is now pointing along the route you chose from the map and you are ready to travel.

50
Following the Compass Bearing
Hold your compass level and steady. Ensure that the red end of the needle is in line with the Red ‘N’ on the Housing every time you refer to the compass bearing. Follow the direction of travel arrow. You will find it easier to line up the direction arrow with a physical feature on the ground (eg tree, pylon, tower). Use this as a reference point which you can move towards. This is easier than following the compass every inch of the way.
. Use this as a reference point which you can move towards. This is easier than following the compass every inch of the way.")
51
Ground to Map Mag to Grid…………. GET RID

52
Ground to Map Select the feature on the ground to which you wish to take a bearing. Hold the compass steady and level. Point the direction of travel arrow at the feature. Rotate the housing until the red end of the needle is in line with the Red ‘N’ on the Housing.

53
Ground to Map This is your Mag bearing which you can either travel along or convert to a grid bearing. To plot on the map you should first locate your own position and mark it. Convert the Mag bearing to a Grid bearing by Mag to Grid……Get Rid. (Usually 5º West in UK.) Subtract the magnetic variation.
 Subtract the magnetic variation.")
54
Ground to Map Place the compass on the map and keeping the bearing set on the housing, rotate the whole compass until the orienting lines are parallel to the Eastings on the map. The edge of the compass should run through your position and show the bearing on the map.

55
Ground to Map By turning your body until the red end of the needle is in line with the Red ‘N’ on the Housing you have now oriented yourself and the map.

56
You and your map are now facing North.
Quick Orientation You can orientate yourself and the map to the ground at any time using this easy system: A. Lay the compass on the map. B. Line the edge of the compass and the orienting lines up with the Eastings. C. Turn your body until the red end of the needle is in line with the Red ‘N’ on the Housing. You and your map are now facing North.

57
Route Planning It is important, where possible, to take time in planning your route before you start. This will help you to identify any problems early and to estimate how far you intend to travel and how long it should take. Prepared by: The Expedition Company Limited

58
Route Card A route card is simple to produce and makes navigation on the ground simple. A basic format is shown here: Prepared by: The Expedition Company Limited

59
Route Planning & Safety
Make sure that your route is well within your ability and that you are in possession of the right equipment. Leave a copy of your route card with a friend or contact in order that you can be easily found in an emergency. Prepared by: The Expedition Company Limited

60
Map Reading & Navigation
Prepared by: The Expedition Company Limited

61
Ordnance Survey Romsey Road SOUTHAMPTON United Kingdom, SO16 4GU

62
Produced in association with
The Expedition Company Limited Po Box 17 Wiveliscombe Taunton, TA4 2YL Tel: +44 (0) Fax: +44 ()) Web:
 Fax: +44 ()) Web:")
Similar presentations


 team of Otto Gonzalez-USDA Foreign Agricultural Service (Team Leader), Jon Fripp.>")


