Download presentation
Presentation is loading. Please wait.

1
LEGO CASE BY SOC

2
Phone building Lets build this phone First you will build you base of the phone the (key pad) Next you will build the base for the head set Then you will build the bottom of the head set Lets us get Started
 Next you will build the base for the head set Then you will build the bottom of the head set Lets us get Started")
3
Building your Key Pad Follow the pictures to build the key pad.

4
Supplies for Key Pad Materials Needed: 1 green 16 x 16 flat 3 black 10 x 1 flat 3 black 6 x 1 flat 1 black 8 x 1 1 black 4 x 1 3 white 2 x 2 3 yellow 2 x 2 3 blue 2 x 2 3 red 2 x 2

5
Key Pad Assembly Left Side: 1 black 10 x 1 1 black 6 x 1 Bottom Side: 1 black 10 x 1 1 black 4 x 1 Right Side: 1 black 6 x 1 1 black 10 x 1 Top Side: 1 black 8 x 1 1 black 6 x 1

6
Step One Bring the left side black 10 x 1, and the bottom side 10 x 1, together. Meeting at the bottom left corner. Place right side 10 x 1 at the top right corner.

7
Step Two Bring left side 6 x 1 and top side 6 x 1 together. Meeting at the top left corner Place right side 6 x 1 next to the 10 x 1. There should be a solid black line down the right side.

8
Key Pad Completed Place top side 8 x 1 in the empty space Place bottom side 4 x 1 in the empty space. There should be a solid black line all around the green 16 x 16

9
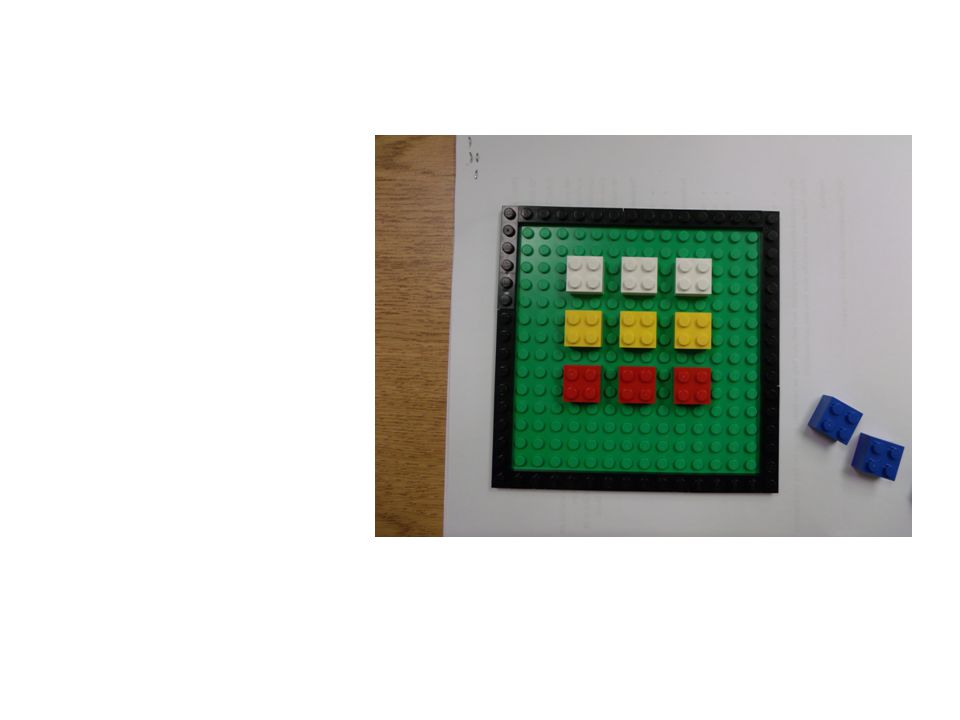
Placing your buttons Step One: Place first button five spaces IN, (including border) from the left side, and DOWN four spaces from the top (including border). Place two more buttons directly to the right of the first There should be one space between each button. (Button color pattern is subjective to the assembler. )
.")
10
Step Two Place three more buttons directly below the first, top, three buttons. There should be a one space between the tops and sides of each button. Repeat this step for the next two rows of buttons

12
Finish Key Pad Now start on the head set

13
Head Set Lets get started

14
Supplies for Head Set Follow the pictures Supplies Needed: 1 gray 10 x 4 flat 1 green 6 x 4 flat 2 white 2 x 2 2 white 2 x 4 2 white 2 x 6 1 white 2 x 8 1 yellow 2x4 flat

15
Hand Set Assembly Step One: Place green 6 x 4 and gray 10 x 4 directly beside each other. Take one white 2 x 8 and place it at the top right corner of the gray 10 x 4.

16
Step Two Place the two white 2 x 4s next to the white 2 x 8. This should look like a thick white line across the top of the flat green and gray pieces.

18
Step Three Place the two white 2 x 2s in each of the bottom corners. See Picture

19
Step Four Place the two white 2 x 6s in the left over spaces.

20
This is what you should get.

22
Now take the yellow 2 x 4 flat. This will brace the green and gray pieces together.

23
Place the yellow 2 x 4 along the bottom seam of the green and gray pieces.

25
It should look like this.

26
Hand Set Assembly Phase Two These are the pieces you will need to finish completing the handset. 2 blue 2 x 4 2 light blue 2 x 4 2 yellow 2 x 4 1 red 2 x 4 2 white 2 x 2

27
Step One According to the assemblers color/pattern preference, make three columns. Take three 2 x 4s and connect them. Repeat 2 times Take two 2 x 4s and the two 2 x 2s and connect them. The 2 x 2s between the 2 x 4s

28
Step One Cont.

31
Last (Fourth) Column You will need: 1 red 2 x 4 1 white 1 x 2 1 green 2 x 2 1 white 2 x 3 1 red 1 x 2
 Column You will need: 1 red 2 x 4 1 white 1 x 2 1 green 2 x 2 1 white 2 x 3 1 red 1 x 2")
32
Step One Place the white 1 x 2 on the bottom of the red 2 x 4. Like shown.

33
Step Two Place green 2 x 2 beneath the red 2 x 4. Like shown.

34
Step Three Place red 1 x 2 beneath the green 2 x 2. Like shown.

35
Complete Column Place the white 2 x 3 and complete the column. Like shown.

36
Completed Column

37
Hand Set – Final Step Take the white handset base and the four completed columns. See picture.

39
Step One Place two columns on the bottom of the base. One on each end.

40
Step Two Place the last to columns next to the other columns.

41
Completed Handset

42
Completes Handset

43
Completed Handset

45
Finished Phone After putting all your pieces together you should have a phone that looks like this. Ring

46
Consumer Service Infomations: Phone number 304-555-5555 e-mail SOC@lego.com Address 1234 Lego Road Rio Grande, OH 55555

Similar presentations


>")


>")


