Download presentation
Presentation is loading. Please wait.

1
Intraosseous Vascular Access

2
The System

3
EZ-IO Training Materials
PowerPoint™ Presentations With comprehensive notes located behind each slide EZ-IO StarCast Presentations Quick Reference Card Insertion & Removal Poster Training Mannequins Training Driver & Needle Sets Complete Web Site Clinical Support Hotline

4
The EZ-IO Lithium Driver
Sealed cap Lithium Batteries Designed for 1000 human insertions

5
Needle set packaging

6
The EZ-IO Needle Sets Catheter & Stylet Specialized tip
EZ-IO Needle Set (safety cap removed) EZ-IO Needle Set (“X-Ray View” with safety cap) Stylet Hub Catheter & Stylet Stylet Needle Set Safety Cap Catheter & Catheter Hub Metal Disc
 EZ-IO Needle Set ( X-Ray View with safety cap) Stylet. Hub. Catheter & Stylet. Stylet. Needle Set. Safety Cap. Catheter & Catheter Hub. Metal Disc.")
7
EZ-IO PD & EZ-IO AD needle sets
15 mm in length 5 mm mark 25 mm in length Length and color are the only differences between PD & AD needle sets

8
Sealed Sterile Cartridge Open Cartridge Open Cartridge
Note: “lot code and expiration” moved to cartridge barrel Open Cartridge Note: Needle Set’s position Note: torn (and lifted) safety seal Open Cartridge Note: torn (and lifted) safety seal Open Cartridge Note: exposed “single use only” sticker Stylet in “Shuttle” Note: REMOVED safety seal Stylet in “Shuttle” Note: REMOVED safety seal
 safety seal. Open Cartridge. Note: torn (and lifted) safety seal. Open Cartridge. Note: exposed single use only sticker. Stylet in Shuttle Note: REMOVED safety seal. Stylet in Shuttle Note: REMOVED safety seal.")
9
Put it where it belongs! Stylets belong in approved sharps containers

10
Important EZ-IO usage considerations
Consider these points BEFORE EVERY EZ-IO insertion: Did you “hear” a pop when the cartridge was opened? Did the Driver easily attach to the Needle Set (With the Needle Set remaining in the cartridge)? Did you REMOVE the Needle Set Safety Cap from the Needle Set? Did you CONFIRM the 5 mm mark? Needle Set Note that a “lone Stylet” sits deeper than a complete Needle Set Important EZ-IO usage considerations
 Did you REMOVE the Needle Set Safety Cap from the Needle Set Did you CONFIRM the 5 mm mark Needle Set. Note that a lone Stylet sits deeper than a complete Needle Set. Important EZ-IO usage considerations.")
11
Precise cylindrical hole created by EZ-IO insertion

12
The EZ-IO Infusion Solution
EZ-IO Storage Cases & Cradle Training Driver EZ-Connect Wristband Training Needle Sets EZ-IO Driver EZ-IO AD & PD Needle Sets

13
General IO Anatomy

14
Anatomy of intraosseous access
Thousands of small veins lead from the medullary space to the central circulation

16
Adult IO Anatomy

17
Proximal Tibial Anatomy

18
Distal Tibial Anatomy

19
The ankle joint is comprised of the Tibia, Talus and Fibula

20
Proximal Humeral Anatomy

21
Insertion site Insertion site

22
Note that arm is adducted with the elbow posteriorly placed!
The Proximal Humerus insertion site is found “slightly anterior to the arms lateral midline” Right arm Adult male Note that arm is adducted with the elbow posteriorly placed!

23
Pediatric IO Anatomy

24
If the patient “fits” on the Broselow™ Tape THINK PINK
If the patient “fits” on the Broselow™ Tape THINK PINK* and use the EZ-IO PD = *Obese pediatric patients may require the EZ-IO AD needle Set

25
Pediatric Anatomical Overview

26
The pediatric growth plate
Clearly visible tibial growth plate Growth Plate Insertion site Tibia Right Leg Left Leg

27
Identifying the EZ-IO PD insertion site
If the Tibial Tuberosity CANNOT be palpated the insertion site is two finger widths below the Patella (and then) medial along the flat aspect of the Tibia The Tibial Tuberosity can be difficult or impossible to palpate on younger patients
 medial. along the flat. aspect of the Tibia. The Tibial Tuberosity can be difficult or impossible to palpate on younger patients.")
28
Identifying the EZ-IO PD insertion site
If the Tibial Tuberosity CAN be palpated the insertion site is one finger width below the Tuberosity (and then) medial along the flat aspect of the Tibia As patients mature the Tibial Tuberosity becomes easier to identify
 medial. along the flat. aspect of the Tibia. As patients mature the Tibial Tuberosity becomes easier to identify.")
29
Indications

30
Indications for intraosseous access
Cardiac Arrest Respiratory Compromise Need for immediate rapid sequence induction Hemodynamic Instability Mass Casualty Situations Trauma Resuscitations Bridge to Central Line Allowing Controlled Placement Altered Level of Consciousness Difficult IV Placement Intraosseous Access = Immediate Vascular Access

31
Indications for Intraosseous Access
Patients with poor peripheral access Dialysis Patients Sickle Cell Patients Obese Patients Mass casualty incidents (shootings, motor vehicle collisions) Congestive Heart Failure Oncology Patients IV Drug Abuse Dehydration (especially pediatrics) Diabetic Patient (DKA or hypoglycemia) Consistent with the AHA & ERC Guidelines Intraosseous Access = Immediate Vascular Access
 Congestive Heart Failure. Oncology Patients. IV Drug Abuse. Dehydration (especially pediatrics) Diabetic Patient (DKA or hypoglycemia) Consistent with the AHA & ERC Guidelines. Intraosseous Access = Immediate Vascular Access.")
32
AHA, ERC, ILCOR, NAEMSP Guidelines
IO should be considered early in vascular access emergencies Adults - 2 peripheral IV attempts Progress to IO Pediatrics - 1st line of choice ET tube is no longer recommended for drug delivery Central lines are discouraged Approximately 5 million central venous catheters placed each year in US Central line placement causes unnecessary drug delivery delay during resuscitation CDC report indicates 9% infection rate with central lines in US ILCOR is comprised of seven formal members – American Hear Association, European Resuscitation Council, Heart and Stroke Foundation of Canada, Australian and New Zealand Committees on Resuscitation, Resuscitation Councils of Southern Africa, and the InterAmerican Heart Foundation and Resuscitation Council of Asia

33
What About Infections With IO
20 + year history in pediatrics with Cook/Jamshidi needles sets Overall infection rate is 0.6% Cases of osteomylitis occurred when catheter was left in place for > 72 hours Newer IO devices cause less bone trauma EZ-IO database Contains insertions with no local infections or osteomylitis Estimate of 80,000+ insertions with no local infections or osteomylitis

34
Intraosseous access: is it painful?
IO insertion pain is equivalent to a peripheral IV IO infusion pain can be severe but is significantly moderated by the administration of 20 – 40 mg Lidocaine for patients > 39kgs and 0.5mg/kg for patients 39kgs or less via the IO route (*2% preservative free Lidocaine is recommended)
")
36
Pressure and Flow Rates
With pressure, IO flow rates are similar to IV Tibial relates to a 18 gauge catheter Humeral relates to a 16 gauge catheter Flow rates for infusions given through an IO with a 300 mm pressure infuser 3 – 6 liters/hour of saline Unit of blood in approximately minutes Syringe bolus infusions can be completed in seconds Initial rapid 10 cc syringe bolus for patients > 39kgs and 5cc flush for patients 39kgs or less dramatically increases IO flow rates NO FLUSH = NO FLOW

37
Infusion of Medication
Which Drugs can be given? Any medications that can be safely injected into a central venous catheter can be safely injected IO What Dose? IO and IV doses are identical Lab Testing: cc of blood can be aspirated from an IO device and placed into a syringe for standard laboratory testing

38
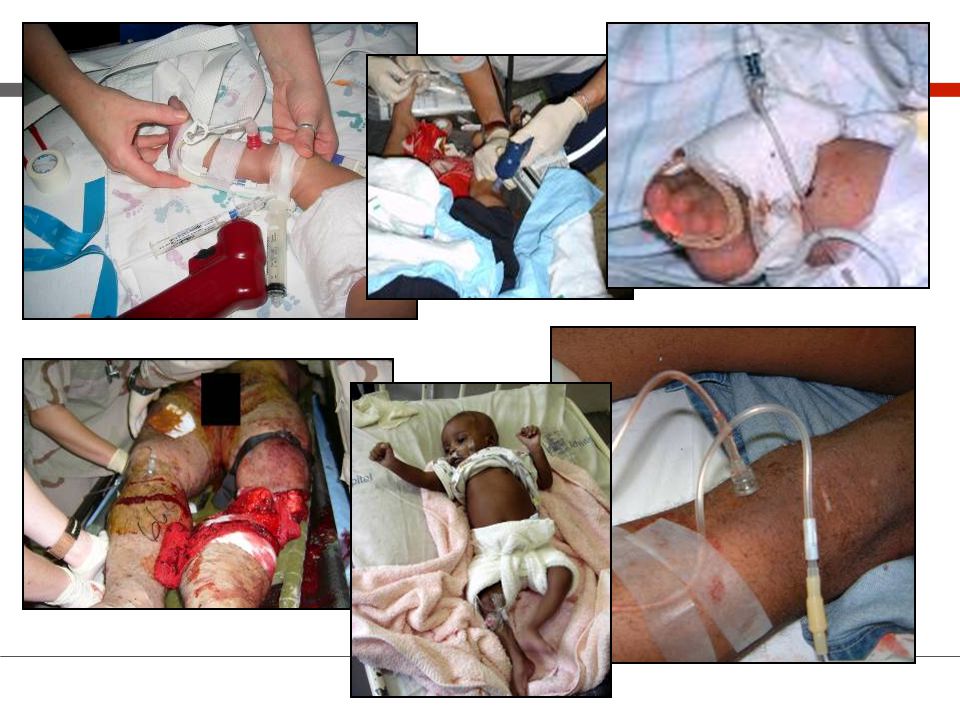
The Reality of Intraosseous Flow
Immediate flow from the tibia and proximal humerus to the central circulation

39
Contraindications Local Infection (at the insertion site)
Fractures (to the bone selected for insertion) Prosthesis Recent (24 hours) IO in same extremity Absence of anatomical landmarks or excessive tissue
 Prosthesis. Recent (24 hours) IO in same extremity. Absence of anatomical landmarks or excessive tissue.")
40
EZ-IO Access The art of insertion

41
Observe Body Substance Isolation Precautions

42
Adult

43
Confirm and clean insertion site

44
Confirm and clean insertion site

45
Identify the Proximal Humerus insertion site
Elbow should remain adducted and posteriorly located To begin the discussion on humeral access we must first position the arm for maximum proximal humerus exposure. Adduct the patient’s humerus then posteriorly locate the elbow to the same “plane” as the spine. Next, place the patient’s hand on the patient’s abdomen – at or near the umbilicus. This position will provide for a more prominent insertion site as well as ensure protection for the vital neurovascular structures located under the patient’s arm. Important note: By placing the hand on the umbilicus (rather than the entire forearm across the abdomen) you will be able to retain the elbow on the stretcher or the ground and maximize your approach to the proximal humerus. Place the hand over the umbilicus for humeral positioning and safety orient the arm to this position
 you will be able to retain the elbow on the stretcher or the ground and maximize your approach to the proximal humerus. Place the hand over the umbilicus. for humeral positioning and safety. orient the arm to this position.")
46
Preferred insertion site identification method
Place patient in supine position with the arm correctly oriented

47
Alternate site identification method
Coracoid Process Acromion This alternate method of identification can be used in association with the preferred method to ensure proper placement Alternate site identification method

48
Confirm and clean insertion site

49
Pediatric

50
Confirm and clean insertion site

51
Confirm and clean insertion site

52
Confirm and clean insertion site

53
Insert AD needle set into appropriate site
Position the EZ-IO Driver at a 90 degree angle to the bone Remember “EZ does it” Lightly holding the EZ-IO driver will improve usage 40 kg and greater usage Don’t force the needle set into position - “allow the driver to do the work”

54
Insert PD needle set into appropriate site
Position the EZ-IO Driver at a 90 degree angle to the bone Lightly holding the EZ-IO driver will improve usage kg usage Select needle set based on patient size & weight

55
Important needle set insertion tip
Allow driver to do the work! DO NOT EXCESSIVE FORCE Gently GUIDE needle set into position Recoil! Caution! Recoil! Caution! STOP WHEN YOU FEEL THE POP kg usage 40 kg and greater usage User induced recoil may lead to needle set dislodgement or extravasation

56
Confirm placement by noting
Remove stylet and confirm placement Confirm placement by noting Blood at the stylet tip Firmly seated catheter Blood in the catheter hub Aspiration of blood Fluids flow without difficulty Pharmacologic effects Monitor the insertion site and distal extremity for signs of extravasation

57
Syringe flush catheter
No Flush = No Flow Syringe flush the catheter with 10 ml (5 ml for PD) of a sterile solution
 of a sterile solution.")
58
Avoid rocking the EZ-IO catheter during usage
Use the EZ-Connect supplied with the needle set!

59
Begin infusion with pressure
kg usage Regulate fluid delivery for pediatric patients 40 kg and greater usage A pressure bag, infusion pump or syringe will improve the flow rates

60
EZ-IO Removal Maintain a 90 degree angle
Maintain 90 degree angle, Rotate clockwise and gently Pull

61
Once catheter has been removed – cover site and monitor patient

62
Possible Complications
Rocking, Bending or inadvertently Striking the catheter may cause it to break If breakage occurs Grasp the exposed catheter with a hemostat – rotate and pull 24 hour emergency support

64
Around the world - 24 hours a day, 7 days a week

65
Questions? If you have questions – we would enjoy hearing from you!
Please call us at or visit us on the website at

Similar presentations


>")


 – Hard bone Cancellous bone (Spongy bone) – Medulary cavity. Meshwork occupied by bone marrow,>")
 infusion. The anatomical and physiological principle of I.O. infusion. Familiarization.>")


