Download presentation
Presentation is loading. Please wait.

1
AUDIO VISUAL TRAINING PRESENTATION
Covering the basics and troubleshooting equipment.

2
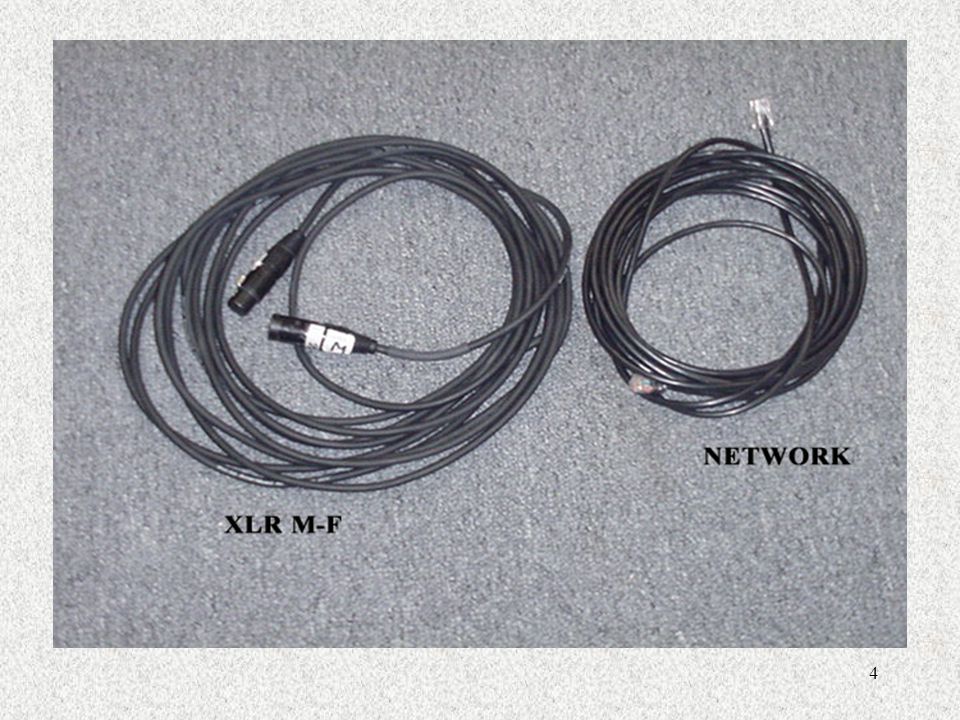
Types of Cables: AC, RCA, RF, BNC, XLR, ¼”, mini, VGA, “D” Plug, network, combination Some cables are video cables, some are audio cables.

6
Which cables are for audio and which cables are for video?
Can any of them be for both? RCA Can be used for video or audio signals. When you Separate video from audio, that is a component signal. Each “component” has it’s own cable. BNC are video cables. We mostly use This with some of the vcrs we have here. XLR are AUDIO cables. We use these with Our microphones. RF, or radio frequency cable, transmits both audio And video in the same cable. This is known as a composite signal When everything is combined in one cable. We use this on most tv/vcr connections.

7
Does it affect the signal if you combine cables to make them longer?
For what we do, most of the time we can combine cables without Having the signal compromised. However, some cable runs are affected When they are too long, especially VGA and video cables. Can cables go bad? Yes! Cables can go bad. This is why it is important to properly store And coil cables. The wires inside can get twisted and break. How do you troubleshoot a cable? You exchange the cable in question with another cable. If the new cable works, then you most likely have a bad cable. Throw all bad cables away! There is no use for a bad cable. Remember, too, that frayed cables are potentially dangerous. Do not use questionable cables.

8
Can you convert one kind of cable to another?
Yes! But only certain kinds. On the next page is a Photo of various kinds of adapters. There are many Different kinds of audio and video “ends” and you Can convert between them. For example, it is very easy To change a mini audio cable into an RCA cable or Even a 1/4 “ cable. You have to match the cable to the Input of the equipment you are using. If you have a vcr that Only takes RCA cables for the video input, but you only have a bnc cable for Video, you can convert the BNC to an RCA with an Adapter. On the next slide I will go over the types of Adapters we use here.

9
ADAPTERS

10
Adapters, another view

11
OVERHEAD PROJECTORS OVERHEAD PROJECTORS HAVE MANY PARTS. I WILL GO
OVER THOSE PARTS AND HOW TO CHANGE LAMPS AND HOW TO CLEAN THEM. MOST OF OUR OVERHEAD PROJECTORS ARE MADE BY 3M OR APOLLO. I WILL SHOW YOU THE 3M. THE TIPS ON CLEANING AND CHANGING LAMPS ARE THE SAME NO MATTER WHICH BRAND IT IS. ONLY THE VARIOUS PARTS OR BUTTONS MAY BE IN A DIFFERENT PLACE. ALMOST ALL OF THE OVERHEADS WE USE ON THIS CAMPUS HAVE A CAPACITY FOR TWO LAMPS , OR “BULBS”. ONLY THE OLDER MODELS THAT YOU MIGHT RUN INTO IN THE NEW BUILDING ( LAW DEPARTMENT) MAY HAVE ONLY ONE LAMP CAPACITY. THESE ARE PROBABLY PROJECTORS THEY HAVE HAD FOR YEARS AND JUST MOVED OVER THERE WITH THEM WHEN THEY MOVED INTO THE BUILDING.
 MAY HAVE ONLY ONE LAMP CAPACITY. THESE ARE PROBABLY. PROJECTORS THEY HAVE HAD FOR YEARS AND JUST MOVED OVER. THERE WITH THEM WHEN THEY MOVED INTO THE BUILDING.")
12
Lamp changer. If lamp number 1 goes out, turn the knob to lamp 2.
The on/off switch to the right pushes in to turn on or off. To the left is the Lamp changer. If lamp number 1 goes out, turn the knob to lamp 2. ( or vice versa). There is also a small switch to the right of the lamp changer That controls the brightness. You can make it very bright, or less bright. Very Bright is best. Please Note: If the door to the lamp changer is left open or is Not closed all the way, the projector will not come on! This is a safety feature!
. There is also a small switch to the right of the lamp changer. That controls the brightness. You can make it very bright, or less bright. Very. Bright is best. Please Note: If the door to the lamp changer is left open or is. Not closed all the way, the projector will not come on! This is a safety feature!")
13
Of lamp this projector uses. ONLY USE THE RECOMMENDED LAMP!
To the right of the lamps, you will see the diagram that tells you what type Of lamp this projector uses. ONLY USE THE RECOMMENDED LAMP! What happens if you put the wrong lamp in? Depending on what you put in there, many things can happen. It could blow Out immediately, it could explode, it could damage the overhead so that It cannot be used. Please be careful what you put in the projectors! The lamp are seated in the socket below. Please do not touch the inside of The lamp. Oils from fingers cause the lamp to overheat and blow out. Be sure the Lamp is seated firmly in the socket.

14
Focus the projector, turn the focus knob forward or backward until
To open the top to change the lamp, you pull up on the switch labeled below And pull up. The release shown below releases the arm of the overhead. To Focus the projector, turn the focus knob forward or backward until The picture is sharp.

15
How do I change the lamp? Very carefully! Lift up on the lever holding the lamp in place gently and remove The lamp that is burned out. Put the lever back down and gently place The new lamp in the socket. You need to press firmly down until it is set In the socket well. Be sure you have the right lamp! How do you know what kind of lamp it takes? Look inside the projector to the right of the lamps and you will see the lamp Model you should be using. Only use this lamp! The lamp models are Letters, such as EXR or FXL or EYB. Be sure you use the correct one. What happens if you put in the wrong lamp? Many things can happen. The lamp could explode, burn out right away, Overheat, burn out the socket, or cause a fire.

16
Why does the light from the overhead look orange?
Check to make sure the brightest setting is chosen. If it still looks orange The lamp is probably getting old and wearing out. If it is very dim, change The lamp and that should take care of the problem. I just changed the lamp and it blew out right away. Why did it do that and What should I do ? Sometimes a piece called the diode burns out. This regulates the voltage Running through the projector. This will make lamps burn out immediately. Do not add any more lamps, and place it in the office for repair. Remember to Always check the overhead once you change the lamp.

17
FRESNEL LENS FUZZY? If you are suddenly getting only a blurry round spot from your overhead projector and no readable image, your fresnel lens is probably installed upside down. While this won't happen by itself, it's a common problem for those who have tried to clean the dust out of their overhead recently. The typical overhead projector has a top piece of glass (stage glass) and just below that is a plastic lens with lots of circular lines on it (the fresnel lens). Most fresnel lenses are marked on one side indicating which side goes toward the lamp. If you know how to remove it, just take it out and reinstall it the correct way. By the way, never use glass cleaner on the fresnel lens, it can destroy the plastic lens. Clean the fresnel lens with canned air. But no matter what you do, be very careful because this lens is a very expensive part of your projector.
 and just below that is a plastic lens with lots of circular lines on it (the fresnel lens). Most fresnel lenses are marked on one side indicating which side goes toward the lamp. If you know how to remove it, just take it out and reinstall it the correct way. By the way, never use glass cleaner on the fresnel lens, it can destroy the plastic lens. Clean the fresnel lens with canned air. But no matter what you do, be very careful because this lens is a very expensive part of your projector.")
18
Document Cameras There are Elmo document Cameras in 120, 121, 221, and 225 as well as the Vtel room for teleconferencing. You use base light for overhead transparencies, and you use top lamp For opaque objects, such as a sheet of paper or an object. Basically, you use the bottom Lamp for transparencies like you use on an overhead projector and the top lamp for Everything else. The top lamp acts like a camera and shows what you are doing or what You want to project. This unit is connected to the console with a BNC connection which Means it is a video signal. This means it switches as a video signal in the console.

19
LCD PROJECTORS

20
We use many types of LCD projectors
We use many types of LCD projectors. Some we use for check out, some are Mounted in the classrooms. I will go over some of the basics of each one. Menu for LCD Goes from harddrive or laptop into The computer in with a VGA cable.

21
The Infocus has a dedicated
Cable that MUST be used And can only be used with The Infocus. A regular VGA Will not work with this. It will Handle both MAC and PC Operating system with the Switch of the bar and by Turning the cable to the Computer around.

22
This is the Sharp. We use this one for Checkout. You can see the inputs
For video and audio are on the side inside the panel. On top, you have The menu and the volume control and the input select to chose video Or computer.

23
This Sharp is mounted in 120, 121, 221, and 225 in the new building
This Sharp is mounted in 120, 121, 221, and 225 in the new building. As you can see, the power lights, the lamp light and the temperature Lights are located on the front of the projector. The maximum lamp hours is 1500 hours. The red indicator on the front of the projector will flash red when the projector reaches 1400 hours. It will flash yellow when it is time to change the bulb. The projector will power up, but will cut off within 5 minutes.. It will not allow you to use it after 1500 hours. To change the lamp, the projector has to be taken down from the ceiling. If this happens during a class, just take a portable projector over there until we can get in the class and take the projector down since this takes some time.

24
Off-Centered? Scrambled picture?
Just use portable projectors any time a lamp goes out during class. Be sure to send a message to the listserv if this happens, too, so faculty will know to contact for help if they want to use an LCD projector. No Signal? If there is no signal to the projector in the smart rooms, and you know all the connections are good, please make sure the power distribution amp is on in the black box. This runs the power for the inline box in the wall. If the inline box is not on, the signal won’t get to the projector. Check your VGA cable. Are all your cables seated properly? Are there bent pins? Off-Centered? If the image is ‘cut off’ on the screen, check the horizontal control ( blue knob on the inline box) to adjust the image left or right. Scrambled picture? All of the projectors in classrooms are 800X600 resolution. Many laptops are 1024x768 or even higher now. You may need to change the laptop resolution if the projector isn’t reading the signal well.
 to adjust the image left or right. Scrambled picture All of the projectors in classrooms are 800X600 resolution. Many laptops are 1024x768 or even higher now. You may need to change the laptop resolution if the projector isn’t reading the signal well.")
25
THE INLINE BOX Computer Audio cable goes here ,
Adjusts , screen position VGA cable goes here c i.e. For CD player

26
Some of the older laptops do not send a signal strong enough to display on the computer monitor and the lcd projector. Try taking the signal off the computer monitor and sending it full strength to the lcd projector. (Check the laptop for the correct keys to send the signal to the projector.. i.e., Function / F5 etc… ) The refresh rate may need to be changed on your computer. Many of the latest laptops use graphic adapter hardware that is capable of producing an output at various refresh rates. You should try any other refresh rate available but it is best to start as close to 60Hz as possible to be compatible with the largest number of projectors. If you are using Windows 95, the refresh rate is sometimes located on a tab under Display Properties. (To get to the Display Properties under Windows 95, right click on the desktop and select Properties.) Under Windows 98 go to the Settings tab and click the Display or Monitor icon. Go to Settings and click the Advanced button.. It may be under the tab for Adapter. Check around. Filters A dirty filter will cause your projector to overheat and shut down and shortens lamp life. Even worse, the dust that collects on your filter will eventually make its way into your projector and deposit itself on the red, green and blue LCD panels. Once this happens you will have colored spots in your image and your projector will need a professional cleaning.
 Under Windows 98 go to the Settings tab and click the Display or Monitor icon. Go to Settings and click the Advanced button.. It may be under the tab for Adapter. Check around. Filters. A dirty filter will cause your projector to overheat and shut down and shortens lamp life. Even worse, the dust that collects on your filter will eventually make its way into your projector and deposit itself on the red, green and blue LCD panels. Once this happens you will have colored spots in your image and your projector will need a professional cleaning.")
27
DHCP SETTINGS FOR NETWORK CONNECTIVITY
Right Click on Network Neighborhood and Select Properties In the box where the installed network components are listed, scroll down until you see TCP/IP followed by the name and model number of your ethernet card. Click on it once to select it. Click on the “properties” button under the list. One by one, click on the following tabs at the top of the TCP/IP “Properties” window: IP Address, Gateway, DNS Configuration, and WINS configuration. Change the settings as follows: IP Address: Click in the option button for “Obtain an IP Address automatically.” Gateway: Click on any gateway numbers listed under “Installed Gateways” and click on the “remove” button. DNS Configuration: Click in the option button for “Disable DNS”

28
Can I Watch TV through an LCD projector?

29
Yes! You can watch TV through an LCD projector!
Hook up the broadcast cable ( RF ) to the INPUT of the VCR. Take an RCA dubbing cable or two RCA cables from the OUTPUT Of the VCR to the INPUT of the LCD Projector. It’s that simple! Chose Video on the LCD projector. This is useful for when someone wants to watch a program on a large Screen. Classrooms are not cable ready, however. One example of when This could be used is when someone wants to set up a television in the Lobby area near our office. Of course, there would have to be someone Attending the area at all times. We can run a cable feed long enough to Go to the lobby of the 3rd floor.
 to the INPUT of the VCR. Take an RCA dubbing cable or two RCA cables from the OUTPUT. Of the VCR to the INPUT of the LCD Projector. It’s that simple! Chose Video on the LCD projector. This is useful for when someone wants to watch a program on a large. Screen. Classrooms are not cable ready, however. One example of when. This could be used is when someone wants to set up a television in the. Lobby area near our office. Of course, there would have to be someone. Attending the area at all times. We can run a cable feed long enough to. Go to the lobby of the 3rd floor.")
30
WHAT IS KEYSTONING? Keystoning is the effect you get when the projector, no matter what Kind of projector you are using, is too low for the screen. The projected Image will look like this: Projector too Low for screen This means The projector Is not sitting Even. With Screens that are already mounted, there is very little you can Do about it being too low.

31
Electronic Classrooms
We have 6 electonic classrooms in the new building. They are : 120, 121, 221, 225, 329, 332 All electronic classrooms have built in PCs, Podium mics, wireless Lavalier mics, cassette players/recorders, VHS VCRs, mounted LCD Projectors, and document cameras, and inputs for laptops. Only 329 and 332 are exceptions to this. 329 and 332 do not have podium mics, touch panels or cassette players. They do have a wireless mic unit that can be checked out at the circ Desk of the Law Library. They do not have a document camera, but Have an overhead projector instead in those rooms.

32
THE ELECTRONIC CONSOLE
UPS POWER PROTECTOR MAIN POWER , SWITCHERS CASSETTE DECK VHS POWER UNIT6 PC AXCENT CONTROL PANEL SHURE MIC RECEIVER( for wireless unit)
")
33
Electronic Classrooms continued….
Sometimes you have to check to see if the switcher is on the correct signal button. Data switcher Doc Cam and Video switcher This is where you tweak the projector if necessary c If this wire X is not connected, it The control panel cannot Control the VHS Deck.

34
Amp is located behind this screen. The control panel controls the
Amp and you don’t need to get behind there. Be sure this is on or you won’t get video signal to the LCD This unit is the operating system of the control panel. When you choose options On the control panel, you can see lights changing on this unit. This unit is the “receiver” of the wireless mic unit. If you see lights dancing, you are Getting a signal! This unit MUST be on to use the wireless mic.

35
COMBINING ROOMS IN 120/121 THIS IS THE AMP RACK IN THE CLOSET OF ROOM ARL THIS AMP CONTROLS THE SOUND IN BOTH 120 AND 121 ROOMS. ANYTIME YOU COMBINE ROOMS, YOU MUST ALSO COMBINE AUDIO ON THE AMP RACK.

36
The amps must be combined for both speech and program audio.
These controls adjust volume for the floor Inputs. REMEMBER TO SEPARATE THE CONTROLS AFTER AN EVENT!

37
MORE AUDIO Sometimes you might need a backup plan for a microphone. In this case,you can use the audio inputs that are in the floor of 120,121, or 225. The Volume controls are on the rack in the closets of the rooms. ( For 120/121The are both on the amp in the room 119 closet). You use an XLR cable to plug into the floor with one end and a mic on the other end. This is where You would also plug in any extra mics, such as for a panel discussion. The Controls on the amp are usually labled mics 3, 4, 5, and 6. You’ll have to Work with them to figure out which is which in the floor input because they are not labeled in Room 120/121. In Room 225, the actual inputs are wires with XLR ends and those are labeled.
. You use an XLR cable to plug into the floor with one end and a mic on the other end. This is where You would also plug in any extra mics, such as for a panel discussion. The Controls on the amp are usually labled mics 3, 4, 5, and 6. You’ll have to Work with them to figure out which is which in the floor input because they are not labeled in Room 120/121. In Room 225, the actual inputs are wires with XLR ends and those are labeled.")
38
SLIDE PROJECTORS AND LAST, BUT NOT LEAST..( OR PERHAPS LEAST..)
This is something we rarely check out, but it is good to know How they work and how to change the lamps and so on… Carousel SLIDE PROJECTORS ,Forward and reverse Release Power and fan Focus

39
MORE SLIDE PARTS AND ACCESSORIES

40
BELOW YOU SEE WHERE THE REMOTE PLUGS INAND WHERE THE MODULE
THAT HOLDS THE LAMP GOES. THE REMOTE CONTROLS FORWARD, REVERSE AND FOCUS OF THE SLIDES. IF THE LAMP BLOWS WHILE YOU ARE USING IT, IT IS BEST TO JUST SWITCH OUT THE MODULE BECAUSE THEY ARE TOO HOT TO CHANGE IMMEDIATELY. THEY NEED TO COOL DOWN.

41
Congratulations! You have made it through 3 full hours
Of technical jargon and training! Comments??? Do you want more??? Write down other areas you wish to learn about and we will do this Again!!

42
INDEX AND TROUBLESHOOTING GUIDE
Types of Cables : 2-10 Photos : 2-5 Descriptions : 6 Problems with cables : 7 Converting cables/adapters : 9,10 Overhead Projectors: 11-17 Basics : 11 Changing brightness/switching lamp : 12 ( troubleshooting ) Changing burned out lamp/how to know what kind : 13 Troubleshooting/how to operate 14-17 Document Camera : 18 : How to use them. LCD Projectors: 20-27 Hooking the projector up: 20 Types of Projectors we have: 21-23 Troubleshooting : 24-26 Inline Box: 25, 26 DHCP Settings : 27
 Changing burned out lamp/how to know what kind : 13. Troubleshooting/how to operate Document Camera : 18 : How to use them. LCD Projectors: Hooking the projector up: 20. Types of Projectors we have: Troubleshooting : Inline Box: 25, 26. DHCP Settings : 27.")
43
INDEX CONTINUED.. Can I watch TV through an LCD projector? : 29
Why is the image lop-sided?: 30 Electronic Classrooms ( Arlington ) 31-37 Please see photos of the Electronic console for descriptions of Equipment and what each one does. How do you hook up extra mics in Room 120/121 in the New Building? : 37 Slide Projectors :
 Please see photos of the Electronic console for descriptions of. Equipment and what each one does. How do you hook up extra mics in Room 120/121 in the New Building : 37. Slide Projectors :")
Similar presentations


 Ltd>")


