Download presentation
Presentation is loading. Please wait.

1
UV mapping is a process of applying textures to an object by hand Figure: Blender model textured through a UV map

4
1. Start with a simple mesh, such as a sphere or cube. 2. Split the screen into two views, and change one of them to UV/image editor, using the editor icon in the header strip. 3. Enter edit mode and choose edge select mode, as shown in Figure

5
4. Select the edges (Shift-RMB) that will be seams. Try to select areas that when cut will result in the mesh being able to unfold into a flat pattern. Press Ctrl+E and choose Mark Seam from the pop-up menu. 5. When you think you have achieved well- placed seams, press A to select the full mesh, then press U, and then select Unwrap from the pop-up menu. Blender will attempt to flat-unwrap your mesh in the UV editor window.

6
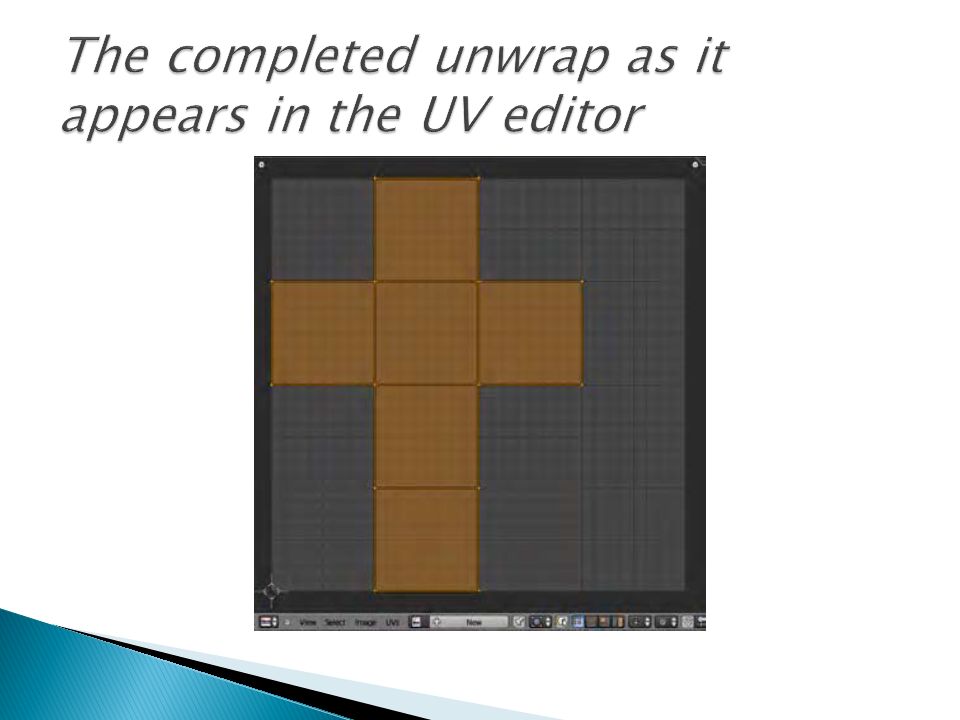
The unwrapped pattern in the UV editor window is Blender’s best guess at how the pattern should be arranged. You can rearrange the layout if you wish. Simply select the vertices in the UV layout and move them around using the G,S, and R keys, just as you would arrange vertices of a model in 3D view.

9
Once your object is unwrapped and a texture is applied to its material through UV coordinates, it is possible to paint directly onto the mesh within Blender itself This is a powerful technique because it allows you to paint directly against the surface of our model without having to visualize (in your head) what the results would be like were you to paint the unwrapped UV map texture.
 what the results would be like were you to paint the unwrapped UV map texture.")
10
1. Go into texture paint mode, using the mode selection drop-down. 2. Press T to bring up the Tool Shelf, which should now display brush options similar to those found in a paint program like Photoshop or Gimp. By default, the chosen brush (which can be changed by LMB-clicking the big image) should be set to TexDraw. 3. To ensure the brush paints a strong line, move the Strength slider to the right, to a value of 1.000. 4. Choose a color from the palette circle above.
 should be set to TexDraw. 3. To ensure the brush paints a strong line, move the Strength slider to the right, to a value of 4. Choose a color from the palette circle above..")
11
5. Draw on the model using the LMB. The texture in the UV window should immediately update to reflect your work in the 3D view, as shown in Figure

12
Note that when the “Enable image painting mode” button is enabled (this button is shown in Figure and is located in the header strip of the UV/Image editor view), then you can also paint with the mouse directly onto the UV/Image editor view (the unwrapped image).
, then you can also paint with the mouse directly onto the UV/Image editor view (the unwrapped image).")
13
Draw: This is your basic paintbrush. Use it to draw lines. Soften: This creates a blur effect. Note that Soften only seems to work properly when used with the UV editor window, but it works like Draw (it paints color) when used in the 3D view. This is most likely a bug to be fixed in a future release of Blender. Clone: Place the 3D cursor in one area (in texture paint mode, Ctrl-LMB-click to reposition the cursor) and paint in another using the LMB. The texture from the location of the 3D cursor duplicates at the second painting area. You should keep the LMB held down while painting or else the paint will reset itself to the position of the cursor. Smear: This is a smudge tool allowing colors to mix, as when working with charcoal or chalk pastel.
 when used in the 3D view. This is most likely a bug to be fixed in a future release of Blender. Clone: Place the 3D cursor in one area (in texture paint mode, Ctrl-LMB-click to reposition the cursor) and paint in another using the LMB. The texture from the location of the 3D cursor duplicates at the second painting area. You should keep the LMB held down while painting or else the paint will reset itself to the position of the cursor. Smear: This is a smudge tool allowing colors to mix, as when working with charcoal or chalk pastel..")
14
The texture is separate from the Blender file, so you will lose it if you don’t make an effort to save the image from the UV editor. In the UV/Image editor, you can see the resulting image of your texture painting, and there is an Image menu in the header strip, possibly followed by an asterisk symbol. As stated earlier, an asterisk next to the Image menu indicates that the current texture has not been saved. Follow the menu through Image ➤ Save to do this.

16
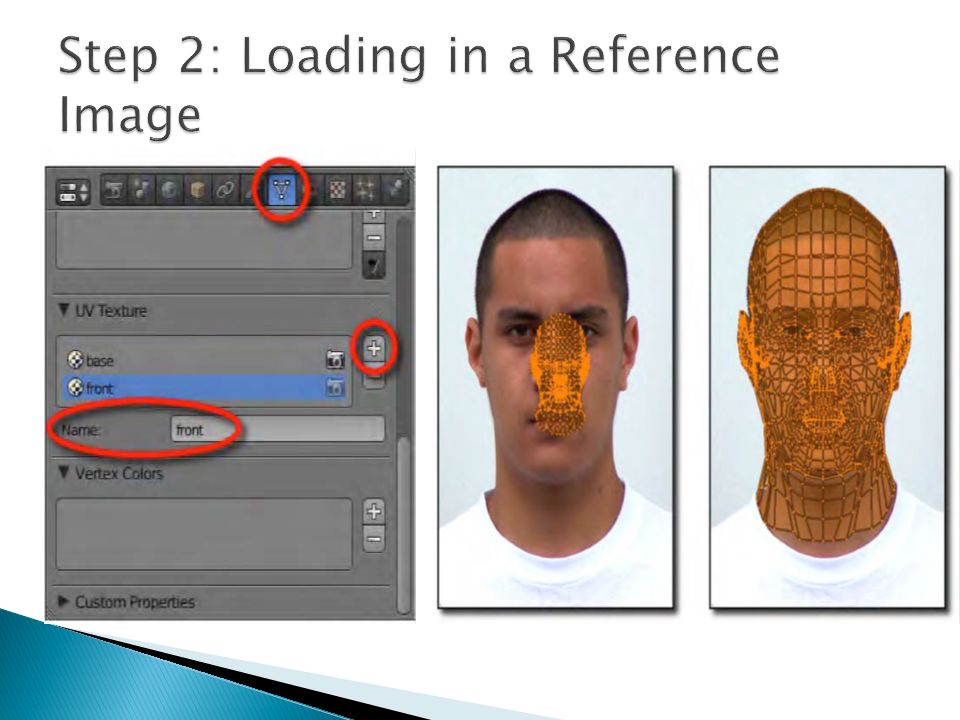
Projection painting takes texture painting one step further. Instead of painting with colors, the settings are changed in order to paint with photographic textures taken directly from reference photos. Texture a head model based on reference photos of the front, side, and back views

17
1. First of all, unwrap your mesh and arrange the UV layout to make the most of the available space. As shown in Figure, in the UV Texture area on the Object Data tab, rename the UV layout base. Make sure you are in edit mode, and press A to select all vertices. This ensures that you will assign the UV texture to the current mesh for the base layout when you carry out the steps in the next section.

18
In the UV editor window, create a new image (Image ➤ New). Save the image with a name like base.tga or skin.tga. The image is shown in Figure.

21
Once working, texture painting looks like magic Figure:- Projection painting in progress

22
1. On the Object Data tab, choose base as the current UV map and texture. This will become the current mesh texture, and is the one we will be painting onto. 2. Switch to texture paint mode, as you did with texture painting earlier on. 3. Under Brush, choose Clone. 4. Set the strength of the brush to the maximum: 1.000. 5. Make sure Project Paint is on. 6. Still within the Project Paint area, make sure Layer is checked. 7. To the right of Layer is the name of one of the UV layers. Select it and choose front.

23
Step 4: Save, Save, Save (Can I Say It Enough?)
")
24
Figure - Simple car model with texture

25
Both normal maps and bump maps add detail to the surface texture of a model in the form of bumps and dents, making the surface geometry appear a lot more detailed than it actually is.

26
A coin was photographed with lighting from three different angles. When these shotswere combined with the correct color for each angle, they produced a working normal map foruse in Blender.

27
Bump maps are grayscale height maps, with the lighter shades representing added height to the surface at any point. Being grayscale, this is the easiest of the two methods to use if you want to touch up the result in a 2D paint program like Photoshop or Gimp. Normal maps are tricolor (based on red, green, and blue). Instead of height data, the color of each pixel in a normal map represents the angle that the area is slanted. One way to think of this is to imagine that the surface is illuminated by three different colored spotlights from different angles (although the overall tone of a normal map usually has a bluish tinge). Because the lighting is simulated from three angles (as opposed to the single-angled top-down grayscale bump map method), normal maps are the more physically accurate of the two.
. Instead of height data, the color of each pixel in a normal map represents the angle that the area is slanted. One way to think of this is to imagine that the surface is illuminated by three different colored spotlights from different angles (although the overall tone of a normal map usually has a bluish tinge). Because the lighting is simulated from three angles (as opposed to the single-angled top-down grayscale bump map method), normal maps are the more physically accurate of the two..")
28
Thanks.

Similar presentations


 MastertextAformattedplaceholderforthemainslidetext(thisisalsotheobject.>")