Download presentation
Presentation is loading. Please wait.

1
www.folio3.com Folio3 IPhone Training Session 2 Testing App on device Presenter: Imam Raza

2
www.folio3.com Joining the iphone Developer programmer Enroll for iphone developer programm at below URL http://developer.apple.com/programs/iphone/ Enrollment into this program currently costs $99 per year After completing enrollment process: – Navigate to http://developer.apple.com – Click on the Member Center link located near the top right hand corner of the screen. – On the resulting page enter the Apple ID and password associated with your iPhone Developer Program membership to access the member center home page as illustrated in the following figure.

3
www.folio3.com

4
Familiarizing with Vocabulary Provisioning Profile Certificate is a combination of: Developer Certificates Devices UUIDs AppIDs

5
www.folio3.com Developer Certificate

6
www.folio3.com Creating an iPhone Development Certificate Signing Request Any apps that are to be installed on an iPhone must first be signed using an iPhone Development Certificate.Below are steps to generate it: Generate a Certificate Signing Request (CSR). – Begin this process by opening the Keychain Access tool on your Mac system – This tool can be found in the Applications -> Utilities folder See below figure:

7
www.folio3.com Generating Certificate Certificate Request(CSR)
")
8
www.folio3.com Generating Certificate Certificate Request(CSR) Within the Keychain Access utility, perform the following steps: Keychain Access -> Preferences Select the Keychain Access -> Preferences menu and select Certificates in the resulting dialog:
 Within the Keychain Access utility, perform the following steps: Keychain Access -> Preferences Select the Keychain Access -> Preferences menu and select Certificates in the resulting dialog:")
9
www.folio3.com Generating Certificate Certificate Request(CSR) Within the Preferences dialog make sure that the online Certificate Status Protocol (OCPS) and Certificate Revocation List (CRL) settings are both set to Off, then close the dialog. Keychain Access -> Certificate Assistant -> Request a Certificate from a Certificate Authority Select the Keychain Access -> Certificate Assistant -> Request a Certificate from a Certificate Authority.

10
www.folio3.com Generating Certificate Certificate Request(CSR)
")
11
www.folio3.com Generating Certificate Certificate Request(CSR) Clicking the Continue button will prompt for a file and location into which the CSR is to be saved.
 Clicking the Continue button will prompt for a file and location into which the CSR is to be saved.")
12
www.folio3.com Generating Certificate Certificate Request(CSR) Verify that the 2048 bits key size and RSA algorithm are selected before clicking on the Continue button.
 Verify that the 2048 bits key size and RSA algorithm are selected before clicking on the Continue button.")
13
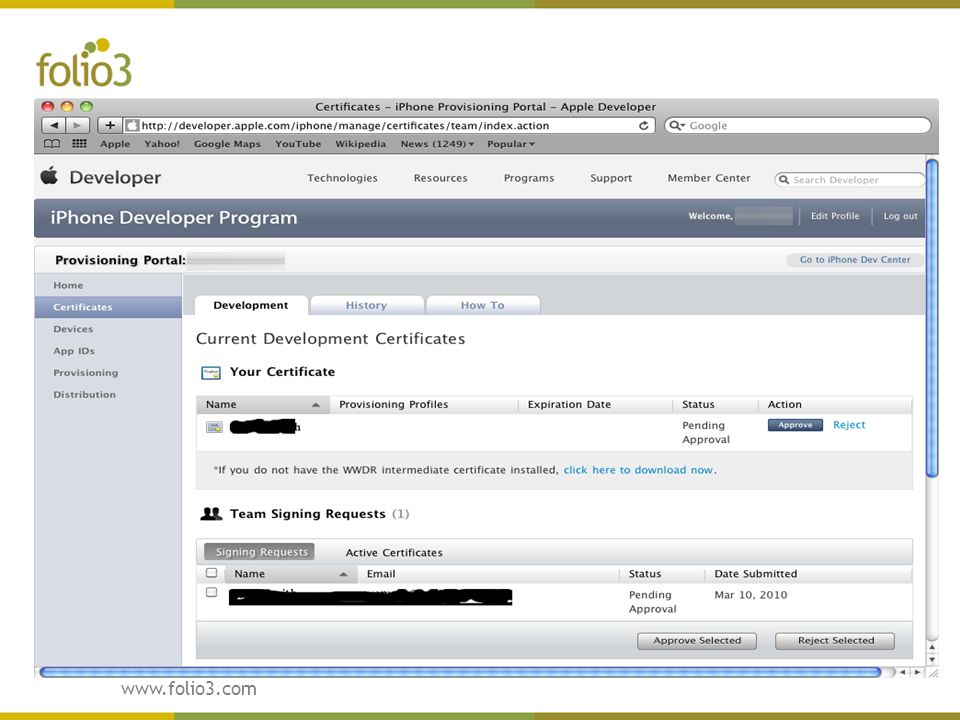
www.folio3.com Submitting the iPhone Development Certificate Signing Request Having created the Certificate Signing Request (CSR) the next step is to submit it for approval. iPhone Provisioning Portal Under Developer Program Resources on the main member center home page select iPhone Provisioning Portal. Within the portal, select the Certificates link located in the left hand panel to display the following page:

14
www.folio3.com Submitting the CSR

15
www.folio3.com Submitting the CSR Request Certificate In previous figure Click on the Request Certificate button. Create an iPhone Development Certificate Scroll down to the bottom of the text under the heading Create an iPhone Development Certificate click on the Choose File button. In the resulting file selection panel, navigate the certificate signing request file created in the previous section and click on Choose.

16
www.folio3.com Submitting CSR Once your file selection is displayed next to the Choose File button, click on the Submit button located in the bottom right hand corner of the web page. Pending Approval At this point you will be returned to the main Certificates page where your certificate will be listed as Pending Approval as shown in below figure. If you are not the Team Admin, you will need to wait until that person approves your request

17
www.folio3.com
18
Installing certificate on iphone

19
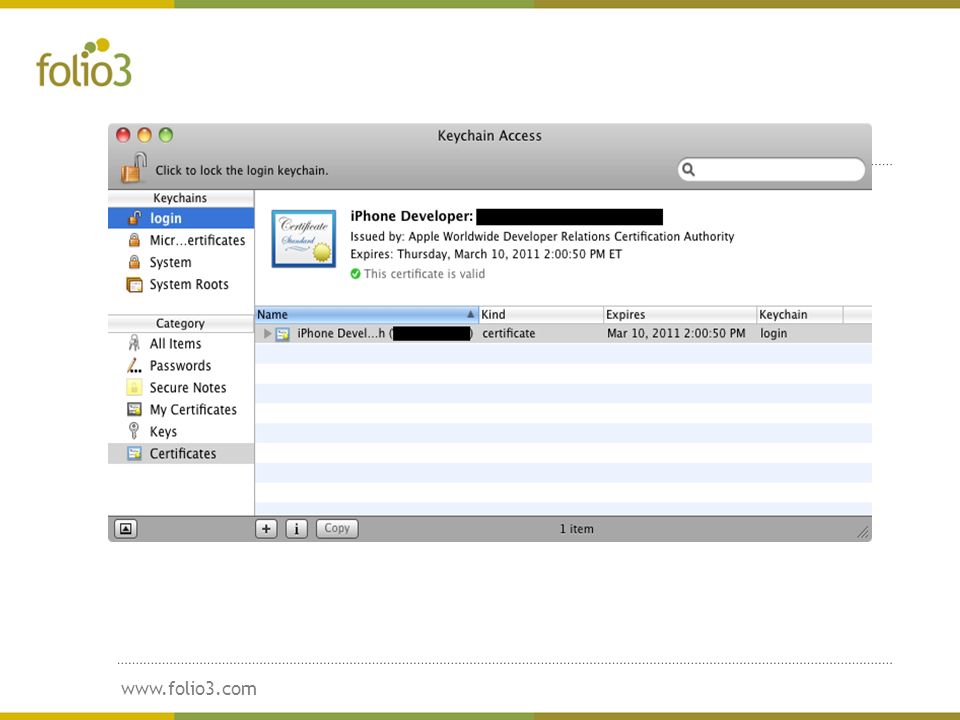
www.folio3.com Installing an iPhone Development Certificate Download the certificate from the iPhone Provisioning Portal by clicking on the Download button located on the certificates page as shown in previous figure. Once the file has downloaded, double click on it to load it into the Keychain Access tool. The certificate will then be listed together with a status as shown in next figure:

20
www.folio3.com
21
Adding Devices on Portal

22
www.folio3.com Adding Devices on portal Apple restricts developers to 100 devices per year. The UDID for a device may be obtained either via Xcode or iTunes.

23
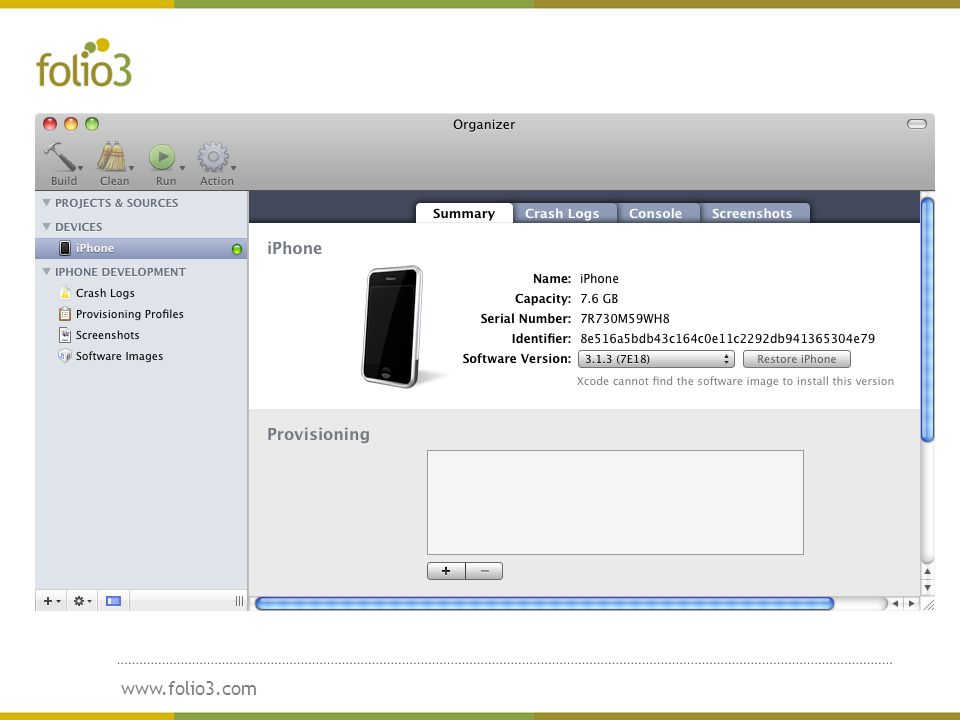
www.folio3.com Getting Device UUID from XCode Connect device with Mac. Once Xcode has launched the Organizer screen will appear displaying summary information about the device. The UDID is listed next to the Identifier label as illustrated in the following figure.

24
www.folio3.com

25
Getting UUID from ITunes launch iTunes Select the device in the left hand pane and review the Summary information page One of the fields on this page will be labeled as Serial Number. Click with the mouse on this number and it will change to display the UDID.

26
www.folio3.com Adding Device on portal On the Add Devices page enter a descriptive name for the device and the 40 character UDID.

27
www.folio3.com Creating App id

28
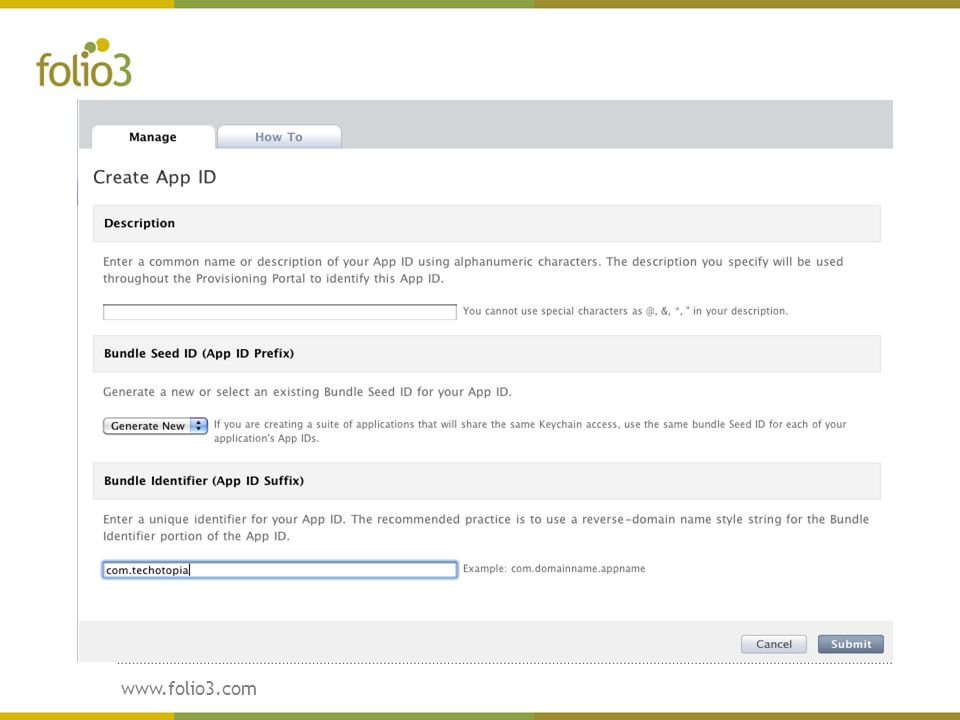
www.folio3.com Creating Application ID Why need to create App ID. – This ID allows your app to be uniquely identified within the Apple iPhone application infrastructure. Steps to create App ID: – select the App IDs link in the provisioning portal – click on the New App ID button to display the Create App ID screen as illustrated below figure: – Enter a suitably descriptive name into the Description field and then make a Bundle Seed ID selection – Enter the Bundle Identifier e.g com.folio3.myApp

29
www.folio3.com
30
Iphone Development Provisioning Profile

31
www.folio3.com Iphone Development Provisioning Profile What is it? The provisioning profile defines which developer certificates are allowed to install an app on a device, which devices can be used and which apps can be installed. Once created, the provisioning profile must be installed on each device on which the designated app is to be installed.

32
www.folio3.com Creating Provisioning Profile select the Provisioning link in the Provisioning Portal and click on the New profile button In the resulting Create iPhone Provisioning Profile screen, perform the following tasks: – In the Profile Name field enter a suitably descriptive name for profile you are creating. – Set the check box next to each certificate to specify which developers are permitted to use this particular profile. – Select an App ID from the menu. – Select the devices onto which the app is permitted to be installed. – Click on the Submit button.

33
www.folio3.com Installing provisioning Profile click on the Download button next to your new profile and save it to your local system Once saved, either drag and drop the file to the Xcode icon in the dock or into the Xcode Organizer window, which may be accessed using the Xcode Window -> Organizer menu option. Once the provisioning profile is installed, it should appear in the Organizer window as follows:

34
www.folio3.com Installing provisioning Profile

35
www.folio3.com Activating device for development To activate this device for development, select it from the left hand panel under the DEVICES sub- heading to display summary information.

36
www.folio3.com Activating device for development To enable the device for development testing, click on the Use for Development button and wait while Xcode connects to the device and gathers some information. Once the activation is complete, the indicator next to the device will change to green and the device summary information will update to provide information about the device and provisioning profiles that are available for use on the device:

37
www.folio3.com
38
Installing Provisional Profile on Device Click on the “+” button on shown at bottom of previous diagram.mobileprovision Navigate to the.mobileprovision file that was downloaded from the iPhone Provisioning Portal.

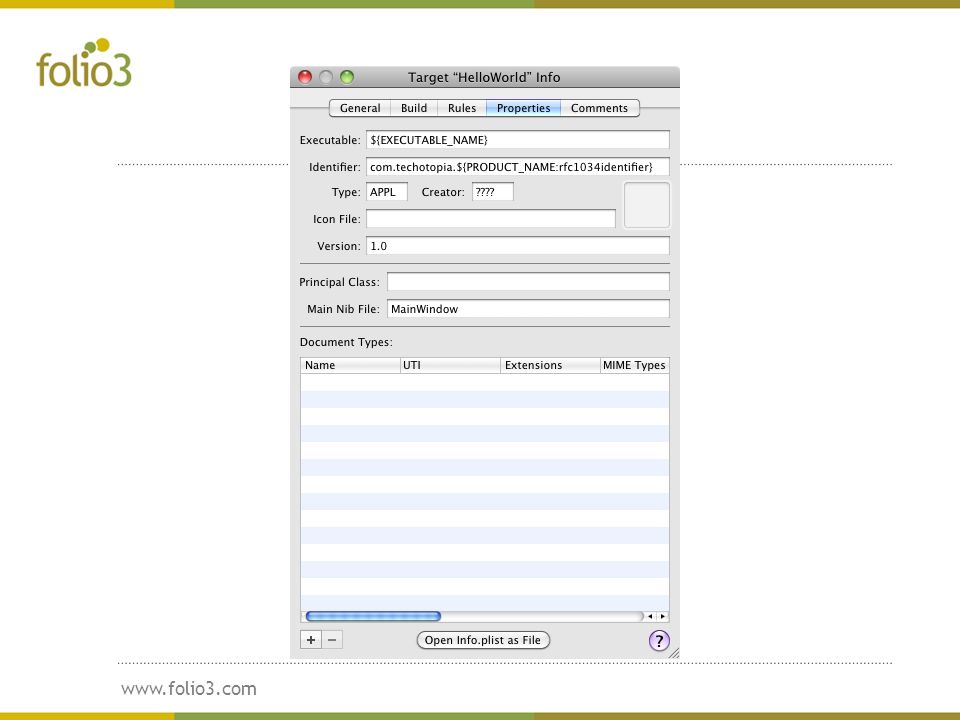
39
www.folio3.com Associating an App ID with an App Before we can install our own app directly onto a device, we must first embed the App ID created in the iPhone Provisioning Portal and referenced in the provisioning profile into the app itself. Below are the steps for it: – right click on the app name located under Targets in the Groups and Files panel located on the left hand side of the Xcode main window – select Get Info from the resulting menu – In the info window, selecting Properties will display the following window. – In the Identifier field enter the App ID you created in the iPhone Provisioning Portal.

40
www.folio3.com
41
Installing App on the Device Located in the top left hand corner of the main Xcode window is drop down menu which, when clicked, provides menu of options to control the target run environment for the current app. Select the device connected in this menu. codesign wants to sign using key Installing.app on iPhone.. Click Build and Run.Once the code is built, Xcode will need to sign the app using your developer certificate. If prompted with a message that reads codesign wants to sign using key in your keychain select either Allow or Always Allow. Once signing is complete the status will change to Installing.app on iPhone..

Similar presentations


