Download presentation
Presentation is loading. Please wait.

1
Struts 2 Introduction

2
The Struts 2 : MVC pattern

3
The Struts 2 : MVC pattern
CONTROLLER—FILTERDISPATCHER The role of the controller is played by the Struts 2 FilterDispatcher. You just need to inform the framework which request URLs map to which of your actions. You can do this with XML-based configuration files or Java annotations. MODEL—ACTION In Struts 2 the model component is implemented by the Action component. VIEW—RESULT A view in Struts 2 can be, HTML / JSP ( most common used technology for java based web applications) XML / XSLT And many more…
 XML / XSLT. And many more…")
4
How Struts 2 works

5
How Struts 2 works The FilterDispatcher has already done its controller work by selecting the appropriate action to handle the request. The figure demonstrates what really happens when the action is invoked by the controller. Figure 1.4 introduces the following new Struts 2 components: ActionContext, interceptors, the ValueStack, and OGNL. This diagram goes a long way toward showing what really happens in Struts 2.

6
How Struts 2 works Interceptors : provides an architectural component in which to define various workflow and cross-cutting tasks so that they can be easily reused as well as separated from other architectural concerns. (they execute both before and after the rest of the request processing). ValueStack as a storage area for all application domain data that will be needed during the processing of a request. OGNL is a powerful expression language (and more) that is used to reference and manipulate properties on the ValueStack.
. ValueStack as a storage area for all application domain data that will be needed during the processing of a request. OGNL is a powerful expression language (and more) that is used to reference and manipulate properties on the ValueStack.")
7
How Struts 2 works The ActionContext contains all of the data that makes up the context in which an action occurs. This includes the ValueStack but also includes stuff the framework itself will use internally, such as the request, session, and application maps from the Servlet API.

8
Declarative architecture
Declarative architecture refer to a type of configuration that allows developers to describe their application architecture at a higher level than direct programmatic manipulation. CONFIGURING THE FRAMEWORK ITSELF If you want to change the URL extension by which the framework recognizes which requests it should handle, you can configure the framework to recognize any extension that you like. By default, Struts 2 looks for URLs ending in .action, but you could configure the framework to look for .do ( the Struts 1.x default extension) or even no extension at all. Other examples of configurable parameters include maximum file upload size and the development mode flag.
 or even no extension at all. Other examples of configurable parameters include maximum file upload size and the development mode flag.")
9
Declarative architecture
Two mechanisms for declaring your architecture, Through XML-based configuration files or through Java annotations. Figure 2.1 demonstrates the dual interface to the declarative architecture.

10
Declarative architecture

11
Declarative architecture
XML-BASED DECLARATIVE ARCHITECTURE Struts 2 allows you to use XML files to describe your application’s desired Struts 2 architectural components. In general, the XML documents will consist of elements that represent the application’s components. Listing 2.1 shows an example of XML elements that declare actions and results.

12
Declarative architecture

13
Declarative architecture
XML-BASED DECLARATIVE ARCHITECTURE The framework uses a specific file as the entry point into this large description. This entry point is the struts.xml file. This file, which resides on the Java classpath , must be created by the developer. While it’s possible to declare all your components in struts.xml, developers more commonly use this file only to include secondary XML files in order to modularize their applications.

14
Declarative architecture
JAVA ANNOTATION–BASED Declarative Architecture A relatively new feature of the Java language, annotations allow you to add metadata directly to Java source files. Java annotations support for tools that can read metadata from a Java class and do something useful with that information. Struts 2 uses Java annotations in this way. If you don’t want to use XML files, the declarative architecture mechanism can be configured to scan Java classes for Struts 2–related annotations. Listing 2.2 shows what these annotations look like.

15
Declarative architecture

16
Declarative architecture
JAVA ANNOTATION–BASED Declarative Architecture The annotation-based mechanism is considered by many to be a more elegant solution than the XML mechanism. The information that must be explicitly specified in the XML elements can be deduced automatically from the Java package structure to which the annotated classes belong. For instance, you don’t need to specify the name of the Java class, as that is clearly implicit in the physical location of the annotations.

17
Declarative architecture
WHICH METHOD SHOULD YOU USE? Ultimately, choosing a mechanism for declaring architecture is up to the developer. The most important thing is to understand the concepts of the Struts 2 declarative architecture. The XML file provides a more centralized notation of an application’s components. The information that must be explicitly specified in the XML elements can be deduced automatically from the Java package structure to which the annotated classes belong.

18
Example : Greeting message
Enter your name and click the Submit button. The application will prepare your customized greeting and return a new page with the name.

19
Example : Greeting message

20
Example : Greeting message

21
Example : Greeting message

22
Example : Greeting message

23
Example : Greeting message

24
Example : Greeting message

25
Struts2 Actions Actions do the core work for each request. They
contain the business logic, hold the data, and then select the result that should render the result page. This is an action-oriented framework; actions are at its heart.

26
Struts2 Actions ACTIONS ENCAPSULATE THE UNIT OF WORK {
One of the central responsibilities of this role is the containment of business logic; actions use the execute() method for this purpose. The following code snippet, from the HelloWorld application, shows the work done by the HelloWorldAction. public String execute() { setCustomGreeting( GREETING + getName() ); return "SUCCESS"; }
 method for this purpose. The following code snippet, from the HelloWorld application, shows the work done by the HelloWorldAction. public String execute() { setCustomGreeting( GREETING + getName() ); return SUCCESS ; }")
27
Struts2 Actions ACTIONS PROVIDE LOCUS FOR DATA TRANSFER
Being the model component of the framework also means that the action is expected to carry the data around.

28
Struts2 Actions ACTIONS PROVIDE LOCUS FOR DATA TRANSFER
The action merely implements JavaBeans properties for each piece of data that it wishes to carry. Request parameters from the form are moved to properties that have matching names. The framework does this automatically. In addition to receiving the incoming data from the request, these JavaBeans properties on the action will also expose the data to the result. The action serves as a centralized data transfer object that can be used to make the application data available in all tiers of the framework.

29
Struts2 Actions ACTIONS RETURN CONTROL STRING FOR RESULT ROUTING
The final duty of an action component is to return a control string that selects the result that should be rendered. The value of the return string must match the name of the desired result as configured in the declarative architecture. For instance, the HelloWorldAction returns the string "SUCCESS". As you can see from our XML declaration, SUCCESS is the name of the one of the result components. <action name="HelloWorld" class="manning.chapterOne.HelloWorld"> <result name="SUCCESS">/chapterTwo/HelloWorld.jsp</result> <result name="ERROR">/chapterTwo/Error.jsp</result> </action>

30
Struts2 Package Whether you declare your action components with XML or Java annotations, when the framework creates your application’s architecture, it’ll organize your actions and other components into logical containers called packages. Struts 2 packages are similar to Java packages. They provide a mechanism for grouping your actions based on commonality of function or domain. Many important operational attributes, such as the URL namespace to which actions will be mapped, are defined at the package level. Packages provide a mechanism for inheritance, which among other things allows you to inherit the components already defined by the framework.

31
Struts2 Package

32
Struts2 Package Using the components of the struts-default package
Using the intelligent default components of the struts-default package is easy. You only need to extend that package when creating your own packages. By definition, an intelligent default shouldn’t require that a developer do anything manually. Indeed, once you extend this package, many of the components automatically come into play. One good example is the default interceptor stack, which we’ve already used in the HelloWorld application. The struts-default package, defined in the system’s struts-default.xml file, declares a huge set of commonly needed Struts 2 components ranging from complete interceptor stacks to all the common result types.

34
Implementing actions Basically, any class can be an action if it wants. It simply must provide an entry method for the framework to invoke when the action is executed. Struts 2 actions don’t have to implement the Action interface. Any object can informally honor the contract with the framework by simply implementing an execute() method that returns a control string. The optional Action interface Most actions will implement the com.opensymphony.xwork2.Action interface. It defines just one method: String execute() throws Exception
 method that returns a control string. The optional Action interface. Most actions will implement the com.opensymphony.xwork2.Action interface. It defines just one method: String execute() throws Exception.")
35
Implementing actions Since the framework doesn’t make any type requirements, you could just put the method in your class without having your class implement this interface. But the Action interface also provides some useful String constants that can be used as return values for selecting the appropriate result. The constants defined by the Action interface are public static final String ERROR "error" public static final String INPUT "input" public static final String LOGIN "login" public static final String NONE "none" public static final String SUCCESS "success" These constants can conveniently be used as the control string values returned by your execute() method. The true benefit is that these constants are also used internally by the framework. This means that using these predefined control strings allows you to tap into even more intelligent default behavior.
 method. The true benefit is that these constants are also used internally by the framework. This means that using these predefined control strings allows you to tap into even more intelligent default behavior.")
36
Implementing actions Actions can be implemented in three ways,
Create a POGO class Create action class by implementing Action interface Create action class by extending ActionSupport class

37
Implementing actions All actions may implement this interface, which exposes the execute() method. Conveniently, the Struts 2 intelligent defaults provide a default action implementation that we inherit if we don’t specify one. This default action has an empty execute() method that does nothing but automatically return the Action interface’s SUCCESS constant as its control string.
 method that does nothing but automatically return the Action interface’s SUCCESS constant as its control string.")
38
Implementing actions static String ERROR The action execution was a failure. static String INPUT The action execution require more input in order to succeed static String LOGIN The action could not execute, since the user most was not logged in static String NONE The action execution was successful but do not show a view static String SUCCESS The action execution was successful. String execute() Where the logic of the action is executed.
 Where the logic of the action is executed.")
39
Implementing actions The ActionSupport class
The ActionSupport class, a convenience class that provides default implementations of the Action interface and several other useful interfaces, giving us such things as data validation and localization oe error messages. Struts 2 provides a rich and highly configurable validation framework, ActionSupport provides a quick form of basic validation that will serve well in many cases. Cross-cutting task such as validation can be factored out of the action’s execution logic through the use of interceptors and interfaces. ActionSupport implements two interfaces that coordinate with one of the interceptors from the default stack, the DefaultWorkflowInterceptor, to provide basic validation. If your package extends the struts-default package, thereby inheriting the default interceptor stack, and your action extends ActionSupport, thereby inheriting implementation of the two necessary interfaces, then you already have everything you need for clean validation of your data.

41
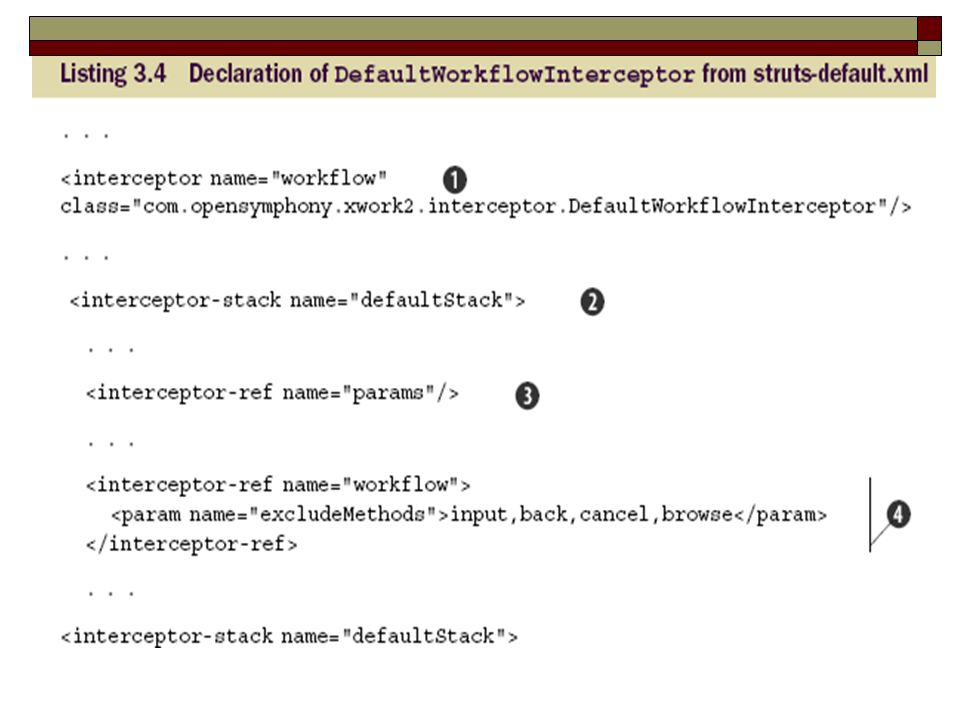
Implementing actions The workflow interceptor from struts-default
Note that this is called the workflow interceptor because it will divert the workflow of the request back to the input page if a validation error is found. Next, we see the declaration of the default interceptor stack. We haven’t included all of the interceptors in this listing. Instead, we’ll focus on the interceptors that participate in the validation process. Note that the params interceptor comes before the workflow interceptor. The params interceptor will move the request data onto our action object. Then, the workflow interceptor will help us validate that data before accepting it into our model. The workflow interceptor must fire after the params interceptor has had a chance to move the data on to the action object. As with most interceptors, sequence is important.

42
Implementing actions Validation using validate() method { --------- }
When the workflow interceptor fires, it’ll first look for a validate() method on the action to invoke. You’ll place your validation logic in validate(). This method is exposed via the com.opensymphony.xwork2.Validateable interface. ActionSupport implements the validate() method, but we have to override its empty implementation with our own specific validation logic. public void validate() { }
 method on the action to invoke. You’ll place your validation logic in validate(). This method is exposed via the com.opensymphony.xwork2.Validateable interface. ActionSupport implements the validate() method, but we have to override its empty implementation with our own specific validation logic. public void validate() { }")
43
Example : Portfolio (Registration.jsp)
")
44
Example : Portfolio (Register.java)
")
45
Example : PortFolio (Register.java)
")
46
Example : PortFolio (Register.java)
")
47
Example : PortFolio (struts.xml)
")
48
Implementing actions Action class extends ActionSupport class, as it implements the below interfaces Action execute() Validateable validate() ValidationAware - addFieldError() The execute() method that contains the business logic, registering a user in this case. After that, we see a set of JavaBeans properties. These are common features of actions; they serve to receive the data from the framework’s automatic transfer and then carry that data throughout the framework’s processing.
 Validateable - validate() ValidationAware - addFieldError() The execute() method that contains the business logic, registering a user in this case. After that, we see a set of JavaBeans properties. These are common features of actions; they serve to receive the data from the framework’s automatic transfer and then carry that data throughout the framework’s processing.")
49
Implementing actions Now we focus the basic validation mechanism provided by ActionSupport. The validate() method that contains all of our logic for checking the validity of the data received by our JavaBeans properties. This leaves this action’s execute() method focused on business logic. The validation logic test each of the three fields to make sure they’re not empty. If a piece of data doesn’t validate, we create and store an error via methods provided by the ActionSupport superclass addFieldError().
 method that contains all of our logic for checking the validity of the data received by our JavaBeans properties. This leaves this action’s execute() method focused on business logic. The validation logic test each of the three fields to make sure they’re not empty. If a piece of data doesn’t validate, we create and store an error via methods provided by the ActionSupport superclass. addFieldError().")
50
Implementing actions Now we focus the basic validation mechanism provided by ActionSupport. The validate() method that contains all of our logic for checking the validity of the data received by our JavaBeans properties. This leaves this action’s execute() method focused on business logic. The validation logic test Each of the three fields to make sure they’re not empty. The user doesn’t already exist in the system If a piece of data doesn’t validate, we create and store an error via methods provided by the ActionSupport superclass addFieldError().
 method that contains all of our logic for checking the validity of the data received by our JavaBeans properties. This leaves this action’s execute() method focused on business logic. The validation logic test. Each of the three fields to make sure they’re not empty. The user doesn’t already exist in the system. If a piece of data doesn’t validate, we create and store an error via methods provided by the ActionSupport superclass. addFieldError().")
51
Implementing actions The Struts 2 Portfolio application uses a simple encapsulation of business logic and data persistence. The PortfolioService object is capable of conducting our simple business needs at this stage. It contains all the business rules in its simple methods, and persists data only in memory.

52
Implementing actions After all the validation logic has executed, control returns to the workflow interceptor. Note that there is no return value on the validate() method. Even though control has returned to the workflow interceptor, it’s not finished. What does the workflow interceptor do now? After calling the validate() method to allow the action’s validation logic to execute, the workflow interceptor will check to see whether any error messages were generated by the validation logic. If it finds errors, then the workflow interceptor will alter the workflow of the request. It’ll immediately abort the request processing and return the user back to the input form, where the appropriate error messages will be displayed on the form.
 method. Even though control has returned to the workflow interceptor, it’s not finished. What does the workflow interceptor do now After calling the validate() method to allow the action’s validation logic to execute, the workflow interceptor will check to see whether any error messages were generated by the validation logic. If it finds errors, then the workflow interceptor will alter the workflow of the request. It’ll immediately abort the request processing and return the user back to the input form, where the appropriate error messages will be displayed on the form.")
53
Implementing actions Two obvious questions remain.
Where were those error messages stored ? How did the workflow interceptor check to see whether any had been created? The com.opensymphony.xwork2.ValidationAware interface defines methods for storing and retrieving error messages. A class that implements this important interface must maintain a collection of error messages for each field that can be validated, as well as a collection of general error messages that pertain only to the action as a whole. ActionSupport class implements this interface so we can readily use the methods. To use them, we invoke the following methods: addFieldError ( String fieldName, String errorMessage ) addActionError ( String errorMessage )
 addActionError ( String errorMessage )")
54
Implementing actions To add a field error, we must pass the name of the field, along with the message that we want displayed to the user. Adding an action-scoped error message is even easier, as you don’t need to specify anything other than the message. The ValidationAware interface also specifies methods for testing whether any errors exist. The workflow interceptor will use these to determine whether it should redirect the workflow back to the input page. If it finds that errors exist, it’ll look for a result with the name input.

55
Using Resource Bundles For Message Text
In our Register action’s validation logic, we set our error messages using String literals. addFieldError ( String fieldName, String errorMessage ) addFieldError( "password", "Password is required.") Using String literals like this creates a two problems, Maintenance of code becomes difficult. Changing languages for different user locales is virtually impossible without some layer of separation between the source code and the messages themselves. The well-established best practice is to bundle these messages together into external and maintainable resource bundles, commonly implemented with simple properties files. Action Support provides built-in functionality for easily managing just that.
 addFieldError( password , Password is required. ) Using String literals like this creates a two problems, Maintenance of code becomes difficult. Changing languages for different user locales is virtually impossible without some layer of separation between the source code and the messages themselves. The well-established best practice is to bundle these messages together into external and maintainable resource bundles, commonly implemented with simple properties files. Action Support provides built-in functionality for easily managing just that.")
56
Using Resource Bundles For Message Text
ActionSupport implements two interfaces that work together to provide this localized message text functionality. com.opensymphony.xwork2.TextProvider To provides access to the messages.The getText() method to retrieve our messages from properties files based upon a key. This interface exposes a flexible set of methods by which you can retrieve a message text from a resource bundle.No matter which method you use to retrieve your message, you’ll refer to the message by a key. The TextProvider methods will return the message associated with that key from the properties file associated with your action class. com.opensymphony.xwork2.LocaleProvider It provides a basic internationalization solution for the localizing message text.The interface exposes a single method, getLocale(). To retrieve the user’s locale based upon the locale setting sent in by the browser.
 method to retrieve our messages from properties files based upon a key. This interface exposes a flexible set of methods by which you can retrieve a message text from a resource bundle.No matter which method you use to retrieve your message, you’ll refer to the message by a key. The TextProvider methods will return the message associated with that key from the properties file associated with your action class. com.opensymphony.xwork2.LocaleProvider. It provides a basic internationalization solution for the localizing message text.The interface exposes a single method, getLocale(). To retrieve the user’s locale based upon the locale setting sent in by the browser.")
57
Using Resource Bundles For Message Text
Getting started with a properties file resource bundle is easy. First, we need to create the properties file and give it a name that mirrors the action class for which it provides the messages. The following code snippet shows the contents from our Register action’s associated properties file, Register.properties user.exists=This user already exists. username.required=Username is required. password.required=Password is required. portfolioName.required=Portfolio Name is required.

58
Using Resource Bundles For Message Text

59
Using Resource Bundles For Message Text
Getting started with a properties file resource bundle is easy. First, we need to create the properties file and give it a name that mirrors the action class for which it provides the messages. The following code snippet shows the contents from our Register action’s associated properties file, Register.properties (Resource Bundle – property file) user.exists=This user already exists. username.required=Username is required. password.required=Password is required. portfolioName.required=Portfolio Name is required.
 user.exists=This user already exists. username.required=Username is required. password.required=Password is required. portfolioName.required=Portfolio Name is required.")
60
Using Resource Bundles For Message Text
Getting started with a properties file resource bundle is easy. First, we need to create the properties file and give it a name that mirrors the action class for which it provides the messages. The following code snippet shows the contents from our Register action’s associated properties file, Register.properties (Resource Bundle – property file) user.exists=This user already exists. username.required=Username is required. password.required=Password is required. portfolioName.required=Portfolio Name is required.
 user.exists=This user already exists. username.required=Username is required. password.required=Password is required. portfolioName.required=Portfolio Name is required.")
61
Object-backed JavaBeans properties
The params interceptor, included in the defaultStack, automatically transfers data from the request to our action objects. To enable this transfer, the developer needs only to provide JavaBeans properties on her actions, using the same names as the form fields being submitted. This is easy, but we need to collect these individually transferred data items and transfer them to an application domain object. (This code we have to instantiate)
")
62
Object-backed JavaBeans properties
Why not ask the framework to go ahead and transfer the data directly to our User object? Why not ask the framework to instantiate the user object for us? Since Struts 2 provides powerful data transfer and type conversion facilities, we can ask for these things and get them. In this case, it’s simple. Let’s rewrite our Register action so that it replaces the individual JavaBeans properties with a single property backed by the User object itself. Listing 3.8 shows the new version of our new action as implemented in the ObjectBackedRegister class.

63
Object-backed JavaBeans properties

64
Object-backed JavaBeans properties
This logic is much cleaner because we let the framework handle instantiating our User object and populating its attributes with data from the request.Previously, we’d done this ourselves. In order to let the framework handle this tedious work, we simply replaced the individual JavaBeans properties with a single property backed by the User object itself . We don’t even have to create the User object that backs the property because the framework’s data transfer will handle this for us when it starts trying to move the data over. Note that our validation code now must use a deeper notation to reach the data items, because they must go through the user property to get to the individual fields themselves.

65
Object-backed JavaBeans properties
Similarly, we also have to make a couple of changes in the way we reference our data from our results, JSPs in this case. First of all, we have to change the field names in the form that submits to our new action. The bottom line is that we now have another layer in our JavaBeans properties notation. The following code snippet shows the minor change to the textfield name in our form, found in our Registration_OB.jsp page. <s:textfield name="user.username" label="Username"/> The following code snippet shows <h5>Congratulations! You have created </h5> <h3>The <s:property value="user.portfolioName" /> Portfolio</h3>

66
ModelDriven actions ModelDriven actions depart from the use of JavaBeans properties for exposing domain data. com.opensymphony.xwork2.ModelDriven (Interface) Expose an application domain object via the getModel() method. The interceptor is already in the default stack; the data transfer is still automatic and even easier to work with than previous techniques. In this case, it’s the data that comes in from the request and is altered by the execution of the business logic. That data is then made available to the view, JSP pages in the case of our Struts 2 Portfolio application. Listing 3.9 shows the new action code from the ModelDrivenRegister class.
 Expose an application domain object via the getModel() method. The interceptor is already in the default stack; the data transfer is still automatic and even easier to work with than previous techniques. In this case, it’s the data that comes in from the request and is altered by the execution of the business logic. That data is then made available to the view, JSP pages in the case of our Struts 2 Portfolio application. Listing 3.9 shows the new action code from the ModelDrivenRegister class.")
67
ModelDriven actions

68
ModelDriven actions ModelDriven actions depart from the use of JavaBeans properties for exposing domain data. com.opensymphony.xwork2.ModelDriven (Interface) Expose an application domain object via the getModel() method. The interceptor is already in the default stack; the data transfer is still automatic and even easier to work with than previous techniques. In this case, it’s the data that comes in from the request and is altered by the execution of the business logic. That data is then made available to the view, JSP pages in the case of our Struts 2 Portfolio application. Listing 3.9 shows the new action code from the ModelDrivenRegister class.
 Expose an application domain object via the getModel() method. The interceptor is already in the default stack; the data transfer is still automatic and even easier to work with than previous techniques. In this case, it’s the data that comes in from the request and is altered by the execution of the business logic. That data is then made available to the view, JSP pages in the case of our Struts 2 Portfolio application. Listing 3.9 shows the new action code from the ModelDrivenRegister class.")
69
ModelDriven actions However, we don’t incur any depth of reference penalty in our view layer. All references in the JSP pages return to the simplicity of the original Register action that used the simple, individual JavaBeans properties for data transfer. The following code snippets, from Registration_MD.jsp <s:textfield name="username" label="Username"/> RegistrationSuccess.jsp <h5>Congratulations! You have created </h5> <h3>The <s:property value="portfolioName" /> Portfolio</h3>

70
File uploading Most of you will have to implement file upload at some point. Our sample application, the Struts 2 Portfolio, will need to upload some image files. So let’s learn how our actions can work with an interceptor from the default stack to implement ultraclean and totally reusable file uploading.

71
File uploading Struts 2 provides built-in help for file uploading.
In this case, the default interceptor stack includes the FileUpload Interceptor. struts-default.xml is the system file that defines all of the built-in components. Listing 3.10 shows the elements from that file that declare the fileUpload interceptor and make it a part of the default interceptor stack.

72
File uploading

73
File uploading As you can see, the struts-default package contains a declaration of the fileUpload interceptor, backed by the org.apache.struts2.interceptor.FileUpload Interceptor implementation class. This interceptor is then added to the default- Stack so that all packages extending the struts-default package will automatically have this interceptor acting on their actions. We make our Struts 2 Portfolio packages extend this package to take advantage of these built-in components.

74
File uploading What does the fileUpload interceptor do?
The fileUpload interceptor creates a special version of the automatic data transfer mechanisms we saw earlier. With the previous data transfers, we were dealing with the transfer of form field data from the request to matching JavaBeans properties on our action objects. The params interceptor, also part of the defaultStack, was responsible for moving all of the request parameters onto the action object wherever the action provided a JavaBeans property that matched the request parameter’s name. In listing 3.10, you can see that the defaultstack places the fileUpload interceptor just before the params interceptor. When the fileUpload interceptor executes, it processes a multipart request and transforms the file itself, along with some metadata, into requestparameters. It does this using a wrapper around the servlet request. Table 3.2 shows therequest parameters that are added by this fileUpload interceptor.

75
File uploading

76
File uploading After the fileUpload interceptor has exposed the parts of the multipart request as request parameters, it’s time for the next interceptor in the stack to do its work. Conveniently, the next interceptor is the params interceptor. When the params interceptor fires, it moves all of the request parameters, including those listed in table 3.2, onto the action object. Thus, all a developer needs to do to conveniently receive the file upload is add JavaBeans properties to her action object that match the names in table 3.2.

77
File uploading We’ve also referred to the role of interceptors in terms of preprocessing and postprocessing. In the case of the fileUpload interceptor, the preprocessing is the transformation of the multipart request into request parameters that the params interceptor will automatically move to our action. The postprocessing comes when the interceptor fires again after our action to dispose of the temporary version of the uploaded file.

78
File uploading The Struts 2 Portfolio uses this file upload mechanism to upload new images to the portfolio. The first task is presenting a form through which users can upload files. You can visit the image upload page by first creating an account in the Struts 2 Portfolio sample application. Once you’ve created an account, choose to work with your portfolio and choose to add a new picture.You’ll see a page presenting you with a simple form to upload an image. The following code snippet, from chapterThree/ImageUploadForm.jsp, shows the markup that creates the form you see: Table 3.2 Request parameters exposed by the FileUpload interceptor Parameter name Parameter type and value [file name from form] File—the uploaded file itself [file name from form]ContentType String—the content type of the file [file name from form]FileName String—the name of the uploaded file, as stored on the server.

79
File uploading

80
File uploading

Similar presentations


>")

 that enables the interaction between users and servers.>")


 Lecture 9 JavaServer Pages (JSP) (Based on Møller.>")
 is a server-side programming technology that enables the creation of dynamic,>")
 Matt Fierst Computer Resource Team OracleWorld 2003 - Session 36321.>")