Download presentation
Presentation is loading. Please wait.

1
Eyes Inspection Visual Acuity Visual Fields Pupillary Response
Fundoscopic Exam Physical Examination: Eyes Inspection Visual acuity Visual Fields Pupillary Response Fundoscopic Exam

2
my

4
Eye Examination Inspection
11._____ Inspects external ocular (eye) structures (lids, conjunctiva, iris, cornea, pupils) 12._____ Gently moves eyelids up and down to obtain a better view 11.Inspects external ocular (eye) structures (lids, conjunctiva, iris, cornea, pupils) 12.Gently moves eyelids up and down to obtain a better view
 structures (lids, conjunctiva, iris, cornea, pupils) 12._____ Gently moves eyelids up and down to obtain a better view. 11.Inspects external ocular (eye) structures (lids, conjunctiva, iris, cornea, pupils) 12.Gently moves eyelids up and down to obtain a better view.")
5
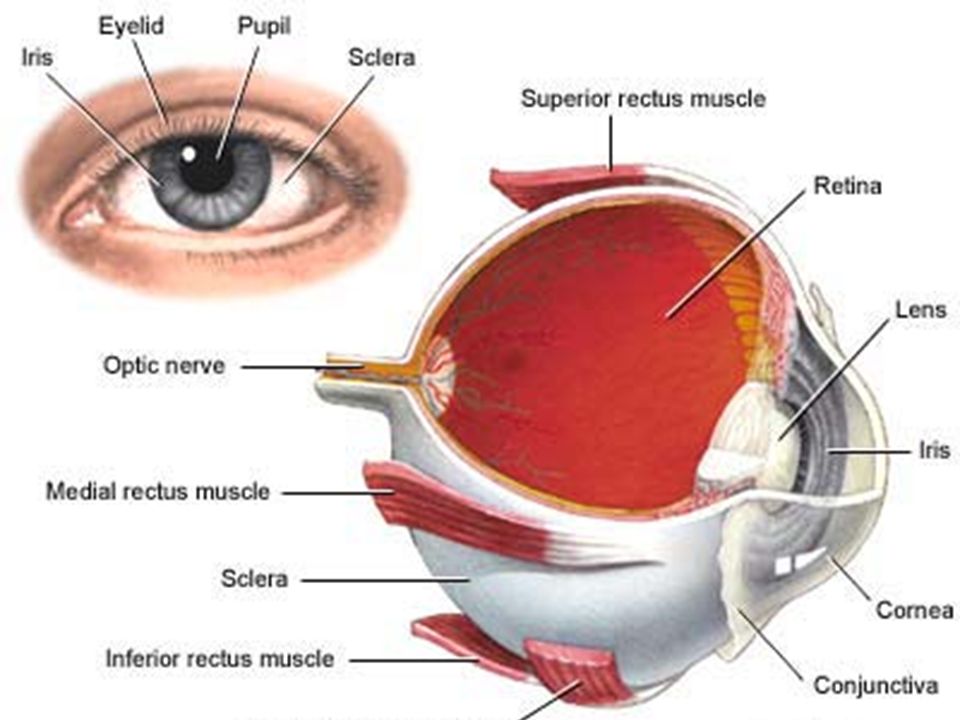
Important landmarks of the external eye

6
Eye: Inspection 1. Structures to Inspect Position and alignment of eyes Eyebrows Eyelids Lacrimal Apparatus Conjunctiva and sclera Cornea and lens Iris Pupils 2. Facilitate visualization Move lower lid down ask pt to look up Move upper lid up ask pt to look down

7
External examination Visual acuity Visual fields Extraocular muscle movements Ocular surface examination Pupils Intra ocular pressure Ophthalmoscopy

8
Inspection 11. Structures to Inspect Position and alignment of eyes
Eye: Inspection 11. Structures to Inspect Position and alignment of eyes Eyebrows Eyelids Lacrimal Apparatus Conjunctiva and sclera Cornea and lens Iris Pupils 12. Facilitate visualization Move lower lid down ask pt to look up Move upper lid up ask pt to look down 11. Structures to Inspect Position and alignment of eyes Eyebrows Eyelids Lacrimal Apparatus

9
Anatomy Extraocular movements Medial Lateral Upward Downward

10
Eyes Visual Acuity 13.Checks acuity with Snellen and from proper distance 14.Checks acuity both eyes separately 13._____ Checks acuity with Snellen and from proper distance 14._____ Checks acuity both eyes separately

11
Hand held eye chart Snelling Eye Chart Snelling Eye Chart

13
13, 14. Visual Acuity Hold card approx 14” from pt’s nose Ask pt to cover one eye Read smallest line Cover other eye and repeat 13, 14. Visual Acuity Hold card approx 14” from pt’s nose Ask pt to cover one eye Read smallest line Cover other eye and repeat

14
Extraocular Movements
Eyes Extraocular Movements Extraocular Movements 15. Evaluates extraocular movement (big H) 16. Checks convergence and accommodation (follows finger from far to near) Extraocular Movements 15. Evaluates extraocular movement (big H) 16. Checks convergence and accommodation (follows finger from far to near)
 16. Checks convergence and accommodation (follows finger from far to near) Extraocular Movements. 15. Evaluates extraocular movement (big H) 16. Checks convergence and accommodation (follows finger from far to near)")
15
Extraocular Muscles and Direction of Movement
Extraocular Movements The extraocular movements of each are controlled by the 4 rectus and 2 oblique muscles The extraocular movements may be tested by having the patient move the eye in the direction controlled by each muscle. This may be accomplished by having the patient move their eyes in the six cardinal direction depicted on this diagram. The extraocular movements of each are controlled by the 4 rectus and 2 oblique muscles The extraocular movements may be tested by having the patient move the eye in the direction controlled by each muscle. This may be accomplished by having the patient move their eyes in the six cardinal direction depicted on this diagram.

16
15. Extraocular Movements
Ask the pt to hold his/her head still and to follow your finger with their eyes 15. Extraocular Movements Ask the pt to hold his/her head still and to follow your finger with their eyes

17
Six Cardinal Positions of Gaze
Extraocular Movements In order to test all of the extraocular muscles ask the pt to follow your finger through the 6 cardinal direction of gaze Right Right and up Right and down Left Left and up Left and down This is accomplished by moving your finger in a large H Need our picture

18
Convergence and Accommodation
Ask pt to focus on your finger held approx 12” away from his/her nose Move your finger towards the pt’s nose The eyes should converge and the pupils constrict (accommodation) Needs illustration
 Needs illustration.")
19
Eyes Visual Fields Visual Fields
1. Visual fields - both eyes independently 2. Visual fields - eight cardinal directions for each eye (N,NE, E, SE, S, SW, W NW) 3. Visual fields - simultaneous stimulation (each eye should only be able to see on hand – the one on that side) 4. Visual Fields – Examiners hands or object to view introduced in the plane half-way between patient and examiner
 3. Visual fields - simultaneous stimulation (each eye should only be able to see on hand – the one on that side) 4. Visual Fields – Examiners hands or object to view introduced in the plane half-way between patient and examiner.")
20
Ask the pt to cover one eye Cover your opposite eye
17 –20: Visual Fields Ask the pt to cover one eye Cover your opposite eye Ask the pt to look straight ahead Place one hand in the plane between the patient and the examiner out of your vision Move the hand and ask the patient when he/she can see your hand 17 –20: Visual Fields Ask the pt to cover one eye Cover your opposite eye Ask the pt to look straight ahead Place one hand in the plane between the patient and the examiner out of your vision Move the hand and ask the patient when he/she can see your hand This is to be completed in all 8 cardinal directions Repeat for the other eye

21
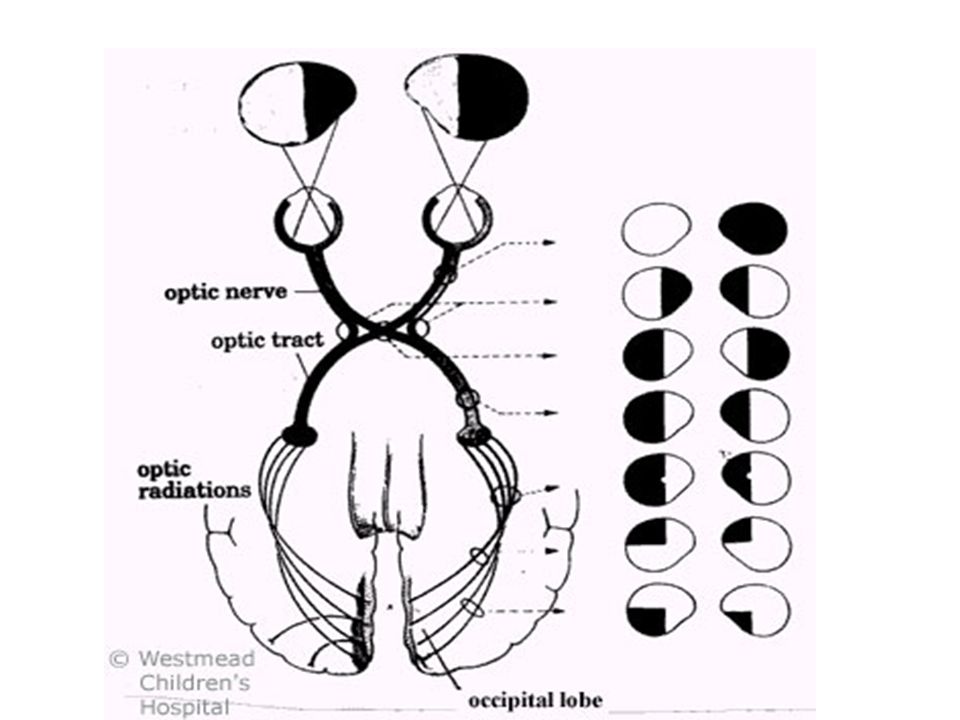
19. Both eyes should be checked for stimulation simultaneously.
Place hands in the lateral field of both eyes ask the pt to note which hand is moving and at some point move both hands. Each of the examiners hands should be visible by only one of the pt’s eyes. If the pt can only see one hand moving when both handsare moving, this may indicate a small defect in the occipital cortex. 19. Both eyes should be checked for stimulation simultaneously. Place hands in the lateral field of both are moving, this may indicate a small defect in the occipital cortex. eyes ask the pt to note which hand is moving and at some point move both hands. Each of the examiners hands should be visible by only one of the pt’s eyes. If the pt can only see one hand moving when both hands

23
Eyes Pupillary Response
21.Pupillary response to light – direct (same eye the light is directed into) 22.Pupillary response – indirect (eye light is not directed into) (watch examiner’s eyes closely, can watch eye dilate) 23.Swinging flashlight test (start in one eye, quickly move to other eye, wait then fast back to original eye and wait) Pupillary Response 21. Pupillary response to light – direct (same eye the light is directed into) 22. Pupillary response – indirect (eye light is not directed into) (watch examiner’s eyes closely, can watch eye dilate) 23. Swinging flashlight test (start in one eye, quickly move to other eye, wait then fast back to original eye and wait) Pupillary Response
 22.Pupillary response – indirect (eye light is not directed into) (watch examiner’s eyes closely, can watch eye dilate) 23.Swinging flashlight test (start in one eye, quickly move to other eye, wait then fast back to original eye and wait) Pupillary Response. 21. Pupillary response to light – direct (same eye the light is directed into) 22. Pupillary response – indirect (eye light is not directed into) (watch examiner’s eyes closely, can watch eye dilate) 23. Swinging flashlight test (start in one eye, quickly move to other eye, wait then fast back to original eye and wait) Pupillary Response.")
24
21, 22. Pupillary Light Response
Observe reflection of pen light in both pupils. Is it symmetrical? Test the papillary response to light Direct response – pupil constricts in examined eye Consensual (Indirect) response – pupil constricts in the opposite eye 21, 22. Pupillary Light Response Observe reflection of pen light in both pupils. Is it symmetrical? Test the papillary response to light Direct response – pupil constricts in examined eye Consensual (Indirect) response – pupil constricts in the opposite eye
 response – pupil constricts in the opposite eye. 21, 22. Pupillary Light Response. Observe reflection of pen light in both pupils. Is it symmetrical Test the papillary response to light. Direct response – pupil constricts in examined eye. Consensual (Indirect) response – pupil constricts in the opposite eye.")
25
Swinging Flashlight Test
Detects optic nerve disease vs occular disease A bright light is placed in front of one eye and moved quickly to the other eye, then one or two seconds later moved quickly back to the first eye. The pupils should remain constricted when the light is taken from one eye quickly to the other Note in the example shown on the right, the patient’s L pupil dilates when the light is shown into it after the light has been “swung” from the R eye. This indicates damage to the optic nerve on the L. The sensory (afferent) stimulus sent to the midbrain is reduced. The affected pupil responds less vigorously to the light dilates from its prior constricted state (from the efferent output from the consensual reaction). This finding is know as a Marcus Gunn pupil and is an afferent defect. Detects optic nerve disease vs occular disease A bright light is placed in front of one eye and moved quickly to the other eye, then one or two seconds later moved quickly back to the first eye. The pupils should remain constricted when the light is taken from one eye quickly to the other
 stimulus sent to the midbrain is reduced. The affected pupil responds less vigorously to the light dilates from its prior constricted state (from the efferent output from the consensual reaction). This finding is know as a Marcus Gunn pupil and is an afferent defect. Detects optic nerve disease vs occular disease. A bright light is placed in front of one eye and moved quickly to the other eye, then one or two seconds later moved quickly back to the first eye. The pupils should remain constricted when the light is taken from one eye quickly to the other.")
26
Fundoscopic Exam of the EYE
Optic disc Disc outline Color Physiologic cup Fundoscopic Exam Optic disc Disc outline Color Physiologic cup Retina Vessels 4 quadrants Fovea and macula Anterior structures Retina Vessels 4 quadrants Fovea and macula Anterior structures

27
Eye Fundoscopic Exam 24. Lights are dimmed
25. Holds and positions ophthalmoscope properly and uses index finger to switch lens 26. Examiner uses R hand R eye to look in R eye 27. Inspects anterior structure with ophthalmoscope - R eye(Start to see anterior structures and move toward 0) 28. Inspects optic nerve - R eye (comes in at 15 with lens at 0 or moving from the positive toward 0) 29. Traces vessels to all four quadrants - R eye 30. Observes macula - R eye (Credit to be given if #28 and look laterally) 31. Examiner uses L hand L eye to look in L eye 32. Inspects anterior structure with ophthalmoscope - L eye (Start at to see anterior structures and move toward 0) 33. Inspects optic nerve - L eye (Comes in at 15 with lens at 0 or moving from the positive towards 0 34. Traces vessels to all four quadrants - L eye 35. Observes macula - L eye (credit to be given if #33 and look laterally) Fundoscopic Exam 24. Lights are dimmed 25. Holds and positions ophthalmoscope properly and uses index finger to switch lens 26. Examiner uses R hand R eye to look in R eye 27. Inspects anterior structure with ophthalmoscope - R eye(Start to see anterior structures and move toward 0) 28. Inspects optic nerve - R eye (comes in at 15 with lens at 0 or moving from the positive toward 0) 29. Traces vessels to all four quadrants - R eye 30. Observes macula - R eye (Credit to be given if #28 and look laterally) 31. Examiner uses L hand L eye to look in L eye 32. Inspects anterior structure with ophthalmoscope - L eye (Start at to see anterior structures and move toward 0) 33. Inspects optic nerve - L eye (Comes in at 15 with lens at 0 or moving from the positive towards 0 34. Traces vessels to all four quadrants - L eye 35. Observes macula - L eye (credit to be given if #33 and look laterally)
 28. Inspects optic nerve - R eye (comes in at 15 with lens at 0 or moving from the positive toward 0) 29. Traces vessels to all four quadrants - R eye. 30. Observes macula - R eye (Credit to be given if #28 and look laterally) 31. Examiner uses L hand L eye to look in L eye. 32. Inspects anterior structure with ophthalmoscope - L eye (Start at to see anterior structures and move toward 0) 33. Inspects optic nerve - L eye (Comes in at 15 with lens at 0 or moving from the positive towards Traces vessels to all four quadrants - L eye. 35. Observes macula - L eye (credit to be given if #33 and look laterally) Fundoscopic Exam. 24. Lights are dimmed. 25. Holds and positions ophthalmoscope properly and uses index finger to switch lens. 26. Examiner uses R hand R eye to look in R eye. 27. Inspects anterior structure with ophthalmoscope - R eye(Start to see anterior structures and move toward 0) 28. Inspects optic nerve - R eye (comes in at 15 with lens at 0 or moving from the positive toward 0) 29. Traces vessels to all four quadrants - R eye. 30. Observes macula - R eye (Credit to be given if #28 and look laterally) 31. Examiner uses L hand L eye to look in L eye. 32. Inspects anterior structure with ophthalmoscope - L eye (Start at to see anterior structures and move toward 0) 33. Inspects optic nerve - L eye (Comes in at 15 with lens at 0 or moving from the positive towards Traces vessels to all four quadrants - L eye. 35. Observes macula - L eye (credit to be given if #33 and look laterally)")
28
Internal Anatomy of the Eye
During the Fundoscopic Exam the ophthalmoscope may be used to visualize the following strutures of the eye: •Optic disc •Disc outline •Color •Physiologic cup •Retina •Vessels •4 quadrants •Fovea and macula •Anterior structures During the Fundoscopic Exam the ophthalmoscope may be used to visualize the following strutures of the eye: •Optic disc •Disc outline •Color •Physiologic cup •Retina •Vessels •4 quadrants •Fovea and macula •Anterior structures

29
Need our picture or permission from Welsh Allen
Ophthalmoscope Lenses (magnification power of lens = diopters) Controlled by diopter dial Black or green numbers - positive numbers - counterclockwise – plus lenses Red numbers – negative numbers –clockwise- minus lenses Light source Brightness controlled by rheostat Various apertures Large – usually use this one Small - small pupils Red free filter - green beam, optic disc pallor and minute vessels changes Slit - Anterior eye, elevation of lesions Grid - size of fundal lesions Ophthalmoscope Lenses (magnification power of lens = diopters) Controlled by diopter dial Black or green numbers - positive numbers - counterclockwise – plus lenses Red numbers – negative numbers –clockwise- minus lenses Light source Brightness controlled by rheostat Various apertures Large – usually use this one Small - small pupils Red free filter - green beam, optic disc pallor and minute vessels changes Slit - Anterior eye, elevation of lesions Grid - size of fundal lesions Need our picture or permission from Welsh Allen
 Controlled by diopter dial. Black or green numbers - positive numbers - counterclockwise – plus lenses. Red numbers – negative numbers –clockwise- minus lenses. Light source. Brightness controlled by rheostat. Various apertures. Large – usually use this one. Small - small pupils. Red free filter - green beam, optic disc pallor and minute vessels changes. Slit - Anterior eye, elevation of lesions. Grid - size of fundal lesions. Ophthalmoscope. Lenses (magnification power of lens = diopters) Controlled by diopter dial. Black or green numbers - positive numbers - counterclockwise – plus lenses. Red numbers – negative numbers –clockwise- minus lenses. Light source. Brightness controlled by rheostat. Various apertures. Large – usually use this one. Small - small pupils. Red free filter - green beam, optic disc pallor and minute vessels changes. Slit - Anterior eye, elevation of lesions. Grid - size of fundal lesions. Need our picture or permission from Welsh Allen.")
30
Need our picture or permission from Welsh Allen
Holding the Opthalmoscope Use the index finger to change lenses (diopters) Holding the Opthalmoscope Use the index finger to change lenses (diopters) Need our picture or permission from Welsh Allen
 Holding the Opthalmoscope. Use the index finger to change lenses (diopters) Need our picture or permission from Welsh Allen.")
31
24-35. Fundoscopic Examination Darken the room
Place the opthalmoscope to 0 diopters and the large round beam Keep index finger on lens disc Use R hand for pt’s R eye and L hand for pt’s L eye Ask pt to fix gaze on a spot on the wall From about 15” away and about 15o lateral look into pt’s eye Observe the red reflex and then move in closer You may rest your opposite hand on the pt’s forehead above the eye to help guide Move the opthalmoscope very close to the pt’s eye If you initially see blood vessels, you can follow the blood vessels toward the disc. They flow like rivers toward the disc. Diopters may need to be adjusted to obtain a good focus Fundoscopic Examination Darken the room Place the opthalmoscope to 0 diopters and the large round beam Keep index finger on lens disc Use R hand for pt’s R eye and L hand for pt’s L eye Ask pt to fix gaze on a spot on the wall From about 15” away and about 15o lateral look into pt’s eye Observe the red reflex and then move in closer You may rest your opposite hand on the pt’s forehead above the eye to help guide Move the opthalmoscope very close to the pt’s eye If you initially see blood vessels, you can follow the blood vessels toward the disc. They flow like rivers toward the disc. Diopters may need to be adjusted to obtain a good focus

32
Once you see the disc, you should note its color and note what percent of the physiologic cup involves the disc. The cup-to-disc ratio should be less than 0.6. You should note the size of the arterioles as compared to the veins. They should be 2/3 to 4/5 the size of veins. Next look in all 4 quadrants of the retina Finally, look at the fovea and macula. This may be accomplished by asking the pt to look at the light Once you see the disc, you should note its color and note what percent of the physiologic cup involves the disc. The cup-to-disc ratio should be less than 0.6. You should note the size of the arterioles as compared to the veins. They should be 2/3 to 4/5 the size of veins. Next look in all 4 quadrants of the retina Finally, look at the fovea and macula. This may be accomplished by asking the pt to look at the light / this site shows a movie of the retinal exam Need illustration

33
Inspecting the Anterior Structures
Rotate the lens progressivly towards the positive diopters to around +10 to +12 visualize the anterior aspects of the eye Inspecting the Anterior Structures Rotate the lens progressivly towards the positive diopters to around +10 to +12 visualize the anterior aspects of the eye

34
Panoptic Ophthalmoscope
Focus the scope on an object about 10 to 15 feet away Put the aperture on the “home position” (green line) Start about 6 inches away at a 15o angle Visualize the fundus and move in until the cup is compressed against the pt’s face Panoptic Ophthalmoscope Focus the scope on an object about 10 to 15 feet away Put the aperture on the “home position” (green line) Start about 6 inches away at a 15o angle Visualize the fundus and move in until the cup is compressed against the pt’s face --Used with permission of Welch Allyn
 Start about 6 inches away at a 15o angle. Visualize the fundus and move in until the cup is compressed against the pt’s face. Panoptic Ophthalmoscope. Focus the scope on an object about 10 to 15 feet away. Put the aperture on the home position (green line) Start about 6 inches away at a 15o angle. Visualize the fundus and move in until the cup is compressed against the pt’s face. --Used with permission of Welch Allyn.")
Similar presentations