Download presentation
Presentation is loading. Please wait.

1
Cow Eye Dissection Welcome to Cow Eye Dissection. This powerpoint was created to be downloaded and used with your students. Please feel free to edit to meet the needs of your students. To fully participate in this professional development, it would be ideal for you to have a cow eye and all the dissection equipment necessary for you to perform the cow eye dissection along with me.

2
Objectives By the end of this lesson, students will be able to:
Demonstrate proper dissection safety techniques. Explore and identify the external anatomy of the cow eye. Explore and identify the internal anatomy of the cow eye. Compare and contrast human and cow eye anatomy Evaluate how the structure of the parts of an eyeball relate to its function. Read this slide as written.

3
Arkansas Frameworks Grade 6 Grade 7 Grade 8 LS.2.6.1 LS.7.1.2 LS.8.1.8
This lesson is geared primarily to the 6th, 7th and 8th grade Arkansas State Frameworks for Life Science.

4
Why Dissect? Dissection allows students to: Practice safety procedures
Construct science process skills Organize the hierarchal relationships of tissues, organs, organ systems and organisms Compare similarities and differences among organisms Connect organism complexity to its diversity Dissection can be a controversial issue. Arguments both for and against dissection can be made related to personal safety, environmental safety, ethics and pedagogy. Opponents of dissection contend: Dissection depletes natural populations Dissection can be unsafe for students in very large or unruly classes Dissection preservatives are toxic and allergenic Dissection may be too much for young students who may be emotionally immature Dissection may focus too much on simple identification rather than on higher order thinking skills. Dissection proponents contend: Dissection can teach students a lot when structures around inquiry questions rather than identifying parts. Additionally dissection allows students to practice safety procedures, construct science process skills, organize the hierarchal relationships of tissues, organs, organ systems and organisms, compare similarities and difference among organisms and connect organism complexity to its diversity.

5
Materials Cow eye specimen Dissection tray or Styrofoam meat tray
Dissection kit with scissors, pins, scalpels, tweezers and probes Gloves Goggles Plastic aprons Student worksheets Before classroom dissection, you will need to obtain cow eye specimens and dissection trays or styrofoam meat trays. Many times you can ask your local butcher to donate the meat trays for your classroom. Additionally, you will need dissection kits that contain scissors, pins, scalpels, tweezers and probes. Students will be required to wear gloves, goggles and plastic aprons and remember to have all student handouts and worksheets copied prior to the lab.

6
General Safety Rules The classroom should be well ventilated
Work space should be flat and free of unnecessary materials All equipment should be clean and unbroken ABSOLUTELY no eating, drinking or gum chewing during dissection activities The general safety rules shown on this slide provide a basic checklist to establish a safe learning environment for dissection. However, your classroom should go beyond these simple rules. Signs and symbols can make your classroom both educational and safe. Make sure your room number is clearly identified and that your students know what the room number is in case of emergency. Post important emergency phone numbers and extensions alongside the fire, storm and earthquake procedures. Integrate signage as part of your rooms’ organization plan. Label where things go. Use lots of pictures and symbols as well as worded labels and instructions. Use bilingual signage if needed for your students. Test your students on the location and usage of fire protection equipment and eye protection equipment. Mark the shower, eyewash and fire extinguisher areas and keep them clear. Check that all safety equipment is maintained and working properly on a routine schedule. Making your students your partner in the care, maintenance and proper use of safety equipment will help to ensure that they respect their science experiences.

7
Sharp Instrument Safety
Prepare a container for disposal of broken instruments or glassware Dispose of the container intact and replace with a new one to prevent others from being cut Inventory all sharp items to ensure all objects remain in the classroom Ensure that students use sharp instruments properly. Remind students they should always cut away from themselves and others Sharp instruments include tools, parts of tools and broken objects with sharp edges or points that can break the skin and cause cuts or other injuries. If you have any sharp instruments such as metal blades, scissors, or glassware, you must have a separate disposal container for them. This container should not be opened or emptied, but disposed of intact and replaced with a new one. It is important that you inform anyone in charge of removing waste from your room how to dispose of these instruments properly. You might want to delete this slide if using this powerpoint with your students.

8
Before we proceed While dissecting, be respectful of your lab partners and of the specimen you are about to explore, observe and learn from. Take extra care with your dissection tools. Your scissors are your most important tool, but be sure to handle them carefully and always double check before cutting. If you have any questions, please ask. This slide was designed to remind students of their behavior before actually performing the dissection. This would be a good time to model all safety precautions for this lab and to remind students of the specific behavior expectations in your classroom. If you feel you would like more information on dissection safety, you are invited to participate in the dissection safety workshop presented on Arkansas IDEAS.

9
Attire Always!! No Exceptions!!!! Wear Gloves Wear Aprons
Wear Goggles (ANSI Z87.1) Always!! No Exceptions!!!! Many clothing fashions are simply inappropriate in a safe science classroom. It may help to stress to students that the science lab is a workplace – an environment where common sense clothing is required. Loosely hanging, floppy clothing and hanging jewelry are not reasonable clothing items for the science lab. Dangling and loose articles such as hats, coats and loose jewelry, should be removed and stored during lab. If a student insists on keeping the article, then cover it with tape or a bandage. Bare midriffs are not acceptable. Absorbent watchbands or wrist ornaments should be removed. Long hair should be secured back behind the shoulders. Shoes should be closed toe and securely tied. Shoes should not be platform or designed in such a way that might make it easier to trip and fall. Many people have allergies to latex, so it is advisable to purchase non –latex or nitrile gloves. Rubber tubing and balloons are also sources of potential problems for students who have allergies to latex. Students should wear aprons to protect their clothing and skin while working in the lab. Make sure the safety goggles purchased are rated ANSI Z These can be purchased through most reputable science equipment supply companies. Contact lenses should be avoided in the science laboratory. Contact lenses can trap chemicals or absorb chemical fumes that can render the eyewash ineffective. Contacts can be worn with well-fitting safety glasses if there is no risk of exposure to strong chemical fumes. If strong chemicals are being used, contacts should be replaced with eyeglasses and goggles should be worn at all times. The best recommendation is contacts out, glasses on to avoid confusion. The decision is up to you, just remember, you are liable should an accident occur. If the student should not have glasses to replace the contacts, get in touch with the students’ parent or guardian. Explain to them the potential hazards and ask them to consult with an ophthalmologist. I would be sure to document all actions taken to establish a safe working environment for the student. Document, Document, Document. Goggles are not only used when chemicals are present. They should also be used in any activity that can generate projectiles. This includes dissection because the preservatives and parts can splash and the instruments are sharp. This rule also applies to any activity requiring rubber bands. Be sure to sanitize goggles between each use. This can be achieved by placing them in an appropriate Ultraviolet cabinet or in hot water and detergent or disinfectant. This will prevent the spread of conjunctivitis and hepatitis.
 Always!! No Exceptions!!!! Many clothing fashions are simply inappropriate in a safe science classroom. It may help to stress to students that the science lab is a workplace – an environment where common sense clothing is required. Loosely hanging, floppy clothing and hanging jewelry are not reasonable clothing items for the science lab. Dangling and loose articles such as hats, coats and loose jewelry, should be removed and stored during lab. If a student insists on keeping the article, then cover it with tape or a bandage. Bare midriffs are not acceptable. Absorbent watchbands or wrist ornaments should be removed. Long hair should be secured back behind the shoulders. Shoes should be closed toe and securely tied. Shoes should not be platform or designed in such a way that might make it easier to trip and fall. Many people have allergies to latex, so it is advisable to purchase non –latex or nitrile gloves. Rubber tubing and balloons are also sources of potential problems for students who have allergies to latex. Students should wear aprons to protect their clothing and skin while working in the lab. Make sure the safety goggles purchased are rated ANSI Z87.1. These can be purchased through most reputable science equipment supply companies. Contact lenses should be avoided in the science laboratory. Contact lenses can trap chemicals or absorb chemical fumes that can render the eyewash ineffective. Contacts can be worn with well-fitting safety glasses if there is no risk of exposure to strong chemical fumes. If strong chemicals are being used, contacts should be replaced with eyeglasses and goggles should be worn at all times. The best recommendation is contacts out, glasses on to avoid confusion. The decision is up to you, just remember, you are liable should an accident occur. If the student should not have glasses to replace the contacts, get in touch with the students’ parent or guardian. Explain to them the potential hazards and ask them to consult with an ophthalmologist. I would be sure to document all actions taken to establish a safe working environment for the student. Document, Document, Document. Goggles are not only used when chemicals are present. They should also be used in any activity that can generate projectiles. This includes dissection because the preservatives and parts can splash and the instruments are sharp. This rule also applies to any activity requiring rubber bands. Be sure to sanitize goggles between each use. This can be achieved by placing them in an appropriate Ultraviolet cabinet or in hot water and detergent or disinfectant. This will prevent the spread of conjunctivitis and hepatitis.")
10
Interesting Facts Look all around without moving your head. Look up, look down, look side to side and all around. You have six muscles surrounding your eye that allows you to look in different directions. However, cows only have four muscles. Therefore, they can only look up, down, left and right. They are not able to roll their eyes like you can. This slide is designed to engage your students in learning about the cow eye, its structure and function. At this time, I would like to play a little game of Simon says. Simon says look up. Look down. No, Simon says look down. Look right, look left. No Simon says look right. Simon says look left. Now, roll your eyes all around. No, Simon says roll your eyes all around. It’s a bit like doing the hokey pokey isn’t it. What’s so cool about this is that humans have the ability to move their eyes in all directions because we have six muscles surrounding our eyes, allowing us to look in different directions. Cows on the other hand, only have four muscles surrounding their eyes. Therefore, cows can only look up, down, left and right. They cannot roll their eyes like you can. I bet the momma cows appreciate that as their babies become teenagers.

11
Interesting Facts Muscle Reach up and feel around your eye. Can you feel the bone of your skull? Fat surrounds your eyeball to keep it from bumping against the bone and getting bruised. The fat and muscle surrounding the cow eye is cut away when dissecting in order to see the eyeball. Feel around your eye. Can you feel the bone of your skull? Fat surrounds your eyeball to keep it from bumping against the bone and getting bruised. Fat is a yellowish-white tissue that cushions the eye from shock. As mentioned previously, cows have four muscles attached to the eye that allows the cow to look up, down, left and right. These muscles are reddish and flat. We will locate these structures momentarily. Fat Optic Nerve

12
External Anatomy Obtain a cow eye, place it in your dissecting pan and rinse with water. Observe the white part of the eye. This is the sclera. The sclera is the outer covering of the eyeball. Sclera Following verbal instructions, a short video will be shown that models the instructions provided on the next few slides. Now that you have a cow eye specimen, see if you can locate the yellowish-white fatty tissue. Also, see if you can identify the four reddish-brown muscles attached to the eye. These are often imbedded or surrounded by fat. Finally, identify the sclera. The sclera is a thick tough, white outer covering of the eyeball. Sclera Fat

13
External Anatomy Locate the eyelids.
Observe the blue portion of the eye. This is the cornea. The cornea starts out clear but becomes cloudy after death. Look through the cornea and locate the iris. The iris is a round black tissue. Locate the pupil. The pupil is the round opening in the center of the eye. Most cow eye specimens will have eyelids attached. However, on rare occasions the eyelids may be removed. Take this time to identify the eyelids. Eyelids are located on top and bottom of the eye. They are moveable covers that protect the eye from dust, bright light and impact. Now observe the blue portion of the eye. This is the cornea. The cornea is a tough, clear covering over the iris and pupil that helps protect the eye. Light bends as it passes through the cornea. This is the first step in making an image on the retina. The cornea begins bending light to make an image; the lens finishes the job. The cornea starts out clear, but becomes cloudy after death. This may make it difficult to see the pupil. You will be able to identify these parts upon further internal investigation. Look through the cornea and locate the iris. The iris is a round, black muscle tissue that controls the amount of light that enters the inner part of the eye. It is suspended between the cornea and lens. In cow’s the iris is brown. Humans irises come in many colors including, brown, blue, green and grey. The iris can change shape, focusing on objects that are close up and objects that are far away. Now locate the pupil. The pupil is the round opening in the center of the eye. It is a dark circle in the center of the iris. The pupil allows light to enter the eye. The size of the pupil is controlled by the iris. Your pupil is round, but the cow’s pupil is oval. In dim light, the pupil enlarges to let in more light. In bright light, the pupil contracts to allow less light to enter the eye. Cornea Pupil Iris

14
External Anatomy On the opposite side of the cornea, locate the optic nerve. The optic nerve is a white cord on the back of the eye about 3 mm thick. The following video will review what we’ve learned about the external anatomy of the eye. Our final external anatomy investigation involves identifying the optic nerve. The optic nerve is located on the opposite side of the cornea. It is a white cord on the back of the eye that is approximately 3 millimeters thick. The optic nerve is a bundle of nerve fibers that carry information from the retina to the brain. The point at which the optic nerve leaves the retina is called the blind spot. Each eye has a blind spot where no light sensitive cells exist. We will investigate this again when we look at the internal anatomy of the eye. Now lets watch a short video clip to review what we’ve done so far. Please feel free to follow along with your specimen should you have one. Optic Nerve

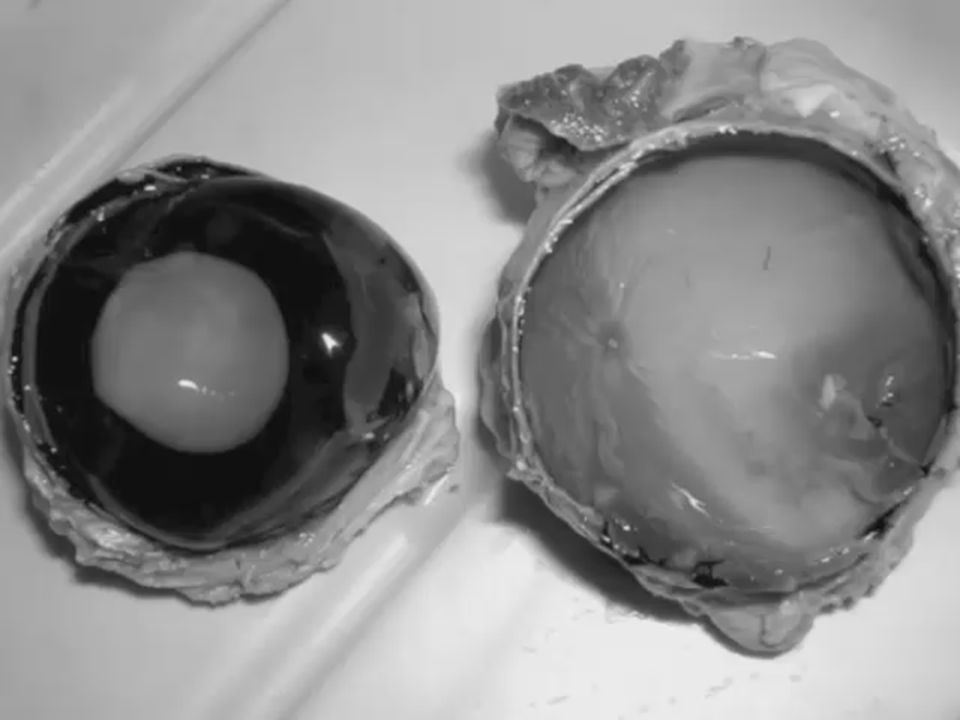
16
Incision 1 Sclera Now remove the fat and muscle surrounding the eye using caution not to remove the optic nerve. Place the eye in the dissecting pan so it is again facing you. Using your scalpel, pierce the white part of the eye (sclera) just behind the edge of the cornea. Make a hole large enough for your scissors. Following verbal instructions, a short video will be shown that models the instructions provided on the next 3-4 slides. Place the cow eye in the dissecting pan so that the cornea is facing you. Using your scalpel, pierce the sclera, which is the white tissue just behind the edge of the cornea. Some fluid may ooze out when the eye is poked. This fluid is the aqueous humor.
 just behind the edge of the cornea. Make a hole large enough for your scissors. Following verbal instructions, a short video will be shown that models the instructions provided on the next 3-4 slides. Place the cow eye in the dissecting pan so that the cornea is facing you. Using your scalpel, pierce the sclera, which is the white tissue just behind the edge of the cornea. Some fluid may ooze out when the eye is poked. This fluid is the aqueous humor.")
17
Incision 2 Using your scissors, carefully cut around the eye using the edge of the cornea as a guide. Lift the eye and turn it as needed to make the cut and be careful not to squeeze the liquid out of the eye. Now, insert your scissors into the punctured tissue and carefully cut around the eye using the edge of the cornea as a guide. You will probably need to lift the eye and turn it as needed to complete the incision. Try to be cautious not to squeeze the aqueous humor or clear fluid out of the eye.

18
Internal Anatomy If a fluid should ooze out, it is called the aqueous humor. This fluid is clear and made of protein and water. The aqueous humor helps give the eye its shape. Should fluid escape from the eye, just remember this is the aqueous humor. This fluid is clear and composed of protein and water. The function of the aqueous humor is to give the eye and cornea its rounded shape. Aqueous Humor

19
Internal Anatomy After completing the cut, carefully remove the front of the eye and lay it in your dissecting tray. Place the back part of the eye in the pan with the inner part facing upward. After you have successfully dissected the eye around the cornea, carefully lay each portion on your dissecting try. Make sure you place the eye so that the inner portion of the eye is facing upward. Now let’s watch a video to review the procedures thus far. Please feel free to follow along with your specimen should you have one.

21
Internal Anatomy Observe the tough tissue of the removed cornea. Cut across the cornea with your scalpel to note its thickness. Observe the iris. The iris is the black tissue of the eye that contains curved muscle fibers Locate the ciliary body. It is located on the back of the iris that has muscle fibers to change the shape of the lens. Again, these sets of slides will be accompanied by a short video that models the instructions provided. Let’s see if we can identify some of the parts we discussed externally. Observe the tough tissue of the cornea. This is the clear tissue that can be seen through the opening called the pupil. The pupil is the hole that lets light into your inner eye. It is the dark circle in the center of your iris. Remember this the cornea may be cloudy instead of clear because the tissue changes upon death. Cut across the cornea with your scalpel and note its thickness. Why do you think this tissue is so thick? (USE WAIT TIME). What is the main function of the cornea? (USE WAIT TIME). Remember, the cornea protects the eye from injury. Therefore, its structure or thickness relates to its function, which is to protect. Now, observe the iris. The iris is the black tissue of the eye to contains curved muscle tissue. Remember the iris controls the amount of light that enters the eye. Therefore, the iris must be able to contract. This is why it is made of muscle tissue. This is yet another example of how the structure relates to its function. As mentioned previously, in humans the iris can come in a variety of colors. Finally, let’s locate the ciliary body. It is located on the back of the iris. It is composed of muscle fibers that help change the shape of the lens. Can you explain how the structure of the ciliary body relates to it’s function? (USE WAIT TIME). Ciliary Body Pupil Iris
. What is the main function of the cornea (USE WAIT TIME). Remember, the cornea protects the eye from injury. Therefore, its structure or thickness relates to its function, which is to protect. Now, observe the iris. The iris is the black tissue of the eye to contains curved muscle tissue. Remember the iris controls the amount of light that enters the eye. Therefore, the iris must be able to contract. This is why it is made of muscle tissue. This is yet another example of how the structure relates to its function. As mentioned previously, in humans the iris can come in a variety of colors. Finally, let’s locate the ciliary body. It is located on the back of the iris. It is composed of muscle fibers that help change the shape of the lens. Can you explain how the structure of the ciliary body relates to it’s function (USE WAIT TIME). Ciliary Body. Pupil. Iris.")
22
Internal Anatomy Retina Locate the lens. It can be found by looking through the pupil. Using your scalpel and dissecting needle, carefully lift and work around the edges of the lens to remove it. The gel the lens is suspended it is called the vitreous humor. Let’s identify and discuss some parts we haven’t discussed yet. Locate the lens. It can be found by looking through the pupil. Using your scalpel and dissecting needle, carefully remove it from the eye. The lens is a clear, flexible structure that makes an image on the eye’s retina. It is so flexible that it can change shape in order to focus on that are close up or on objects that are far away. The lens flattens in order to focus on objects that are far away. The muscle controlling the shape of the lens (also called the cilliary body) relaxes and fibers attach to the lens stretch it out a little bit. When observing something close, the muscle controlling the shape of the lens or the cilliary body contracts, reducing the tension on the fibers that stretch out the lens, letting the lens form its naturally bulging shape so that it can focus light from a nearby object on the retina. The lens only focuses 20% of the light and it acts as a magnifier. If the lens is not cloudy, students could place the lens over printed material to observe how it magnifies the print. The lens was surrounded by a thick, clear, jelly-like substance. This is the vitreous humor. The vitreous humor helps give the eyeball its shape. Like the aqueous humor, the vitreous humor is clear so that light can pass through it and it is made of protein and water. This jelly helps maintain pressure that helps hold the retina on the back of the eye. It is important that the vitreous humor keep the retina laying flat on the back of the eye. If the retina becomes folded, the signal from the retina to the brain will be confused or distorted. This is called a detached retina. Lens Vitreous Humor
 relaxes and fibers attach to the lens stretch it out a little bit. When observing something close, the muscle controlling the shape of the lens or the cilliary body contracts, reducing the tension on the fibers that stretch out the lens, letting the lens form its naturally bulging shape so that it can focus light from a nearby object on the retina. The lens only focuses 20% of the light and it acts as a magnifier. If the lens is not cloudy, students could place the lens over printed material to observe how it magnifies the print. The lens was surrounded by a thick, clear, jelly-like substance. This is the vitreous humor. The vitreous humor helps give the eyeball its shape. Like the aqueous humor, the vitreous humor is clear so that light can pass through it and it is made of protein and water. This jelly helps maintain pressure that helps hold the retina on the back of the eye. It is important that the vitreous humor keep the retina laying flat on the back of the eye. If the retina becomes folded, the signal from the retina to the brain will be confused or distorted. This is called a detached retina. Lens. Vitreous Humor.")
23
Internal Anatomy Observe the back of the eye after the lens has been removed. It should be shaped like a bowl. On the inside of the bowl is a thin film with red blood vessels running through it. This is the retina. The retina is attached to the back of the eye at just one spot. It is called your blind spot. Use forceps to separate the retina from the back of the eye to see the layer beneath it. Retina Now that the lens and aqueous humor have been removed, observe the back of the eye. It should be shaped like a bowl. On the inside of the bowl is a thin film with red blood vessels running through it. This is the retina. The retina is composed of photoreceptor cells called rods and cones that are sensitive to light. Rods function mainly in dim light and provide black and white vision, while cones support daytime vision and the perception of color. The retina receives signals and sends those signals to the brain through the fibers of the optic nerve. The retina is attached to the back of the eye at just one spot. This is called your blind spot. Use forceps to separate the retina from the back of the eye to see the layer beneath it and identify the blind spot by inserting a probe. Again, the blind spot is the place where the optic nerve leaves the retina. At this point there are no light sensitive cells. It is important to note that each eye has a blind spot. This is an excellent point to trace the hierarchal relationships that exist in the structure of the cow eye. The eye is an organ which his made of various tissues which are composed of cells. For example: the eye (an organ) has a retina (tissue) that is composed of rods and cones (cells). Can you give another example of this hierarchical relationship? (USE WAIT TIME). Organs are part of organ systems, which system do you believe the eye is a part of? (USE WAIT TIME). If you said the nervous system you would be correct. Blind Spot
 has a retina (tissue) that is composed of rods and cones (cells). Can you give another example of this hierarchical relationship (USE WAIT TIME). Organs are part of organ systems, which system do you believe the eye is a part of (USE WAIT TIME). If you said the nervous system you would be correct. Blind Spot.")
24
Internal Anatomy The layer beneath the retina is called the tapetum. It is a shiny, blue-green layer designed to assist night vision by reflecting light back through the retina. Humans do not have a tapetum. This structure is responsible for the shining of animals eyes at night. Tapetum Have you ever seen an animals eyes shine at night? There’s a reason for that. Just underneath the retina, there is a shiny, blue-green layer in the called the tapetum. The tapetum is designed to assist night vision by reflecting light back through the retina. Therefore its function is to improve an animals ability to see at night. Humans do not have a tapetum because their survival is not as dependent upon seeing at night. Can you think of some examples of animals that would need a tapetum? (USE WAIT TIME). Many animals have this layer, dogs, cats, opossums. You could definitely name any nocturnal animal and be correct. It’s interesting that cows have this layer since they really do not hunt at night. Do you think this adaptation was necessary for cows for some reason long ago? (USE WAIT TIME). Now lets watch a short video clip to review what we’ve done so far. Please feel free to follow along with your specimen should you have one.
. Many animals have this layer, dogs, cats, opossums. You could definitely name any nocturnal animal and be correct. It’s interesting that cows have this layer since they really do not hunt at night. Do you think this adaptation was necessary for cows for some reason long ago (USE WAIT TIME). Now lets watch a short video clip to review what we’ve done so far. Please feel free to follow along with your specimen should you have one.")
26
Clean Up Place all dissecting specimens and parts into approved container provided by the instructor. Wash dissecting equipment and trays in dilute bleach solution provided by the instructor. Dry equipment thoroughly to prevent rusting. Clean table tops with dilute bleach solution provided by the instructor. Wash hands thoroughly before leaving the classroom. At the end of the lab, make sure all equipment has been returned. Dissection specimens should be disposed of in a double bag. You can use two large ziplock baggies for this placing one inside another and zipping both before throwing in the garbage. Instruments should be washed in a 10% bleach solution and dried thoroughly to prevent rusting. Make sure everyone has stopped the activity when it is time to clean up. See that work surfaces are washed with soap or bleach disinfectant and dried completely. This is a great habit to instill even if it doesn’t seem necessary. Make clean up a responsibility for the students, but have them use a mild detergent or a 10% bleach solution. Do not allow students to leave the room for appointments or pullout programs unless they first clean up their work areas. Better yet, don’t allow anyone to leave the room until all equipment has been returned, workspaces cleaned and hands washed.

27
Resources Cow Eyeball Dissection: Cow Eye Dissection, worksheet, lab:
Cow Eye Dissection, worksheet, lab: Cow Eye Dissection: Dissection Narrative: This slide provides some additional resources for your investigation should you be interested in pursuing more information or activities that relate to the eye. For example: the first website is the Exploratorium museum website in San Francisco. This site has tons of additional activities that deal with eyes and human perception. It also has a video of a young student demonstrating the dissection as well. Thank you for participating in cow eye dissection.

Similar presentations


. 2. *The sclera is the.>")
 November 21 (B day). In Interactive Notebooks… In your Table of Contents, add a new entry: “Parts of the Eye : Notes” Number.>")
>")


 Due Tuesday Warm up Name as many parts of the eye as you can. - Week 9, Day Three.>")


