Download presentation
Presentation is loading. Please wait.

1
Environmental and Exploration Geophysics I tom.h.wilson wilson@geo.wvu.edu Department of Geology and Geography West Virginia University Morgantown, WV Resistivity IV Characteristic Curves and Case Histories

5
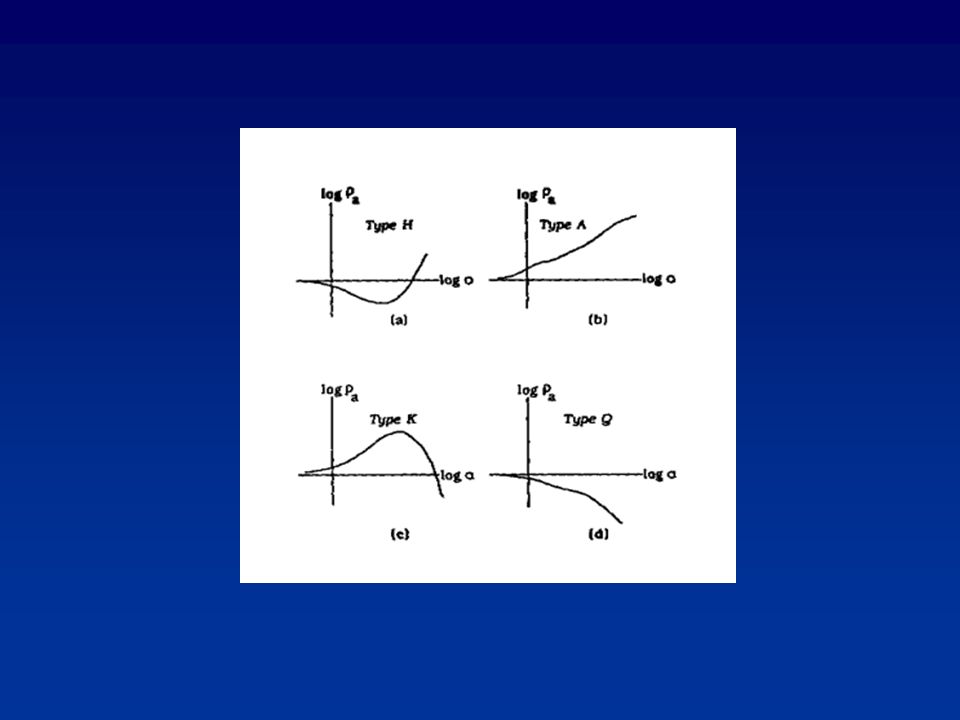
2 Layer 4 Layer 3 Layer Characteristic Curves were developed for a variety of different models.

6
The effect of variations in depth to a layer of higher resistivity L=AB/2 (Schlumberger Array)
")
7
The effect of variations in depth to a layer of negative resistivity

8
The effect of resistivity variations - positive resistivity contrast

9
The effect of resistivity variations - negative resistivity contrast

10
Three layer curves- varied depth to top of middle layer.

11
Three layer curves illustrate the effect of varied depth to base of middle layer.

12
The method of Characteristic Curves (Two layer case) Summary of steps Set 1 = a1 Construct the ratios a / 1 for each spacing. Guess a depth Z …. Refer to handout from week before last and also today’s handout.

13
The method of Characteristic Curves (Two layer case) Summary of steps ……. Guess a depth Z Compute the ratio a/Z Plot a / 1 vs. a/Z on the characteristic curves (right) Select best guess based on the goodness of fit to the characteristic curves. Determine k (the reflection coefficient) based on the best fit line. Compute 2, using relationship between k and ‘s Each of these curves are associated with a different value of k - the reflection coefficient.
 Select best guess based on the goodness of fit to the characteristic curves. Determine k (the reflection coefficient) based on the best fit line. Compute 2, using relationship between k and ‘s Each of these curves are associated with a different value of k - the reflection coefficient..")
14
Recall, that once you have determined k, it is straightforward to compute 2 1 = a (shortest a-spacing)
")
15
Homework Assignment Take the data from the example problem, and 1) determine the depth to the top of layer 2 and 2) determine the resistivity of layer 2. Use the method of characteristic curves. Bring questions to class next Tuesday (Oct. 9rd). Due Oct. 11th
. Due Oct. 11th.")
16
Tri-potential resistivity method Can you compute the geometrical factors for these various electrode configurations? -6 a 3a3a 2a2a

20
Case History Resistivity Profiling Surveys on the Hopemont Farm in Terra Alta, WV Survey performed by Eb Werner for Dr. Rauch

21
Survey was conducted for the City of Terra Alta to locate a water well. From Werner and Rauch

22
CCPP CPPC CPCP The tri-potential resistivity response over a fracture zone Model data From Werner and Rauch

23
The Terra Alta surveys conducted by Werner and Rauch employed measurements at three different a-spacings - 10ft, 20 ft and 40 ft. Lines were positioned to cross a photolineament and were from 250 to 500 feet in length. Readings were made at 10 foot intervals. Things to avoid- Conductive materials buried or in contact with the ground. Buried telephone cables and metallic pipelines, fences, metallic posts and overhead power lines

24
Larger streams have greater effect than smaller ones. You know they are there. (Werner and Rauch don’t discuss stream effect, but one wonders about the difference between loosing and gaining types of stream/water table relationships.) Wires are sufficiently insulated to allow them to operate effectively when submerged Rain may coat the wires however and lead to “leakage” (in the electrical sense) which can be significant. The meter is usually placed on an insulating pad to avoid current leakage from the instrument directly into the ground. Some Field Concerns
 Wires are sufficiently insulated to allow them to operate effectively when submerged Rain may coat the wires however and lead to leakage (in the electrical sense) which can be significant. The meter is usually placed on an insulating pad to avoid current leakage from the instrument directly into the ground. Some Field Concerns.")
25
The apparent resistivity measurements made by Werner and Rauch were interpreted within the context of the tri-potential response predicted by the Carpenter model (see earlier figure). “.. The present problem involves only the confirmation of the existence and exact location of a fracture zone mapped from other information. ” “ … it is only necessary to locate anomalies characteristic of vertical discontinuities …” “ … the graphic plots were inspected visually for those anomaly responses..” Anomalous areas were plotted on location maps. “Alignments of such anomalies at or near the location of the postulated fracture zone were accepted as confirmation of the existence of the fracture zone. Interpretation approach

26
Northernmost site - site 1 (see earlier location map) From Werner and Rauch
 From Werner and Rauch")
27
The anomaly around 100 feet is considered to be “data noise” The feature at 320 feet is interpreted to be the “fracture zone” response. Note that this feature is not marked by highs in the CPPC and CPCP measurements The 20 foot a-spacing profile reveals a more pronounced fracture zone anomaly at about 320 feet along the profile. Line 1 NS

28
Red dots locate prominent “fracture zone” anomalies observed on all three a-spacings From Werner and Rauch The blue line indicates the probable location of a major fracture zone. Given the 10 foot station spacing location of the zone is accurate to no more than ±5 feet Line 1 Line 6

29
From Werner and Rauch Line 6 The fracture zone anomaly appears consistently on Line 6 at approximately 125 feet along the profile The anomaly broadens as the a-spacing increases because electrodes in the array extend over the anomalous region at greater and greater distances from the array center point. NS

30
Site 2 From Werner and Rauch

31
Line 9 NS The anomaly on the north end changes “polarity” on the 20 foot a-spacing (CCPP is high) Reference is made to the anomaly at 230 feet as being due to the stream channel, but this anomaly does not have an expression on the 10 and 20 foot a-spacing profiles. Flips Flips Again The suggestion is made that the most prominent anomaly is the one at 70 feet. ?

33
Line 10 SN Anomaly at 100 feet is noted as being “near but not in the small stream” A second anomaly is noted at 250 feet. It looks like it could be near the pipeline noted on the photo, but no reference in the discussion is made to this coincidence.

34
Drilling locations and results Two wells - wells 1 and 2 shown in the photo and map above - were drilled based on interpretations of the resistivity profiling. Both wells were located along the trend of the fracture zone anomaly.

35
The “fracture zone” anomaly is observed at the 20 and 40 foot a-spacings.near 275 feet on the west end of Line 7 Line 7

36
The fracture zone anomaly observed just west of Well #2 and Line 7 near 140 feet Is observed on the 10 and 20 foot a-spacings an has the opposite polarity of the anomaly observed to the east along Line 7 (I.e. CCPP goes down on this line but up on Line 7). Line 12
. Line 12.")
37
Anomaly near well #1. Note that the production in well #1 was not as good as that in well 2. Line 8

38
Potential oil and gas exploration applications Mammoth Geophysical

41
Melted areas in permafrost

42
Location of gravel deposits in a clay alluvium

43
High resistivity stream channel gravels are delineated by the 250 ohm-meter contour

45
Dates to Remember - 1. the resistivity and terrain conductivity papers are due next Thursday - October 11th. 2. Characteristic curve analysis due Thursday - October 11th. 3. Resistivity lab will be due on October 9th 4. Begin reading Burger Chapter 6 - Exploration Using Gravity - pages 317-343. We will begin discussions of gravity methods next Tuesday

Similar presentations


 Environmental and Exploration Geophysics I>")


 Environmental and Exploration Geophysics II>")


