Download presentation
Presentation is loading. Please wait.

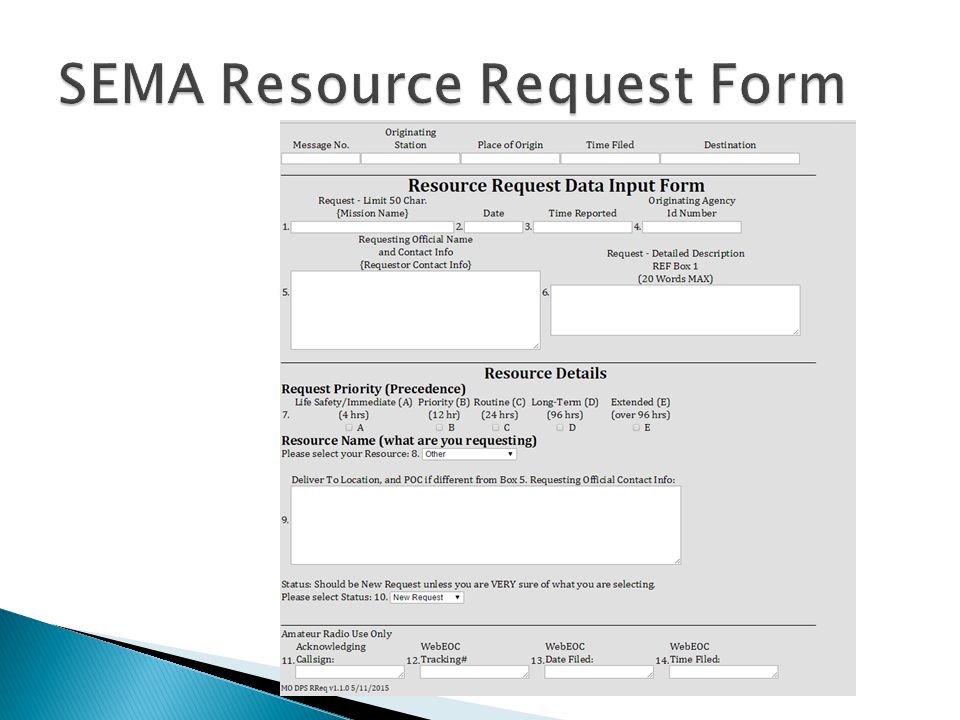
1
Using the SEMA Resource Request Data Input Form

2
SEMA is requiring a Resource Request Form that is compatible with WebEOC. If the internet is not available, Amateur Radio will be the mode of communication to SEMA for Resource Requests. A standard form is needed that will be usable in both voice and digital radio communications and be easily transferred to WebEOC. For digital transmission, small file size is paramount so PDF and HTML files are out.

4
The form is an HTML file that can be opened in any browser. (IE, Chrome, Firefox, etc. The form can be printed after the information is filled in the appropriate fields. To save the form data for digital transmission, Flmsg must be used. The form, along with Flmsg will be available on the MO ARES website for downloading by amateur operators. (See Installation Addendum) SEMA will distribute the form to all State EOCs and organizations that will be sending requests to SEMA for resources.
 SEMA will distribute the form to all State EOCs and organizations that will be sending requests to SEMA for resources..")
5
When a resource is to be requested from SEMA, the originating Served Agency will fill out the form and provide it to the originating communicator, usually as a paper form. The originating communicator will only fill out the header when the message is sent via voice or digital radio. The communicator is not responsible for filling information in Boxes 1 – 10. If boxes 1 – 10 are not complete, the form should be returned for clarification before sending to SEMA. For digital radio, the communicator will need to use Flmsg and fill out the form using provided information from the paper version, then save the digital form using Flmsg.

6
After establishing communication with a SEMA voice receiving station, the form information will be passed. ◦ Send the header information and break for form. ◦ Send Boxes 1 through 5. Spoken format would be “Box 1 – Generator”, “Box 2 – July 2, 2014”, “Box 3 – 20:00 Hours”, “Box 4 – W0ABC”, “Box 5 – NNNNNN”, break for further. ◦ Send the balance of the boxes. Break after the larger information boxes. (i.e. 5,6,& 9). Priority Box 8 is sent simply as “Box 7 – Alpha” or whatever priority box is checked.
. Priority Box 8 is sent simply as Box 7 – Alpha or whatever priority box is checked..")
7
The receiving station should open a blank form or have a printed blank form. Fill in the appropriate box as sent by the transmitting station. Acknowledge receipt after each break When transmission is complete, save or print the form. Give/send the form to a SEMA official.

8
Digital transmission by both Winlink and Fldigi utilize an electronic version of the form managed by Flmsg. Must have v2.0 or newer of Flmsg From Flmsg, select Form, Custom, RReqvx.y where x.y is the latest version of the form

9
Next select Edit Form, your default browser will open to display the form, fill it out adding your info in the header and the remainder as provid- ed by the served agency. Click Submit, that saves the form data for transmission by radio.

10
Sending by radio using Fldigi (must already be running), click AutoSend and Flmsg will ask if you’d like to save the form, then send the data. Save it! Be sure to agree on frequency, mode and time with the receiving station before sending!

11
Winlink ◦ Fill out digital form on computer using Flmsg. ◦ Save File from Flmsg. ◦ Choose save location be sure to remember where you save it!

12
Save the file

13
Attach Flmsg file to Winlink E-mail and send. RMS Express – Click Message, New Message… or click the New Message Icon

14
Fill out the message header (To: and Subject:) and attach the Flmsg file from the location where you save it. Suggest using the originating agency ID in the subject. Click Post to Outbox Send as you would any other Winlink email.

15
If receiving by Winlink, you will need to save the.k2s file attachment; then drag & drop the saved file on the blue dot in the upper right corner of Flmsg, then View Form & print for delivery.

16
Instructions for obtaining & installing: ◦ Fldigi (multi-mode digital transmit/receive) ◦ Flmsg (message generator) ◦ RMS Express (Winlink client) ◦ ITSHF (propagation software) ◦ RReqvx.y.html (custom form) These instructions are a guide to get you started; they do not cover every step for every radio, computer, and operating system combination.
 ◦ Flmsg (message generator) ◦ RMS Express (Winlink client) ◦ ITSHF (propagation software) ◦ RReqvx.y.html (custom form) These instructions are a guide to get you started; they do not cover every step for every radio, computer, and operating system combination.")
17
The latest version of Fldigi & Flmsg can be downloaded directly from w1hkj.com/download.html w1hkj.com/download.html The Windows setup files are circled in Red Clicking on them puts a copy in your Downloads folder

18
Clicking on the tab for the downloaded files should start the setup program; accept all defaults. If your browser doesn’t show the tabs at the bottom for the files, double- click on them in your Downloads folder.

19
You should now have Fldigi & Flmsg icons on your desktop. Double-click Fldigi icon to start. The first time you run them you’ll get a setup dialog; enter your callsign, name and Locator.

20
Next configure the soundcard; Signalink USB recommended. Click the Audio tab make sure Port Audio is selected. Then USB Audio Codec Mic for Capture and Speakers for Playback, then save.

21
The first time you run Flmsg, you’ll need to enter operator callsign, name, etc. Click the red X to close when finished.

22
Next, download the SEMA form from: ares-mo.org/Forms/ Alternate site www.w0kah.net/flmsg you want this version or newer: ◦ RReqv1.1.0.html ◦ Save the form in: Windows 7 & 8.1: C:/users/ /NBEMS.files/CUSTOM/

23
Using Fldigi: ◦ You don’t need to use computer control, everything can be done manually ◦ Ignore the frequency display and rig info displays; look at your radio and make adjustments there. ◦ Digital comms are always USB, even on 80 & 40 meters. ◦ When tuning Winmor frequencies, use the Dial Freq as the display frequency on your radio. The station frequency will be 1.5 Khz higher. ◦ Speaker output from the computer should be near max, control audio drive to your radio using the Signalink TX knob, adjust for NO ALC action. ◦ Delay should be full Counter Clockwise, none.

24
From the Winlink family, the RMS Express client was chosen as the easiest to install and use. A propagation prediction program needs to be installed at the same time. Both are available from: ◦ ftp://autoupdate.winlink.org/User%20Programs/ ftp://autoupdate.winlink.org/User%20Programs/ Download itshfbc_120722.zip or neweritshfbc_120722.zip Download RMS_Express_install_1-3-3-0.zip or newerRMS_Express_install_1-3-3-0.zip Unzip the setup programs by clicking on the downloaded zip files at the bottom of your browser, then start the setup programs from the window showing the contents of the zip files. Accept all defaults.

25
Double-click the RMS Express Icon on your desktop, it should start up and display the setup screen; if not click Files, PMS Express Setup At a minimum, enter callsign, name, grid square, propagation program path, and service codes PUBLIC EMCOMM, then click update.

26
For sending digital messages by HF, you’ll be using Winmor, so with RMS Express running and configured, Open a Winmor WL2K session

27
Three windows will open; ◦ A registration Reminder, click Remind Me Later ◦ A soundcard waterfall; ignore for now ◦ A Winmor Winlink 2000 Session; click Setup Make sure USB Audio Codec is selected for Capture and Playback, then click Update.

28
Using Winmor: ◦ You don’t need to use computer control, everything can be done manually ◦ Digital comms are always USB, even on 80 & 40 meters. ◦ When tuning Winmor frequencies, use the Dial Freq as the display frequency on your radio. The station frequency will be 1.5 Khz higher. ◦ Speaker output from the computer should be near max, control audio drive to your radio using the Signalink TX knob, adjust for NO ALC action. ◦ Delay should be full Counter Clockwise, none.

29
The Winmor Sound Card TNC window displays connection status and information. ◦ Adjust the RX level on the Signalink USB such that the top green bar on the Rec Level is in the green area of the lower bar, Blue is too weak, red is overdriving and will cause errors and retransmissions.

30
Special thanks to: Jeff Young KB3HF EC for Missouri and JD Simmons WA0BER DEC for District F for their contributions, help and support in preparing this document. Ken Humbertson W0KAH ADEC District C Digital Modes and Networking w0kah@arrl.netw0kah@arrl.net cell 314-504-0757

Similar presentations


 views of functions and file.>")


![Installing and Using Relay Recorder. System Requirements for Windows Microsoft Windows 7 [32-bit or 64-bit] or Windows 8 Internal or external microphone.](/21/6273581/big_thumb.jpg "Installing and Using Relay Recorder. System Requirements for Windows Microsoft Windows 7 [32-bit or 64-bit] or Windows 8 Internal or external microphone.>")
 CDW-G Punch-out Catalog.>")


