Download presentation
Presentation is loading. Please wait.

1
Elementary New Year Setup and Copy to Next Year This PowerPoint with take you through the process of setting up your new school year and copying your students over to that year.

2
Open Core Trillium on your picture menu click on School Setup and then click School Years.

3
This is where we will set up the New School Year, Tracks, Semesters and Terms

4
First Tab is School Year on this tab click the green plus button to add a blank line

5
Add your New School Year 20152016 along with the start and end dates. Do not check Current Year until the beginning of the new school year. Do not check History Year Do not check Offering Full Year and Semestered Courses

6
Click on the Track Tab click the green plus button to add a blank line Track name is Standard hit the tab button and the dates will populate for you. Enter the Description which will be Standard Track

7
Click on the Semester Tab Pick the Standard track, Click on the green plus sign to add a blank line Your dates should pre populate to what is already set up in the school year The screenshot below is an example, dates may not be accurate.

8
Click on the Term Tab Standard Track Semester 1. Click the green plus button to add the term dates.

9
Changes have been made without reinitializing Calendar. Click OK to this warning, we will do this part later.

10
Back at your picture menu go to Action and change to your New School Year 20152016 Click OK

11
Ensure you are in 20152016 and click on School Setup then Timetable Structure

12
We will set up Timelines, Periods, Cycle Days, Blocks, and Timeslots. We start with the Timelines under the Standard Track.

13
Click on the Periods Tab The track that you have set up will have to have periods added to it in order to get the correct FTE of each Student. Click the green plus button to add each period, please use a 24 hour clock and your own bell times. (below is an example).
..")
14
Click on the Cycle Days Tab The Track that was set up needs to have a Cycle Day added, click the green plus button to add a blank line, select the Default Timeline ensuring that it corresponds to the appropriate track. Save Changes.

15
Click on the Blocks Tab Again each track will have to have blocks added to it. Click the green plus sign to add blank lines. Leave the default sequence as it is. Save Changes.

16
Click on the Timeslots Tab Pick the appropriate Track and Timeline. Add the corresponding block to the period. Save your changes.

17
Stay in the 20152016 School Year click School Setup and then click Events and Calendar

18
Do NOT set up your School Events at this time. Click on the School Calendar Tab and select the track. Ensure the start and end dates are correct. Click on the Initialize button and ensure you have flagged the correct settings before clicking the Okay button

19
Initialize School Calendar

20
At this point you are ready to start pre- registering students. You are also ready to do your Copy To Next Year, to move current registered students to next year. This may be done numerous times in order to move new students over to next year if they register after you have done a copy to next year. Let us continue on!!!

21
Back to your current year 20142015 Click on School, and then click on Copy to Next Year.

22
This part will take us through the Students and Teachers to copy to the New School Year.

23
Students Tab Fill in all the drop downs for each grade we want to transfer to the new school year. Transfer.

24
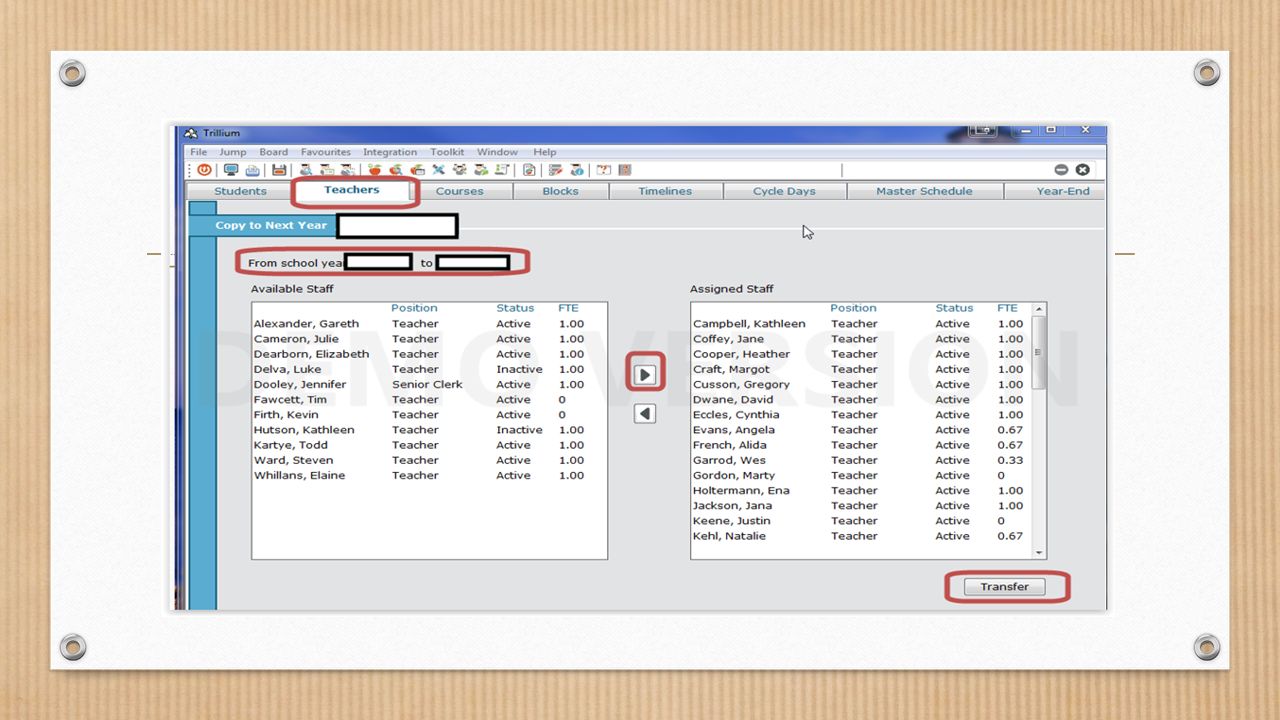
Teachers Tab Under the Available Staff column, select only the staff members whom you are certain will be returning to your school for the next year. If in doubt then do not copy them over. Once the appropriate staff names have been selected and highlighted, click on the right arrow and move them over into the Assigned Staff Column. Next, click on the Transfer button at the lower right hand corner. This completes the staff transfer from the current school year to the next school year.

26
This completes the Copy to Next Year Change to the New School Year 20152016 and you will see all the students you copied forward. There status is PreReg If you find out that a student is going to leave you after you copied them forward, you just depart them as you normally would and it will pull them out of the New School Year.

Similar presentations


 should be worth 45 pts each,>")

![Management Unit of the North Sea Mathematical Models MUMM | BMM | UGMM OURS Manual, November 2008 [1][1] OURS – Onboard Underway.](/12/3414802/big_thumb.jpg "Management Unit of the North Sea Mathematical Models MUMM | BMM | UGMM OURS Manual, November 2008 [1][1] OURS – Onboard Underway.>")


