Download presentation
Presentation is loading. Please wait.

1
12 ACTIVE LEARNING Tools

2
Active Learning “Active learning involves providing opportunities for students to meaningfully talk and listen, write, read, and reflect on the content, ideas, issues, and concerns of an academic subject.” Meyers, C., Jones, T.B. (1993) “Promoting Active Learning”, Jossey-Bass Higher and Adult Education Series
 Promoting Active Learning , Jossey-Bass Higher and Adult Education Series.")
3
Active Learning If a teacher could shift the focus of his delivery of course material to the engagement of students with the course material, then that teacher would be promoting active learning, move from being a "sage on the stage" to becoming a "guide on the side". The goal of the teacher should be to facilitate learning; Active learning techniques allow the teacher to achieve that goal.

4
Think-Pair-Share

5
THINK individually about a topic or problem Work in a PAIR to discuss the topic or problem SHARE your ideas with the rest of the class

6
Active Learning Different people respond better to different active learning techniques or tools, so we’ll look at a range of tools and it is up to you to find a tool that best suits you. We’ll look at three kinds of tools: – Individual Tools - easy to learn but powerful – Group Tools – encourages students to work in groups – Full-class Tools – getting the whole class to work together

7
Individual Tools Individual Tools are easy to use but can be highly effective in terms of encouraging reflection, and independent learning.

8
Group Tools Group Tools encourage students to work in groups, and can help with communication, turn-taking, and creativity.

9
Full-class Tools Full-class tools get the whole class working together, and expose students to a range of perspectives, and can encourage competition and innovation.

10
Individual Tools

11
The Pause Procedure

12
Probably the simplest and most effective active learning technique (imo/ime). It simply consists of taking a break from lecturing after 20-30 minutes into the lesson, and getting the students to do something for a few minutes. There’s lots of things you can get them to do.

13
The Pause Procedure Write down a list of the three keys ideas we have covered in the class so far. – Give them 2 minutes to do it – This is very effective, it gets them to reflect on the topic, and reflect on their participation in the class – It is worth getting them to then discuss in pairs what they thought were to top three ideas (many will have different ideas), and this can lead to very engaging conversations – It might also be worth sharing with the full class
, and this can lead to very engaging conversations – It might also be worth sharing with the full class.")
14
The Pause Procedure Review their notes and put question marks beside anything they aren’t sure about. – Give them 2 minutes to do it – This is very effective, it gets them to reflect on the topic, and reflect on their participation in the class – It is worth getting them to then discuss in pairs what they had issues with (many will have different issues), and they can teach each other – It might also be worth sharing with the full class
, and they can teach each other – It might also be worth sharing with the full class.")
15
The Pause Procedure Create 2-4 questions about the topic. – Give them 2 minutes to do it – This is very effective, it gets them to reflect on the topic, and reflect on their participation in the class – It is worth getting them to then discuss in pairs their questions (many will have different ideas), and this can lead to very engaging conversations – It might also be worth sharing with the full class
, and this can lead to very engaging conversations – It might also be worth sharing with the full class.")
16
The Pause Procedure Pose them a question. – Give them 2 minutes to answer it – It is worth getting them to then discuss in pairs their answers (many will have different ideas), and this can lead to very engaging conversations – It might also be worth sharing with the full class
, and this can lead to very engaging conversations – It might also be worth sharing with the full class.")
17
The Pause Procedure Give them a crossword to do. – Give them 4 minutes to do it – It is worth getting them to then discuss in pairs their answers (many will have different ideas), and this can lead to very engaging conversations – It might also be worth sharing with the full class
, and this can lead to very engaging conversations – It might also be worth sharing with the full class.")
18
Headings

19
Students are given a handout with no headings or subheadings, but with space for these. Students read the handout and decide headings that summarise what follows in that section of text in the form of a statement. You can adapt an existing handout by removing existing headings, and or by asking students to write a ‘heading’ for each paragraph in the margin.

20
One-Minute Paper

21
Students spend a minute writing on a topic or in response to a question that you've developed for the session. You are asking participants to move from one level of understanding to another, from presentation of new ideas to application of ideas.

22
Fact Rounding

23
The Fact rounding technique works as follows, towards the end of a lesson the students are asked to recall one fact from the material covered. Another student should not repeat a fact already mentioned and the activity should continue until all the lesson material has been covered.

24
Group Tools

25
Active Reading ?

26
Students are given an unfamiliar piece of text. In pairs or small groups they are asked to: – Formulate important questions the text should be able to answer, or they hope the text will answer. – Read the text, highlighting key points, – Discuss the key points and agree answers to the questions formulated in ‘1’.

27
Random Pictures

28
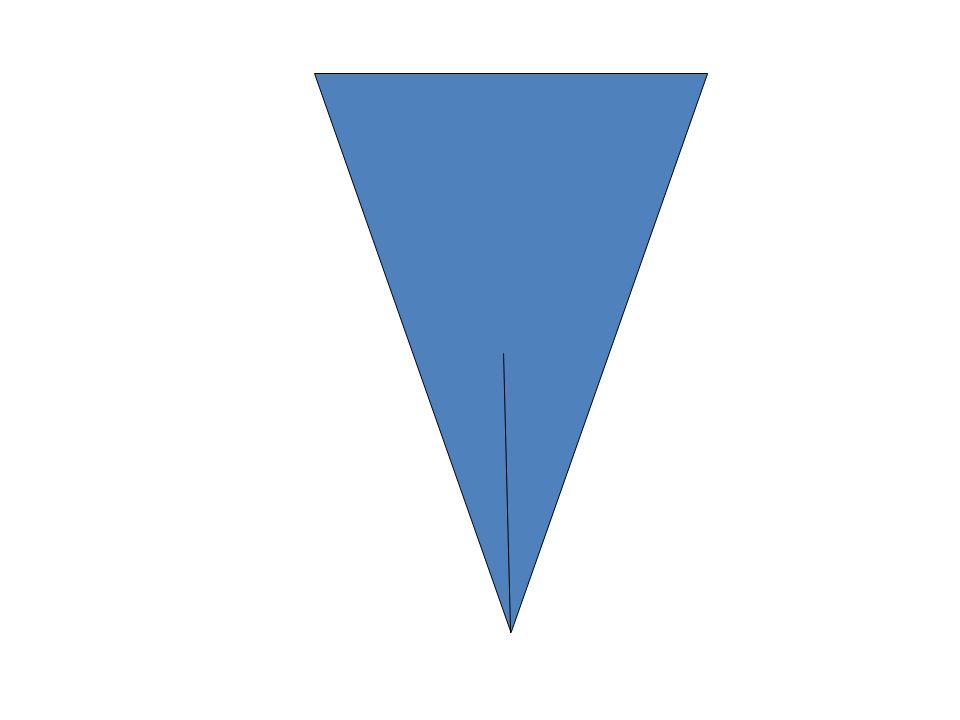
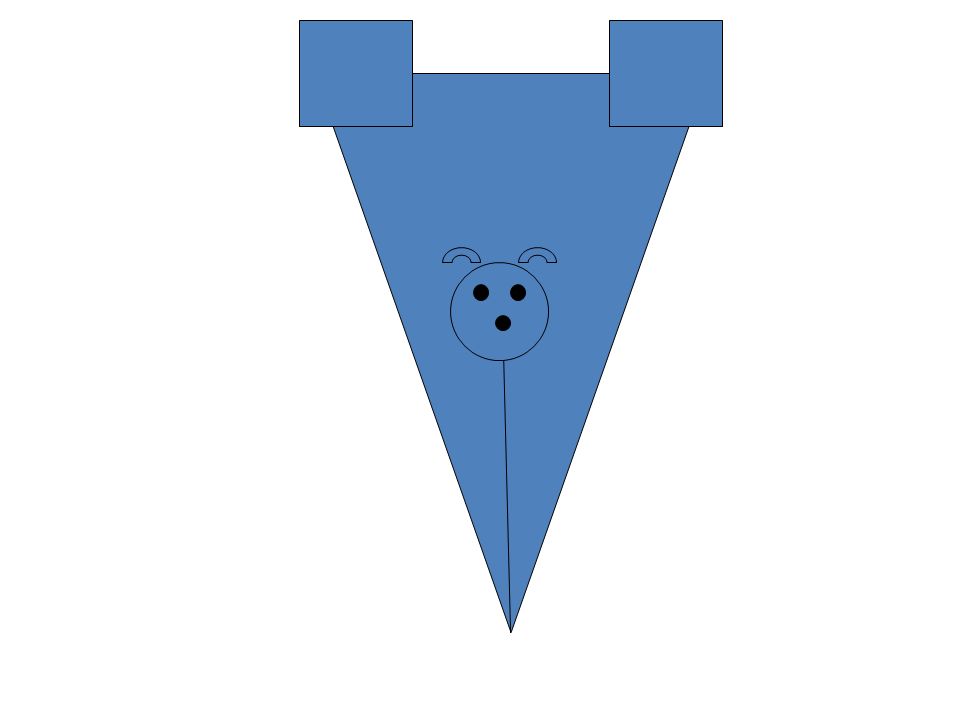
Some students look at a picture, and have to describe it to other students who haven’t seen the picture. They can’t say what the picture is, but they can describe the geometry of the image. For example:

30
Step 1. Tell the person to; Draw an upside isosceles triangle

32
Step 2. Tell the person to; Draw a line bisecting the angle on the bottom, this line reaches one third of the way up to the centre of the triangle

34
Step 2. Tell the person to; Sitting on the top of the line add a circle half the width of the triangle at this point, and in the circle add three black circles in an inverted triangle shape (each circle about 1/5 of the size of the main circle).
..")
36
Step 3. Tell the person to; Add two squares approximately the same size as the circle in the middle, each overlaid on the top two corners of the triangle

38
Step 4. Tell the person to; Add two semi-circles (or arches) to the top of the centre circle, each above the black points inside the circle
 to the top of the centre circle, each above the black points inside the circle.")
40
Step 5. Tell the person to; Now cover with white fur

Similar presentations


 Work in pairs. List 3 things you learnt today. Share them with your.>")


