Download presentation
Presentation is loading. Please wait.

1
Applications for Web Development (CIS 46) Class #6 –Photoshop Continued
 Class #6 –Photoshop Continued")
2
Today’s Outline Intro to Photoshop Continued (hands on activity) ▫How to create/design buttons
 ▫How to create/design buttons")
3
Client: Jonathan Bing, Attorney at Law Accomplishments: Created a logo for Mr. Bing using text and a custom shape Goal: Create a series of web buttons for Mr. Bing that have a ‘default’ and a rollover look

4
Creating Shapes with Selections What are selections? Areas of an image you would like to isolate from the remainder of an image With the isolated/selected part of the image, you may choose to modify it or paste it onto another image Example – Remove yourself from a group photo and place yourself standing next to the President We will be creating shapes with selections to build web buttons

5
Style of Web Buttons Purpose of buttons on a website: Allow users to easily navigate the website via clickable images (buttons) Complement the look and feel of the website Avoid the following: Flat or boring web buttons Graphical buttons that don’t match the style of the website Not using web buttons, since buttons make the website more pleasant to navigate (Let’s discuss this point as a class)
 Complement the look and feel of the website Avoid the following: Flat or boring web buttons Graphical buttons that don’t match the style of the website Not using web buttons, since buttons make the website more pleasant to navigate (Let’s discuss this point as a class)")
6
Photoshop: Creating a Web Button Open Photoshop Create a New Image Width: 75 pixels Height: 25 pixels Resolution: 72 pixels/inch Color Mode: RGB Color 8 bit Background Contents: Transparent Create a new layer and name it Circle

7
Photoshop Toolbox Navigate through the toolbox and identify the location of the following tools: Marquee Tool Move Tool Lasso Tool Crop Tool Quick Selection Tool Magic Wand Tool Slice Tools Pen Tools Painting Tools (Quick Mask Mode)
")
8
What do these tools do? Marquee Tool: Let’s you select rectangles, ellipses, and 1-pixel rows and columns. Move Tool: Lets you drag a selection or layer to a new location in the image, and to other images. You can also use the Move tool to align selections and layers. Lasso Tool: Lets you draw both straight-edged and freehand segments of a selection border. The Magnetic Lasso Tool allows the border to snap to the edges of the defined areas within the image.

9
What do these tools do? Crop Tool: Works similarly to the Rectangular Marquee tool. You can click and drag to draw a Rectangular area to select the part of the image you want to include. Cropping is the process of removing portions of an image to create focus or strengthen the composition. You can crop an image using the Crop tool and the Crop command (Image » Crop).
..")
10
What do these tools do? Quick Selection Tool: Used to quickly paint a selection using an adjustable round brush tip. As you drag, the selection expands outward and automatically finds and follows defined edges in the image. Magic Wand Tool: Lets you select a area by color range without having to trace its outline. You can specify the color range, or tolerance, for the Magic Wand tool's selection in the tool's option bar. Enter a low value to select the few colors very similar to the pixel you click, or enter a higher value to select a broader range of colors.

11
What do these tools do? Slice Tool: Used to divide large images into to small connected pieces of rectangular images that are useful for building a website. Pen Tool: Lets you create straight lines and smooth flowing curves. For most users, the Pen tool provides the best control and greatest accuracy for drawing. The Freeform Pen Tool lets you draw as if you were drawing with a pencil on paper. Anchor points are added automatically as you draw. You do not determine where the points are positioned, but you can adjust them once the path is complete. Painting Tools include the following: Brush Tool, Pencil Tool, Color Replacement Tool History Brush and Art History Brush Tool Gradient Tool and Paint Bucket Tool

12
Creating a Circle While on the Circle Layer, Select the Ellipse Marquee tool Hold down the Shift key then click and drag to create a perfect circle Double-click the Foreground Color square in the toolbox. From the Color Picker dialog box, change the RGB to R:13 G:31 B:124 Click OK Select the Paint Bucket tool and click inside of the ellipse that you drew. You may now use the Move Tool to place the circle where you want it to appear.

13
Creating a Selection from and Image While still in the Circle layer, click Ctrl+D to deselect the circle Select the Single Column Marquee Tool In the options bar, select Add to Selection Click outside of the circle, toward the center, so that the column selection appears directly through the center of the circle. You may use your arrow keys to adjust its placement. Click the Move Tool While holding the Shift key, use your left arrow twice. This demonstrates that you have successfully isolated a portion of your image Use Ctrl+Alt+Z to return the column that you moved

14
Creating a Selection from and Image With the single column still selected, click Ctrl+T (or Edit > Free Transform) Hover over the left, center area of your free transform block until your cursor appears as two horizontal arrows Click and drag your cursor to the far left edge of your image Click Enter Click Ctrl+D to deselect the image
 Hover over the left, center area of your free transform block until your cursor appears as two horizontal arrows Click and drag your cursor to the far left edge of your image Click Enter Click Ctrl+D to deselect the image")
15
Adding Effects Add a Drop Shadow effect (we used this functionality last week) Right click in the Circle layer and select Blending Options Check Drop Shadow and Bevel and Emboss Click OK
 Right click in the Circle layer and select Blending Options Check Drop Shadow and Bevel and Emboss Click OK")
16
Adding Text to Your Web Button Select the Text Tool from the toolbox Select Window > Character. From the Character pallet make the following changes: Font Family: Palatino Linotype Font Style: Bold Italic Font Size: 10 pt Change the Tracking (letter spacing) to 200 Change the anti-aliasing method to Sharp Text color: White (RGB 255, 255, 255)
 to 200 Change the anti-aliasing method to Sharp Text color: White (RGB 255, 255, 255).")
17
Adding Text to Your Web Button Click somewhere on the image and type the text “HOME” Use the Move Tool to place the text where you want it to appear Keep in mind the name (and text placement) of the other buttons you plan to create Make the letter “H” size 12 pt (two sizes larger) Add Bevel and Emboss blending options to the HOME text Zoom out to view your image
 of the other buttons you plan to create Make the letter H size 12 pt (two sizes larger) Add Bevel and Emboss blending options to the HOME text Zoom out to view your image")
18
Using Preset Styles Sometimes a pre-set style can offer you several options and effects all in one convenient package To view the available options: Right click the Circle Layer and select Blending Options Click on Styles (Text Effects 2 from the extended menu) Click on Dark Red Bevel Click OK Save your image as a.psd
 Click on Dark Red Bevel Click OK Save your image as a.psd")
19
Defining a Button for a Rollover Effect While holding the Shift key, click the Circle and the Home layer Right click on the select layers and click on Duplicate Layers Click OK Rename the layers as button mouseover and HOME mouseover

20
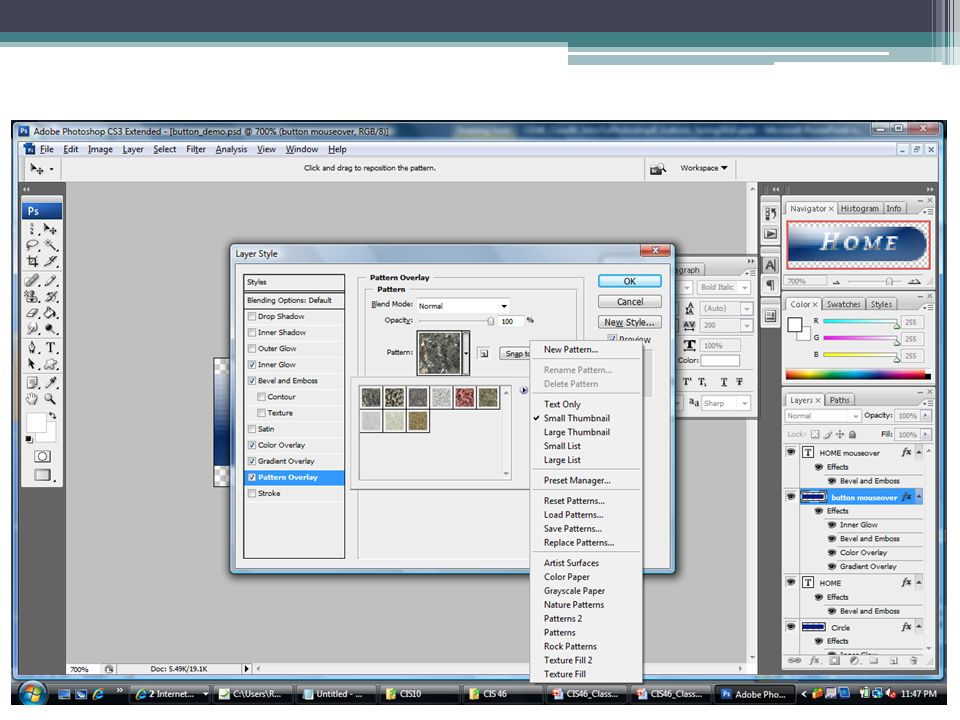
Defining a Button for a Rollover Effect Right click the button mouseover layer and select Blending Options Click on the Pattern Overlay Option Select Color Paper from the extended menu Select the Blue Crepe pattern (row 1, column 3) Before clicking OK, click the Inner Shadow checkbox (this is to give the impression of a pushed- down effect) Click the Stroke option and change the Fill Type to Pattern and select the Blue Crepe pattern Click OK
 Before clicking OK, click the Inner Shadow checkbox (this is to give the impression of a pushed- down effect) Click the Stroke option and change the Fill Type to Pattern and select the Blue Crepe pattern Click OK")
23
Defining a Button for a Rollover Effect For the full effect, select the HOME mouseover layer and use the Move Tool to move your text a few pixels downward In Class Work For practice purposes, create two additional buttons: One for Contact One for Services Each button should have a default as well as a rollover button Remember to also name each button accordingly Bing_contact.psd Bing_services.psd

24
Homework Create Navigation Buttons for your website

25
Homework Create 3-5 buttons, along with their matching hover displays, for your website Using the skills learned in class, along with the skills that you have learned via online tutorials, create an image which combines at least 2 original (separate) photos. You should send me your originals along with your final image. ▫Note: This does not have to pertain to your website, I want you to use this as an opportunity to explore Photoshop on your own

26
Homework cont. Post links to your del.icio.us website that: ▫Explain copyright laws. Be sure to read the pages to which you are linking! ▫Identify where you can obtain royalty free (public domain) images online.
 images online..")
27
Any questions?

Similar presentations


 Objects produced by changing.>")

