Download presentation
Presentation is loading. Please wait.

1
Visual Basic 2010 How to Program © 1992-2011 by Pearson Education, Inc. All Rights Reserved.

3
In this chapter, we explain how to create, write to and read from data files. We also discuss resource management. As programs execute, they often acquire resources, such as memory and files, that need to be returned to the system so they can be reused at a later point. We show how to ensure that resources are properly returned to the system when they’re no longer needed. © 1992-2011 by Pearson Education, Inc. All Rights Reserved.

4
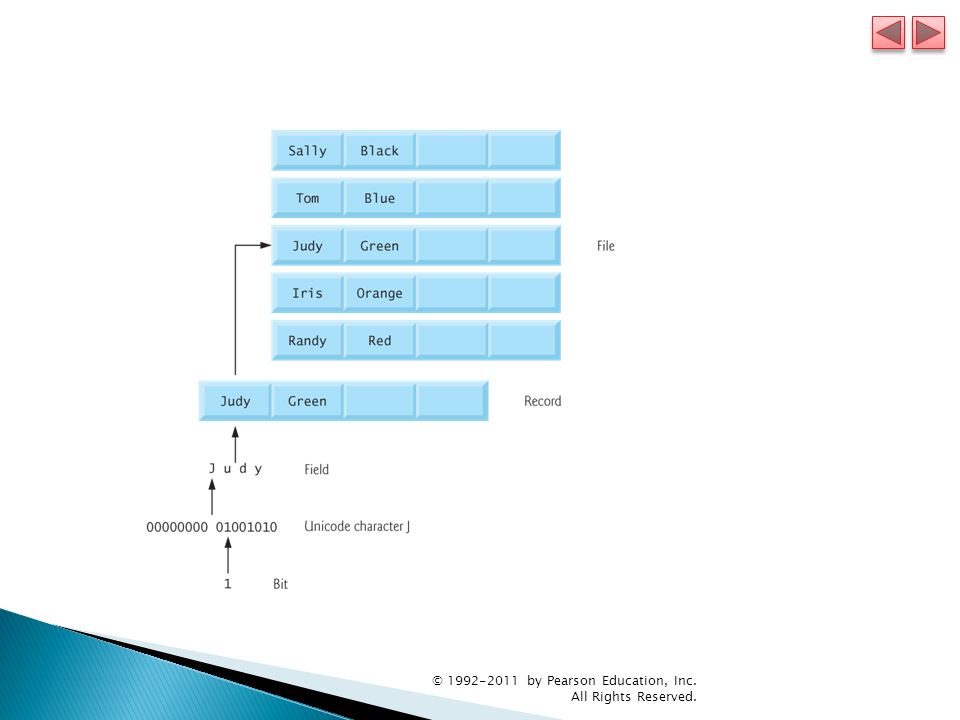
Typically, a record is composed of several related fields. In a payroll system, for example, a record for a particular employee might include the following fields: Employee identification number Name Address Hourly pay rate Number of exemptions claimed Year-to-date earnings Amount of taxes withheld © 1992-2011 by Pearson Education, Inc. All Rights Reserved.

6
Visual Basic views a file simply as a sequential stream of bytes. Depending on the operating system, each file ends either with an end-of-file marker or at a specific byte number that’s recorded in a system-maintained administrative data structure for the file. You open a file from a Visual Basic program by creating an object that enables communication between a program and a particular file, ◦ such as an object of class: StreamWriter to write text to a file or ◦ an object of class StreamReader to read text from a file. © 1992-2011 by Pearson Education, Inc. All Rights Reserved.

11
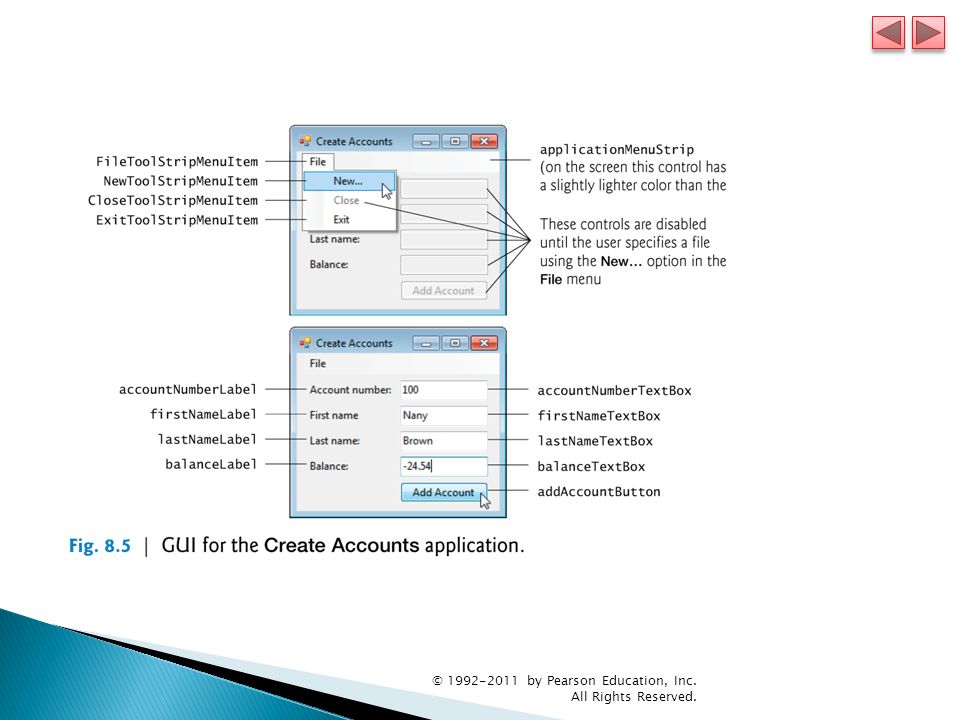
The GUI for the Create Accounts application is shown in Fig. 8.5. This application introduces the MenuStrip control which enables you to place a menu bar in your window. It also introduces ToolStripMenuItem controls which are used to create menus and menu items. Like other controls, you can change the variable names in the Properties window by modifying the (Name) property. © 1992-2011 by Pearson Education, Inc. All Rights Reserved.
 property. © by Pearson Education, Inc. All Rights Reserved..")
13
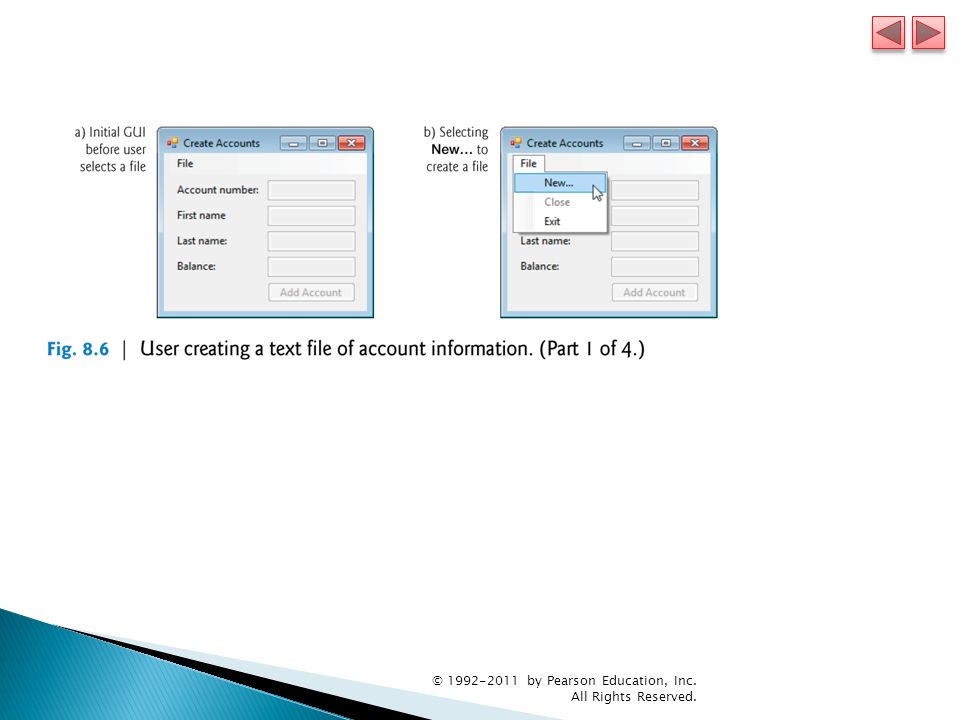
Interacting with the Create Accounts Application ◦ When the user initially executes this application, the Close menu item, the TextBox es and the Add Account Button are disabled (Fig. 8.6(a))—the user can interact with these controls only after specifying the file into which the records will be saved. ◦ The File menu provides two other menu items— Close to close the file so the user can create another file and Exit to terminate the application. © 1992-2011 by Pearson Education, Inc. All Rights Reserved.
)—the user can interact with these controls only after specifying the file into which the records will be saved. ◦ The File menu provides two other menu items— Close to close the file so the user can create another file and Exit to terminate the application. © by Pearson Education, Inc. All Rights Reserved..")
18
Let’s now study the declaration of class CreateAccounts. Framework Class Library classes are grouped by functionality into namespaces, which make it easier to find the classes needed to perform particular tasks. Line 3 is an Imports statement, which indicates that we’re using classes from the System.IO namespace. This namespace contains stream classes such as StreamWriter (for text output) and StreamReader (for text input). Line 6 declares fileWriter as an instance variable of type StreamWriter. © 1992-2011 by Pearson Education, Inc. All Rights Reserved.
 and StreamReader (for text input). Line 6 declares fileWriter as an instance variable of type StreamWriter. © by Pearson Education, Inc. All Rights Reserved..")
20
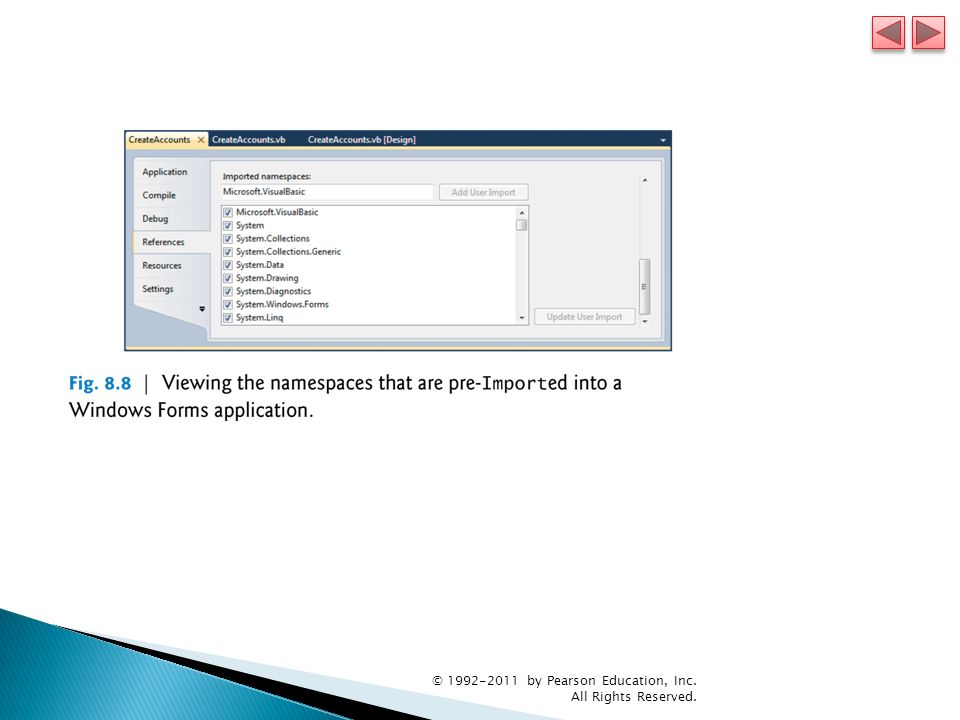
You can see the namespaces (Fig. 8.8) that were automatically imported into your project by right clicking the project’s name in the Properties window, selecting Properties from the menu and clicking the References tab. The list appears under Imported namespaces: —each namespace with a checkmark is automatically imported into the project. This application is a Windows Forms application.The System.IO namespace is not imported by default. To import a namespace, you can either use an Imports statement (as in line 3 of Fig. 8.7) or you can scroll through the list in Fig. 8.8 and check the checkbox for the namespace you wish to import. © 1992-2011 by Pearson Education, Inc. All Rights Reserved.
 that were automatically imported into your project by right clicking the project’s name in the Properties window, selecting Properties from the menu and clicking the References tab. The list appears under Imported namespaces: —each namespace with a checkmark is automatically imported into the project. This application is a Windows Forms application.The System.IO namespace is not imported by default. To import a namespace, you can either use an Imports statement (as in line 3 of Fig. 8.7) or you can scroll through the list in Fig. 8.8 and check the checkbox for the namespace you wish to import. © by Pearson Education, Inc. All Rights Reserved..")
24
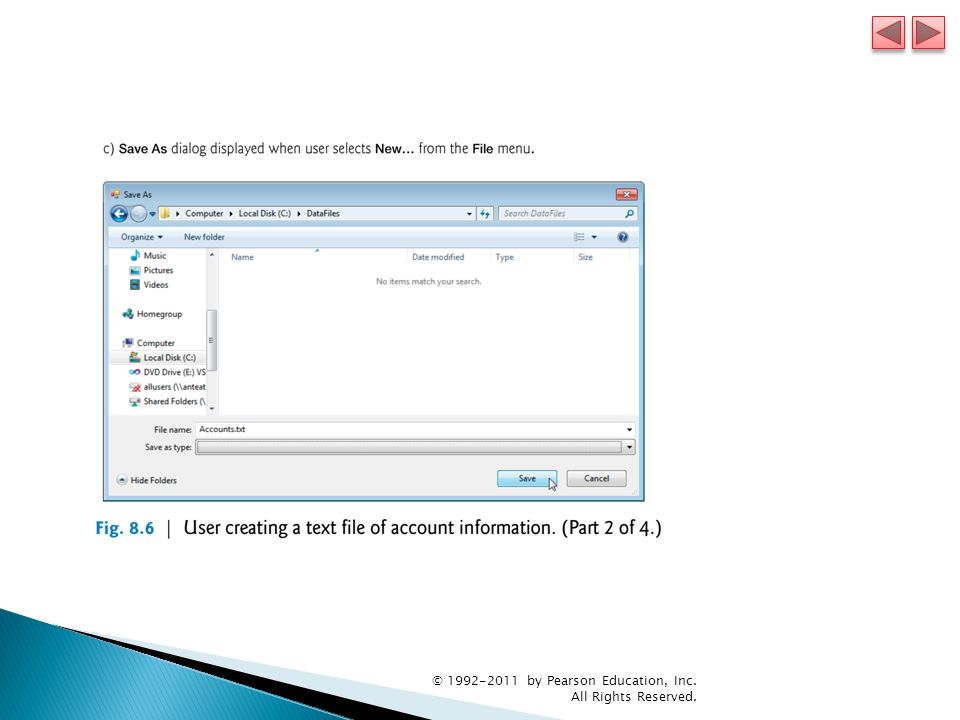
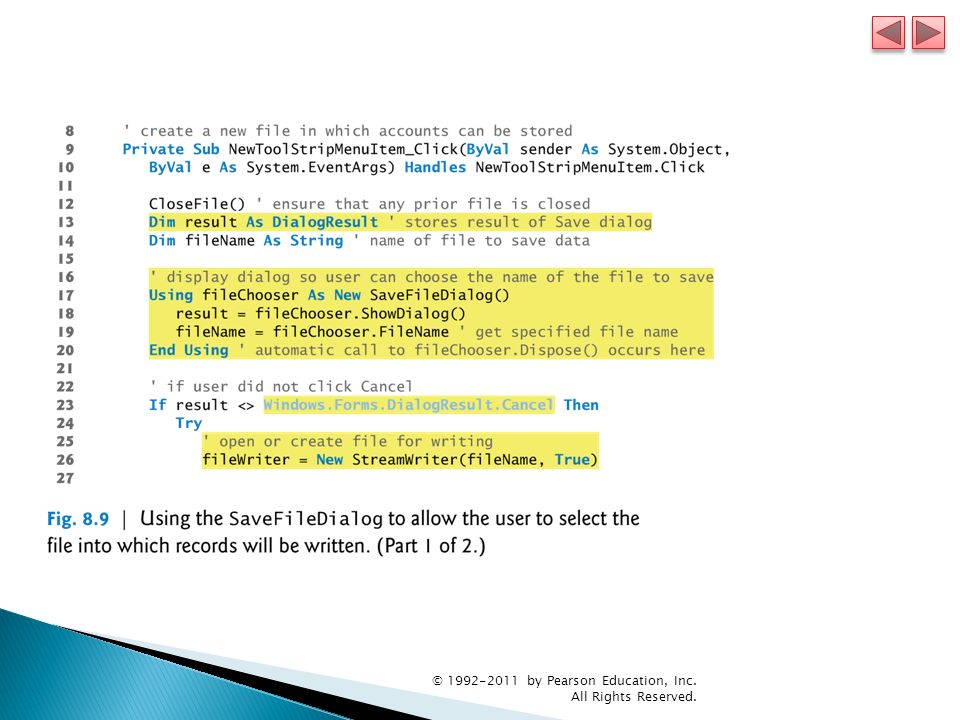
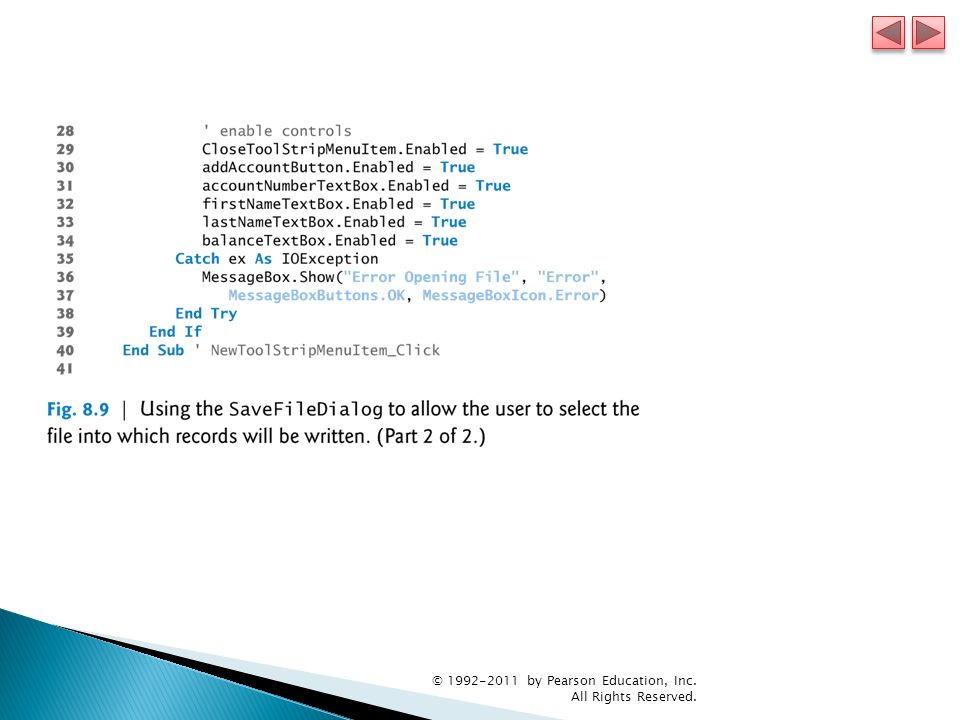
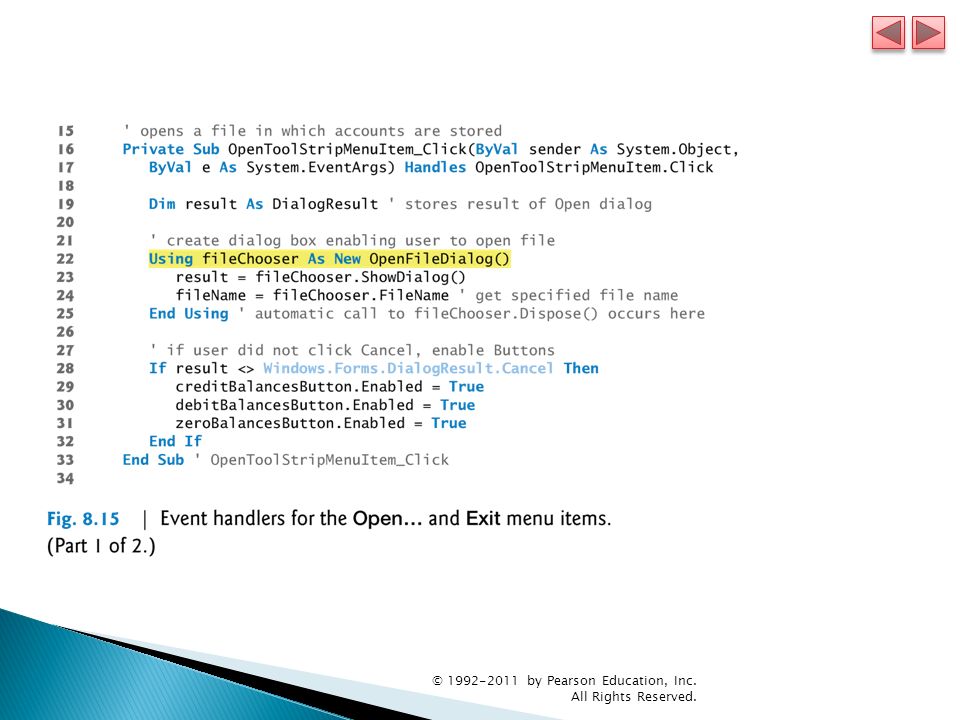
First, line 17 creates the SaveFileDialog object (namespace System.Windows.Forms ) named fileChooser. Line 18 calls its ShowDialog method to display the SaveFileDialog (Fig. 8.6(c)). This dialog prevents the user from interacting with any other window in the program until the user closes it by clicking either Save or Cancel, so it’s a modal dialog. © 1992-2011 by Pearson Education, Inc. All Rights Reserved.
). This dialog prevents the user from interacting with any other window in the program until the user closes it by clicking either Save or Cancel, so it’s a modal dialog. © by Pearson Education, Inc. All Rights Reserved..")
25
Method ShowDialog returns a DialogResult enumeration constant specifying which button ( Save or Cancel ) the user clicked to close the dialog. This is assigned to the DialogResult variable result (line 18). Line 19 uses SaveFileDialog property FileName to obtain the location and name of the file. © 1992-2011 by Pearson Education, Inc. All Rights Reserved.
. Line 19 uses SaveFileDialog property FileName to obtain the location and name of the file. © by Pearson Education, Inc. All Rights Reserved..")
26
Lines 17–20 introduce the Using statement, which simplifies writing code in which you obtain, use and release a resource. In this case, the resource is a SaveFileDialog. Windows and dialogs are limited system resources that occupy memory and should be returned to the system (to free up that memory) as soon as they’re no longer needed. The Using statement in lines 17–20 creates a SaveFileDialog object, uses it in lines 18–19, then automatically calls its Dispose method to release the object’s resources as soon as End Using is reached. © 1992-2011 by Pearson Education, Inc. All Rights Reserved.
 as soon as they’re no longer needed. The Using statement in lines 17–20 creates a SaveFileDialog object, uses it in lines 18–19, then automatically calls its Dispose method to release the object’s resources as soon as End Using is reached. © by Pearson Education, Inc. All Rights Reserved..")
27
Line 23 tests whether the user clicked Cancel by comparing result to the constant Windows.Forms.Dialog- Result.Cancel. If not, line 26 creates a StreamWriter object that we’ll use to write data to the file. The two arguments are a String representing the location and name of the file, and a Boolean indicating what to do if the file already exists. If the file doesn’t exist, this statement creates the file. If the file does exist, the second argument ( True ) indicates that new data written to the file should be appended at the end of the file’s current contents. © 1992-2011 by Pearson Education, Inc. All Rights Reserved.
 indicates that new data written to the file should be appended at the end of the file’s current contents. © by Pearson Education, Inc. All Rights Reserved..")
29
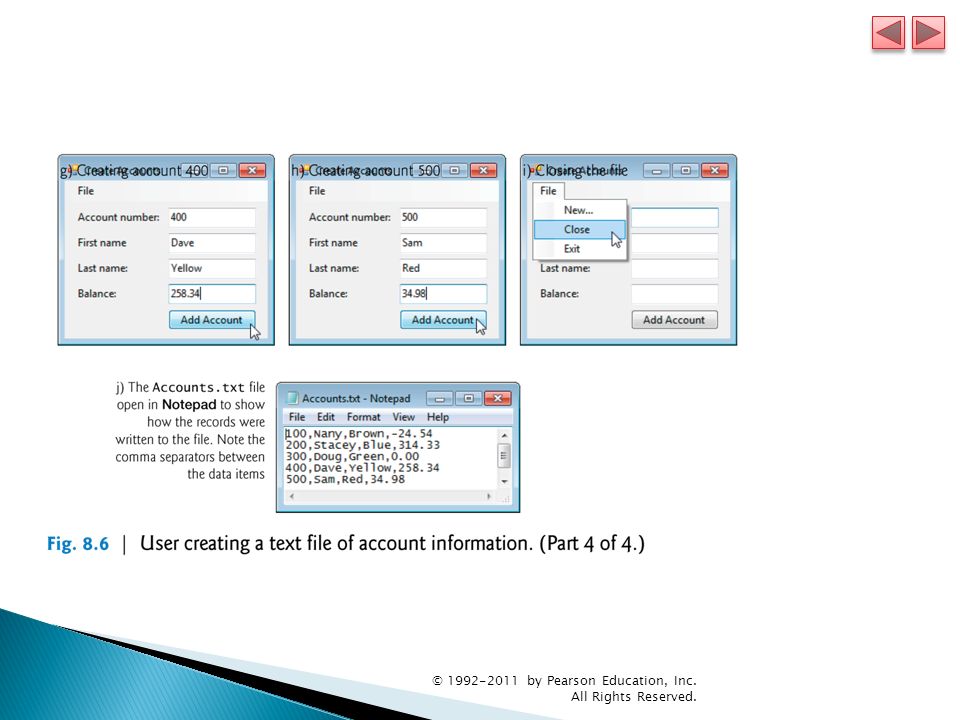
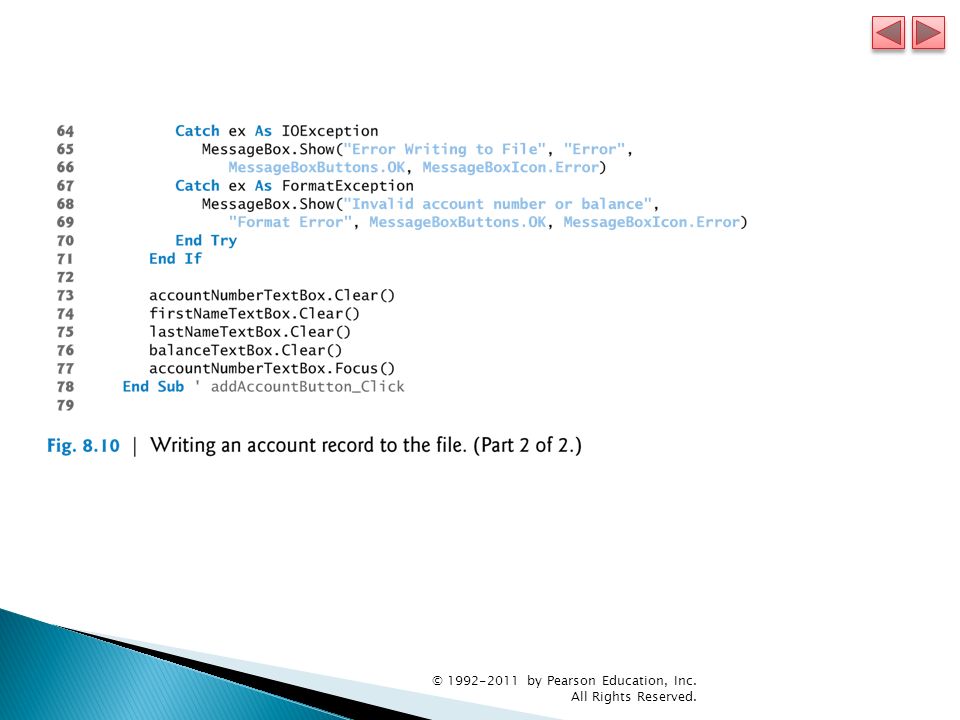
If the user entered a valid account number (that is, an integer greater than zero), we write the record to the file by invoking the StreamWriter ’s WriteLine method, which writes a sequence of characters to the file and positions the output cursor to the beginning of the next line in the file. We separate each field in the record with a comma in this example (this is known as a comma-delimited text file), and we place each record on its own line in the file. © 1992-2011 by Pearson Education, Inc. All Rights Reserved.
, and we place each record on its own line in the file. © by Pearson Education, Inc. All Rights Reserved..")
31
When the user selects File > Close, method CloseToolStripMenuItem_Click (Fig. 8.11, lines 81–91) calls method CloseFile (lines 102– 111) to close the file. Then lines 85–90 disable the controls that should not be available when a file is not open. © 1992-2011 by Pearson Education, Inc. All Rights Reserved.
 calls method CloseFile (lines 102– 111) to close the file. Then lines 85–90 disable the controls that should not be available when a file is not open. © by Pearson Education, Inc. All Rights Reserved..")
32
Subroutine (method)
")
33
© 1992-2011 by Pearson Education, Inc. All Rights Reserved.

34
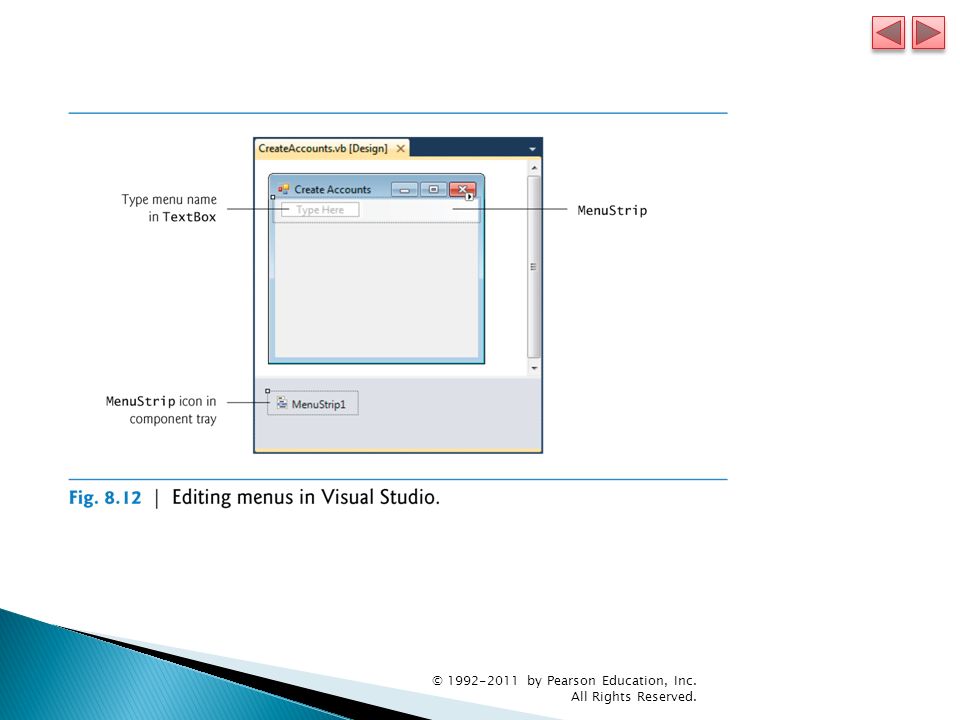
Adding a MenuStrip to the Form ◦ Before you can place a menu on your application, you must provide a MenuStrip to organize and manage the application’s menus. ◦ Double click the MenuStrip control in the Toolbox. ◦ This creates a menu bar (the MenuStrip ) across the top of the Form (below the title bar; Fig. 8.12) and places a MenuStrip icon in the component tray (the gray area) at the bottom of the designer. ◦ You can access the MenuStrip ’s properties in the Properties window by clicking the MenuStrip icon in the component tray. ◦ We set the MenuStrip ’s (Name) property to applicationMenuStrip. © 1992-2011 by Pearson Education, Inc. All Rights Reserved.
 across the top of the Form (below the title bar; Fig. 8.12) and places a MenuStrip icon in the component tray (the gray area) at the bottom of the designer. ◦ You can access the MenuStrip ’s properties in the Properties window by clicking the MenuStrip icon in the component tray. ◦ We set the MenuStrip ’s (Name) property to applicationMenuStrip. © by Pearson Education, Inc. All Rights Reserved..")
35
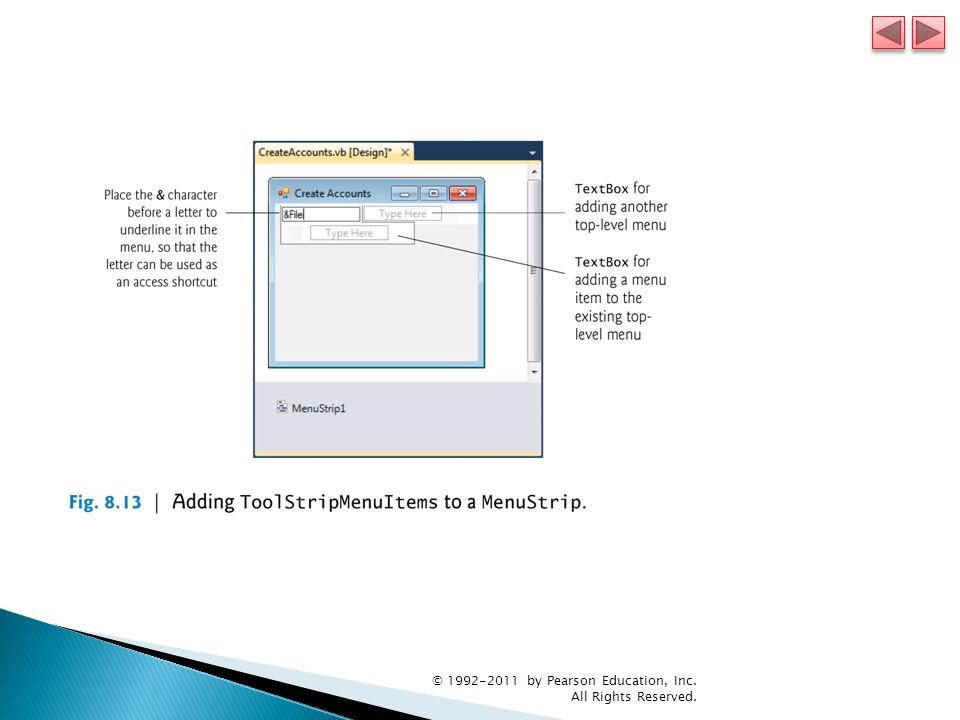
Adding a ToolStripMenuItem to MenuStrip ◦ To add a menu, click the Type Here TextBox (Fig. 8.12) in the menu bar and type the menu’s name. ◦ For the File menu, type &File then press Enter. ◦ This creates a ToolStripMenuItem that the IDE automatically names FileToolStripMenuItem. ◦ Additional Type Here TextBox es appear, allowing you to add menu items to the menu or add more menus to the menu bar (Fig. 8.13). © 1992-2011 by Pearson Education, Inc. All Rights Reserved.
 in the menu bar and type the menu’s name. ◦ For the File menu, type &File then press Enter. ◦ This creates a ToolStripMenuItem that the IDE automatically names FileToolStripMenuItem. ◦ Additional Type Here TextBox es appear, allowing you to add menu items to the menu or add more menus to the menu bar (Fig. 8.13). © by Pearson Education, Inc. All Rights Reserved..")
36
Most menus and menu items provide access shortcuts (or keyboard shortcuts) that allow users to open a menu or select a menu item by using the keyboard. For example, most applications allow you to open the File menu by typing Alt + F. To specify the shortcut key, type an ampersand ( & ) before the character to be underlined—so &File underlines the F in File. © 1992-2011 by Pearson Education, Inc. All Rights Reserved.
 before the character to be underlined—so &File underlines the F in File. © by Pearson Education, Inc. All Rights Reserved..")
43
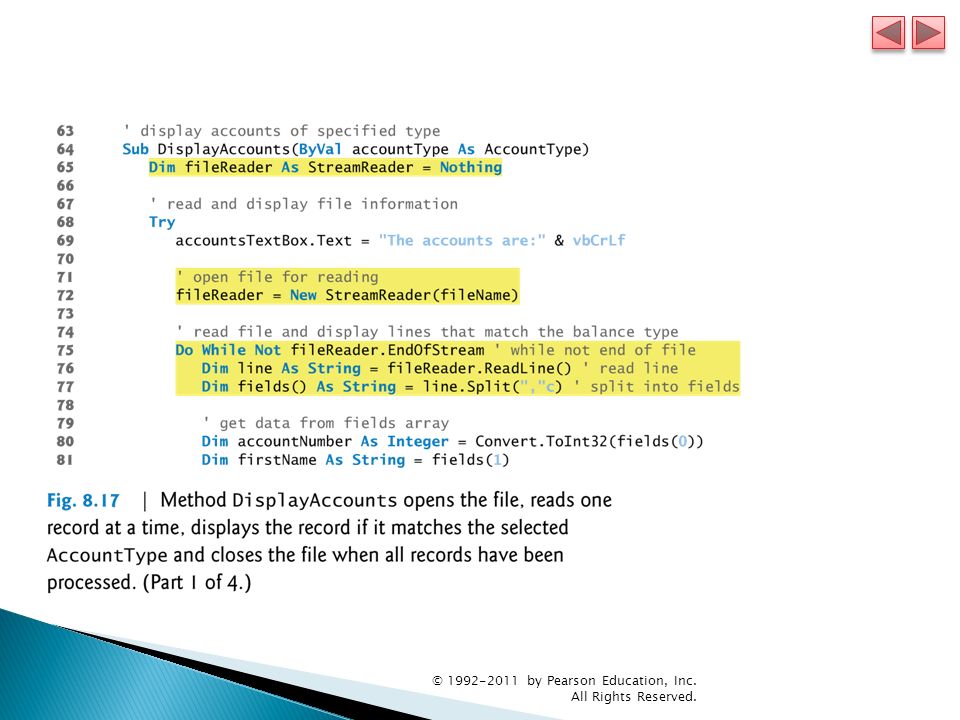
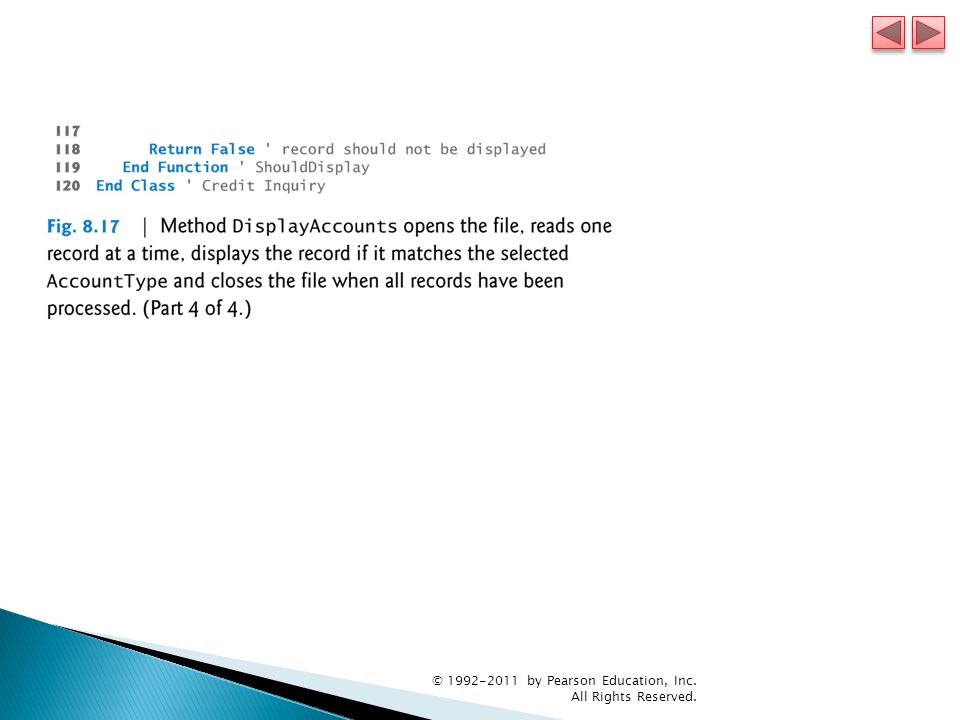
Method DisplayAccounts (Fig. 8.17, lines 64– 104) receives as an argument an AccountType constant specifying the type of accounts to display. The method reads the entire file one record at a time until the end of the file is reached, displaying a record only if its balance matches the type of accounts specified by the user. Opening the File ◦ Line 65 declares the StreamReader variable fileReader that will be used to interact with the file. ◦ Line 72 opens the file by passing the fileName instance variable to the StreamReader constructor. © 1992-2011 by Pearson Education, Inc. All Rights Reserved.
 receives as an argument an AccountType constant specifying the type of accounts to display. The method reads the entire file one record at a time until the end of the file is reached, displaying a record only if its balance matches the type of accounts specified by the user. Opening the File ◦ Line 65 declares the StreamReader variable fileReader that will be used to interact with the file. ◦ Line 72 opens the file by passing the fileName instance variable to the StreamReader constructor. © by Pearson Education, Inc. All Rights Reserved..")
48
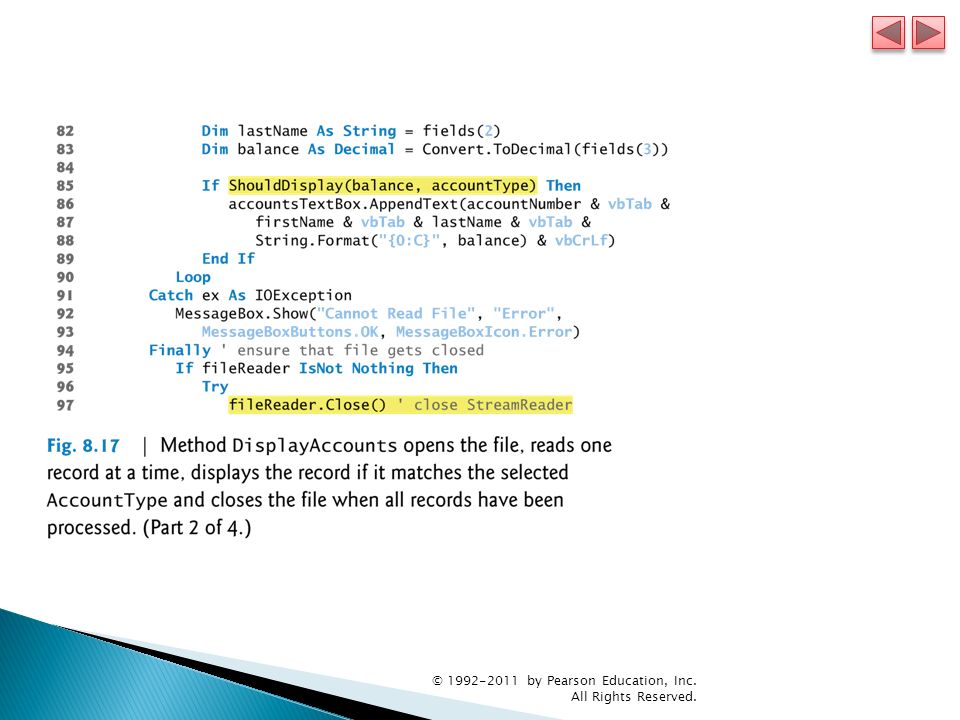
To access the record’s data, we need to break the String into its separate fields. Line 77 breaks the line of text into fields using String method Split, which receives a delimiter as an argument. In this case, the delimiter is the character literal ","c — indicating that the delimiter is a comma. A character literal looks like a String literal that contains one character and is followed immediately by the letter c. Method Split returns an array of String s representing the tokens, which we assign to array variable fields. © 1992-2011 by Pearson Education, Inc. All Rights Reserved.

49
The Using statement is actually a shorthand notation for a Try statement with a Finally block. For example, the Using statement in Fig. 8.15 (lines 22– 25) is equivalent to the following code: Dim fileChooser As New OpenFileDialog() Try result = fileChooser.ShowDialog() ' get specified file name fileName = fileChooser.FileName Finally fileChooser.Dispose() End Try © 1992-2011 by Pearson Education, Inc. All Rights Reserved.
 is equivalent to the following code: Dim fileChooser As New OpenFileDialog() Try result = fileChooser.ShowDialog() get specified file name fileName = fileChooser.FileName Finally fileChooser.Dispose() End Try © by Pearson Education, Inc. All Rights Reserved..")
Similar presentations