Download presentation
Presentation is loading. Please wait.

5
What is Web Site Administration Tool ? WAT Allow you to Configure Web Site With Simple Interface –Manage Users –Manage Roles –Manage Access Rules –SMTP Settings –Generate Database (ASPNetDB.mdf) –Debug and Trace –Error Page –Application Settings
 –Debug and Trace –Error Page –Application Settings.")
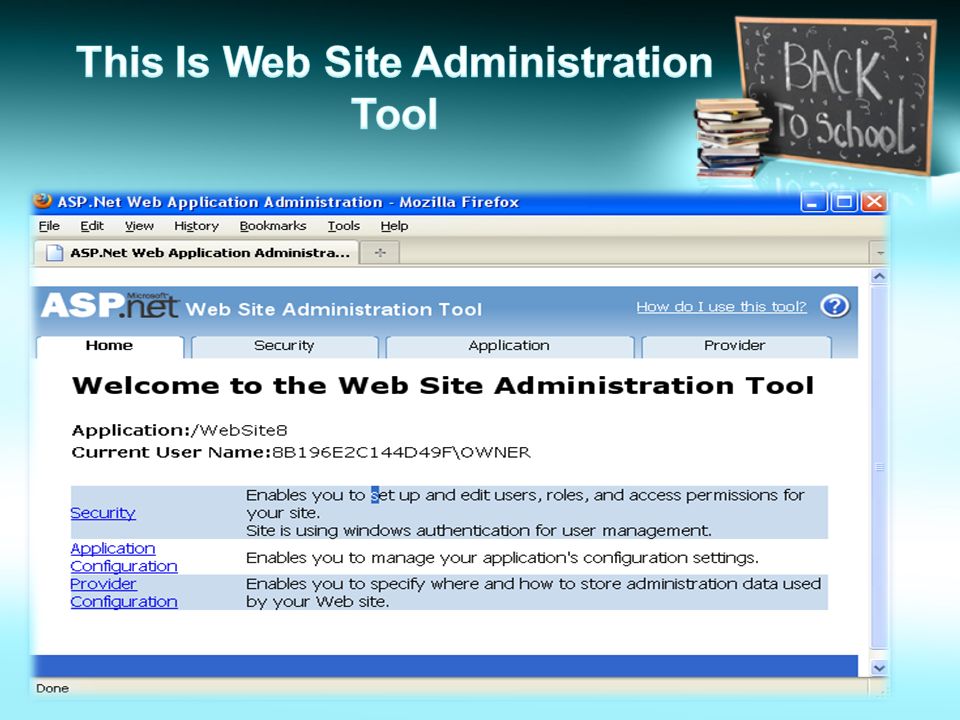
6
How Can I Get It ? Easy To Open and Start –Web Site Menu >> And Choose : ASP.Net Configuration –OR in Solution Explorer Window Click on This Button

7
Home Tab Just Navigation Menu to other tabs

8
Security Tab Choose Authentication Type set up and edit users Cerate & Manage roles Set access permissions (Access Rules ) –Authorization Allow User,Role deny Other
 –Authorization Allow User,Role deny Other")
9
First Step Click Highlight Link

10
Select authentication type –Choose From The internet authentication type and Press Done

11
Come Back Automatically Now You Can create and Manage User

12
Create User Fill Your Data and Press Create User

13
Welcome Member Press Continue To Create New User Or Press Back To Return to Security Tab again

14
Create Roles If You Press Back Will Find this :: –Press Enable Roles To Enable and Create

15
Enable Roles Press Highlight Below To Create

16
Create Roles Enter Role Name and Press Add Role Repeat Step if You Need More Or Press Back To Finish

17
Back To Web.Config Without Closing Window Switch To Web.Config –Will See this ! Agree Press Yes to All Remember that you will See above Dialog Every time you Modify Something in WAT Did you Notes Additional information Like This :

18
Access Rules In other Name Call Authorization – Access Permission –Press Create Access Rules Allow/Deny

19
Admin directory –Allow Administrator Role and Deny Users

20
Manage Rules After Press Ok Press Manage Access Rules –Notes Who is Allowed and Denied ! – Who is Allowed and Denied !

21
Web.Config Again In This Case not top root but in Subfolder (Admin) Dynamically another web.config Created inside –If you can’t see it in Admin Folder Make a refresh –You will get it’s Content Like This
 Dynamically another web.config Created inside –If you can’t see it in Admin Folder Make a refresh –You will get it’s Content Like This")
22
Application Tab Application Settings SMTP Settings (Mail) Application Status Debugging and Tracing Define Error Page
 Application Status Debugging and Tracing Define Error Page")
23
Take a Look

24
Application Settings After Press Create Application Settings Enter Your Data –When you Finished Press Save

25
Add another Want to add another key an value Press Add another Press Ok to return to Application Tab Switch to Web.Conifg to See this

26
Manage Application Settings Edit Or Delete –Press Back to return to Parent tab

27
SMTP Settings Press Configure SMTP E-Mail Settings –SMTP = Simple Mail Transfer Protocol SMTP responsible For Sending Not receiving

28
Don’t Forget Web.Config After You Can Press OK Again Switch to Web.Config Will Find Following:: Note : WAT (Website Adminstration Tool ) Just User interface to Web.Config
 Just User interface to Web.Config")
29
Application Status Online When Publishing Offline When Repairing

30
Taking Applications Offline Related with Take an applications Offline will generated This Code in Web.Config : Your Web applications Can’t be Started –Get Error : HTTP 404 (The Resource Can’t be Found )
")
31
Debugging and tracing

32
Debug

33
Some Details Enable debugging ::Check it When Maintain Website –Uncheck :: when Deploy. Capture tracing information ::Check it to see More info Display tracing information on individual pages :: Don’t check it (will show trace details With Controls in Page ) –Uncheck :: show trace in Own Page (trace.axd) type it manually Display trace output for :: Local requests only :: it’s Ok ( only You ) All requests :: Don’t Do this (All user will See it ) Select the sort order for trace results:: As You Want Number of trace requests to cache :: Not More Select which trace results to cache: AS you Want
 –Uncheck :: show trace in Own Page (trace.axd) type it manually Display trace output for :: Local requests only :: it’s Ok ( only You ) All requests :: Don’t Do this (All user will See it ) Select the sort order for trace results:: As You Want Number of trace requests to cache :: Not More Select which trace results to cache: AS you Want.")
34
Default Error Page Just Choose Error Page and Press Save

35
Debug,Trace, Error Page Web.Config Switch To Web.Config to See the Following :-

36
Provider Tab Two Choice (all in One Or Different for Each )
")
37
Single Provider for All Select a single provider for all site management data –One Database For All : Membership, Roles, Personalization, Profile Make a refresh to See Database in App_Data Folder

38
Different Providers For Each Define One for Membership and One For Roles

39
Membership in Web.config Feel free to return To Part 1,2 will Find Here http://www.ahmedmoosa.wordpress.com Custom Membership:: use another Database Find the way in Part 2 Don’t forget To Open Generated Database in Solution Explorer (ASPDB.mdf )
")
40
Final Word Help

41
Good Bye Keep in Touch For Part 4 (إن شاء الله ) Hope this Help Thanks For Reading
 Hope this Help Thanks For Reading")
Similar presentations


. MODULE 4.5 PubMed/How to Use MY NCBI Instructions - This part of the: course is a PowerPoint demonstration intended to introduce.>")


 TAKING A QUIZ (SLIDE 8) REVIEWING A QUIZ (SLIDE 17) GROUP MEMBERSHIP (SLIDE 26) CREATING QUIZZES (SLIDE 31)>")

 © Abdou Illia, Spring 2006.>")


 follow the hyperlinks to navigate to the specified Topic or Figure.>")


