Download presentation
Presentation is loading. Please wait.

1
MS Power point Tutorial
CS102 By: T.Ebtehal Alotaibi

2
Q/A:@CIS102 https://sites.google.com/site/computersciences102/home
What is Power Point? Program that allows the user to design a presentation that consists of multiple slides. Slides may contain - Images. - Text. - Video clips. - Audios. - and related types of information.

3
Q/A:@CIS102 https://sites.google.com/site/computersciences102/home
Why Power Point? Advantages: Can easily input images. Templates are built in for different appearances. Can add notes pages. Can easily add media and recordings. More exciting than a simple word document or hand written presentation. Master slides make presentations consistent.

4
Q/A:@CIS102 https://sites.google.com/site/computersciences102/home
Why Power Point? Disadvantages: Some features can distract the audience. File size can become quite large. Some of the features can be quite complicated. There are too many software conflicts. Takes quite a bit of time to create a complete presentation.

5
Power Points 2007 (Overview)
6
Power Points 2007(Overview)

7
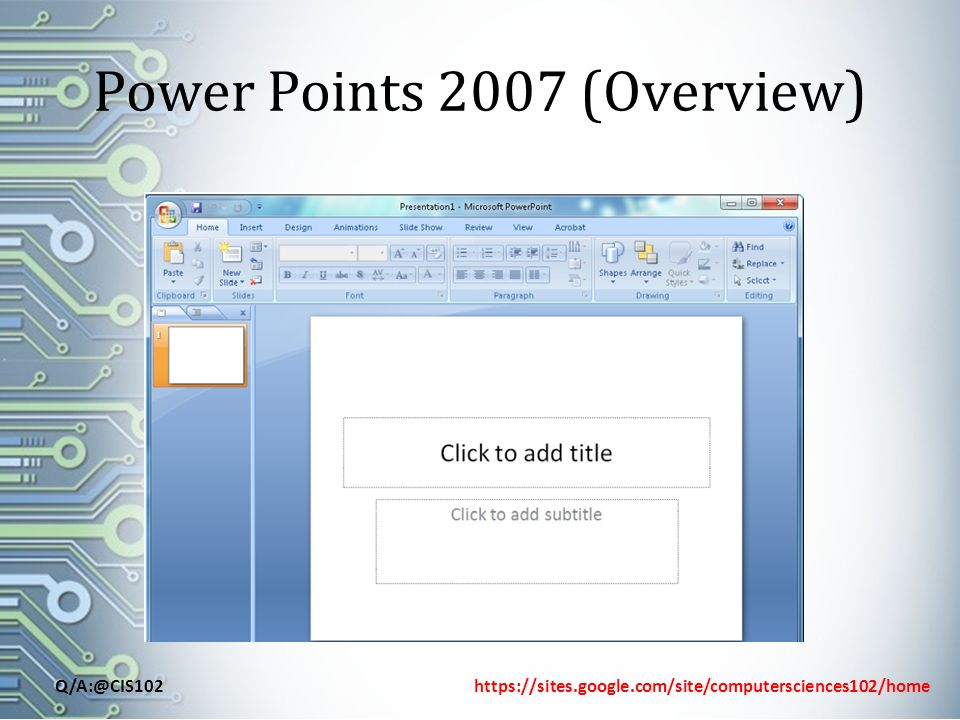
Power Points 2007 (Overview)
The Ribbon

8
Power Points 2007 (Overview)
The status bar displays the slide number that is currently displayed and also the total number of slides. OUTLINE/SLIDES TABS Displays the text contained in your presentation. The slides tab displays a thumbnail of all your slides. NORMAL VIEW Splits your screen into three major sections: slides/outline tabs, the slide pane, and the note area. The outline and slides tab are on your left side of your window. SLIDE SORTER VIEW This view shows you the thumbnails of all your slides. SLIDE SHOW Use the slide show view when you want to view your slides as they will look in your final presentation.

9
Create new presentation
Click the Microsoft Office Button. Click New. Click Blank Presentation.

10
Q/A:@CIS102 https://sites.google.com/site/computersciences102/home
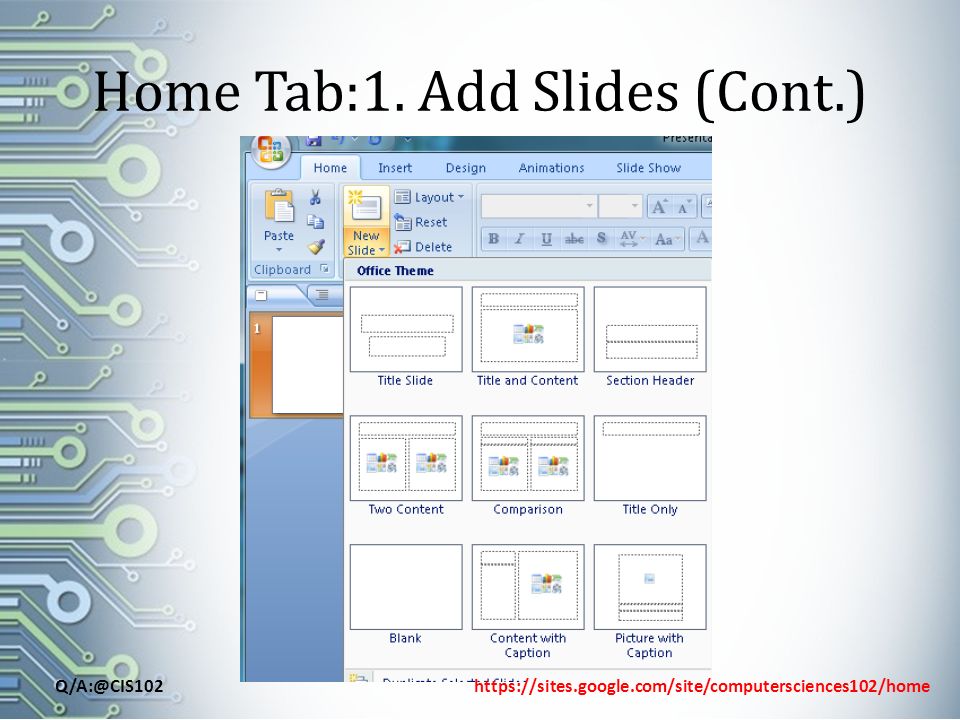
Home Tab:1. Add Slides New Slide: Select the slide immediately before where you want the new slide. Click the New Slide button on the Home tab. Click the slide choice that fits your material. Duplicate Selected Slides Select the slide to duplicate. Click Duplicate Selected Slides. To change slides layout, select your needed design from Layout button To delete slide, select it, then click Delete button.

11
Home Tab:1. Add Slides (Cont.)
12
Insert Tab: 1. Create a Table
To create a table: ‐ Place the cursor on the page where you want the new table. ‐ Click on the Insert tab of the ribbon. ‐ Click on Tables, and enter the number of rows and columns. ‐ Place the cursor in the cell where you wish to enter information and begin typing. ‐ Click on your table and then the Design tab to customize your tables.

13
Insert Tab: 2. Add Picture
To add a picture: ‐ Click on the Insert tab. ‐ Click on the Picture button. ‐ Browse to the picture from your files ‐ Select the picture you want to insert in PowerPoint ‐ Click Insert.

14
Insert Tab: 3. Add Clip Art
To add clip art: ‐ Click the Insert Tab. ‐ Click the Clip Art button. ‐ Search for the clip art using the search Clips Art dialog box. ‐ Select the graphic you would like to add. ‐ To move the graphic, click it and drag it to where you want it.

15
Q/A:@CIS102 https://sites.google.com/site/computersciences102/home
Insert Tab: 4. Add Shape To add Shapes: ‐ Click the Insert tab. ‐ Click the Shapes button. ‐ Click the shape you choose. How to Format the Shapes: ‐ Click on your shape (object). ‐ Click the Format tab.
. ‐ Click the Format tab.")
16
Insert Tab: 5. Add SmartArt
To add SmartArt: ‐ Click The Insert tab. ‐ Click the SmartArt button. ‐ Click the StartArt you choose. ‐ Drag it to the desired location in the slide

17
Insert Tab: 6. Create a Chart
To insert a chart: ‐ Click the Insert tab. ‐ Click the type of Chart you want to create. ‐ Insert the Data and Labels.

18
Insert Tab: 6. Create a Chart 2
Edit Chart Data: ‐ Click on the chart ‐ Click Edit Data on the Design tab. ‐ Edit data in the spreadsheet.

19
Insert Tab: 7. Adding Video and Audio
Adding video clips ‐ Click the Movies button on the Insert tab. ‐ Choose Movies from File or Movie from Clip Organizer. Adding Audio ‐ Click the Audio button on the Insert tab. ‐ Choose Sound from File, Sound from Clip Organizer, Play CD Audio Tract, or Record Sound.

20
Q/A:@CIS102 https://sites.google.com/site/computersciences102/home
What are the themes Themes are designed that can be applied to an entire presentation that allows for consistency throughout the presentation. You can also apply new colors to a theme.

21
Design Tab:1. Change the slides theme
Themes ‐ Click the Design tab. ‐ Choose one of the displayed Themes. Apply Colors Themes ‐ Click the Colors drop down arrow. ‐ Choose a color set or click Create New Theme Color. Background Theme ‐ Click the Background Styles button on the Design tab.

22
Design Tab:1. Change the slides theme (Cont.)

23
Animations Tab:1. TRANSITION
Slide Transitions are effects that are in place when you switch from one slide to the next. To add slide transitions: ‐ Select the slide that you want to transition. ‐ Click the Animations tab. Choose the appropriate animation or click Transition dialog box.

24
Animations Tab:1. TRANSITION
Slide Transitions are effects that are in place when you switch from one slide to the next. To add Transition Sound: Add sound by clicking the arrow next to Transition Sound

25
Animations Tab:1. TRANSITION
Slide Transitions are effects that are in place when you switch from one slide to the next. To modify transition speed: Modify the transition speed by clicking the arrow next to Transition Speed.

26
Animations Tab:2. ANIMATION
Slide animations are special effects that you can add to objects on a slide. To apply animation effects: ‐ Select the object you want to animate. ‐ Click the Animation tab on the Ribbon. ‐ Click Add Effect. ‐ Choose the effect you want on your object To preview the animation on a slide: ‐ Click the Preview button on the Animation tab.

27
Q/A:@CIS102 https://sites.google.com/site/computersciences102/home
Slide Show Tab Slide Show Options: ‐ Preview the slide show from the beginning. ‐ Preview the slide show from current slide. ‐ Set up slide show.

28
Q/A:@CIS102 https://sites.google.com/site/computersciences102/home
PRINTING To print: ‐ Click Microsoft Office Button. ‐ Click Print

29
Q/A:@CIS102 https://sites.google.com/site/computersciences102/home
PRINTING Slides: These are slides that you would see if you were showing the presentation, one slide per page. Handouts: This option allows for more slides per page (2, 3, 4, 6, or 9). Notes Page: This includes the slides and the speaker’s notes. Outline View: This will print out the outline of the presentation.
. Notes Page: This includes the slides and the speaker’s. notes. Outline View: This will print out the outline of the. presentation.")
30
Q/A:@CIS102 https://sites.google.com/site/computersciences102/home
Save the work Click Microsoft Office Button Click Save Renaming and Saving as an Earlier Version of PowerPoint Click Save As Type in a Name for your presentation In the Save as Type box, choose PowerPoint 97‐2003.

31
Q/A:@CIS102 https://sites.google.com/site/computersciences102/home
Homework Exercise (no submission): Create new power point presentation. Apply MS power point built-in theme on your slides. Slide.1: Add two Clip Art objects, one video and one audio files. Slide.2: Create chart of data and table contain that data. Save you work in form of ppt.2007, ppt.2004 and .pdf versions. Bonus Question (due to 4, April at12:00 pm via titled by your name): - Create new power point presentation (3 slides). Create your own theme. “Not built-in theme” and apply it to this file. Add a picture to slide.1 that when we click on it we go to slide.3 .
: Create new power point presentation. Apply MS power point built-in theme on your slides. Slide.1: Add two Clip Art objects, one video and one audio files. Slide.2: Create chart of data and table contain that data. Save you work in form of ppt.2007, ppt.2004 and .pdf versions. Bonus Question (due to 4, April at12:00 pm via titled by your name): - Create new power point presentation (3 slides). Create your own theme. Not built-in theme and apply it to this file. Add a picture to slide.1 that when we click on it we go to slide")
Similar presentations


