Download presentation
Presentation is loading. Please wait.

1
How ASU implemented Salary Planner

2
What is Salary Planner: A tool to take current Banner data, make changes, and then load those changes back into Banner Web based An alternative to Spreadsheet Budgeting and Mass Salary Update functionality.

3
Preliminary Steps: I. Run the NSPACAT.sql script delivered by Banner. A. Delivered with Banner B. DBA runs (must have ability to update tables). C. Creates Approval Categories and Approval Types: All you have to do is give them names. D. Does not create mandatory approval level – established by users of Salary Planner. Cont.
. C. Creates Approval Categories and Approval Types: All you have to do is give them names. D. Does not create mandatory approval level – established by users of Salary Planner. Cont..")
4
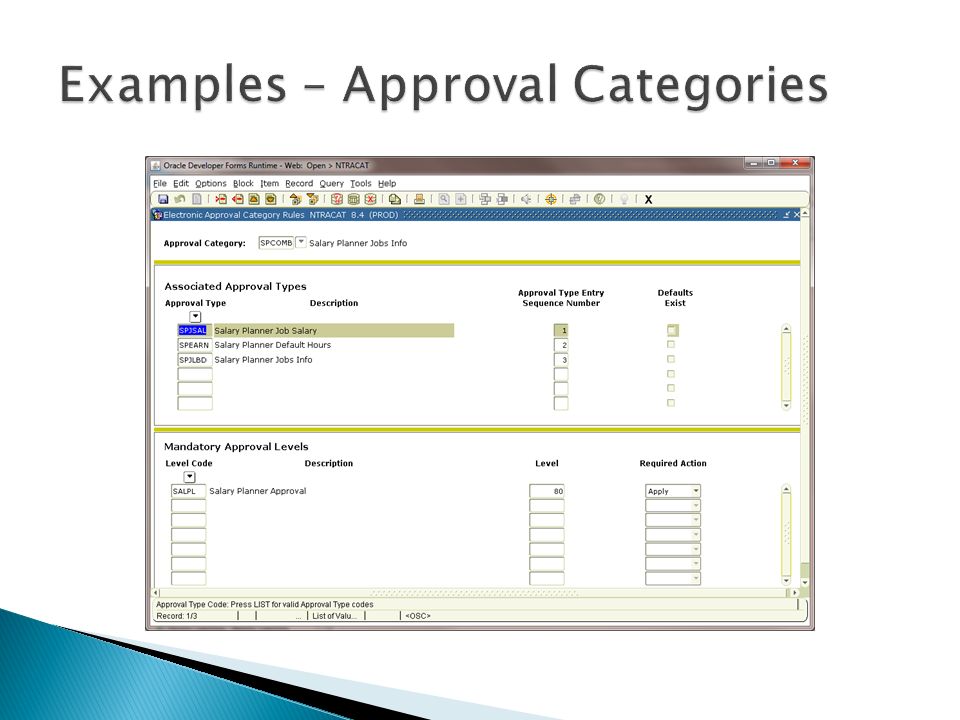
Approval Categories: NTRACAT A. Job Salary Approval Category: SPJSAL B. Default Hours Approval Category: SPEARN C. Job Labor Distribution Category: SPJLBD D. Combined Job Approval Category: SPCOMB

5
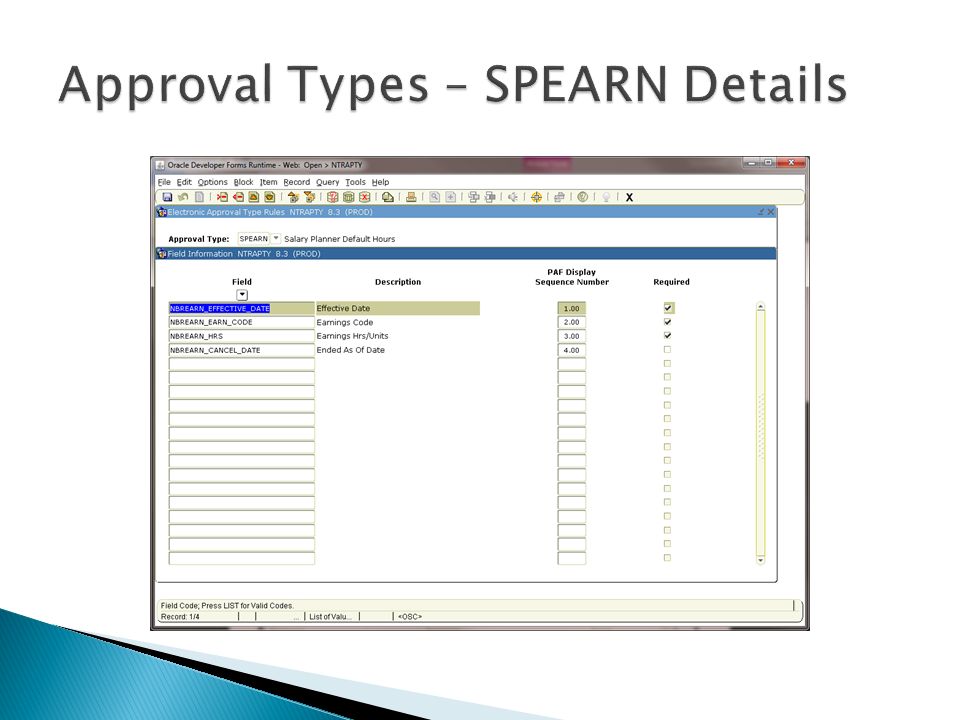
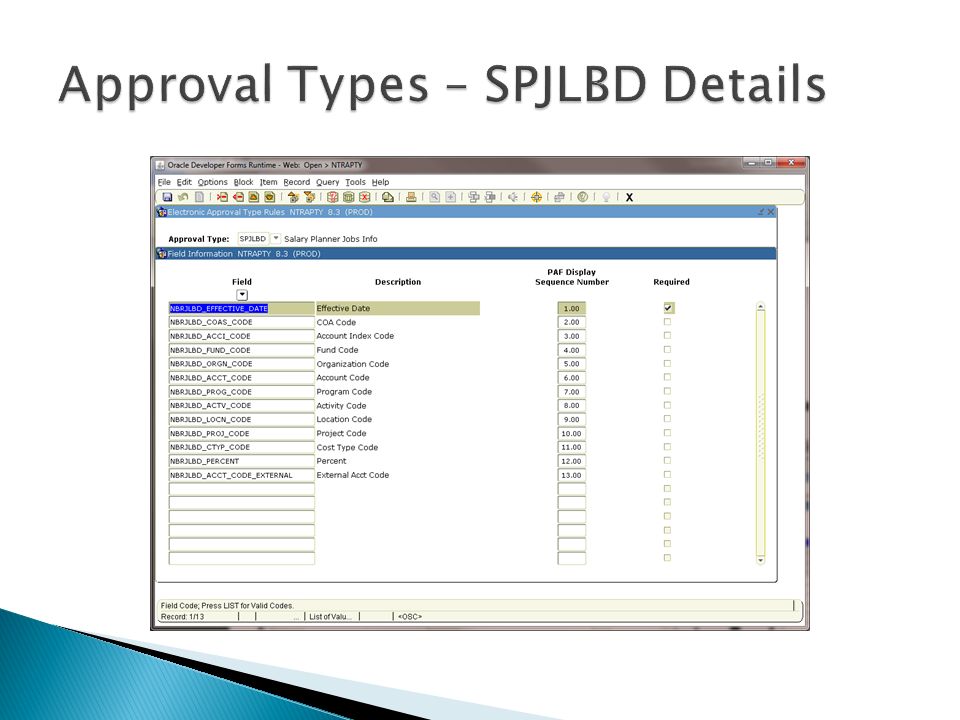
Approval Types: NTRAPTY A. Job Salary Approval Type: SPJSAL B. Default Hours Approval Type: SPEARN C. Job Labor Distribution Approval Type: SPJLBD Examples Next Page:

15
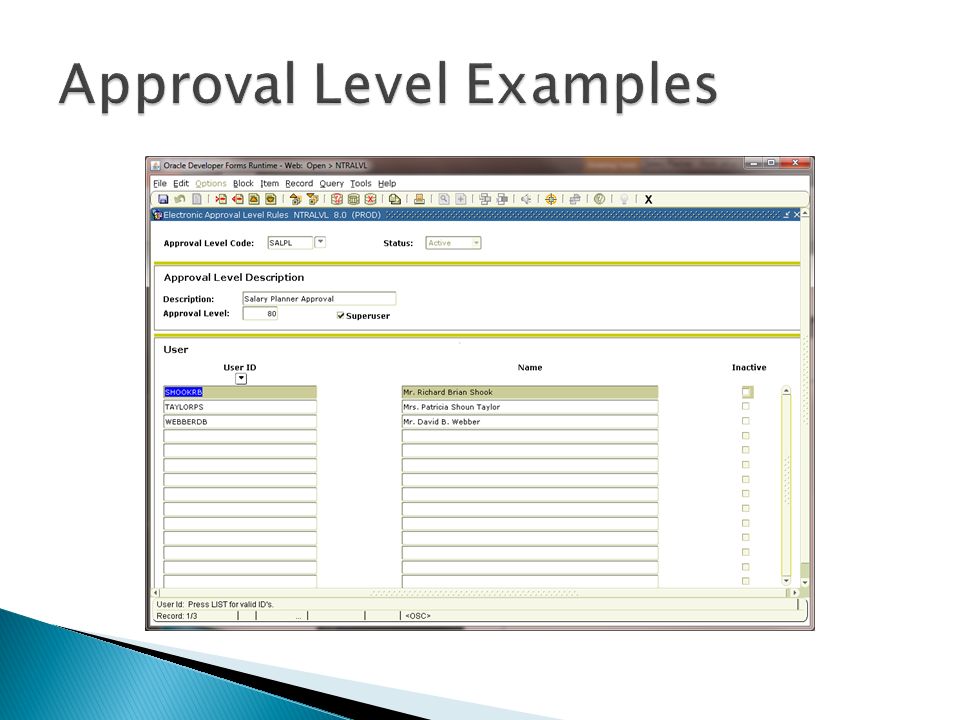
The Sungard script does not create this approval and it must be done manually after the script is run. This is added to the approval categories on NTRACAT as seen on the previous slides. You must decide how you want Salary Planner data to flow into the system. Do you want to route it to someone or do you want it to be applied directly into the system. We decided that all approvals will be done by the time we lock the scenarios and that once done the transactions would be directly applied to the database. This meant only one approval level was necessary. The users setup for running the NBPSPUP job do not necessarily need access to Salary planner but in our case they are the “Admins” for it and so are setup as master salary planner users. Example:

17
Salary Planner uses the following forms and Process. A. NTVBPRO – Budget profile setup form. B. NTRSPEX – Salary planner extract rules form. C. NSASPSC – Salary Planner Org Security Form. D. NBPSPEX – Salary Planner Extract Creation job. E. NBPSPUP – Salary Planner load job. Creates EPAF’s that are loaded using NOPEAMA.

18
If any changes have been made to ESS this link will not appear and must be activated by someone with Webtailor access. Steps to Activate: 1. Log in to ESS 2. Select the Webtailor Administrator tab. 3. Select “Menu Items”. 4. Select the pmenu.p_MainMnu link. 5. Select “Customize Menu Items”. 6. You will see a list of menu items, if at least one local change is displayed follow these additional steps. 7. Select “Add a New Menu Item”. 8. On the “Create a New Menu Item” page enter the following information and then click submit.

19
Add the sequence number. Under url add: pmenu.P_SalaMenu Link Text: Salary Planner Status Bar: Salary Planner

20
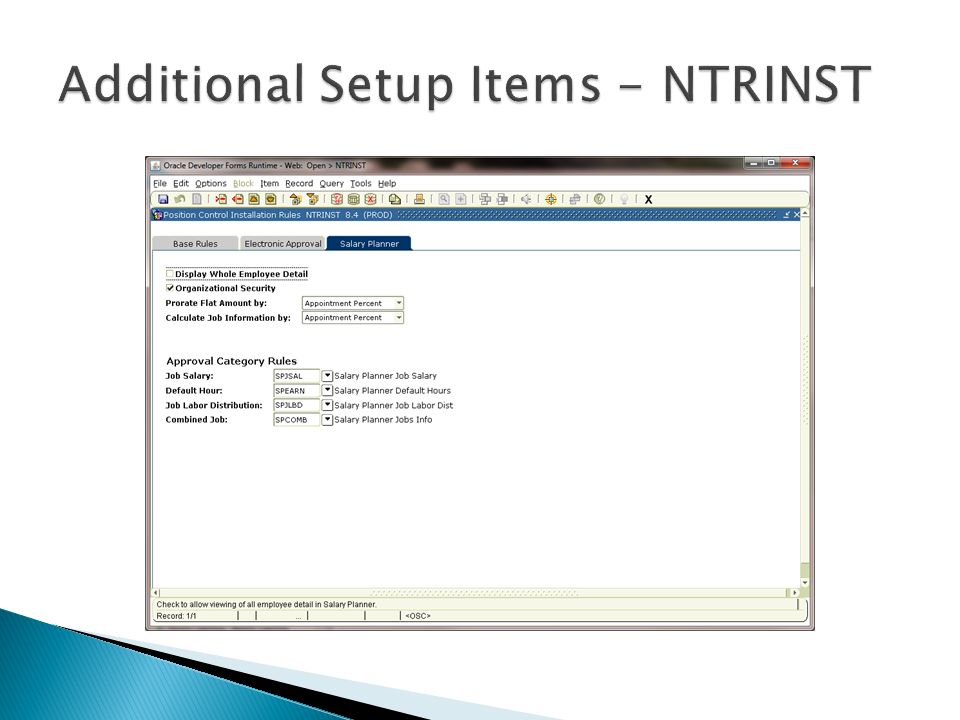
Once the preliminary setup steps are completed it’s time to setup the rest of the rule forms in Banner. These will include NTRINST, PTRUSER, NTRROUT, NTVBPRO, and PTRJCRE A. NTRINST: Position Control Installation Rule form. There is a tab on this form called “Salary Planner”. Under this tab several entries will be required. 1.Display Whole Employee detail: allows user to view the total salary of an employee across the institution regardless of the users organizational security. This info is displayed on the “List by Employee” web page under the Employee Total columns and also on the “Employee Detail” web page. We left this unchecked because we wanted the org code security enforced for all departments who might use Salary Planner. 2.Organizational Security: We wanted to enforce this so this we checked the box. 3.Prorate flat amount by/Calculate job information by: We chose to do this by Appointment percentage but this could also be by FTE or None. 4.Approval Category Rules: Here you enter the approval categories setup earlier.

22
For PTRUSER you must decide on who your users are and what role they will fill. There are 3 options: Update, Query, and None. They work with the Master Org security to allow access to salary planner. The Salary Planner Master Organization Field is used to control Salary Planner Security. The definition on this form works in conjunction with the definition of the Salary Planner Security Rule Form NSASPSC. The following are valid security definitions: Master Organization = Y, Salary Planner Master Organization = Update; No security definition required on NSASPSC Master Organization = Y, Salary Planner Master Organization = Query or None; Security definition required on NSASPSC to access Salary Planner data. Master Organization = N, Salary Planner Master Organization = Update, Query or None; Security definition required on NSASPSC to access Salary Planner data.

23
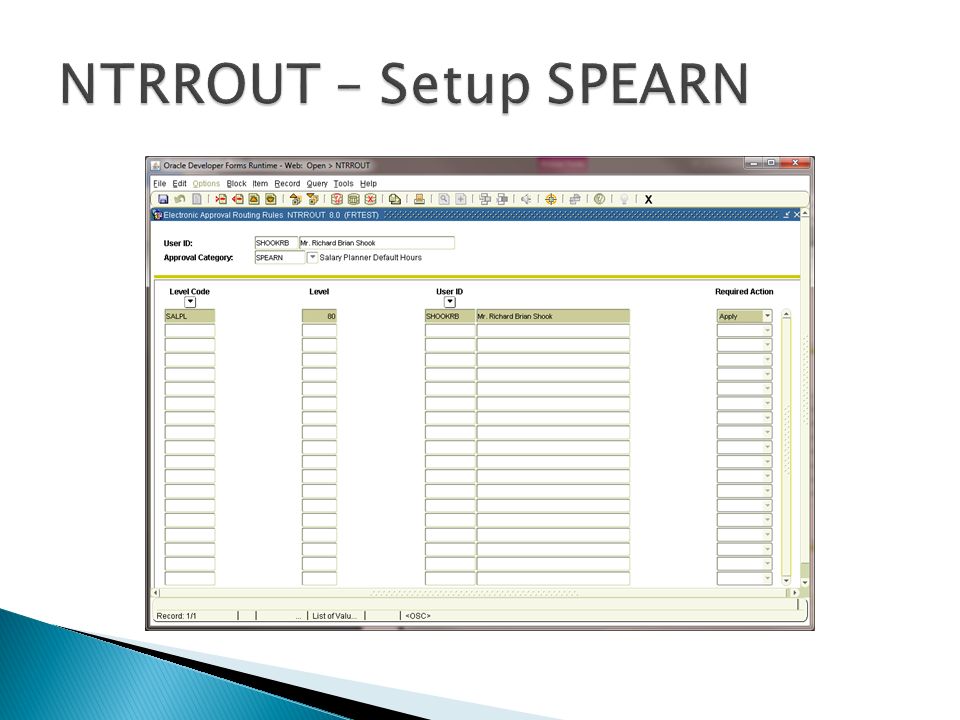
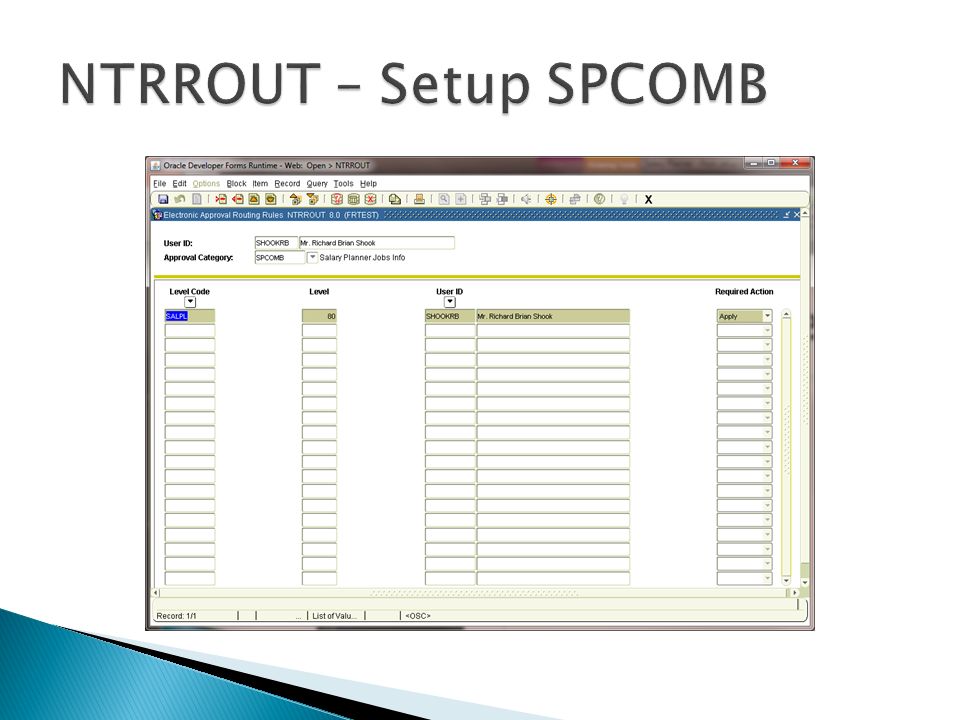
All users must be setup on GOAEACC before they can use Salary Planner. They must be on GOAEACC before you can set them up on PTRUSER. Once the users are setup then the approval categories need to be routed in such a way as there is at least one person who is assigned to the SALPL approval type. On the routing table, each approval category is assigned an approval level and a user who can do the applying just like in EPAF’s. As seen in the next few slides.

26
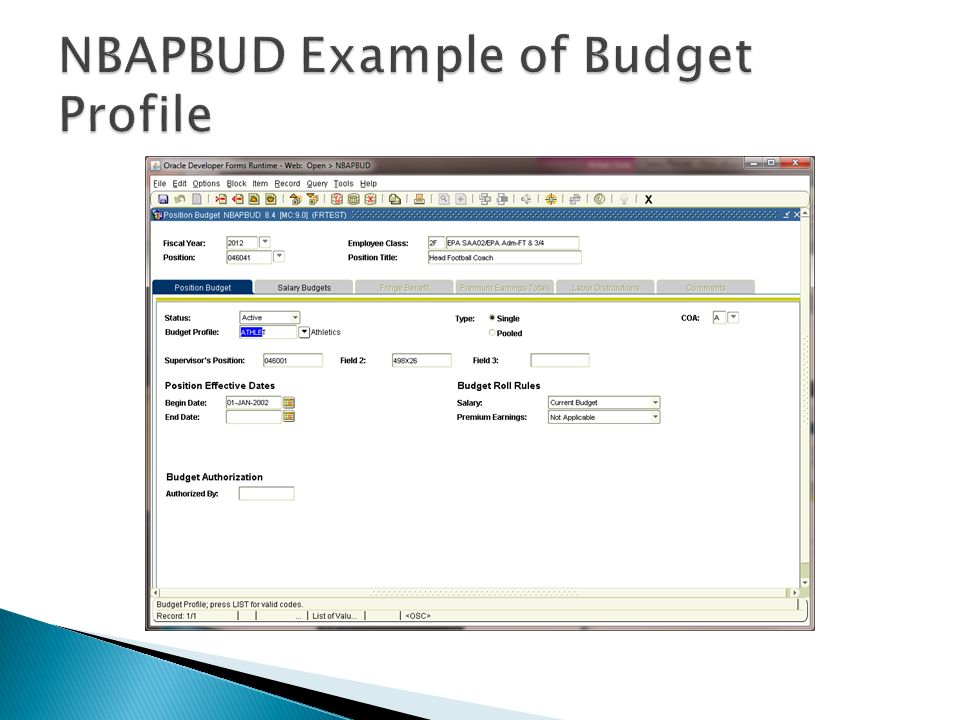
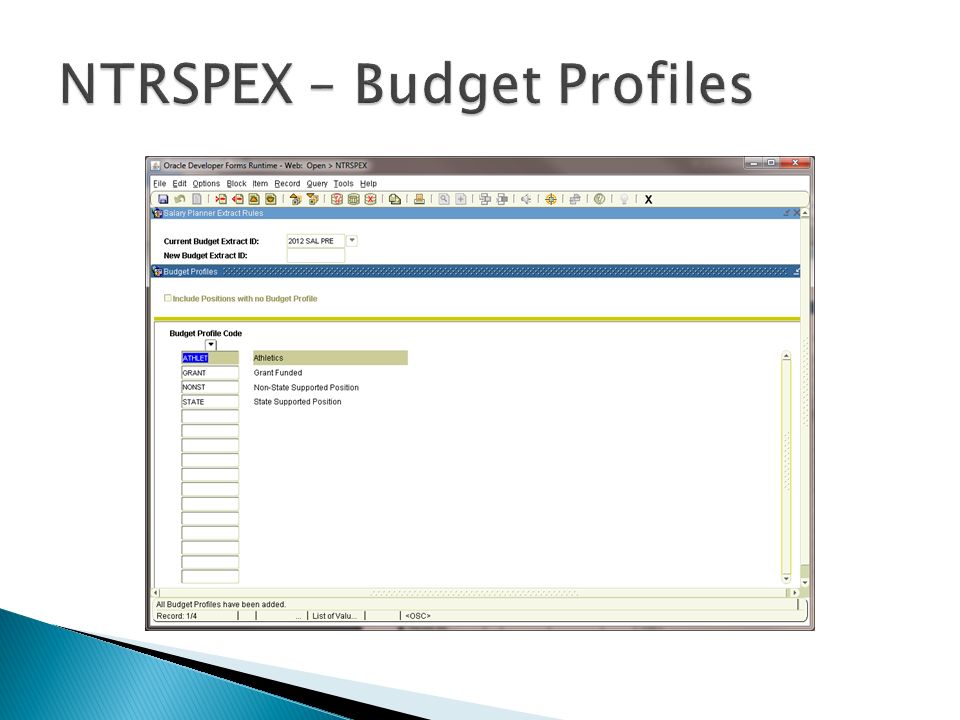
Budget profiles may be created and associated with a position. Budget profile codes are used in conjunction with budget extract rules to further define a budget extract population. Budget profile codes are created on NTVBPRO and associated with a position on NBAPBUD. Budget profile codes are optional and not required to use the Salary Planner functional capability. We created 4 main budget profiles and assigned them to all the full- time positions. These are STATE, NONST, GRANT and ATHLETICS. We use these to separate out employees on our extract. This works well for how we handle our position/job setups (Explanation Required).
..")
30
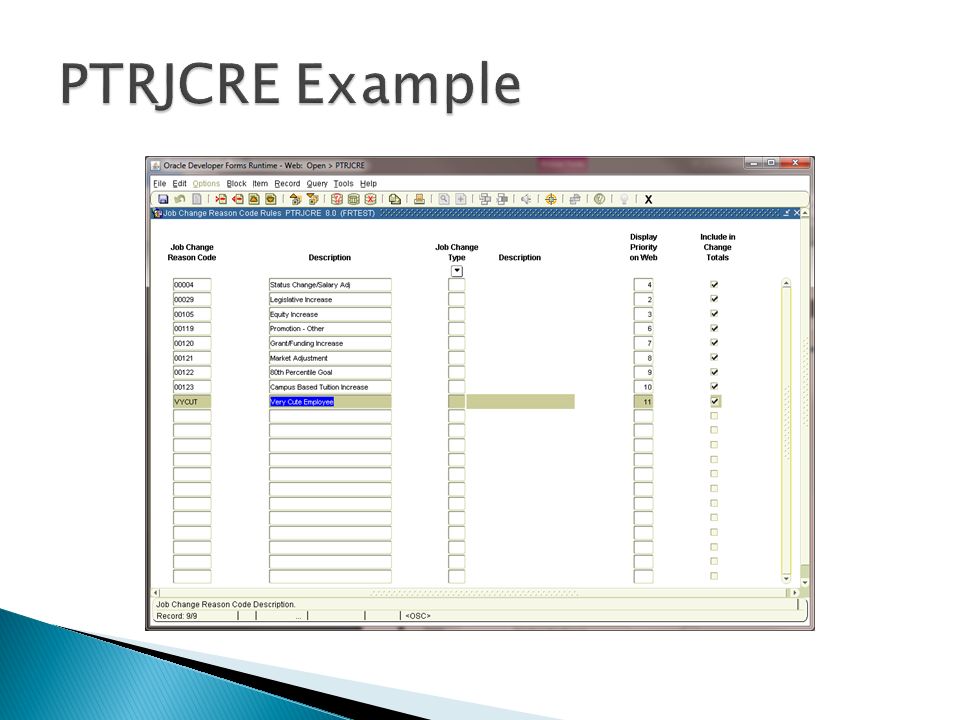
Two fields on the Job Change Reason form, ‘Display Priority on Web’ and ‘Include in Change Totals’ are used in Salary Planner. The ‘Display Priority on Web’ field indicates which reason codes are to be used in Salary Planner and in which order they appear. At least one Change Reason code assigned a priority of 1 is required when using the Salary Planner product and will be the default reason code on the List by Employee page. The ‘Include in Change Totals’ field indicates if the amounts associated with the Job Change Reason should be included in the total change amount and total change percent for a employee job in Salary Planner. This will be demonstrated in our live demo. See Example.

32
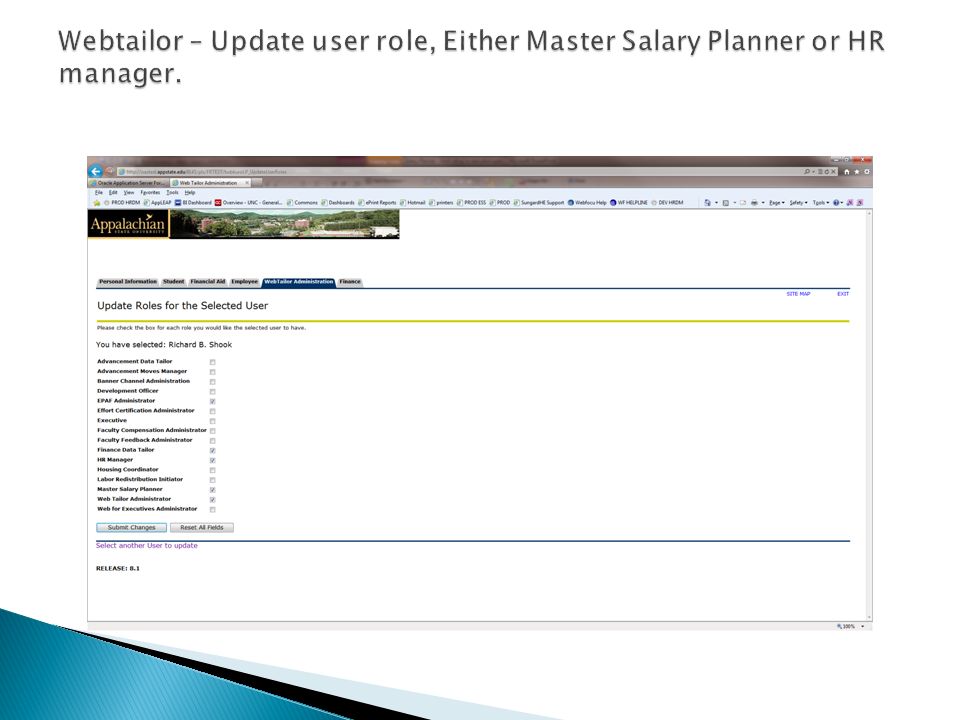
Once Banner is setup you must add roles in ESS to each user of Salary Planner. There are two roles. Master Salary Planner and HR Manager. Master Salary Planner users can update and change the initial extract. HR Managers cannot manipulate the initial extract. There should only be a limited number of Master Salary Planner users.

37
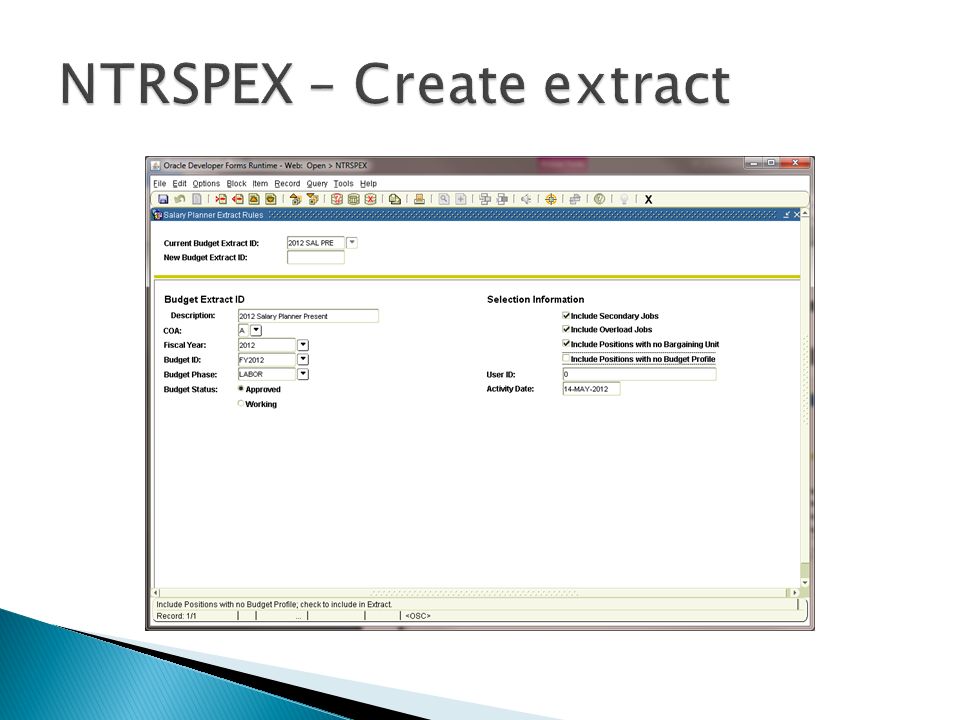
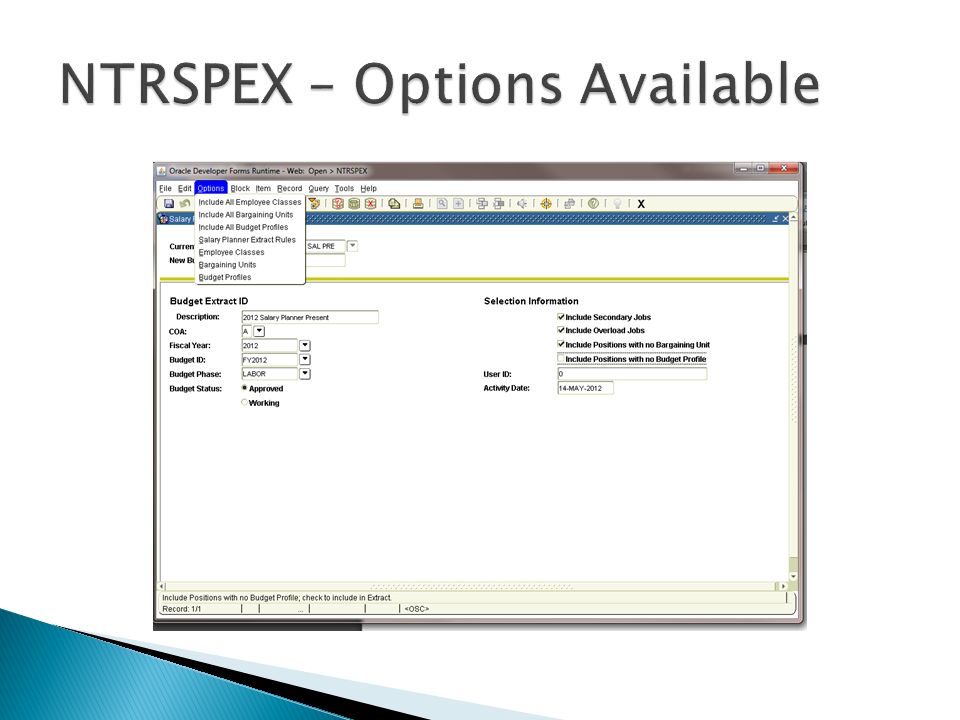
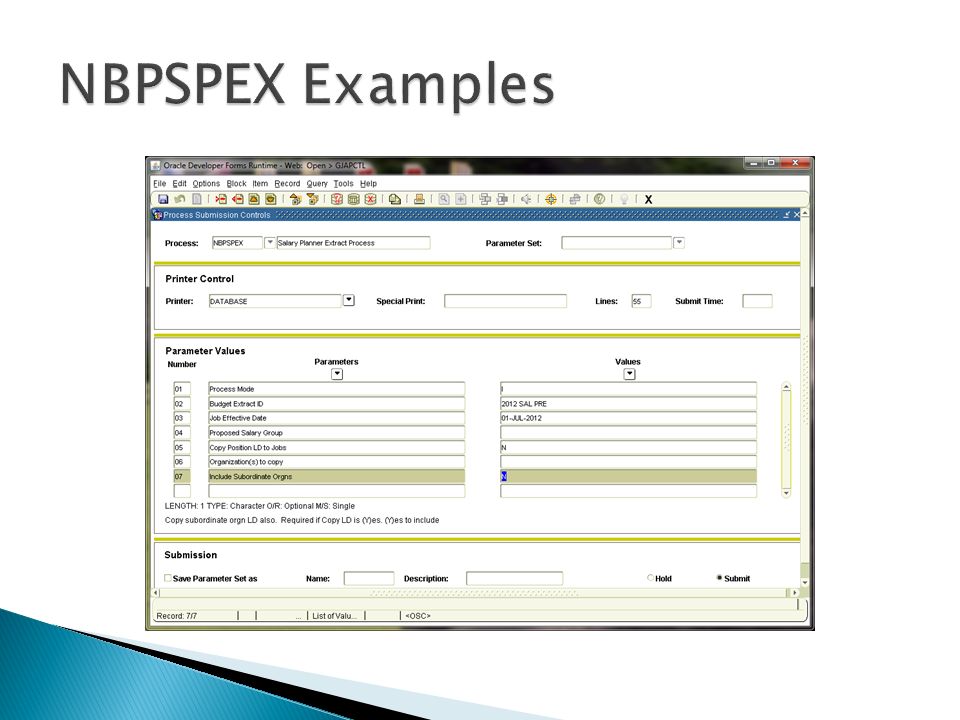
Once the setup is complete, you may start the extract creation process using NTRSPEX. The NTRSPEX form allows you to establish rules on what data will be extracted from Banner HR position budget records and employee jobs into the Salary Planner tables. Each Budget Extract ID identifies a specific chart of accounts, fiscal year, budget id/phase and budget status (working or approved). You can further identify the extract population by including specific items such as: Secondary Jobs Overload Jobs Employee Classes Bargaining Units Budget Profiles The employee class option allows the you to specify which ECLS codes to include in the extract; the ‘Budget Factor’ to use when calculating the ‘Estimated Budget’; the ‘Job Effective Date’ and ‘Personnel Date’ for proposed employee job record changes when creating EPAFS through the Salary Planner Upload process. The Job Effective Date defined here must fall within the fiscal year entered on the root window, e.g. 2012. The Personnel Date has no fiscal year restrictions because it is a memo date entry.
. You can further identify the extract population by including specific items such as: Secondary Jobs Overload Jobs Employee Classes Bargaining Units Budget Profiles The employee class option allows the you to specify which ECLS codes to include in the extract; the ‘Budget Factor’ to use when calculating the ‘Estimated Budget’; the ‘Job Effective Date’ and ‘Personnel Date’ for proposed employee job record changes when creating EPAFS through the Salary Planner Upload process. The Job Effective Date defined here must fall within the fiscal year entered on the root window, e.g The Personnel Date has no fiscal year restrictions because it is a memo date entry..")
42
Once you have selected the codes you want to process there are two dates that need to be set. Job Effective Date: This will be used to select job records with an effective date less than or equal to this date. It will also be used as the effective date on any job records that will be uploaded (see NBPSPEX for more). Job Personnel Date – For information purposes only.
. Job Personnel Date – For information purposes only..")
45
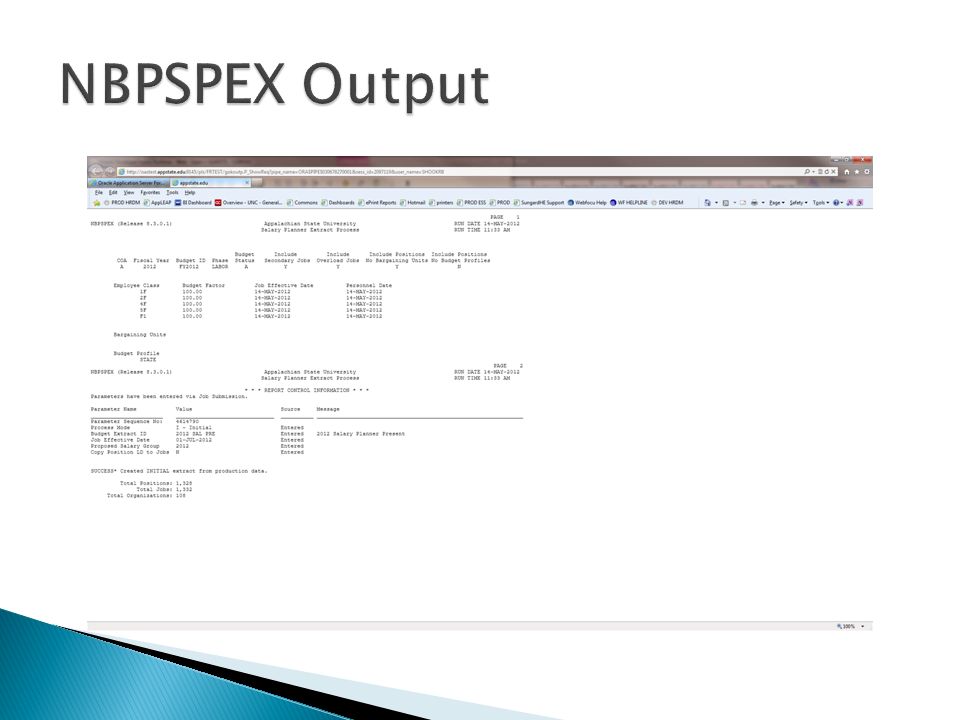
Once the extract rules are setup, the next step is to run the extract creation job – NBPSPEX. This job creates the initial extract using the rules defined on the NTRSPEX rule form. Extract Process Options: ◦ 1. Initial: Used to create the first extract for an Extract ID ◦ 2. Recreate: This option will remove all the data in the salary planner tables and new ◦ extract data will replace the data removed. All scenarios associated with ◦ the extract ID will be deleted and only the initial will be recreated. ◦ 3. Add/Delete: Terminated jobs and positions will be removed. Positions/Jobs added ◦ since the last time NBPSPEX was run will be added to all scenarios ◦ associated with the extract ID. Changes to existing jobs/positions will ◦ create a change flag in Salary Planner. *Once the job is run you will have your first extract to play with.

48
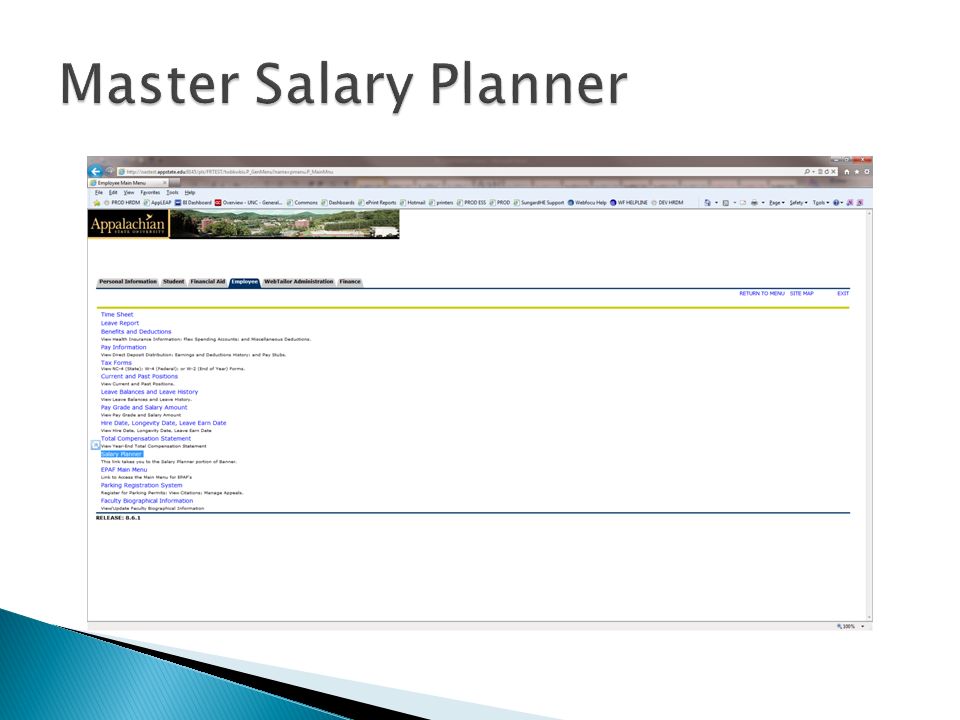
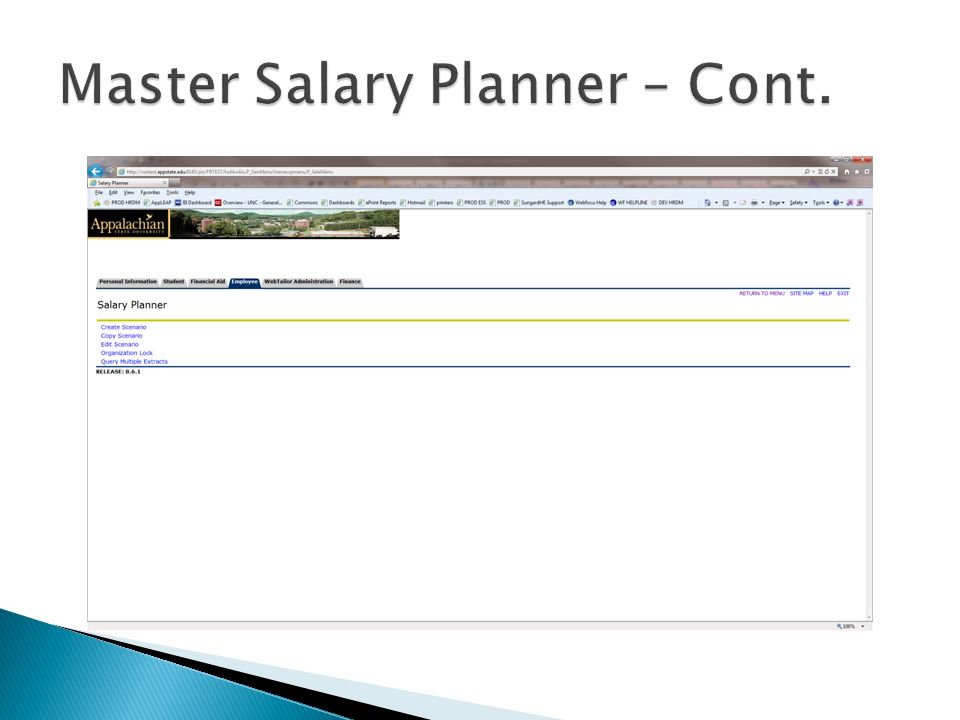
Start by logging into ESS. Next, click on the Employee tab. From there you should see the link you established earlier called Salary Planner. Click on this link and from there it depends on what your role is as to how you proceed. If you are a master salary planner person you need to create the “scenario’s” that the other users will use for their updates.

49
Edit Scenario – Master Salary Planner The Master Salary Planner is the only Web user role that has access to the ‘Initial’ scenario that is created by the NBPSPEX process. The Master Salary Planner may want to edit the ‘Initial’ scenario to hide certain positions from HR Managers. An example might be the Chancellor’s position and salary. The Master Salary Planner can do this by editing the ‘Initial’ scenario. A checkbox is available, only in the ‘Initial’ scenario, on the List by Position, and Position Detail web pages. When checked, the position and any associated job records will not be seen in scenarios created from the ‘Initial’ scenario.

50
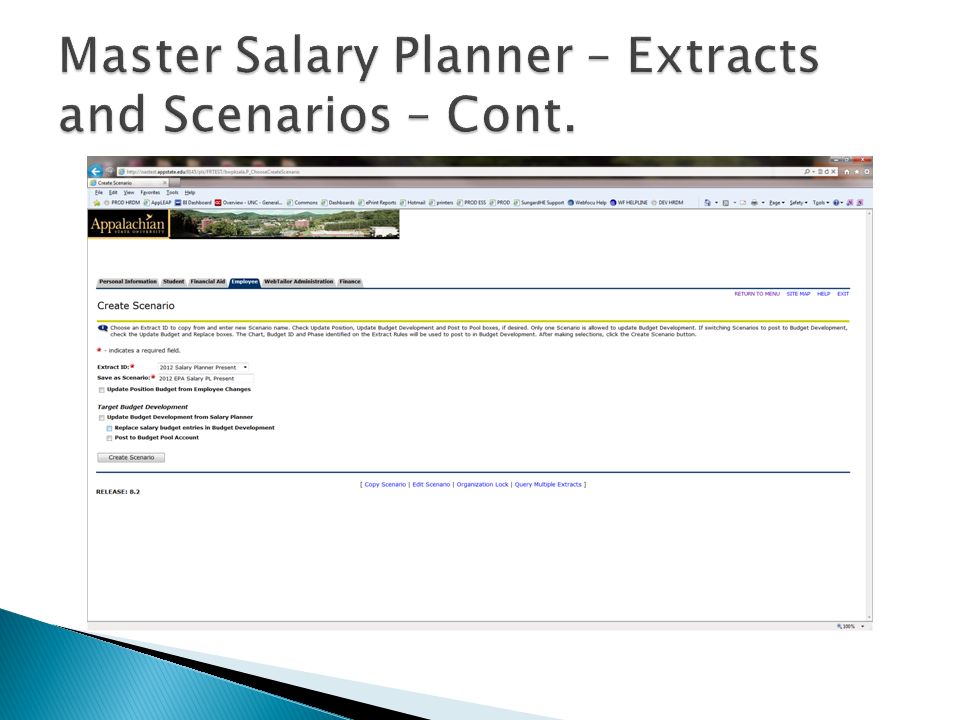
Create Scenario – Master Salary Planner The Master Salary Planner is the only Web user role that can create new scenarios. The new scenario will be named by the Master Salary Planner and will be an exact copy of all the records in the Extract ID of the ‘Initial’ Scenario. The new scenario created form the ‘Initial’ scenario is the scenario the HR Managers will use to revise position budgets and/or employee job salary data. The filtering criterion along with an HR Manager’s security controls the display of information when using Salary Planner.

51
Edit Scenario – HR Manager The HR Manager Web user role uses the edit scenario function to revise position budgets and/or employee job salary data. The Edit Scenario page allows the user to select the Extract ID and the scenario to edit. Extract IDs and scenarios are listed in Oracle Alpha/numeric order. In addition to selecting the ID and Scenario, the user may adjust the number of records to view by using the Filter Criteria. If the user selects ‘By Position Attributes’ the user may select the specific organizations, whether to include subordinate organizations, ECLS, Bargaining Units, Faculty Rank (if applicable), Pooled Positions, Vacant Positions and the number of records you wish to see on one web page before moving to the next web page. If the ‘By Employee Name’ option is selected the user may enter either the name or ID information to search for a specific employee or range of employees, as well as selecting the number of records to see before moving to the next page.
, Pooled Positions, Vacant Positions and the number of records you wish to see on one web page before moving to the next web page. If the ‘By Employee Name’ option is selected the user may enter either the name or ID information to search for a specific employee or range of employees, as well as selecting the number of records to see before moving to the next page..")
58
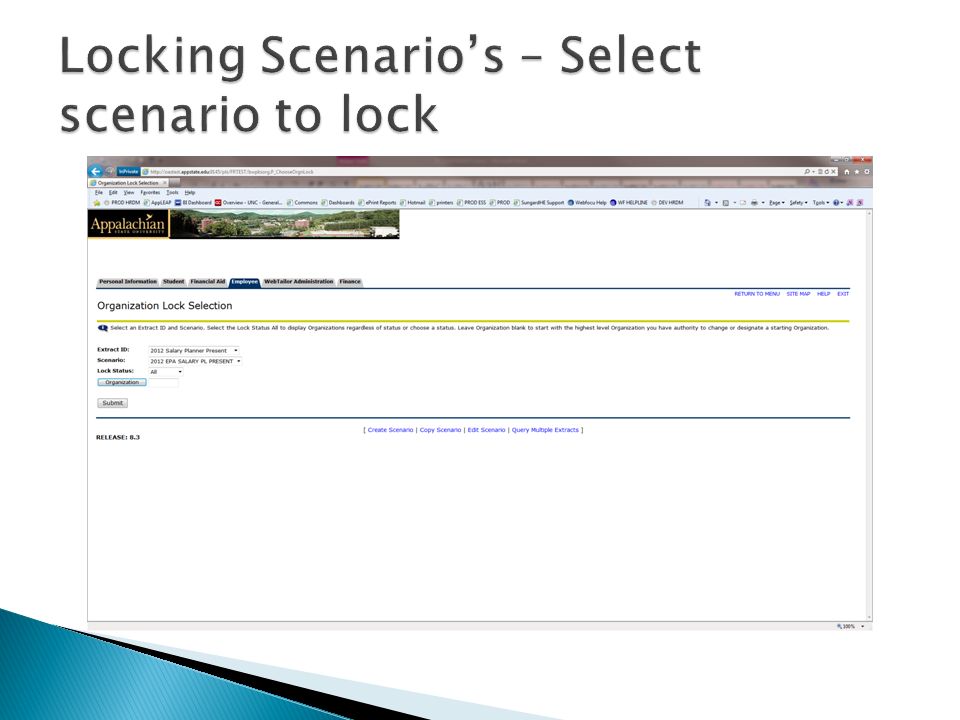
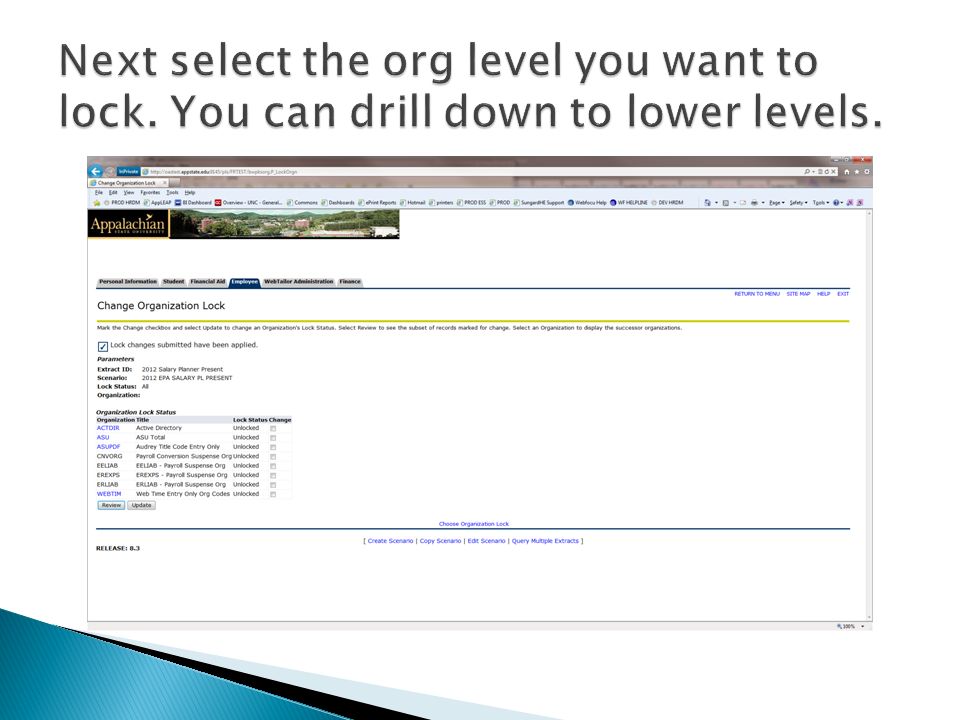
To keep further updates from being done you need to “lock” or freeze the scenario(s). To do this you just go click on the “Organizational Lock” url located at the beginning of Salary Planner.

61
The next step once the scenarios are locked is to take the changes and load them to Banner. We reserved this function for our department and coordinated with the other areas to ensure that all the steps were completed and signed-off on prior to this job being run. It’s run through Banner and access must be granted to run the job.

63
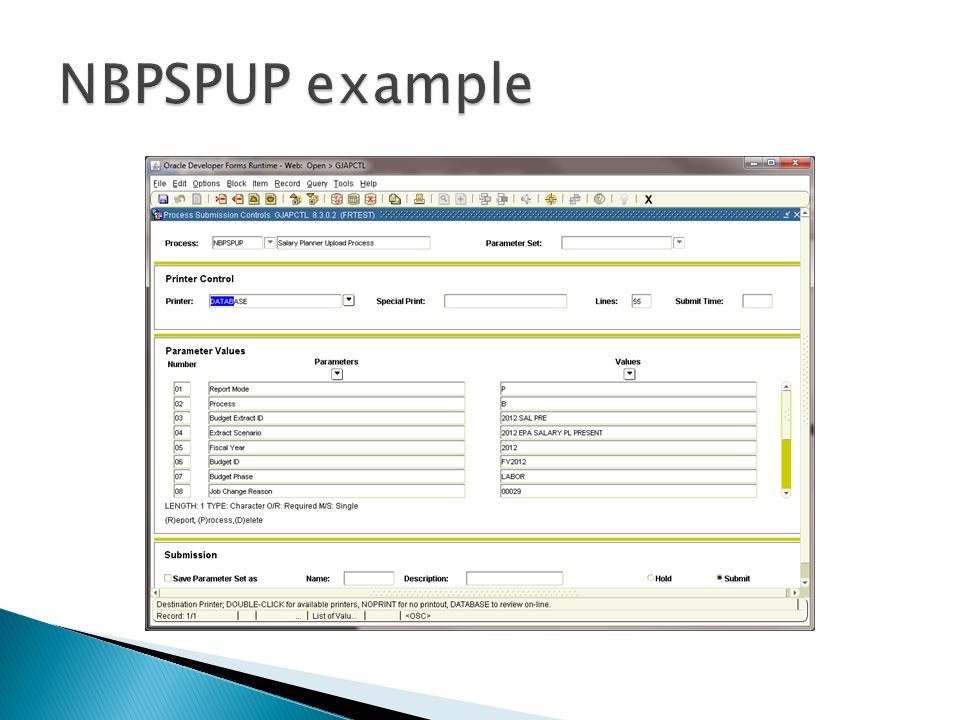
NBPSPUP – Salary Planner Upload Process This process uploads position and/or employee job data from the salary planner tables to the position and employee job tables in the Banner HR database. Position budget data is loaded directly to the position budget tables. Employee job record changes are uploaded into the electronic approval personnel action tables using the electronic approval category codes defined on the NTRINST rule form. Employee job data is applied to the Banner HR database by running the Electronic Approval Mass Apply process NOPEAMA. Upload Process Options Parameter 1: Report mode, the NBPSPUP Upload process can be run in three modes: R eport – used to find possible process errors and warnings P rocess – used to update the SCT Banner database D elete – used to delete unwanted Scenarios (and possible Extract IDs) from Salary Planner Parameter 2: Process, select the type of data to upload: P osition only J ob only B oth position and job Parameters 3-7: Specify the Extract ID / Scenario / FY / Budget ID / Budget Phase
 from Salary Planner Parameter 2: Process, select the type of data to upload: P osition only J ob only B oth position and job Parameters 3-7: Specify the Extract ID / Scenario / FY / Budget ID / Budget Phase.")
64
This matches what is done for EPAF’s if you are using them. The EPAF’s were created by the SQL script provided by Banner. All the error codes and functionality of EPAF’s are followed from this point on.

65
Where employee’s show up in salary planner is determined by the position org code not the timesheet org code. Same holds true for the employee class. Employees are determined by the position. The employee class on the Position determines how they are used in salary planner. If a position is setup as a part-time position and the employee being paid out of it is full-time, salary planner will analyze both the position and the employee using the part-time employee class. To ensure that problems are not encountered all non-pooled positions should be compared to the employee’s job records to ensure that the employee classes are both full time. If there is a reason that these shouldn’t match, and the position should be part-time then the employee will need to be updated manually after loading the salary planner job data. Positions with any status other than active will not show up in Salary Planner.

66
When Org code Transfers are done for positions, the system only transfers the non-expended amounts and only the non-expended amounts pull into Salary Planner. We try to have as many of these done prior to the new fiscal year as possible to reduce the number of transfer records. Budgets should be compared to salaries prior to doing the extracts to ensure that increased salaries are reflected in the Budgets on the positions.

67
◦ Make sure back-ups of NBRJOBS, NBRBJOB, NBRJLBD, NBRPTOT, and NBRPLBD are made prior to doing the data load for jobs and positions so that reports may be run off of them for before and after comparisons. ◦ All Salary Planner tables should be backed up after the loading of budgets and jobs are done so that any reports in the future will use the data as it existed at that point in time. ◦ A backup of the payroll and position control tables should be made prior to the data load in case a restore is necessary.

68
◦ All budget revisions should be completed before the extract is made. The revisions need to be entered prior to the extract to ensure that the budget data is as accurate as possible. ◦ Any pay raises or pay decreases for employees need to be entered prior to the extract being made. This will ensure that salaries are correct when the extract is done.

69
Starting from NTRSPEX and going through NBPSPUP. Will try and do the NOPEAMA load if possible. Thanks.

Similar presentations


 Joe Vande Merwe,>")
 is an electronic process allowing for paperless personnel.>")
