Download presentation
Presentation is loading. Please wait.

2
LEARN MICROSOFT POWERPOINT 2010 Westerville Public Library 2014

3
WHAT IS POWERPOINT Software accompanied with Microsoft Suite A visual presentation used to supplement the oral delivery of a topic Mainly used in businesses and classrooms as an effective training tool

4
ADVANTAGES OF POWERPOINT Organize ideas for a presentation Create visual aids to support a lecture Insert charts and graphs Insert photos and videos Email, print, or upload your presentation to a website

5
WHAT’S WRONG WITH THIS SLIDE? Avoid the Pitfalls

6
CLASSROOM RULES Attendance Respect No Food No Drinks Raise your hand

7
CLASSROOM RULES Attendance Respect No Food No Drinks Raise your hand

8
GETTING STARTED

9
OPEN POWERPOINT Written Instruction Click on the Start Button – All Programs Microsoft Office – Microsoft PowerPoint Visual Instruction 3 3

10
PPT 2010 SCREEN

11
OUR PROJECT Hands-on Activity

12
THE PROJECT Text A Drawn Object A Picture Clip-Art Audio From File Clip-Art Audio Voice Recording Animation (Text and Object)
")
13
CHOOSING A THEME Before we begin let’s choose a theme Go to the Design Tab Hover over a theme to get a preview

14
THE TITLE SLIDE Once you have chosen a theme You will the Title Slide – Click On: “ Click to Add Title” Type: PowerPoint 2010 – Click On “Click to Add Subtitle” Type: Month Day, 2014

15
ADD A NEW SLIDE Point to the New Slide icon on the Home Tab Click on the top half of the icon It will automatically add a new slide

16
SLIDE 1: ADD TEXT In the “Click to Add Title” – Type Indented List In the “Click to Add Text” – Type Level 1 Level 2 Level 3 Level 4 Should look like this

17
HOW TO INDENT LIST Place your cursor before the “L” in Level 2 Press the Tab key How many times will you have to do it for Level 3 and 4? The text should get smaller as it moves to the right

18
HOW TO UNDO INDENTED LIST Place the cursor before the “L” on Level 4 Hold down the Shift key then the Tab key Text will shift back to the left How many times do you have go back for Level 3 and 2?

19
ADD A NEW SLIDE Point to the New Slide icon on the Home Tab Click on the top half of the icon It will automatically add a new slide

20
SLIDE 2: DRAWN OBJECT In the “Click to Add Title” – Type Draw an Arrow In the “Click to Add Text” – Go to the Drawing Group Choose a Block Arrow The cursor will change to a + sign Click to add to slide

21
DRAWN OBJECT (CONT.) Should Look Like ThisObject Handles The square and circles in the box The Circular handles allow you to change the height and width The Square handles allow you to change the proportions of the picture
 Should Look Like ThisObject Handles The square and circles in the box The Circular handles allow you to change the height and width The Square handles allow you to change the proportions of the picture")
22
DRAWN OBJECT (CONT.) Should Look Like ThisObject Handles The Yellow handles allow you change the length and thickness of the arrow heard and shaft, respectively The Green circular handle allows you to rotate the object on the slide
 Should Look Like ThisObject Handles The Yellow handles allow you change the length and thickness of the arrow heard and shaft, respectively The Green circular handle allows you to rotate the object on the slide")
23
DRAWN OBJECT (CONT.) Change Shape Fill/Outline Click on Shape Fill Hover over the colors and you will see a preview Click on the color you want Repeat steps for Shape Outline – Border Weight Should Look Like This
 Change Shape Fill/Outline Click on Shape Fill Hover over the colors and you will see a preview Click on the color you want Repeat steps for Shape Outline – Border Weight Should Look Like This")
24
ADD A NEW SLIDE Point to the New Slide icon on the Home Tab Click on the top half of the icon It will automatically add a new slide

25
SLIDE 3: ADD A PICTURE In the “Click to Add Title” – Type Add a Picture Go to the Insert Tab – Click on the Picture Icon The Insert Picture Dialog Box Go Sample Picture Select a Picture

26
ADD A PICTURE (CONT.) Should Look Like ThisObject Handles Again you have the object handles on the picture like there was on the drawn object.
 Should Look Like ThisObject Handles Again you have the object handles on the picture like there was on the drawn object.")
27
ADD A PICTURE (CONT.) Add effect to a picture – Go to picture styles – Make sure your picture is selected
 Add effect to a picture – Go to picture styles – Make sure your picture is selected")
28
ADD A NEW SLIDE Point to the New Slide icon on the Home Tab Click on the top half of the icon It will automatically add a new slide

29
SLIDE 4: ADD CLIP ART In the “Click to Add Title” – Type Add Clip Art Go to the Insert Tab – Click on the Clip Art Icon The Clip Art Manage Pane Appears

30
ADD CLIP ART (CONT.) Type the word “mountain” in the Search For field Click on the Go button Double-click on the picture to insert into your slide Again the handles will appear
 Type the word mountain in the Search For field Click on the Go button Double-click on the picture to insert into your slide Again the handles will appear")
31
ADD A NEW SLIDE Point to the New Slide icon on the Home Tab Click on the top half of the icon It will automatically add a new slide

32
SLIDE 5: AUDIO FROM FILE In the “Click to Add Title” – Type Audio from file Go to the Insert Tab – Click on the bottom half of the Audio Icon – Select “Audio from File”

33
AUDIO FROM FILE (CONT.) Click on the “Audio From File” – The Insert Audio Dialog Box – Go Sample Music – Select a Song A speaker symbol will appear
 Click on the Audio From File – The Insert Audio Dialog Box – Go Sample Music – Select a Song A speaker symbol will appear")
34
AUDIO FROM FILE (CONT.) Click on Audio Tools – Then Playback You can play music/sound – On Click – Automatic – Across Slide
 Click on Audio Tools – Then Playback You can play music/sound – On Click – Automatic – Across Slide")
35
DO YOU KNOW HOW TO ADD A NEW SLIDE?

36
SLIDE 6: CLIP ART AUDIO In the “Click to Add Title” – Type Clip Art Audio Go to the Insert Tab – Click on the bottom half of the Audio Icon – Select “Clip Art Audio” The Clip Art Audio Manager will appear

37
CLIP ART AUDIO (CONT.) Click on a Sound in the Clip Art Manager Double-click on a sound and it will inserted into the slide A speaker icon will appear
 Click on a Sound in the Clip Art Manager Double-click on a sound and it will inserted into the slide A speaker icon will appear")
38
NEW SLIDE

39
SLIDE 7: RECORD VOICE In the “Click to Add Title” – Type Record Voice Go to the Insert Tab – Click on the bottom half of the Audio Icon – Select “Record Audio”

40
RECORD VOICE (CONT.) Record Audio allows you to record your voice on a slide The sound recorder will appear – The buttons Play Stop Record When done recording a speaker icon will appear
 Record Audio allows you to record your voice on a slide The sound recorder will appear – The buttons Play Stop Record When done recording a speaker icon will appear")
41
NEW SLIDE

42
SLIDE 8: ADDING ANIMATION In the “Click to Add Title” – Type Text and Object Animation In the “Click to Add Text” – Type Level 1 Level 2 Level 3 Level 4 – Insert a Drawn Object

43
ADDING ANIMATION (CONT.) Text Animation Go to the Animation Tab Select/Highlight the text you want to animate – Level 1 (Float In) – Level 2 (Appear) – Level 3 (Split) – Level 4 (Wheel) Should Look Like This
 Text Animation Go to the Animation Tab Select/Highlight the text you want to animate – Level 1 (Float In) – Level 2 (Appear) – Level 3 (Split) – Level 4 (Wheel) Should Look Like This")
44
ADDING ANIMATION (CONT.) Object Animation Click on the shape you want to animate Go to the Animations Tab – Go to Motion Paths/lines Your object will move along the path you choose Should Look Like This
 Object Animation Click on the shape you want to animate Go to the Animations Tab – Go to Motion Paths/lines Your object will move along the path you choose Should Look Like This")
45
THAT’S THE END OF OUR PROJECT NOW LET’S VIEW THE PPT

46
TO VIEW A PPT Go to the Slide Show Tab Click on From Beginning To Stop your PPT press the ESC on the keyboard

47
TO MOVE FORWARD AND BACKWARDS To Move Forward – Right or Down Arrow To Move Backwards – Left or Up Arrow

48
TO SAVE YOUR PPT Click File Then click on Save – The First time you do this it will ask for a file name – Make sure you know where you saved it As you are making the PPT continue to save

49
LET’S PRACTICE SAVE YOUR PPT THEN CLOSE & FINALLY REOPEN THE PPT

50
PRINTING THE PPT Click on the File Tab – The click Print PPT 2010 has Print and Print Preview combined now you get see what you are printing

51
PRINTING THE PPT (CONT.) Once you click on Print A preview will come Up Where it say Full Pages Slides can delineate how many slides to a page if you have to print them out
 Once you click on Print A preview will come Up Where it say Full Pages Slides can delineate how many slides to a page if you have to print them out")
53
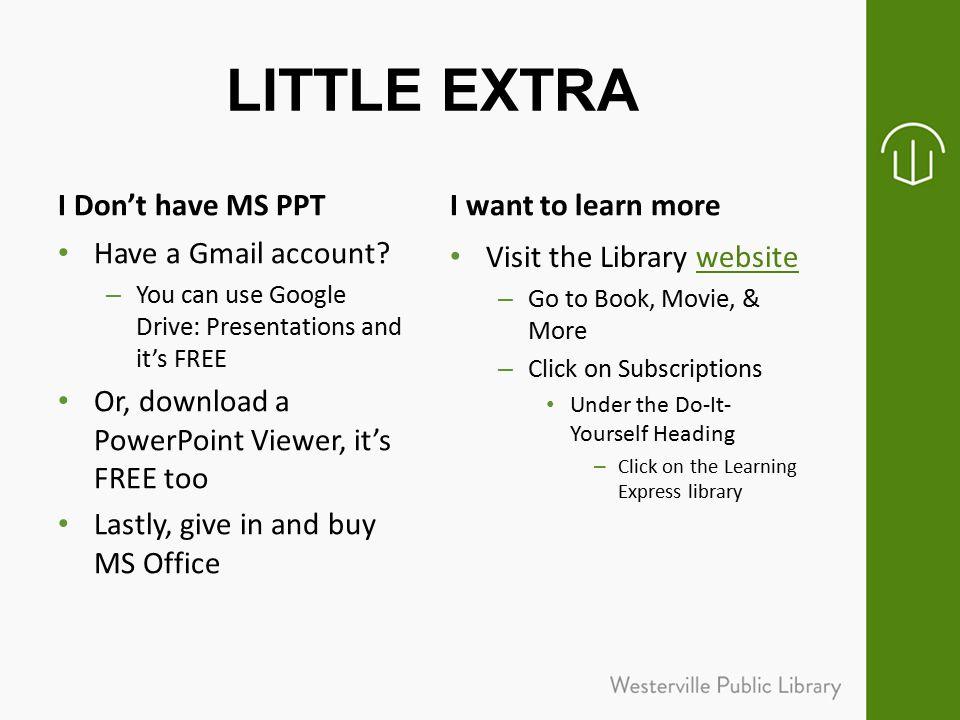
LITTLE EXTRA I Don’t have MS PPT Have a Gmail account? – You can use Google Drive: Presentations and it’s FREE Or, download a PowerPoint Viewer, it’s FREE too Lastly, give in and buy MS Office I want to learn more Visit the Library websitewebsite – Go to Book, Movie, & More – Click on Subscriptions Under the Do-It- Yourself Heading – Click on the Learning Express library

54
QUESTIONS?

Similar presentations


>")
 n Combination of.>")


>")