Download presentation
Presentation is loading. Please wait.

2
Introduction to process, techniques and components of physical assessment. PA is a complex process that requires effort and experience. Review PA abbreviation table 4-1.

3
Head – to - Toe Assessment Most comprehensive Used to obtain baseline information to identify changes in patient status ◦ organized - everything assessed from head progressing down to toes- combines systems (head, assess neuro, MS of upper then later as proceed down assess MS of lower ext) ◦ used for complete PW- it minimizes position changes and requires less time Body Systems Assessment ◦ one system at a time ◦ Cardiac: heart sounds, pulses, capillary refill, B/P ◦ Respiratory: breath sounds, rate and depth, skin color ◦ organized per body systems i.e. lung assessment, abdominal assess, cardiovascular, neuro system ◦ best used for focused physical assessment May use either approach, just be organized. 3

4
From patient's right side Follow a sequences that minimizes discomfort and position changes Respect patient privacy and minimize embarrassment The scope of examination varies according to illness and severity.

5
The PA consists of detailed patient evaluation that consist of four fundamental techniques. Inspection Palpation Percussion Auscultation 5

6
Inspection - critical observation ◦ Take time to “observe” with eyes, ears, nose ◦ Use good lighting ◦ Look at color, shape, symmetry, position ◦ Odors from skin, breath, wound Inspection is done alone and in combination with other assessment techniques

8
Palpation ◦ Using hands to fell areas that cannot be seen ◦ light and deep touch ◦ Back of hand to assess skin temperature ◦ Fingers to assess texture, moisture, areas of tenderness ◦ Assess size, shape, and consistency of lesions ◦ Organ size and location ◦ Rigidity or spasticity ◦ Crepitation & Vibration ◦ Position & Size ◦ Presence of lumps or masses ◦ Tenderness, or pain

9
Palpation Techniques ◦ Light ◦ Deep ◦ Bimanual 9

10
Percussion ◦ Sounds produced by striking body surface ◦ Produces different notes depending on underlying mass (dull, resonant, flat, tympani) ◦ Used to determine size and shape of underlying structures by establishing their borders and indicates if tissue is air-filled, fluid-filled, or solid
 ◦ Used to determine size and shape of underlying structures by establishing their borders and indicates if tissue is air-filled, fluid-filled, or solid")
11
Direct – tapping the body directly with the distal end of a finger ◦ sinus tenderness Indirect- tapping a finger placed on the body, only the finger being struck touches the body ◦ lung percussion Blunt percussion-organ tenderness 11

12
Percussion over normal lung tissue resonant, hollow note Percussion over solid organ dull note Percussion over stomach tympanic note Percussion over large muscle flat note

13
Auscultation ◦ listening to sounds produced by the body Direct auscultation – sounds are audible without stethoscope Indirect auscultation – uses stethoscope ◦ Describe sound characteristics (frequency, pitch intensity, duration, quality) Flat diaphragm picks up high-pitched respiratory sounds best Bell picks up low pitched sounds such as heart murmurs
 Flat diaphragm picks up high-pitched respiratory sounds best Bell picks up low pitched sounds such as heart murmurs")
14
Instrument: stethoscope (to skin) Diaphragm –high pitched sounds Heart Lungs Abdomen Bell – low pitched sounds Blood vessels 14
 Diaphragm –high pitched sounds Heart Lungs Abdomen Bell – low pitched sounds Blood vessels 14")
15
Environment & Equipment Technique General survey Head to toe or systems approach Minimize exposure Areas to assess first – unaffected areas, external before internal parts 15

16
See table 4-2 Stethoscope Ophthalmoscope ◦ Consist of a head and handle ◦ The head contains viewing lenses and beam selection controls ◦ The viewing lens control to focus the instrument Otoscope ◦ Consist of head and handle

18
Skin is the largest organ in the body Skin is composed of 1.Epidermis- outermost portion of a relatively uniform, thin but tough, composed of thickness stratum germinativum and stratum corneum ◦ a. color derived from three sources Brown- pigment melanin Yellow-orange tones of pigment carotene Red-purple tone in underlying vascular bed

19
2. Dermis- bulk of skin; the inner supportive layer consisting mostly of connective tissue or collagen is tough fibrous protein that enables skin to resist tearing and allows skin to stretch with movement. 3. Subcutaneous layer- adipose tissue made up of lobules of fat cells used for energy. It provides insulation for temperature control and aids in protection by its soft cushioning effect

20
1.Protection- skin minimizes injury from physical, chemical, thermal, and light wave sources. 2.Prevents penetration or impermeability- is barrier that stops invasion of microorganisms and loss of water and electrolytes from within the body 3.Perception or Sensation- is a vast sensory surface holding the neurosensory end organ for touch, pain, temperature and pressure 4.Temperature regulation- allow heat dissipation through sweat glands and heat storage through subcutaneous insulation

21
5. Identification- identify one another by unique combination of facial characteristics, hair, skin, color and even finger print 6.Communication- emotion expressive by sign language of face and in body posture. Shows blushing or blanching, also signals emotional state 7.Wound repair- cell replacement of surface wounds 8.Absorption and excretion- limited excretion of metabolic waste by products 9.Production of Vitamin D

22
1. Previous history of skin diseases 2. Skin Color- affected by genetic factors and physiological factors. -Variations of skin color Cyanosis- blue tinge Pallor- loss of rosy glow in skin, paleness Erythema- redness of the skin, increase in climate temperature, inflammation, infection

23
Plethora- redness of skin caused by increase RBS Ecchymosis- large diffuse areas usually black and blue, results of injuries Petechiae- small pinpoint hemorrhages can denote some type of blood disorder Jaundice- yellow staining of skin usually caused by bile pigments

24
3. Changes in mole size, shape, tenderness, bleeding check for abnormal characteristics of pigmented lesions. Note any freckles and changes and any birthmarks (report any changes in size, itching, burning, bleeding of moles)
.")
25
Abnormal characteristics of pigmented lesions: ABCDE Asymmetry of pigmented lesion -one that is not regularly round or oval Border irregularity -notching, scalloping, ragged edges or poorly defined margins Color variation -areas of brown, tan, black, blue, red, white or combination Diameter greater than 6mm Elevation and enlargement

26
4.Texture- palpate note any marks or scaring skin should be smooth and firm 5.Temperature- symmetrically feel each part of the body, compare upper area with lower areas check for hypothermia and hyperthermia Normal finding: warm Changes: cool, cold, hot

27
6.Turgor-amount of elasticity in skin, grasp index finger pull it taut and quickly release- elastic skin immediately assumes in normal position, poor turgor suspended or tented; turgor shows hydration and nutrition 7.Moisture or dryness- check face, hands, axilla, skin folds; shows diaphoresis or dehydration 8.Are there any rashes or lesions; note color, elevation, pattern or shapes, size, location and distribution on body, any exudates

28
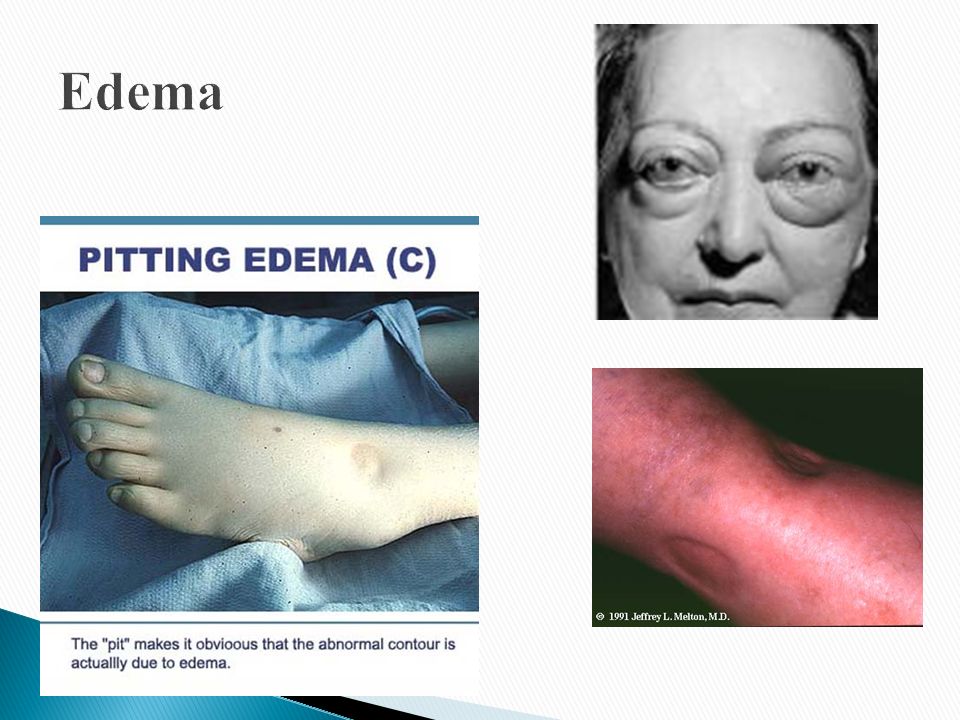
9.Is there any itching (purities) 10.What medication are you taking 11.Note mobility 12.Note any edema- accumulation of fluid in the intercellular spaces; to check for edema, imprint your thumbs firmly against the ankle malleolus or the tibia. If pressure leaves a dent in the skin “pitting” present 1+= mild pitting, slight indentation, no perceptible swelling of the leg 2+= moderate pitting, indentation subsides rapid ly

29
3 += Deep pitting, indentation remains for a short time; leg looks swollen 4+=Very Deep pitting, indentation lasts a long time, leg is very swollen. 13.thickening uniform over body except thick over palms and soles of feet

32
Depress pretibial area & medial malleolus for 5 seconds Grade pitting edema 1+ to 4 +

33
1. Hair- ◦inspect for color (comes from melanin) graying may begin at 3 rd decade; ◦Texture maybe fine or thick; straight, curly, or kinky; ◦Quality maybe shinny or dull; ◦Distribution- coarse or elastic 2. Scalp- inspect for ticks or lice 3. Nails- Shape and Contour- curved or flat, edges smooth, rounded, clean; - Consistency- smooth, regular, nor brittle or splitting, thickness, firm - Color- translucent, pink nails base - inspect nail beds for clubbing
 graying may begin at 3 rd decade; ◦Texture maybe fine or thick; straight, curly, or kinky; ◦Quality maybe shinny or dull; ◦Distribution- coarse or elastic 2. Scalp- inspect for ticks or lice 3. Nails- Shape and Contour- curved or flat, edges smooth, rounded, clean; - Consistency- smooth, regular, nor brittle or splitting, thickness, firm - Color- translucent, pink nails base - inspect nail beds for clubbing.")
34
Capillary return or refill: normal = less than 3 seconds ◦ used to evaluate the ability of the circulatory system to restore blood to the capillary system (perfusion). ◦ Capillary refill is evaluated at the nail bed in a finger. (a) Place your thumb on the patient’s fingernail and gently compress. (b) Pressure forces blood from the capillaries. (c) Release the pressure and observe the fingernail. (d) As the capillaries refill, the nail bed returns to its normal deep pink color. (e) Capillary refill should be both prompt and pink. (f) Color in the nail bed should be restored within 2 seconds, about the time it takes to say "capillary refill."
 Place your thumb on the patient’s fingernail and gently compress. (b) Pressure forces blood from the capillaries. (c) Release the pressure and observe the fingernail. (d) As the capillaries refill, the nail bed returns to its normal deep pink color. (e) Capillary refill should be both prompt and pink. (f) Color in the nail bed should be restored within 2 seconds, about the time it takes to say capillary refill. .")
36
Monitoring Skin Condition Check color Temperature Abnormalities Excessive dryness, moisture, itching, flaking General texture of skin Skin turgor Edema Cleanliness Odor Discoloration (ecchymosis, petechiae, purpura, erythema, altered pigmentation)
")
37
Color: normal finding: pinkish tan to ruddy dark tan or light to dark brown. “Healthy glow” Changes: ◦ Pale, pallor, ashen, dusky ◦ rubor, erythema, flushed ◦ Cyanosis ◦ jaundice ◦ ecchymosis, purpura. Temperature: normal finding: warm Changes: cool, cold, hot localized changes

38
Moisture: normal finding: dry, moist Changes: ◦ sweaty, clammy, diaphoretic ◦ dry/flaky Texture: smooth and firm Intact: absence of injury such as skin tears, skin breakdown Mobility/Turgor: ease of ability to move skin and presence or absence of skin tenting.

39
Go to this website for a tutorial on skin assessment http://www.logicalimages.com:80/morpholo gy/morphology3_content.html

41
We think a normal temperature is 98.6 degrees Fahrenheit (37 degrees Centigrade) - based on the average of a few measurements taken 100 years ago. Actually, normal temperature in healthy adults ranges from 97 to 99.9 degrees Fahrenheit.

42
How to take an oral temperature : Place thermometer under tongue; use probe cover Wait 3 minutes if mercury thermometer, 10 seconds if electronic Wait 10 minutes after eating or drinking hot or cold liquids How to take a rectal temperature : Use lubrication and probe cover Rectal temperature is 0.4-0.5 degrees C (0.7 to 0.8 degrees F) higher than oral Use of axillary temperature : Axillary temperature correlates poorly with rectal temperature It may be OK to do axillary reading in neonates if can't do rectal thermometer
 higher than oral Use of axillary temperature : Axillary temperature correlates poorly with rectal temperature It may be OK to do axillary reading in neonates if can t do rectal thermometer")
43
Why bother to check blood pressure ? For each 20 mm rise in systolic blood pressure or 10 mm rise in diastolic blood pressure over 115/75: ◦ Risk of stroke increases ◦ Risk of heart disease doubles ◦ Risk of renal failure increases Systolic and diastolic blood pressure : Systolic blood pressure is the highest pressure in the arteries, just after the heart beats Diastolic blood pressure is the lowest pressure in the arteries, just before the heart beats Blood pressure is measured indirectly by blood pressure cuff (sphygmomanometer )
.")
44
Inflating cuff increases pressure until it cuts off arterial circulation to the arm Deflating cuff, decrease pressure by 2 to 3 mm of mercury per second until blood first enters the artery, creating turbulence; this causes a sound with each heartbeat Sounds continue with each heartbeat until pressure lowers to the lowest pressure in the artery; then turbulence stops, so the sound stops Systolic blood pressure is the cuff pressure at the first sounds; diastolic is the cuff pressure just before the sounds stop

45
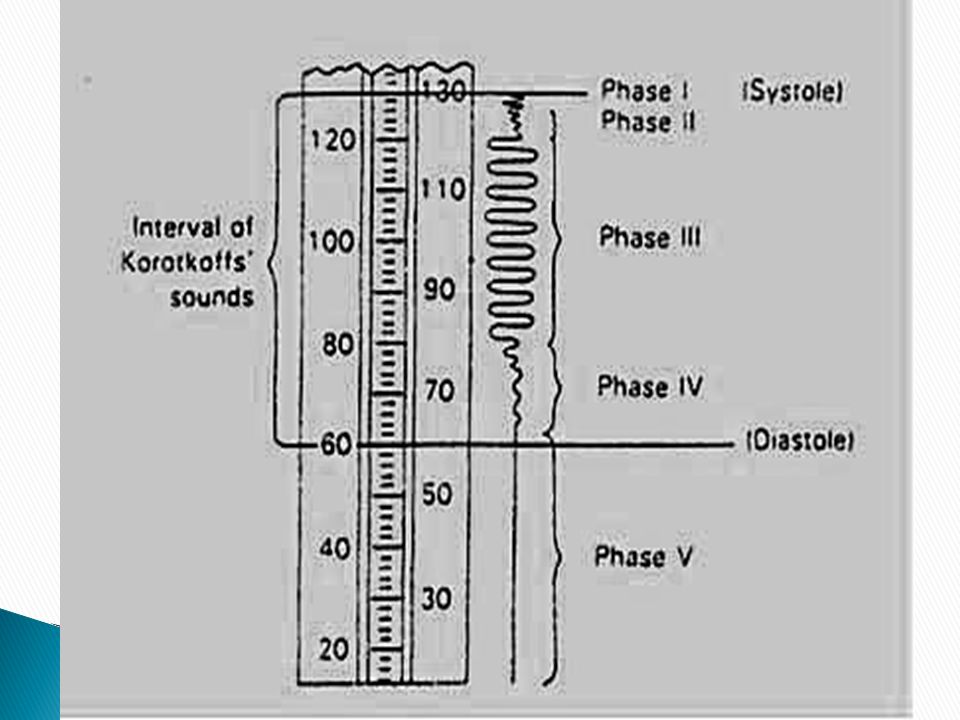
Phase 1: sharp thuds, start at systolic blood pressure Phase 2: blowing sound; may disappear entirely (the auscultatory gap ) Phase 3: crisp thud, a bit quieter than phase 1 Phase 4: sounds become muffled Phase 5: end of sounds -- ends at diastolic blood pressure
 Phase 3: crisp thud, a bit quieter than phase 1 Phase 4: sounds become muffled Phase 5: end of sounds -- ends at diastolic blood pressure")
47
Make sure the cuff is the right size - its width should be at least 40% of the arm's circumference. The cuff will overestimate blood pressure if too small and underestimate if too large. Place the cuff snugly on patient's proximal arm, on skin ( not cloth), centered over the brachial artery (most cuffs have markings) Support the patient's arm at heart level, using your arm or a desk Your patient should sit in the chair for 5 minutes before BP is measured, and should have no caffeine or nicotine for 30 minutes before (JAMA 273, p.1211-1218, 1995)
, centered over the brachial artery (most cuffs have markings) Support the patient s arm at heart level, using your arm or a desk Your patient should sit in the chair for 5 minutes before BP is measured, and should have no caffeine or nicotine for 30 minutes before (JAMA 273, p , 1995).")
48
With fingers palpating radial or brachial artery, inflate cuff rapidly until you can't feel the pulse, then 20 mm higher Release cuff at 2 to 3 mm Hg per second until you again feel the pulse; this is the palpable systolic pressure Wait 30 seconds before measuring blood pressure Measuring palpable pressure first avoids risk of seriously underestimating blood pressure because of the auscultatory gap (mistaking Korotkoff phase 3 for phase 1). Many doctors skip this step for time reasons and instead pump cuff to 200 mm Hg at the next step)
.")
49
Phase 2 of the Korotkoff sounds can be inaudible - especially in older patients with systolic hypertension, who are at especially high risk of stroke. Inflating the cuff until you don't hear sounds can give you a reading of 140/86 when the patient's actual blood pressure is 220/86. Most physicians are pressed for time, so they instead inflate the cuff to 200 mm, which is beyond the auscultatory gap in most patients. But palpable systolic blood pressure is, according to research, more reliable.

50
Place bell of stethoscope (diaphragm is acceptable) over brachial artery Rapidly pump the cuff to 20 to 30 mm Hg above palpable systolic pressure Release pressure in the cuff by 2 to 3 mm Hg per second and listen for Korotkoff sounds, including systolic (first) and diastolic (last) Record as systolic/diastolic. Check in both arms the first time you check a patient's blood pressure. It may differ by 10 mm Hg or more. If the sounds continues to zero, record diastolic blood pressure as the point when sounds become muffled (phase 4) over zero: e.g. 130/70/0, or just as 130/70.
 over zero: e.g. 130/70/0, or just as 130/70..")
51
Rate –Number of beats in 30 seconds x 2 Strength –Bounding, strong, or weak (thready) Regularity –Regular or irregular
 Regularity –Regular or irregular")
52
You need three readings on two occasions to diagnose hypertension, unless blood pressure is very high Normal blood pressure in children is: ◦ 102/55 at 1 year, 112/69 at 5 years, 119/78 at 10 years Blood pressures in adults (JNC VII: JAMA 289:2560- 72, 2003): ◦ Normal: <120/<80 ◦ Prehypertensive: 120-139/80-89 ◦ Stage 1 hypertension: 140-159/90-99 ◦ Stage 2 hypertension: >160/> 100
: ◦ Normal: <120/<80 ◦ Prehypertensive: /80-89 ◦ Stage 1 hypertension: /90-99 ◦ Stage 2 hypertension: >160/> 100")
53
Carotid: in neck, medial to and below angle of jaw Radial: ventral wrist proximal to base of thumb Brachial: antecubital fossa, medial to biceps tendon Femoral: in groin, just medial to quadriceps Popliteal: middle of popliteal fossa; knee flexed 30 degrees Posterior tibial (PT): posterior to medial malleolus, in ankle Dorsalis pedis (DP): dorsal foot, lateral to extensor hallucis longus
: posterior to medial malleolus, in ankle Dorsalis pedis (DP): dorsal foot, lateral to extensor hallucis longus")
54
Peripheral vascular disease : absent or diminished DP and PT pulses - carries risk of ulcers, infection, amputation and other vascular disease. Obtaining arterial blood for blood gas measurement Finding femoral vein for emergency access (IV line)
.")
55
Adult: 60 to 100 Newborn: 120-170 1 year: 80-160 3 years: 80-120 6 years: 75-115 10 years: 70-110

56
How to measure: observe rise and fall of chest In infants, count for 60 seconds; in adults, 15 or 30 seconds Normal respiration: Adults: 12 to 20 Children: newborn 30-80 1 year 20-40 3 years 20-30 6 years 16-2 2

57
57 Rate –Number of breaths in 30 seconds x 2 Quality –Character of breathing Rhythm –Regular or irregular Effort –Normal or labored Noisy respiration –Normal, stridor, wheezing, snoring, gurgling Depth –Shallow or deep

58
http://medinfo.ufl.edu/other/opeta/vital/VS_ main.html

Similar presentations


. Vital Signs.>")

 Pulse (P) Respiration (R) Blood pressure (BP) Pain (often called the fifth vital sign) Oxygen Saturation.>")
