Download presentation
Presentation is loading. Please wait.

1
S G D O R T H O D O N T I C: BIONATOR, ELSAA, ACCO
RUHAIZAN AISHAH AHMAD ZULKHAIRI

2
Aims At the end of this lecture/presentation, we should be able to discuss about: Definition Component Indication Contraindication Of the following appliances, which are: Bionator ELSAA ACCO

3
B I O N A T O R

4
Introduction Functional appliance
- One that changes the posture of mandible, hold it open, or make it open and forward Graber and Neumann Classification Those that displace the mandible to a moderate degree and are intended to stimulate muscle activity i.e. myodynamic - Bionator

5
Classification Removable Fixed
FUNCTIONAL APPLIANCE Removable Activator Bionator Fixed Tooth borne passive appliance (activator, bionator) Tooth borne active appliance Tissue borne passive appliance - FR
 Tooth borne active appliance. Tissue borne passive appliance - FR.")
6
Definition Activator and Bionator are loosely fitting acrylic that work mainly to covers the occlusal portion of teeth of both arches and the palate. The only difference between these appliances is, in Bionator, the palatal coverage is eliminated to increase patient comfort and is replaced by a metal bar. The reduce bulkiness allow for more normal speech patterns compared to Activator appliance. Additional component can be added in order to prevent oral habit

8
Vulcanite palatal plate
History Norman Kingsley 1879 Vulcanite palatal plate Pierre Robin 1902 Monoblock Viggo Andresen 1908 Activator Wilhelm Balter 1960 Bionator Rolf Frankel 1967 Frankel FR William Clark 1977 Twin Block

9
C O M P O N E N T S

10
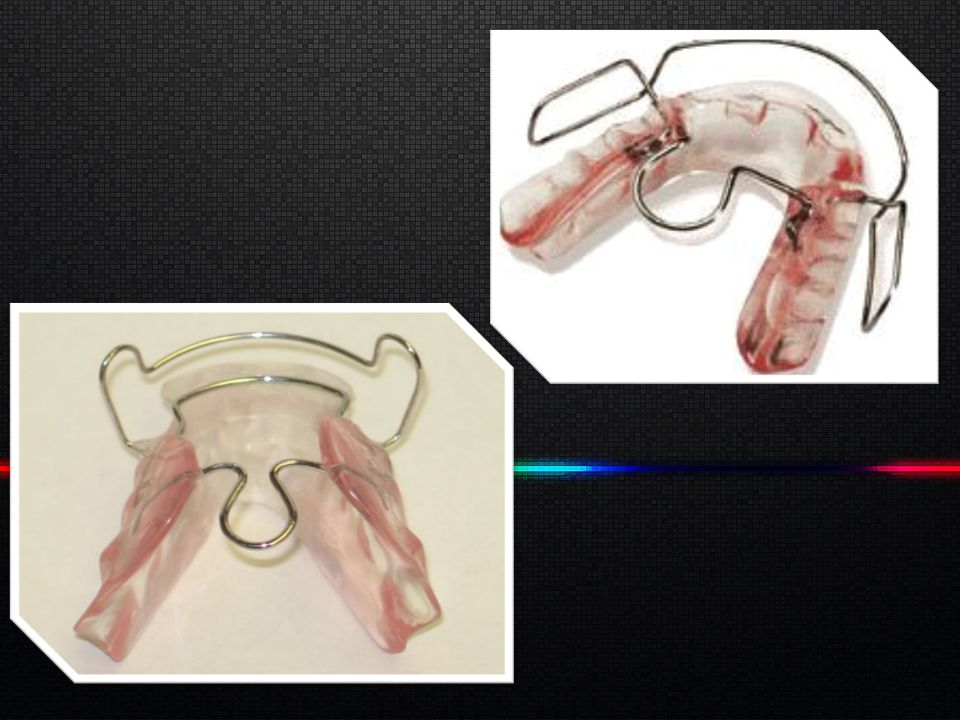
Bionator has three components: Acrylic base Palatal bar Labial bow
The Bionator Base The Bionator acrylic base has an upper component and lower component which is connected to a monoblock. The upper component starts distal to the canines and extends back to the last tooth having an occlusal plan covering 3/4 of the posterior tooth surface. The acrylic has a height of approximately 4mm higher than the gingival margin. The lower component extends from the last tooth present all the way round the lingual surface of the mandible and has in the incisor region a smooth ideal surface and extends 3-4 mm under the gingival margin. All outer surfaces and edges should have a plan smooth glossy finish. Inner surfaces should also be glossy and polished. The occlusal boxes should not be polished. (helps examining tooth eruption) The second molars should be considered when planning construction of the Bionator. If they are erupting or about to erupt an occlusal box should be provided in order to control their height. The tongue guide or coffin spring Bent out of 1,2 mm hard wire with 1 mm distance from the palate follows the alveolar mesial and enters the acrylic bases in the first premolar region and extends not more distally than the distal edge of the first molar. The Labial and Buccal wire Constructed out of 0.9 mm hard the labial wire starts on the upper labial surface extending to the distal edge of the lateral incisors then bent down towards occlusal and bend distally to run parallel with the occlusal plan on about the same plan as the gingival margin extending on to the first third of the first molar. The bow then does a U curve and continues parallel until reaching the middle of the first premolar, then bent towards the occlusion plan the wire is then bent towards the Bionator base to enter the base exactly on the occlusal plan between the canine and premolar being careful not to get in the way of the erupting lower canine. Insider note: In order to protect the wire at this point against being damaged by trimmers while the appliance is being finished a silicon tube can be placed at the point the wire will enter the acrylic, breakage often occurs at this point. The tube should be cut off before delivery. The labial wire portion should be positioned in the high third of the incisors with approximately 0,1mm distance from them. Insider note: Three prong pliers should not be used to construct the Bionator, first it shows incompetency in wire bending secondly the pliers leave marks on the wire causing premature breakage.
 The second molars should be considered when planning construction of the Bionator. If they are erupting or about to erupt an occlusal box should be provided in order to control their height. The tongue guide or coffin spring Bent out of 1,2 mm hard wire with 1 mm distance from the palate follows the alveolar mesial and enters the acrylic bases in the first premolar region and extends not more distally than the distal edge of the first molar. The Labial and Buccal wire Constructed out of 0.9 mm hard the labial wire starts on the upper labial surface extending to the distal edge of the lateral incisors then bent down towards occlusal and bend distally to run parallel with the occlusal plan on about the same plan as the gingival margin extending on to the first third of the first molar. The bow then does a U curve and continues parallel until reaching the middle of the first premolar, then bent towards the occlusion plan the wire is then bent towards the Bionator base to enter the base exactly on the occlusal plan between the canine and premolar being careful not to get in the way of the erupting lower canine. Insider note: In order to protect the wire at this point against being damaged by trimmers while the appliance is being finished a silicon tube can be placed at the point the wire will enter the acrylic, breakage often occurs at this point. The tube should be cut off before delivery. The labial wire portion should be positioned in the high third of the incisors with approximately 0,1mm distance from them. Insider note: Three prong pliers should not be used to construct the Bionator, first it shows incompetency in wire bending secondly the pliers leave marks on the wire causing premature breakage.")
11
Acrylic base / component
-lower horse shoe shaped acrylic lingual plate from distal of last erupted molar of one side to other side -upper arch has palatal extension that cover molar and premolar region

12
Palatal bar 1.2 mm wire Extend from a line connecting distal surface of 6 to middle of 4 ~1mm away from palatal mucosa Fx -orients the tongue & mandible anteriorly by stimulating its dorsal surface with palatal bar

13
Labial bow 0.9 mm wire Begin above contact point between 3 and 4 – runs vertically Labial portion of bow should be at a paper thickness away from incisor

14
Indications Dental arches well aligned Mandible in posterior position
Skeletal discrepancy not severe Labial tipping of upper incisors evident Class III where reverse bionator can be used Open bite

15
Contraindications Class II – if caused by max prognathism
Vertical growth pattern Labial tipping of mandibular incisors

16
Bionator is

17
E L S A A

18
Expansion And Labial Segment Alignment Appliance

19
C O M P O N E N T S

20
Adam’s clasp

21
Anterior bite plane reduce OB

22
Palatal springs activated as the apliance is expanded → procline and align incisor

23
Midline screw allow expansion to prevent posterior crossbite developing during sagittal correction

24
Indications To align and procline the upper labial segment in class II cases prior to functional appliance therapy. Creating an overjet when the upper incisors are either upright or retroclined, which usually only takes a few months and then allows good posture of the mandible to be achieved with a functional appliance.

25
A C C O

26
Acrylic Cervical Occipital Appliance

27
C O M P O N E N T S

28
Adam’s Clasps generally placed on maxillary first premolars to provide additional retention and support

29
Provide the distal tipping force on the maxillary first molars
Finger springs Provide the distal tipping force on the maxillary first molars

30
Labial bow It contacts the labial aspect of the maxillary incisors and acts as a form of anterior anchorage.

31
Palatal acrylic Aids in retention and serves as a framework for other components to attach.

32
Others… Anterior bite plate
It functions to disclude the posterior dentition, allowing movement of the maxillary first molar to occur.

33
Others… Headgear Counteracts anterior forces of ACCO and translates the maxillary first molars distally.

34
Indications In Class II cases
to distalize the maxillary first molars into a Class I position to restrict the growth of the maxilla when it is prognathic or the mandible is retrognathic. late mixed dentition phase of tooth eruption. The maxillary first molars should be in occlusion. This allows clasps to be placed on them for retention of the appliance. The maxillary second molars should be un-erupted as it is very difficult to move the maxillary first molars distally when the maxillary second molars are present

35
Contraindications The ACCO should not be used when patient compliance is questionable. Since the ACCO is a removable appliance, it requires the patient to wear it willingly while also maintaining proper oral hygiene. dental and skeletal open bite cases with a high mandibular plane angle and in patients with increased lower face height ACCO has a tendency to open the bite by allowing the molars to erupt. This is due to the anterior bite plate which discludes the posterior dentition

36
References Cobourne MT, DiBiase AT. Handbook of Orthodontics.

Similar presentations


>")


