Download presentation
Presentation is loading. Please wait.

1
INTRODUCTION TO WEB DEVELOPMENT AND HTML Lecture 12: Advance CSS - Spring 2011

2
Outline List Styles Table Styles Focus, Active, Before and After Pseudo-classes Content and Counters Display and Visibility Positioning and Flow

3
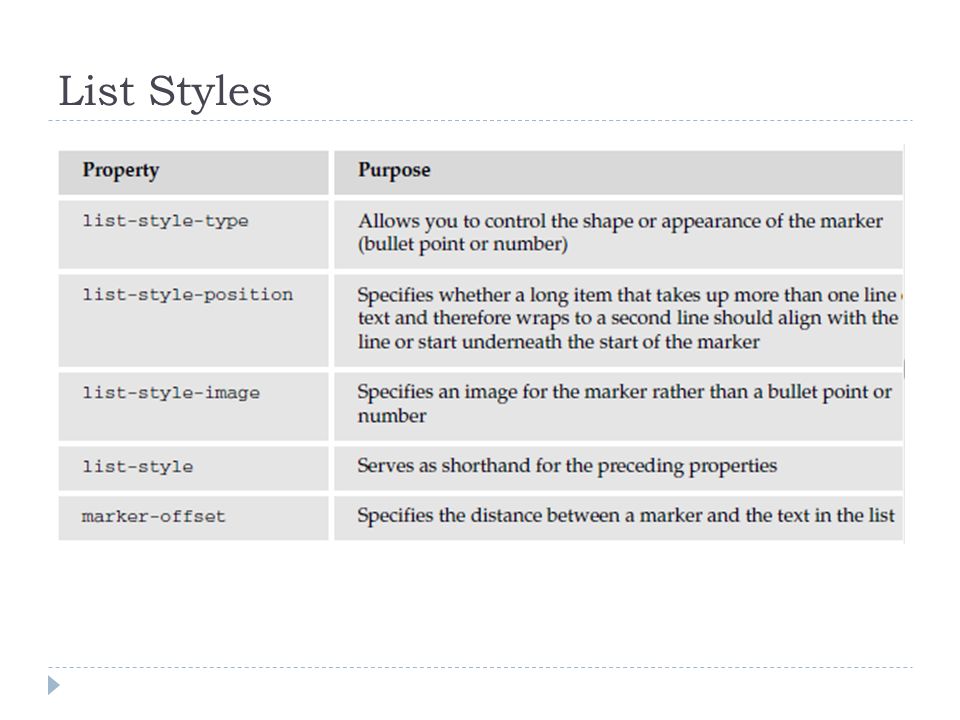
List Styles

5
List-style-type for Unordered Lists

6
List-style-type for Ordered Lists

7
List Examples li.a {list-style:none;} li.b {list-style:disc;} li.c {list-style:circle;} li.d {list-style:square;} li.e {list-style:decimal;} li.f {list-style:lower-alpha;} li.g {list-style:upper-alpha;} li.h {list-style:lower-roman;} li.i {list-style:upper-roman;}

8
List-style-position ul {list-style-position:outside; } ol {list-style-position:inside; }

9
list-style-image allows you to specify an image so that you can use your own bullet style. li {list-style-image: url(“images/bulletpoint.gif”);} If the image cannot be displayed, the browser should just display a dot rather than a broken image symbol.
;} If the image cannot be displayed, the browser should just display a dot rather than a broken image symbol..")
10
Tables

11
Table-specific properties

12
border-collapse specifies whether the browser should display every border

13
border-collapse Example table.one {border-collapse:collapse;} table.two {border-collapse:separate;} td.a {border-style:dotted; border-width:3px; border-color:#000000; padding: 10px;} td.b {border-style:solid; border-width:3px; border-color:#333333; padding: 10px;}

14
The border-spacing property Specifies the distance that separates adjacent cells’ borders. Can receive either one or two values. If one value is provided, it will apply to both vertical and horizontal borders: td {border-spacing:15px;} If two values are provided, the first refers to the horizontal spacing and the second to the vertical spacing: td {border-spacing:2px; 4px;}

15
Outlines Outlines are similar to borders, except in: An outline does not take up space Outlines do not have to be rectangular

16
Outlines Example input {outline-width:2px;} input {outline-style:solid;} input {outline-color:#ffoooo;}

17
The :focus and :active pseudo-classes :focus: Change the style when an element gains focus :active: Change the style when an element is active such as when a user clicks a link. input:focus {outline: #ff0000 thick solid;}

18
The :before and :after Pseudo-elements Enable you to add text before or after each instance of an element or elements defined in a selector. p.abstract:after {content: “You need to register to read the full article.”; color:#ff0000;}

19
The content property

20
Counters The counter() function is designed to allow you to create a counter that increments each time a browser comes across any specified element. counter-reset: set counters to zero. counter-increment: increase the counters every time that element is met

21
Counters Example Introducing Web Technologies Introducing HTML Introducing CSS Introducing XHTML Structure of Documents Text Lists Tables Forms body {counter-reset: chapter; counter-reset: section;} h1:before {content: “Chapter “ counter(chapter) “: “;} h1 {counter-increment: chapter; counter-reset: section;} h2:before { content: counter(chapter) “.” counter (section) “ “; } h2 {counter-increment: section; }
 : ;} h1 {counter-increment: chapter; counter-reset: section;} h2:before { content: counter(chapter) . counter (section) ; } h2 {counter-increment: section; }")
22
Counters Example (Cont'd)
")
23
Quotation Marks The values open-quote and close-quote can be used with the content property to add quote marks before and after occurrences of specified elements.

24
Quotation Marks Example Generated quotes Here are some quotes from Oscar Wilde: Consistency is the last refuge of the unimaginative. If you want to tell people the truth, make them laugh, otherwise they’ll kill you. It is a very sad thing that nowadays there is so little useless information. blockquote:before { content: open-quote;} blockquote:after { content: close-quote;}

25
Quotation Marks Example

26
The display property forces an element (or box) to be a different type of box than you might expect it to be. display: block make an inline box a block-level one. display: inline make a block-level box an inline one. For example, is a block-level box (block element): p { display : inline } After applying the above style, it would behave as an inline element or box.
: p { display : inline } After applying the above style, it would behave as an inline element or box..")
27
The visibility property allows you to hide a box from view, although it still affects the layout of the page (even though its contents are not seen)
")
28
The visibility property Example Here is a paragraph of text. This paragraph of text should be invisible. Here is a paragraph of text. p.invisible { visibility: hidden;}

29
Positioning with CSS

30
By default, elements are laid out on the page using what is known as normal flow. In normal flow: block-level elements flow from top to bottom inline elements flow from left to right.

31
The position property Allows you to specify a position for a box

32
Box Offset properties Indicates where the boxes should be positioned. It is used along with the position property values: relative, absolute, or fixed. Each can take a value of a length, a percentage, or auto.

33
Relative Positioning Takes an element and positions it in relation to where it would otherwise sit in normal flow. It is displaced from that position by an amount given using the box offset properties p {border-style: solid; border-color:#000000; border-width:2px; padding:5px; background-color:#FFFFFF;} p.two { position: relative; left: 40px; top: -40px;}

34
Absolute Positioning Completely removes an element’s content from normal flow, allowing you to fix its position. The box offsets fix the position of a box relative to the containing block. The containing block should be an element whose position property is set to relative or fixed.

35
Absolute Positioning Example div.page { position: absolute; left: 50px; top : 100px; } p { background-color:#FFFFFF; width:200px;} p.two { position: absolute; left: 50px; top: -25px;}

36
Fixed Positioning Specifies that the content of the element should be completely removed from normal flow. The box should not move when users scroll down the page. Example: div { position: fixed; top: 0px; left: 0px; }

37
The z-index property Use to control which boxes, in relative or absolute position, should appear on top when they are overlapping each other.

38
The z-index property Example Here is paragraph one. This will be at the top of the page. Here is paragraph two. This will be underneath the other elements. Here is paragraph three. This will be at the bottom of the page. p.one { z-index: 3; position: absolute; left: 0px; top: 0px;} p.two { z-index: 1; position: absolute; left: 150px; top: 25px;} p.three { z-index: 2; position: absolute; left: 40px; top: 35px;}

39
Floating using the float property Allows you to take an element out of normal flow and place it as far to the left or right of a containing box as possible within that element’s padding.

40
Floating using the float property (cont'd) Important! Whenever you specify a float property, you should also set a width property indicating the width of the containing box that the floating box should take up. Otherwise, it will automatically take up 100% of the width of the containing box leaving no space for things to flow around it, therefore making it just like a plain block-level element.

41
Floating using the float property Example Heading Here is the pullquote…. Here is paragraph one. This will be at the top of the page. …… at the top of the page. Here is paragraph. This will be at the top of the page. Here is paragraph two. This will be at the bottom of the page. p { border-style:solid; border-color:#000000; border-width:2px; padding:5px; background-color:#FFFFFF; width:500px;}.pullQuote { float:right; width:150px; padding:5px; margin:5px; border-style:solid; border-width:1px; }

42
The clear property It's especially helpful when working with boxes that are floated. In case it is preferred that nothing sat next to the floated element, and that surrounding content be pushed underneath the floated element.

43
The clear property Example Floating Here is the pullquote. It will be removed from normal flow and appear on the right of the page. Here is paragraph one. This paragraph will get pushed underneath the floating element. p { clear: right; background-color:#FFFFFF; } div.pullQuote { float: right; padding: 5px; margin: 5px; width: 150px; }

44
Questions?

Similar presentations


>")

: How the web is styled Create Rules that specify how the content of an HTML Element should appear. CSS controls how your web.>")

