Download presentation
Presentation is loading. Please wait.

2
Understanding Mathematical Operators For a mathematical calculation, you use a mathematical operator. The values that you use can be any sort of values you like. For instance, you could use two variables, two numbers, or a variable and a number. A few of these operators are able to perform a task on a single variable’s value. As a quick example, you will remember that you used the addition operator (+) to add two strings together in previous chapters. Here is an example of two string values being combined with the addition operator: window.alert("I begin and "+"this is the end."); You can also use the addition operator when one of the values is a variable, as in this example: var part2="this is the end." window.alert("I begin and "+part2);
 to add two strings together in previous chapters. Here is an example of two string values being combined with the addition operator: window.alert( I begin and + this is the end. ); You can also use the addition operator when one of the values is a variable, as in this example: var part2= this is the end. window.alert( I begin and +part2);.")
3
The Assignment Operator (=) You have been using the direct assignment operator since Chapter 3. It assigns the value on the right side of the operator to the variable on the left side, as in this example: var population=4500; This assigns the value of 4500 to the variable population.

4
Understanding Comparison Operators Comparison operators are often used with conditional statements and loops in order to perform actions only when a certain condition is met. Since these operators compare two values, they return a value of either true or false, depending on the values on either side of the operator. In later chapters, you will learn how to create a block of code to be performed only when the comparison returns true.

5
The Strict Is-Not-Equal-To Operator (!==) This operator was added in JavaScript 1.5, so in order for it to work, your browser needs to support JavaScript 1.5 (refer to Chapter 1, Table 1-1). For the !== operator to return true, the values or statements on each side must not be equal or must not be of the same type. This means that if you use a statement such as 3!==“3”, the operator will return true because the value on the left is a number and the value on the right is a string; the values are of different types (and thus not strictly equal). Whereas the is-not-equal-to (!=) operator first attempts to convert the values on each side of the operator to the same type and then determines if they are not equal, the strict is-not-equal-to operator (!==) automatically returns true if the values are not of the same type. The following table shows some examples of statements that use the !== operator
. Whereas the is-not-equal-to (!=) operator first attempts to convert the values on each side of the operator to the same type and then determines if they are not equal, the strict is-not-equal-to operator (!==) automatically returns true if the values are not of the same type. The following table shows some examples of statements that use the !== operator.")
6
The Bitwise Operators Bitwise operators are logical operators that work at the bit level, where there is a bunch of ones and zeros. You will not be using them in the examples presented in this book, but you may see them in some scripts on the Web. The following table lists some of the bitwise operators and their symbols. This list is by no means complete, but it should help you spot a bitwise operator if you see one.

7
The if/else Statement Block Structure The first thing you must deal with in an if/else statement is the first line, which tells the browser to continue or move along. You begin an if/else statement with the JavaScript keyword if, followed by a comparison in parentheses. The following line shows a sample of the format of the first line: if (comparison here) if (boats==3) { JavaScript Statements Here } If the comparison of boats==3 returns true, the code you place within the brackets will be executed. If it returns false, the code inside the brackets is ignored and the line of code after the closing curly bracket is executed. If you wish to use an else block to execute a certain bit of code when the comparison returns false, you place the else keyword on the next line and then follow it with its own set of curly brackets, as in the following code: if (boats==3) { JavaScript Statements Here } else { JavaScript Statements Here }
 if (boats==3) { JavaScript Statements Here } If the comparison of boats==3 returns true, the code you place within the brackets will be executed. If it returns false, the code inside the brackets is ignored and the line of code after the closing curly bracket is executed. If you wish to use an else block to execute a certain bit of code when the comparison returns false, you place the else keyword on the next line and then follow it with its own set of curly brackets, as in the following code: if (boats==3) { JavaScript Statements Here } else { JavaScript Statements Here }.")
8
Using the switch Statement The switch statement allows you to take a single variable value and execute a different block of code based on the value of the variable. If you wish to check for a number of different values, this can be an easier method than the use of a set of nested if/else statements. First line of a switch statement would have the following syntax: switch (varname) You replace varname with the name of the variable you are testing. You could also replace it with some other sort of expression, such as the addition of two variables or some similar calculation, and have it evaluate. For now, you will just use a variable that has been assigned a value before the switch statement begins. In your later scripts, you may use some more complex switch statements. Now, you need to see the general syntax for a full switch statement. The following code is an example of how a switch statement looks: var thename="Fred"; switch (thename) { case "George" : window.alert("George is an OK name"); break; case "Fred" : window.alert("Fred is the coolest name!"); window.alert("Hi there, Fred!"); break; default : window.alert("Interesting name you have there"); }
 You replace varname with the name of the variable you are testing. You could also replace it with some other sort of expression, such as the addition of two variables or some similar calculation, and have it evaluate. For now, you will just use a variable that has been assigned a value before the switch statement begins. In your later scripts, you may use some more complex switch statements. Now, you need to see the general syntax for a full switch statement. The following code is an example of how a switch statement looks: var thename= Fred ; switch (thename) { case George : window.alert( George is an OK name ); break; case Fred : window.alert( Fred is the coolest name! ); window.alert( Hi there, Fred! ); break; default : window.alert( Interesting name you have there ); }.")
9
Defining Loops To begin using loops, you will want to know what loops are, what they can do, and why they can be useful to you in your scripts. What Is a Loop? A loop is a block of code that allows you to repeat a section of code a certain number of times, perhaps changing certain variable values each time the code is executed. By doing this, you are often able to shorten certain tasks into a few lines of code, rather than writing the same line over and over again within the script and tiring your fingers. Structure of a for Loop The structure of a for loop is very similar to that of the conditional blocks. The only major differences are that a loop serves a different purpose and, as a result, the first line is different. After that, you use the familiar curly brackets to enclose the contents of the loop. The first line of a for loop would look similar to the following line: for (var count=1;count<11;count+=1)
.")
10
while A while loop just looks at a short comparison and repeats until the comparison is no longer true. To begin, take a look at the general syntax for the first line of a while loop: while (count<11) The while statement does not create a variable the way a for statement can. When using a while loop, you must remember to declare the variable you wish to use and assign it a value before you insert it into the while loop while ((count>4)&&(count<11)) This time, the loop runs only while the variable is greater than 4 and less than 11. For the loop to run at all, the initial value of the variable would need to be within that range; otherwise, the loop would be skipped entirely. The following code shows the general structure of a full while loop so that you can see how it looks: var count=1; while (count<6) { JavaScript Code Here count++; }
 The while statement does not create a variable the way a for statement can. When using a while loop, you must remember to declare the variable you wish to use and assign it a value before you insert it into the while loop while ((count>4)&&(count<11)) This time, the loop runs only while the variable is greater than 4 and less than 11. For the loop to run at all, the initial value of the variable would need to be within that range; otherwise, the loop would be skipped entirely. The following code shows the general structure of a full while loop so that you can see how it looks: var count=1; while (count<6) { JavaScript Code Here count++; }.")
11
do while The do while loop is special because the code within the loop is performed at least once, even if the comparison used would return false the first time. A comparison that returns false in other loops on the first attempt would cause them never to be executed. In the case of a do while loop, the loop is executed once, and then the comparison is used each time afterward to determine whether or not it should repeat. The following is an example of a do while loop that will run five times: var count=1; do { document.write("Hi!"); count++; } while (count<6);
; count++; } while (count<6);.")
12
Using break and continue The break and continue statements allow you to stop what a loop is currently doing, but work in different ways. As you will recall from the use of a break statement within a switch block earlier in the chapter, the break statement stops the loop at that point and completely exits the loop, moving on to the next JavaScript statement after the loop. For instance, break could be used in this manner: for (count=1;count<11;count++) { if (count==5) { document.write("The loop is halfway done, and I am done with it! "); break; } else { document.write("I am part of a loop! "); } for (count=1;count<11;count++) { if (count==5) { continue; } document.write(count+". I am part of a loop! "); } This time, nothing is written to the page when count is equal to 5. Instead, the loop is told to go back to the beginning and continue from there
 { if (count==5) { document.write( The loop is halfway done, and I am done with it. ); break; } else { document.write( I am part of a loop. ); } for (count=1;count<11;count++) { if (count==5) { continue; } document.write(count+ . I am part of a loop. ); } This time, nothing is written to the page when count is equal to 5. Instead, the loop is told to go back to the beginning and continue from there.")
14
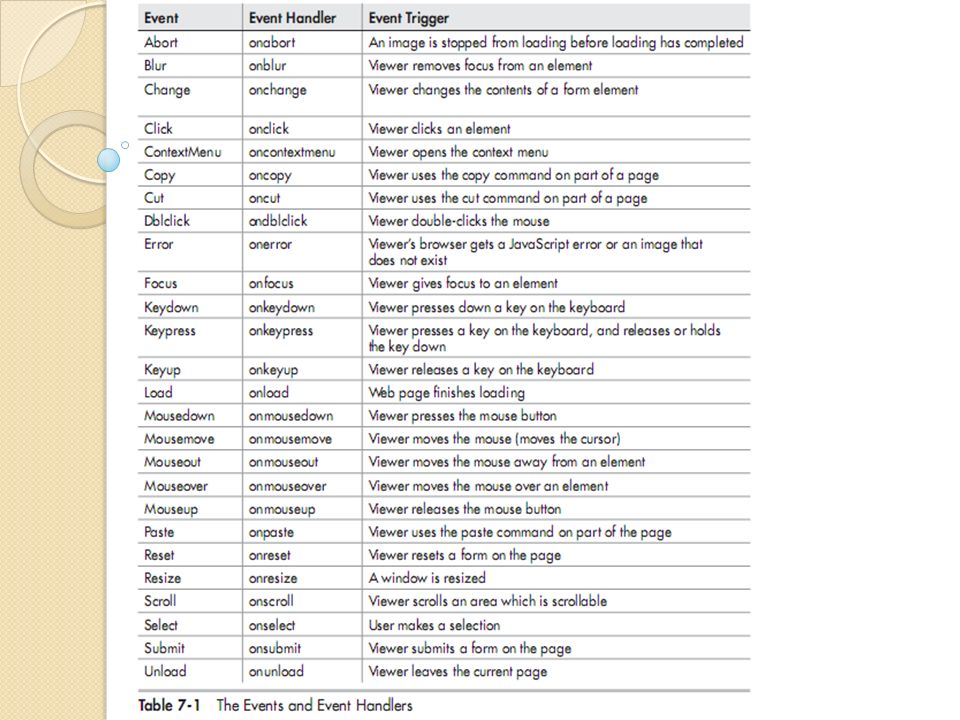
What Is an Event Handler? An event handler is a predefined JavaScript property of an object (in most cases an element in the document) that is used to handle an event on a Web page. You may ask the question “What is an event?” An event is something that happens when the viewer of the page performs some sort of action, such as clicking a mouse button, clicking a button on the page, changing the contents of a form element, or moving the mouse over a link on the page. Events can also occur simply by the page loading or other similar actions. When events occur, you are able to use JavaScript event handlers to identify them and then perform a specific task or set of tasks. JavaScript enables you to react to an action by the viewer and to make scripts that are interactive, and more useful to you and to the viewer. Why Event Handlers Are Useful? Event handlers are useful because they enable you to gain access to the events that may occur on the page. For instance, if you wanted to send an alert to the viewer when he or she moves the mouse over a link, you could use the event handler to invoke the JavaScript alert you have coded to react to the event. You are now making things happen based on the actions of the viewer, which enables you to make more-interactive Web pages. Creating this interactivity is where many people find that JavaScript starts to become a little more fun to code and to use. With event handlers, you can create some surprises for the viewer or make some scripts that will simply add more functionality to the page. JavaScript can make a number of things happen on a Web page that will make the page more interesting than a static HTML document.
 that is used to handle an event on a Web page. You may ask the question What is an event An event is something that happens when the viewer of the page performs some sort of action, such as clicking a mouse button, clicking a button on the page, changing the contents of a form element, or moving the mouse over a link on the page. Events can also occur simply by the page loading or other similar actions. When events occur, you are able to use JavaScript event handlers to identify them and then perform a specific task or set of tasks. JavaScript enables you to react to an action by the viewer and to make scripts that are interactive, and more useful to you and to the viewer. Why Event Handlers Are Useful. Event handlers are useful because they enable you to gain access to the events that may occur on the page. For instance, if you wanted to send an alert to the viewer when he or she moves the mouse over a link, you could use the event handler to invoke the JavaScript alert you have coded to react to the event. You are now making things happen based on the actions of the viewer, which enables you to make more-interactive Web pages. Creating this interactivity is where many people find that JavaScript starts to become a little more fun to code and to use. With event handlers, you can create some surprises for the viewer or make some scripts that will simply add more functionality to the page. JavaScript can make a number of things happen on a Web page that will make the page more interesting than a static HTML document..")
15
Understanding Event Handler Locations and Uses To see how event handlers work, you need to know where you can place them in a document and how to use them to add JavaScript code for an event. Event handlers can be used in a number of locations. They can be used directly within HTML elements by adding special attributes to those elements. They can also be used within the and tags or in an external JavaScript file. To understand better where event handlers are located, you need to learn how to add event handlers to your script. Using an Event Handler in an HTML Element To use an event handler directly in an HTML element, you need to know the keyword for the event handler and where to place the event handler within the HTML code. To give you an example, I will introduce the onclick event handler, which is used to make something happen when the viewer clicks a specific area of the document. One element that can be clicked is a form button. So, suppose you want to alert the viewer to something when the user clicks a form button. You would write something similar to the following code:

16
To use an event handler, you add it as an additional attribute to an HTML tag. The only difference between an event handler “attribute” and an HTML attribute is that you can add JavaScript code inside an event handler attribute rather than just an attribute value. In the previous code, you would replace the JavaScript code here text with some actual JavaScript code.So, to make an alert pop up when the user clicks the button, you can add the necessary JavaScript code right inside your onclick attribute, as shown in the following example:

17
Using an Event Handler in the Script Code You can also use an event handler within the script code (whether using the script tags in the HTML document or using an external JavaScript file). One way to do this is to give the element an id attribute and then use the JavaScript method document.getElementById() to access the element. Once that is done, you can tie an event to the element. Add the id Attribute To use the previous script in this way, you will first add an id attribute to the HTML tag for the input button, as shown here: Notice that the button input element was given an id of say_hi. You will use this to access the button and tie it to an event in your script.
 to access the element. Once that is done, you can tie an event to the element. Add the id Attribute To use the previous script in this way, you will first add an id attribute to the HTML tag for the input button, as shown here: Notice that the button input element was given an id of say_hi. You will use this to access the button and tie it to an event in your script..")
18
Access the Element The document.getElementById() method allows you to access any element in the HTML document that has an id attribute using the value of its id attribute. In order to access the button input element you have been using with an id, you could use the following code: document.getElementById("say_hi"); This simply tells the browser you want to access the element with the id of say_hi in the HTML document. This method could be used directly in the script to access the element, but oftentimes you will want to assign this expression to a variable to save typing if you use it repeatedly. Thus, you could use the following code: var hi_button = document.getElementById("say_hi"); And then you can use this code to access it’s value for example: document.write(hi_button.value);
; This simply tells the browser you want to access the element with the id of say_hi in the HTML document. This method could be used directly in the script to access the element, but oftentimes you will want to assign this expression to a variable to save typing if you use it repeatedly. Thus, you could use the following code: var hi_button = document.getElementById( say_hi ); And then you can use this code to access it’s value for example: document.write(hi_button.value);.")
20
The Button Link Using JavaScript, you can send the viewer to another URL. To do this, you need to use another new property: window.location. This property enables you to change the URL address of the window in which you use it. The following is the general syntax for the command: window.location="http://someplace.com";

21
The History Object The history object, which is also part of the window object, provides information on the browser history of the current window. Property The history object has only one property, named length (in Firefox, a few more are available, but they do not work with Web content). This property returns the number of pages in the session history of the browser for the current window, which includes the currently loaded page. It could be used in a manner similar to this: alert("Your current window has viewed "+history.length+" pages!") This simply sends an alert to the viewer to say how many pages have been visited in the current browser window. Methods There are three methods of the history object, listed in Table 8-3
. This property returns the number of pages in the session history of the browser for the current window, which includes the currently loaded page. It could be used in a manner similar to this: alert( Your current window has viewed +history.length+ pages! ) This simply sends an alert to the viewer to say how many pages have been visited in the current browser window. Methods There are three methods of the history object, listed in Table 8-3.")
22
The cookie Property The cookie property is used to set a JavaScript cookie to store information for the viewer. A cookie is a small text file saved to the viewer’s computer for a particular amount of time (a set date or a browser session). Cookies can be helpful in allowing a site to remember and retrieve information for a viewer (such as the contents of a shopping cart, special settings, or session information). To set a cookie, you set the value of the document.cookie property to a string that contains the information you want to store for the viewer. The following is the syntax: document.cookie=string; You would replace string with a text string that contains the information you want to use. Usually, this is in a format like the one shown in the following example setting of a cookie: document.cookie="site=homepage"; A cookie is a small text file that is stored on the end user’s computer. It can be referenced any time the viewer returns to your site, provided the cookie hasn’t been deleted or expired. Of course, if the viewer doesn’t accept cookies, then a cookie won’t be able to be set or referenced later. Keep the following points in mind when using cookies: ● Cookies must be 4KB (4000 characters) each or less. ● A browser can accept up to only 20 cookies from a single domain. ● If a number of viewers don’t accept cookies, this eliminates any advantages of your cookie(s) to those viewers.
. Cookies can be helpful in allowing a site to remember and retrieve information for a viewer (such as the contents of a shopping cart, special settings, or session information). To set a cookie, you set the value of the document.cookie property to a string that contains the information you want to store for the viewer. The following is the syntax: document.cookie=string; You would replace string with a text string that contains the information you want to use. Usually, this is in a format like the one shown in the following example setting of a cookie: document.cookie= site=homepage ; A cookie is a small text file that is stored on the end user’s computer. It can be referenced any time the viewer returns to your site, provided the cookie hasn’t been deleted or expired. Of course, if the viewer doesn’t accept cookies, then a cookie won’t be able to be set or referenced later. Keep the following points in mind when using cookies: ● Cookies must be 4KB (4000 characters) each or less. ● A browser can accept up to only 20 cookies from a single domain. ● If a number of viewers don’t accept cookies, this eliminates any advantages of your cookie(s) to those viewers..")
23
The formname Property The formname property isn’t actually a property itself. Any time you name a form, you create a formname property, but the property is actually the name of the form and not formname. To see the meaning of this, take a look at a page with a form on it. The following code will give you an HTML page that includes a form: This code creates a document.funform property from the name=“funform” attribute in the opening tag. While this doesn’t do much on its own, it does allow you access to the form elements within the form. The funform property actually has properties under it, which are named after the elements of the form. You could access the button you used in the form from its name=“funb” attribute using document.funform.funb to get to it; however, even this doesn’t let you do much by itself.You need to dig down one more level. The value property allows you to set or change the value of the contents of a form element. These contents are usually set in the value attribute of the form element’s tag. In the form here, you could change the value of the text on the button by accessing its value property using document.funform.funb.value and assigning it a new value. The following example shows how you could use the onclick event handler to make the button text change when the button is clicked: <input type="button" name="funb" value="You can click me I suppose" onclick="document.funform.funb.value='Thanks, you clicked me!';" />

24
Using the Methods of the Document Object The methods of the document object allow you to do some new things that you haven’t been able to do yet. Table 9-2 lists the methods with a short description of each. Because a number of these methods are browser-specific (as with the properties) at the time of this writing, only some specific methods are described in more detail following the table. The getElementById() Method The getElementById() method is one that you have been using extensively in the book already. It allows you access to an element by the value of its id attribute. As you already know, if you have the following code, you can access the element with this method: This is some text. Since the id attribute of the div element has the value of some_text, the document. getElementById() method can access the div element using that value as a string parameter: var text_element = document.getElementById("some_text"); As you have done before, you could make use of an event that occurs on this element and script a reaction to the event. innerHTML innerHTML Returns the HTML code (text, image code, tags, etc.) within the specified node, such as all of the HTML code within a div element. The innerHTML DOM node property allows you to change the HTML code that is inside of a given element.
 at the time of this writing, only some specific methods are described in more detail following the table. The getElementById() Method The getElementById() method is one that you have been using extensively in the book already. It allows you access to an element by the value of its id attribute. As you already know, if you have the following code, you can access the element with this method: This is some text. Since the id attribute of the div element has the value of some_text, the document. getElementById() method can access the div element using that value as a string parameter: var text_element = document.getElementById( some_text ); As you have done before, you could make use of an event that occurs on this element and script a reaction to the event. innerHTML innerHTML Returns the HTML code (text, image code, tags, etc.) within the specified node, such as all of the HTML code within a div element. The innerHTML DOM node property allows you to change the HTML code that is inside of a given element..")
25
The write() Method You started using the write() method early in the book, so you should know quite a bit about how it works already; but here’s a brief description of this method, as a refresher. The document.write() method is used to write a string value to the page. The following code would write “hi there” in the body of an HTML document: document.write("hi there"); The writeln() Method The writeln() method works the same way as the document.write() method, but adds a JavaScript newline character (\n) at the end of the statement. Recall that in the first part discussed how the JavaScript newline character works it only places a new line in the page source code to make it easier to read
 method is used to write a string value to the page. The following code would write hi there in the body of an HTML document: document.write( hi there ); The writeln() Method The writeln() method works the same way as the document.write() method, but adds a JavaScript newline character (\n) at the end of the statement. Recall that in the first part discussed how the JavaScript newline character works it only places a new line in the page source code to make it easier to read.")
26
The confirm() Method The confirm() method can be used to give the viewer a chance to confirm or cancel an action. This method returns a Boolean value of true or false, so its result is often assigned to a variable when it is used. The following is the syntax for assigning the value to a variable: var varname = window.confirm("Your Message"); You would replace varname with a variable name that you wish to use. You would then replace the “Your Message” text with the text you wish to have in the dialog box that pops up. So, if you wanted to assign the result to a variable named is_sure and ask the question “Are you sure?” you could use the following code: var is_sure = window.confirm("Are you sure?"); The home() Method The home() method is used to send the viewer to the home page the viewer has set in the Web browser settings. For instance, you could use it to offer viewers a button that will take them to their selected home page when clicked, as in the following code (at the time of this writing this method worked in Mozilla Firefox and Opera but did not work in Microsoft Internet Explorer):
; You would replace varname with a variable name that you wish to use. You would then replace the Your Message text with the text you wish to have in the dialog box that pops up. So, if you wanted to assign the result to a variable named is_sure and ask the question Are you sure you could use the following code: var is_sure = window.confirm( Are you sure ); The home() Method The home() method is used to send the viewer to the home page the viewer has set in the Web browser settings. For instance, you could use it to offer viewers a button that will take them to their selected home page when clicked, as in the following code (at the time of this writing this method worked in Mozilla Firefox and Opera but did not work in Microsoft Internet Explorer):.")
27
The print() Method The print() method enables the viewer to print the current window. When this method is called, it should open the viewer’s Print dialog box so that the viewer can set the printer settings to print the document. To use it, you could create a button that enables the viewer to print the page they are viewing: <input type="button" value="Click to Print Page" onclick="window.print();">
; >.")
28
The prompt() Method The prompt() method is used to prompt the viewer to enter information. Using this method, you can do things based on what the viewer enters into the text box at the prompt. First, you need to see the syntax for this method. As with the confirm() method, the result (what the viewer enters) is assigned to a variable for later use. The following is an example of the syntax: var varname = window.prompt("Your Text","Default Entry"); You replace varname with a variable name, and replace “Your Text” with the message that you want to send to the viewer (usually a question). The second parameter, “Default Entry”, enables you to enter a default entry for the viewer. Often this is left as “”, which is a blank entry. However, you could set it to something if you would like to have a default answer ready for the viewer to use. You could use the prompt() method to get the viewer’s name and send an alert while the page is loading. The following code prompts the viewer to enter their name and then includes the name in a message that is displayed to the viewer in an alert: var thename = window.prompt("What's your name?",""); if (thename.length < 1) { thename = "Anonymous Visitor"; } window.alert("Hello "+thename+"!")
 method, the result (what the viewer enters) is assigned to a variable for later use. The following is an example of the syntax: var varname = window.prompt( Your Text , Default Entry ); You replace varname with a variable name, and replace Your Text with the message that you want to send to the viewer (usually a question). The second parameter, Default Entry , enables you to enter a default entry for the viewer. Often this is left as , which is a blank entry. However, you could set it to something if you would like to have a default answer ready for the viewer to use. You could use the prompt() method to get the viewer’s name and send an alert while the page is loading. The following code prompts the viewer to enter their name and then includes the name in a message that is displayed to the viewer in an alert: var thename = window.prompt( What s your name , ); if (thename.length < 1) { thename = Anonymous Visitor ; } window.alert( Hello +thename+ ! ).")
29
The open() Method The open() method is the method that enables you to open a new window with JavaScript. This method takes three parameters, the third of which sets a number of options that the window may need. The general syntax for using the open() method is shown in the following example: window.open("URL","name","attribute1=value,attribute2=value"); The first parameter, “URL”, is replaced with the URL of the HTML document that is to be opened in the new window. The “name” parameter is replaced with the name you wish to give to the window. The last parameter enables you to add attributes for the new window. These attributes are set by using “yes”, “no”, or a numeric value on the right side of the equal sign. Notice that each time an attribute is set with a value, there is a comma before the next one and no spaces in between. If you want to open a window with the features of the current window, you could do so by leaving off the last parameter with the attributes. The following example would open a new window with a local URL of newpage.htm and a name of my_window; it will have the same features as the window that opened it: window.open("newpage.html","my_window");
 method is shown in the following example: window.open( URL , name , attribute1=value,attribute2=value ); The first parameter, URL , is replaced with the URL of the HTML document that is to be opened in the new window. The name parameter is replaced with the name you wish to give to the window. The last parameter enables you to add attributes for the new window. These attributes are set by using yes , no , or a numeric value on the right side of the equal sign. Notice that each time an attribute is set with a value, there is a comma before the next one and no spaces in between. If you want to open a window with the features of the current window, you could do so by leaving off the last parameter with the attributes. The following example would open a new window with a local URL of newpage.htm and a name of my_window; it will have the same features as the window that opened it: window.open( newpage.html , my_window );.")
30
If you begin to use the attribute parameter, you should note that once you place something in the attribute parameter, any attribute not defined will now default to “no” instead of copying the main window. So, if you want to open a basic new window with a width of 400 pixels and a height of 300 pixels, you could use the following code: window.open("newpage.html","my_window","width=400,height=300");
;.")
31
The close() Method The close() method is used to close a window; however, unless your script has certain security rights, this can only be used to close a window that has been opened by you with JavaScript. I am a new window! I am newer than that old window that opened me, so I am special. Ha, ha!

Similar presentations