Download presentation
Presentation is loading. Please wait.

1
AGQTP ICPFVicki Lowery 1. Using a scanner to digitise images

2
Ensure the scanner is connected to the computer. Launch the software for your scanner.

3
If your software has similar functions, select the Scan option.

4
Select from Color, Black and White or Grayscale, depending on what your are scanning. Select 300 dpi (dots per inch) as your resolution.
 as your resolution..")
5
Scan of handwriting with pencil at 300 dpi. Note size of file (227 kb) and size of image (2464x1748 pixels) – too large for WebBoard.
 and size of image (2464x1748 pixels) – too large for WebBoard..")
6
Same image scanned at 100 dpi. Note smaller file size and image size but also less readable.

7
A better option is to resize the 300 dpi scan to 800 x 600 pixels. File size: 34kb, image size: 800 x 400. This results in a small file size, small image size but a more legible image on WebBoard.

8
The larger file may not fit on the screen when uploaded to WebBoard

9
Check your attachment Once you have uploaded your attachment to the discussion board, Read your message and open the attachment. If the attachment is too large to fit on screen, delete the message. Resize the graphic to no larger than 800 pixels wide and post it again. Read the message again and open the new attachment to make sure it fits on screen and is legible.

10
Example of Jordan’s work done in pencil and scanned at 300 dpi then resized to 800 x 600 for WebBoard.

11
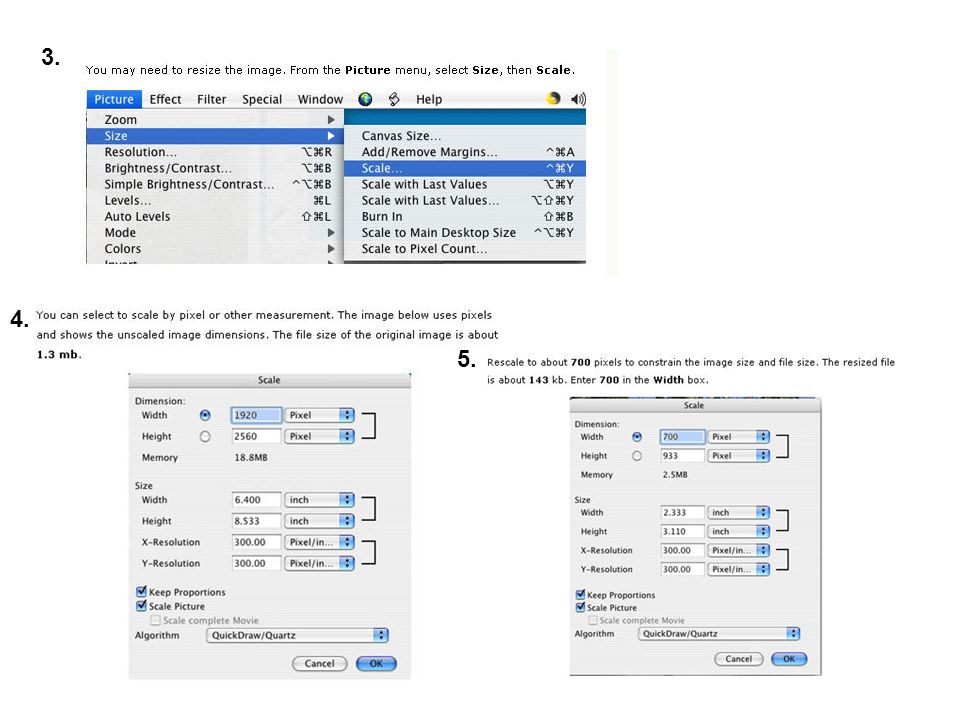
CTJ OnlineVicki Lowery 2. Using a camera to digitise work samples To scan or to photograph?

12
Digital photo of pen and paper work sample. Not very clear.

13
Digital photo of Jordan’s worksample. The scanned image was clearer.

14
Digital photos of students at work in the classroom.

15
Resizing your image Resizing is very important General image size setting in most cameras is approx. 1mb in size – good for printing but not good for emailing or uploading to WeBoard Large images mean large file sizes Slow to upload Slow to download May not fit on the screen for complete viewing

16
Hints for good images Stand square on Place work on floor or wall Try with and without flash Place information card next to work Do not photograph towards window as subject will end up very dark Take photos from different angles Avoid background clutter Always save your work Edit from a copy not the original

17
Software to manipulate images IrfanView software (PC only) is FREE! You can view images as individual images or a slideshow You can resize images You can use IrfanView to ‘acquire’ scans of images The URL for IrfanView is: http://www.irfanview.com/

18
Image here is only 21% of the total size

19
If the image is not set to fit to window, then….

20
..it is too big to fit on the screen.

21
You need to resize your image.

22
Current image size is: Width: 1944 Height: 2592 File size: 1829kb

23
Resize to a pixel size in which the largest size is no bigger than approx. 750 pixels. The ratio of the image is maintained. File size: 115kb

24
Image software: Apple For Apple, you can use Graphic Converter software. Graphic Converter is Shareware and can be downloaded from: http://www.lemkesoft.de/en/graphcon.htm http://www.lemkesoft.de/en/graphcon.htm

25
1. 2.

26
3. 4. 5.
27
Check your attachment Once you have uploaded your attachment to the discussion board, Read your message and open the attachment. If the attachment is too large to fit on screen, delete the message Resize the graphic to no larger than 800 pixels wide (or high) and upload it again. Read the message again and open the new attachment to make sure it fits on screen.
 and upload it again. Read the message again and open the new attachment to make sure it fits on screen..")
28
Attaching your message http://forum.det.nsw.edu.au/default.asp?action=10&boardid=504 &shp=5116&fid=5116

29
Review attaching a file to a discussion message Discussion - help

Similar presentations


