Download presentation
Presentation is loading. Please wait.

1
Regional Workshop 1 Regional Workshop for PARCC Field Test Spring 2014

2
Agenda 2 9:00 AM – 9:30 AM Introduction 9:30 AM – 10:30 AM Part I: Technology Set Up Introduction to computer-based testing Preparing your environment for computer-based testing 10:30 AM – 10:45 AM Break 10:45 AM – 11:30 AM Part I: Technology Set Up (continued) Preparing your environment for computer-based testing Providing technology support during testing Conducting an Infrastructure Trial New technologies – Virtualization, tablets 11:30 AM – 12:30 PM Lunch on your own (no lunch provided) 12:30 PM – 2:15 PM Part II: Administrator Training Overview of PearsonAccess User access and user roles Computer-based assessment Paper-based assessment 2:15 PM – 2:30 PM Break 2:30 PM – 3:30 PM Part III: Accessibility Features & Accommodations with Computer-Based Testing Types of accessibility features and accommodations Assigning accommodated test forms
 Preparing your environment for computer-based testing Providing technology support during testing Conducting an Infrastructure Trial New technologies – Virtualization, tablets 11:30 AM – 12:30 PM Lunch on your own (no lunch provided) 12:30 PM – 2:15 PM Part II: Administrator Training Overview of PearsonAccess User access and user roles Computer-based assessment Paper-based assessment 2:15 PM – 2:30 PM Break 2:30 PM – 3:30 PM Part III: Accessibility Features & Accommodations with Computer-Based Testing Types of accessibility features and accommodations Assigning accommodated test forms")
3
Part I: Technology Set Up 3

4
Computer-Based Testing Components 4

5
Phase 1: Bandwidth & Hardware Verification Phase 2: Assessment Environment Configuration Phase 3: TestNav Configuration in PearsonAccess Phase 4: Infrastructure TrialPhase 5: Pre-administration Checklist Technology Activities: Preparing your Environment 5

6
1.Identify technology coordinators 2.Configure firewall, content filter, proxy server and spam filter 3.Identify the testing rooms and the number of workstations to be used for testing 4.Identify the Proctor Caching machine(s) and install Proctor Caching 5.Complete the SystemCheck tests to verify testing workstation readiness and the number of concurrent testers supported using Proctor Caching 6.Update testing workstations to comply with TestNav hardware/software requirements 7.Enter TestNav configuration(s) in PearsonAccess 8.Pre-cache test content from PearsonAccess site 9.Conduct an Infrastructure Trial 10.Support testing during the computer-based administration Technology Setup Checklist 6
 and install Proctor Caching 5.Complete the SystemCheck tests to verify testing workstation readiness and the number of concurrent testers supported using Proctor Caching 6.Update testing workstations to comply with TestNav hardware/software requirements 7.Enter TestNav configuration(s) in PearsonAccess 8.Pre-cache test content from PearsonAccess site 9.Conduct an Infrastructure Trial 10.Support testing during the computer-based administration Technology Setup Checklist 6")
7
PARCC Field Test Spring 2014 TestNav 8 Browser-Based Student Testing Platform 7

8
TestNav 8 Student Interface 8

9
Firewalls, content, and spam filters must be set to allow access to Pearson domains Minimum screen resolution of 1024 x 768 is required Browser Requirements: – Java runtime plugin version 1.5 or higher – Windows firewall configured to allow javaw.exe to communicate – Accept Java applet – Allow pop-ups for Pearson sites – Allow local file access to home directory TestNav will save student responses to an encrypted backup file during testing and when the student exits the system to avoid losing response data. –TestNav, by default, saves student response data to: /Pearson/ /SRF Complete requirements for TestNav 8 can be found at: http://PARCC.Pearson.com/TN8Requirementshttp://PARCC.Pearson.com/TN8Requirements TestNav Technology Requirements 9

10
The following domains and ports must be allowed to pass through your Internet firewalls, content filters, or spam filters. *testnav.com 80, 443 *pearsonaccess.com 80, 443 *amazonaws.com80, 443 NOTE: Districts using IP-based content filters must contact Pearson Technical Support to receive the allowed IP addresses and Pearson support agents will change a setting in PearsonAccess so that the correct URL prints on the Student Authorization Tickets. PARCC Call Center phone number: 1-888-493-9888 PARCC Customer Support E-mail: PARCC@support.pearson.com PARCC Customer Support Hours: 6:00 am 8:00 pm CST, Monday–Friday Firewalls, Content Filters & Spam Filters 10

11
Wireless Testing for Computer-Based Testing Wireless networks are acceptable for computer-based testing 11

12
PARCC Field Test Spring 2014 Proctor Caching 12

13
How Proctor Caching Works 13

14
Proctor Caching Setup 14 Download Proctor Caching installer from PearsonAccess. Run the installer and Start Proctor Caching if it is not already started by the installer. Use SystemCheck from client computer to verify that Proctor Caching is functional. Create a Proctor Caching setup or add a Proctor Caching computer within PearsonAccess at the district or school level.

15
Contents Tab Content is displayed at the Test and Form level. Functionality is available to Refresh, Reload, or Purge selected test content. Clicking on a test name will display the Content Details screen which displays individual items in a test. 15

16
PARCC Field Test Spring 2014 SystemCheck for TestNav 16

17
17 SystemCheck was developed for customers to validate that their testing workstations meet the minimum requirements needed to run TestNav. To gather realistic results, SystemCheck should be run from a student testing machine, in a testing lab, on the same day of week/time of day as when you anticipate performing online testing. Since SystemCheck is Java based, it will not run on iPads or Chromebooks. A TestNav app will be available early 2014 to launch TestNav on these devices. Learn more about using SystemCheck by visiting http://PARCC.Pearson.com/Support and selecting the SystemCheck training module.http://PARCC.Pearson.com/Support Launch SystemCheck from http://PARCC.Pearson.com/SystemCheckhttp://PARCC.Pearson.com/SystemCheck SystemCheck for TestNav Overview

18
18 Check Your System: Validates system requirements are met on testing workstations Provides steps to verify whether TestNav can run on the workstation Testing Capacity: Bandwidth testing for Internet and Proctor Caching connections Volume estimates for capacity planning SystemCheck Functionality

19
Verifies that workstation can run TestNav 19 Check Your System: TestNav Verification

20
Internet bandwidth testing between the workstation and Pearson’s servers Click Add Caching Computer to add your potential Proctor Caching machine for a local network bandwidth test 20 Testing Capacity

21
Click on Start to begin the test Onscreen information helps determine whether the connection was successful or not 21 Testing Capacity: Results

22
Based on the bandwidth test, SystemCheck can provide an estimated number of students that can test concurrently. 22 Testing Capacity: Results

23
PARCC Field Test 2014 Create a TestNav Configuration 23

24
Creating a TestNav Configuration 24

25
PearsonAccess Test Setup: Configure TestNav 25 Step 1: Select “New Configuration” Step 2: Provide a configuration name

26
PearsonAccess Test Setup: Configure TestNav 26

27
PearsonAccess Test Setup: Configure TestNav 27

28
PearsonAccess Test Setup: Configure TestNav 28

29
PARCC Field Test 2014 Early Warning System 29

30
The Early Warning System (EWS) is integrated functionality that gives TestNav a high degree of fault tolerance and provides additional fail-safes in the event of unexpected network disruptions during computer-based testing. Early Warning System (EWS) 30
 30.")
31
The Early Warning System writes continuously in the background to the student response files (SRF). Both the Primary and Alternate files are written to at the same time. The SRF file has a response data threshold that, once reached, triggers TestNav to send response data to Pearson servers. Uploading of response data is continuous. If an upload to the Pearson servers fails, student responses continue to be saved locally and TestNav cycles and attempts another upload. If the response data upload is successful, TestNav creates a new empty SRF file and begins the process again. TestNav only deletes an SRF file once it is successfully uploaded to the Pearson servers. Student Responses: SRF Files 31

32
Scenario 1: TestNav determines that neither Saving Response File Location is viable. – Results in an immediate Test Proctor Click Here notification. Scenario 2: TestNav is unable to download portions of the test. – Results in an immediate Test Proctor Click Here notification. Scenario 3: TestNav is unable to upload student responses to Pearson. – Results in a Test Proctor Click Here notification only if the student attempts to Exit or Submit the test. TestNav Early Warning System: Triggers 32

33
PARCC Field Test 2014 Infrastructure Trial 33

34
Infrastructure Trial Introduction Answer: An Infrastructure Trial is a “dress rehearsal” of a computer-based assessment. It does not use real student information. This is low-stakes, dry run for final confirmation that: TestNav is configured correctly Devices can successfully run TestNav Network will bear the full load Participating staff know what to do for computer-based assessment 34 What is an Infrastructure Trial?

35
Infrastructure Trial Introduction Answer: Everyone within the LEA and the school who will have a role in the computer-based PARCC assessments should be included in the Infrastructure Trial. District and School Test Coordinators Test Administrators LEA technology staff School technology staff 35 Who should be involved in an Infrastructure Trial?

36
Infrastructure Trial Introduction Answer: The Infrastructure Trial is conducted using the PARCC Training Center at http://PARCC.Pearson.com/TrainingCenter. The PARCC Training Center offers the ability to create “dummy” students in bulk to reduce preparation time for the Infrastructure Trial. http://PARCC.Pearson.com/TrainingCenter Set up login access for your staff Create “dummy” students in PARCC Training Center for the Infrastructure Trial and assign to test sessions Confirm technology setup and configuration using Infrastructure Trial test 36 Where do I access the Infrastructure Trial?

37
Pearson Communication District Technology Staff District & School Testing Staff School Technology Staff Content Filters Firewalls Proxies TestNav District IT Communications Important Notices District-specific PARCC Communications Firewalls Proctor Caching TestNav District IT Communications Special Alerts IT-specific and School Coordinator-specific New Tools New Processes White Papers Important Notices Communication between staff is critical 37

38
PARCC Training Center Log In 38 The Infrastructure Trial is conducted in the secure PARCC Training Center. NOTE: You will have a separate login and password for the PARCC Training Center and PARCC operational PearsonAccess site from you state assessment PearsonAccess sites. A PARCC logo will be present in the header to help identify the site.

39
Creating “Dummy” Students 39 Create “Dummy” Student Data for Practice Create mock students using the Create Students option from the Student Data menu. Create as many students as needed to represent the number of students that would be tested on a typical day during the live test window. Choose the organization (school), create a new group, select the grade, test name, and choose the number of students you would like to create for practice in the school you have selected.
, create a new group, select the grade, test name, and choose the number of students you would like to create for practice in the school you have selected..")
40
Creating “Dummy” Students Continued 40 In the PARCC Training center, new students created using the wizard will automatically be registered for the computer-based test mode of the test selected in the create students step.

41
Emerging Technologies: Virtualization and Tablets 41 Part I: Technology Set Up

42
Apple iPads have some unique challenges for TestNav iPads can not run Java so TestNav can’t lock down the device properly like “standard” computers via the browser Pearson has developed an iPad TestNav app which will be available from the App Store in early January 2014 Student Response Files (SRFs) will be saved locally through the application Districts must take steps to configure iPads to deliver tests securely Disable screen capture Disable Home button functionality Enable “single app” mode iPads & Computer-based Testing 42
 will be saved locally through the application Districts must take steps to configure iPads to deliver tests securely Disable screen capture Disable Home button functionality Enable single app mode iPads & Computer-based Testing 42")
43
There are multiple options on how to enable “single app” mode Manually enable Guided Access single app mode on iOS 6 or iOS 7 Manage iPads (iOS 6 & iOS 7) via Apple Configurator and use Apple Profile Manager or 3 rd party Mobile Device Manager (MDM) to push secure testing configuration Manage iPads (iOS 7 only) via Apple Configurator and 3 rd party MDM to provide on-demand secure configuration using app-requested single-app mode iPads & Computer-based Testing 43
 via Apple Configurator and use Apple Profile Manager or 3 rd party Mobile Device Manager (MDM) to push secure testing configuration Manage iPads (iOS 7 only) via Apple Configurator and 3 rd party MDM to provide on-demand secure configuration using app-requested single-app mode iPads & Computer-based Testing 43")
44
What is Virtualization? Using your monitor/keyboard/mouse to look at and run software on some other computer “Thin Clients” are one type of virtualization VDI (Virtual Desktop Infrastructure) is becoming popular as a way of turning aging computers into terminals, instead of retiring them Virtualization 44
 is becoming popular as a way of turning aging computers into terminals, instead of retiring them Virtualization 44.")
45
Virtualization Network A Virtualized environment runs on a central server and streams the user interface to workstations. 45

46
Virtualization Security Concerns 46

47
Other Technology Considerations 47 Additional Training Modules for Technology Setup: SystemCheck for TestNav Evaluating device readiness Evaluating network readiness Setting up an Infrastructure Trial ( available January 2014) Purpose and description of Infrastructure Trial Infrastructure trial readiness checklist Technical Setup ( available December 2013) Components of computer-based testing Minimum requirements and technology setup tasks Emerging Technologies and Security with Computer-Based Testing ( available January 2014) Using thin clients and virtual desktops Computer-Based testing on iPads and Chromebooks Security and room layout considerations for computer-based testing
 Purpose and description of Infrastructure Trial Infrastructure trial readiness checklist Technical Setup ( available December 2013) Components of computer-based testing Minimum requirements and technology setup tasks Emerging Technologies and Security with Computer-Based Testing ( available January 2014) Using thin clients and virtual desktops Computer-Based testing on iPads and Chromebooks Security and room layout considerations for computer-based testing")
48
Part II: Test Administration Training 48 Part II: Test Administration Training

49
Accessing PearsonAccess Resources in PearsonAccess PearsonAccess Functionality – Administrative Management – Student Data – Test Setup – Test Management and test results Training Center Additional Resources Agenda 49

50
The PARCC PearsonAccess website may be accessed at http://PARCC.Pearson.com http://PARCC.Pearson.com How Do I Access PearsonAccess? 50

51
PearsonAccess Home Page 51

52
Resources 52

53
Manage staff user accounts Administrative Management Review organization contacts Organizations Student Data Test Setup Test Administration Tasks PearsonAccess Tabs Test Management Send student data files Filter and sort students Add, delete, or change student data Send student data files Filter and sort students Add, delete, or change student data Order additional materials and track shipments Configure TestNav Order additional materials and track shipments Configure TestNav Register students Manage test sessions Register students Manage test sessions View extracted reports Test Results PearsonAccess Tabs 53

54
Administrative Management 54

55
User Roles and Permissions User accounts must be created before personnel can login to PearsonAccess; the user’s role will determine the functionality they can access. 55

56
Authorized district and school personnel will be able to view and create staff user accounts within PearsonAccess manually or by submitting a file. View and Create Individual User Accounts 56

57
View User Accounts lets authorized personnel view and update existing accounts, as well as create new accounts manually. View User Accounts 57

58
A user’s role and organization will determine the functionality they can access. Manually Create a New User Account 58

59
User Accounts can also be created or maintained by submitting a user account file; this is especially helpful when working with accounts in bulk. Send User Account File 59

60
By using the Export to Excel button on the View User Accounts page, a template is created for submitting a User Account file. User Account File 60

61
The User Account File template, and some important fields. User Account File fields 61

62
Submit your file for processing at Administrative Management > Send User Account File. Send User Account File 62

63
PARCC Customer Support agents may: – Reset passwords – Unlock accounts for LEA/District Test Coordinator accounts – Update email addresses for LEA/District Test Coordinator accounts Agents may not: – Create accounts – Lock/unlock accounts for non-LEA/District Test Coordinator accounts – Update email addresses for non-LEA/District Test Coordinator accounts – Delete/undelete accounts Agent Authorizations 63

64
Customer Support Requests allow authorized staff to securely communicate with Pearson. Customer Support Requests 64

65
Student Data 65

66
Student Data refers to student demographic data and other testing-specific information about individual students. Student Data 66

67
Resources for creating a student data upload (SDU) file can be located on the Support > Resources > Templates page. Send Student Data – Resources 67

68
Send Student Data Submitting an SDU file to mass upload students for testing is the most common way students are registered. 68

69
Send Student Data - Status Once an SDU is submitted, PearsonAccess provides detailed status updates, along with applicable error information. 69

70
Student Data Information allows you to search for students, add or delete students, update enrollment, and view reports. Student Data Information 70

71
Student Data Information – Search Results After executing a search, selecting an individual student provides the Student Details with the student record and enrollments. 71

72
The Enrollments tab shows current enrollment for a student, and allows you to manually update enrollment as needed. Enrollments 72

73
Adding a New Student When adding new students, remember: ■ Students are enrolled to a school. ■ Students are registered for a test administration. ■ Students are assigned to a registration class. ■ Students are assigned to a test. 73

74
Test Setup 74

75
Test Setup activities help you to prepare for both paper and online testing. Test Setup 75

76
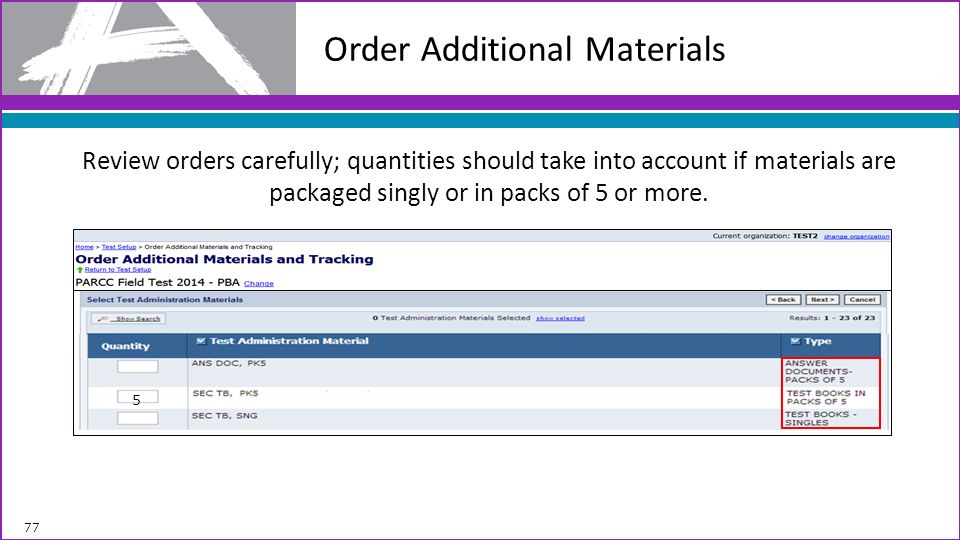
Order Additional Materials Orders can be submitted by users with the following roles: – LEA/District Test Coordinator – Non-School/Institution Test Coordinator – School/Institution Test Coordinator. Ordering additional materials is a three-step process. – Verify the shipping information is correct. If it is not correct, contact your State Field Test Contact. – Enter a quantity in the Quantity column for each type of material that you want to order. – Review the order, and then click Save to complete the ordering process. Use Order Additional Materials and Tracking to order additional paper materials than originally provided in your initial distribution. 76

77
Order Additional Materials Review orders carefully; quantities should take into account if materials are packaged singly or in packs of 5 or more. 5 77
78
Shipment Tracking Order Additional Materials and Tracking is also used to check on the status of existing orders and track order shipments. 78

79
Shipment Tracking - Reports Multiple order and shipment reports are available for review by selecting Reports. 79

80
Test Management 80

81
Test Management The primary test management activities are registering students and managing test sessions. Register Students allows you to manually assign students to paper & online tests, update student demographic data before testing, and view student counts by administration. Managing Test Sessions is one of the main activities for computer-based testing. 81

82
Register Students – Manual Registration Students are typically registered via an SDU file, but can be registered manually. 82

83
Register Students – Manual Steps After manually registering a student, a registration class and test(s) need to be added. 83

84
Use the registration file to: – view student registration information, and – update information (such as change from paper to computer-based (online) testing, update students’ grade levels, or update demographics) and then upload the updated student information using the registration file via Send Student Data. Use the registration summary file to: – view counts of unregistered students, registered students, students being tested, students with existing test assignments, students with valid test attempts, and students with failed test attempts. – The report includes only schools that are participating in the selected test administration. Register Students Register Students also allows you to run reports to help you manage student registrations. 84

85
Register Students – View/Update/Remove Registrations From the Register Students screen, you can also view, update, or remove registrations. 85

86
Manage Test Sessions To view or edit an existing session, click on the session name. To create a new session, click New Session. To delete a session, place a check mark next to the session name and then click Delete. To view details about currently scheduled test sessions, click Currently Scheduled Sessions. To view a CSV file with students registered to test but not in a session, click Students not assigned to session. To download the session list as a CSV file, click Session List Download. Most activities associated with computer-based test sessions will be performed on Manage Test Sessions. 86

87
Create Test Sessions Click the New Session button. Enter a session name and select a school. Enter the remaining session details. Required fields are designated with a red arrow. If applicable, select “No” from the Read Aloud by Test Examiner drop-down menu. For administrations in which there is only one form, “Main” must be selected from the Form Group Type drop-down menu. If applicable, a proctor caching computer should be selected from the Proctor Caching Computer drop-down menu. To grant school-level users the ability to assign district-level proctor caching computers to test sessions, select the “Include caching computers defined for the District” checkbox. You may add students now, or you can add students later. Click the Save button after completing all session details. Before students can take a computer-based test, test sessions must be created. 87

88
Session Details In the Session Details screen, you can: – start and stop a test session, – print Student Authorizations and/or seal codes, – print Proctor Authorizations (for Read Aloud administrations), – proctor cache test content, – print a session roster, – update TestNav configurations, – monitor individual student’s tests, – resume a student’s test, – mark a test complete, and – add/remove/move students. The Session Details screen allows you to manage the details of each test session. 88

89
Proctor Caching Test Content Proctor caching is completed at the session level, on the Session Details screen. – The Proctor Caching button will be disabled and you will not be able to cache the test content for the test session if you do not have access to proctor caching or if you are not within the proctor caching window. Proctor caching is available up to one week before an administration; districts will receive notification when it is available. Proctor caching refers to downloading encrypted test content from the Pearson testing server to a secure local computer prior to starting a test session. 89

90
Student and Proctor Authorizations Each student must have an authorization in order to log in to a test. Proctor authorizations (log in for test administrator) are only for Read Aloud Administrations. Authorizations contain: – the URL to access tests through the browser-based TestNav, – a unique login ID, and – the test code needed to log in. Student authorizations also contain the keystrokes available for navigating through TestNav. Student and Proctor authorizations are needed to perform certain functions at the session level. 90
 are only for Read Aloud Administrations. Authorizations contain: – the URL to access tests through the browser-based TestNav, – a unique login ID, and – the test code needed to log in. Student authorizations also contain the keystrokes available for navigating through TestNav. Student and Proctor authorizations are needed to perform certain functions at the session level. 90.")
91
Authorizations - Seal Codes There will be one set of seal codes assigned to each test session. Before students in a test session can go to the next sealed section of an electronic test, they must enter the appropriate four-digit seal code. Seal codes for a specific test session are listed on the seal codes document. Seal codes are the electronic equivalents of the adhesive tabs that are used to seal sections of paper test booklets. 91

92
Starting Test Sessions Scheduling a date and time for a new test session is intended primarily for planning purposes. A test session will not start until you click the Start button on the Session Details screen, regardless of the scheduled start date and time. NOTE: If you do not have access to start a test session, the Start button will be disabled and you will not be able to start the test session. Users with Organization and Technology Coordinator Roles only do not have access to start or stop sessions. A test session must be started before students can begin testing. 92

93
Monitoring Test Sessions The table below gives an explanation of the possible statuses for students as they test. StatusMeaning ReadyThe student has not yet started the test. ActiveThe student has logged in and started the test. ExitedThe student has exited TestNav but has not submitted test responses, e.g. took a break. (Student must be resumed by a test administrator to continue testing.) ResumedThe student has been authorized by a test administrator to resume the test. Resumed-UploadThe student has been authorized to resume the test, and any responses saved locally can be uploaded when the student is ready to continue testing. CompletedThe test has been submitted by the student through TestNav and the data has been processed. Marked CompleteThe student has exited TestNav and will not resume the same test, e.g left due to illness. 93
 ResumedThe student has been authorized by a test administrator to resume the test. Resumed-UploadThe student has been authorized to resume the test, and any responses saved locally can be uploaded when the student is ready to continue testing. CompletedThe test has been submitted by the student through TestNav and the data has been processed. Marked CompleteThe student has exited TestNav and will not resume the same test, e.g left due to illness. 93.")
94
Resuming a Student’s Test Select the checkbox for the student on the Session Details screen. Click the Resume Test button. The student’s status will change to “Resumed” (if the student was in “Exited” status) or “Resumed-Upload” (if the student was in “Active” status). – The student’s test will be resumed from the point at which it was exited or interrupted. Any saved test responses that the student entered will be uploaded when the connection to the Pearson testing server is reestablished. Have the student log in using their original student authorization. A test administrator must resume an Exited student’s test in order for the student to complete testing. 94
 or Resumed-Upload (if the student was in Active status). – The student’s test will be resumed from the point at which it was exited or interrupted. Any saved test responses that the student entered will be uploaded when the connection to the Pearson testing server is reestablished. Have the student log in using their original student authorization. A test administrator must resume an Exited student’s test in order for the student to complete testing. 94.")
95
View Test Progress When available, select the student’s View Progress link to review test progress. Users with Organization and Technology Coordinator Roles only do not have access to view progress. The Status column in the Session Details allows administrators to view test progress. StatusMeaning Visited/No Response RequiredStudent has visited the item but no response is required. Visited/AnsweredStudent has visited the item and entered a response. Visited/Not AnsweredStudent has visited the item but has not entered a response. Not VisitedStudent has not visited the item. 95

96
Mark Test Complete Select the checkbox for the student on the Session Details screen. Click the Mark Test Complete button. You will be prompted to enter a reason for marking the test “complete.” Click the Save button. The student’s status will change to “Marked Complete.” If a student has exited a test and will not resume testing, the test can be manually marked “complete.” 96

97
Stopping Test Sessions After all students have completed the test and submitted their responses, or been marked “complete,” you should stop the session. Click the Stop button. NOTE: A session does not stop until you click the Stop button. The system will NOT automatically start or stop a session. Once a session has been stopped, it can no longer be modified. You cannot stop a test session until all students in the session are in “Completed” or “Marked Complete” status. 97

98
Test Results – View Published Reports Go to Test Results > View Published Reports to see a list of available reports. If necessary, click the Change link and select the correct administration. From the View by options set, select the correct organization type. Click on the organization link in the available list. Open the desired report(s); icons designate the report’s format. Reports in Spring 2014 include data extracts that are available for viewing, downloading, and printing. 98
; icons designate the report’s format. Reports in Spring 2014 include data extracts that are available for viewing, downloading, and printing. 98.")
99
Accessibility Features and Accommodations with Computer-Based Testing 99 Part III: Accessibility Features and Accommodations

100
Types of Accessibility Features and Accommodations 100

101
Computer-Based Accessibility Features and Embedded Accommodations During the PARCC field test administration, some accessibility features and accommodations will not be available due to ongoing development and research that is required to ensure that all accessibility features and accommodations provide a valid reflection of what students know and can do. In addition, some specific accessibility features and accommodations may not be available on specific devices such as Chromebooks, and Android and Linux devices. The following slides will summarize which accessibility features and computer-based accommodations will be supported for the PARCC Field Test versus the 2014-2015 operational assessment. More detailed information about PARCC accessibility can be found in the PARCC Accessibility Features and Accommodations Guidelines (http://www.parcconline.org/parcc-draft-accommodations-manual ).http://www.parcconline.org/parcc-draft-accommodations-manual 2014 PARCC Field Test Accessibility Features and Accommodations 101
 PARCC Field Test Accessibility Features and Accommodations 101.")
102
102 Accessibility Features and Accommodations: Tools http://parcconline.org/field-test-technologyhttp://parcconline.org/field-test-technology - Full Technology Specifications document

103
103 Accessibility Features and Accommodations for PARCC Field Test http://parcconline.org/field-test-technologyhttp://parcconline.org/field-test-technology - Full Technology Specifications document

104
Assigning Accommodated Test Forms 104 Part III: Accessibility Features and Accommodations

105
Read Aloud Administrations A separate test session must be created for each test subject to be Read Aloud. You may add multiple students to the session, as long as they are all receiving a Read Aloud administration. Students receiving a Read Aloud administration should be tested separately from students who are not receiving this accommodation. To create a Read Aloud administration testing session, select “Yes” in the Read Aloud by Test Examiner drop down on the New Test Sessions screen. NOTE: If the drop down is unavailable (grayed out) then the Read Aloud accommodation is not valid for the test to be administered. A Read Aloud administration is an accommodation for eligible students. 105
 then the Read Aloud accommodation is not valid for the test to be administered. A Read Aloud administration is an accommodation for eligible students")
106
Other Accommodations A separate test session must be created for each test subject where an accommodation applies. You may add multiple students to the session, as long as they are all receiving an the same accommodation. To assign an accommodated form, select the appropriate Form Group Type from the dropdown during the “Create New Session” activity. Assigning Alternate Forms Groups for Other Accommodations 106

107
PARCC Support Center 888-493-9888 PARCC@support.pearson.com 107 Resources & Additional Support

Similar presentations


 Eric Mason, Director of Assessment 520-2414 ◦ Student Enrollment.>")


 STC High School Administration Training.>")

