Download presentation
Presentation is loading. Please wait.

1
How Photography Works Robert Ponzio Oak Hall School
Photography is undoubtedly one of the most important inventions in history -- it has truly transformed how people conceive of the world. Now we can "see" all sorts of things that are actually many miles -- and years -- away from us. Photography lets us capture moments in time and preserve them for years to come. Robert Ponzio Oak Hall School Photography is undoubtedly one of the most important inventions in history -- it has truly transformed how people conceive of the world. Now we can "see" all sorts of things that are actually many miles -- and years -- away from us. Photography lets us capture moments in time and preserve them for years to come.

2
The first successful picture was produced in June/July 1827 by Frenchman, Joseph Niépce. He put a metal plate covered with a chemical called bitumen into a camera box. The bitumen got hard on the parts of the plate exposed to the sun. When the plate was washed, a permanent picture remained. It took Niépce eight hours to expose this photograph. NIÉPCE, Joseph Nicephore b. 7 March 1765; d. 5 July 1833 Niépce (pronounced Nee-ps) is universally credited with producing the first successful photograph in June/July He was fascinated with lithography, and worked on this process. Unable to draw, he needed the help of his artist son to make the images. However, when in 1814 his son was drafted into the army to fight at Waterloo, he was left having to look for another way of obtaining images. Eventually he succeeded, calling his product Heliographs (after the Greek "of the sun"). Lady Elizabeth Eastlake, writing in 1857, informs us that he was a man of private means, who had began his researches in When he eventually succeeded, he came over to England later that year and sought to promote his invention via the Royal Society (then as now regarded as the leading learned body concerned with science). However, the Royal Society had a rule that it would not publicise a discovery that contained an undivulged secret, so Niépce meet with total failure. Returning to France, he teamed up with Louis Daguerre in 1829, a partnership which lasted until his death only four years later, at the age of 69. He left behind him some examples of his heliographs, which are now in the Royal Photographic Society's collection. This is the first known photograph. There is little merit in this picture other than that fact. It is difficult to decipher: the building is on the left, a tree a third in from the left, and a barn immediately in front. The exposure lasted eight hours, so the sun had time to move from east to west, appearing to shine on both sides of the building.
 is universally credited with producing the first successful photograph in June/July He was fascinated with lithography, and worked on this process. Unable to draw, he needed the help of his artist son to make the images. However, when in 1814 his son was drafted into the army to fight at Waterloo, he was left having to look for another way of obtaining images. Eventually he succeeded, calling his product Heliographs (after the Greek of the sun ). Lady Elizabeth Eastlake, writing in 1857, informs us that he was a man of private means, who had began his researches in When he eventually succeeded, he came over to England later that year and sought to promote his invention via the Royal Society (then as now regarded as the leading learned body concerned with science). However, the Royal Society had a rule that it would not publicise a discovery that contained an undivulged secret, so Niépce meet with total failure. Returning to France, he teamed up with Louis Daguerre in 1829, a partnership which lasted until his death only four years later, at the age of 69. He left behind him some examples of his heliographs, which are now in the Royal Photographic Society s collection. This is the first known photograph. There is little merit in this picture other than that fact. It is difficult to decipher: the building is on the left, a tree a third in from the left, and a barn immediately in front. The exposure lasted eight hours, so the sun had time to move from east to west, appearing to shine on both sides of the building.")
3
DAGUERRE, Louis Jacques Mande
The Daguerreotype DAGUERRE, Louis Jacques Mande b. 18 November 1787; d. 10 July 1851 Daguerre (pronounced Dagair) was perhaps the most famous of several people who invented photography. In 1835, he made an important discovery by accident. As the story goes, he put an exposed plate in his chemical cupboard, and some days later found, to his surprise, that the latent image had developed. Daguerre eventually concluded that this was due to the presence of mercury vapour from a broken thermometer. This important discovery that a latent image could be developed made it possible to reduce the exposure time from some eight hours to thirty minutes. He regularly used a camera obscura as an aid to painting in perspective, and this had led him to seek to freeze the image. In 1835, he made an important discovery by accident. As the story goes, he put an exposed plate in his chemical cupboard, and some days later found, to his surprise, that the latent image had developed. Daguerre eventually concluded that this was due to the presence of mercury vapour from a broken thermometer. This important discovery that a latent image could be developed made it possible to reduce the exposure time from some eight hours to thirty minutes. Though he now knew how to produce an image, it was not until 1837 that he was able to fix them. This new process he called a Daguerreotype. These early daguerreotypes had several drawbacks. •the length of the exposure necessary all but ruled out portraiture. the image was laterally reversed (as one sees oneself in a mirror). Many of the portraits reveal this from the way the coat was buttoned; if one required a picture the right way round, the camera would be pointed at a mirror reflecting the sitter's image. Initially this will not have bothered people, who were used only to seeing their mirror image in any case. it was very fragile. •perhaps most limiting of all, it was a "once only" system; what was needed was a means whereby copies of a photograph might easily be made.
 was perhaps the most famous of several people who invented photography. In 1835, he made an important discovery by accident. As the story goes, he put an exposed plate in his chemical cupboard, and some days later found, to his surprise, that the latent image had developed. Daguerre eventually concluded that this was due to the presence of mercury vapour from a broken thermometer. This important discovery that a latent image could be developed made it possible to reduce the exposure time from some eight hours to thirty minutes. He regularly used a camera obscura as an aid to painting in perspective, and this had led him to seek to freeze the image. In 1835, he made an important discovery by accident. As the story goes, he put an exposed plate in his chemical cupboard, and some days later found, to his surprise, that the latent image had developed. Daguerre eventually concluded that this was due to the presence of mercury vapour from a broken thermometer. This important discovery that a latent image could be developed made it possible to reduce the exposure time from some eight hours to thirty minutes. Though he now knew how to produce an image, it was not until 1837 that he was able to fix them. This new process he called a Daguerreotype. These early daguerreotypes had several drawbacks. •the length of the exposure necessary all but ruled out portraiture. the image was laterally reversed (as one sees oneself in a mirror). Many of the portraits reveal this from the way the coat was buttoned; if one required a picture the right way round, the camera would be pointed at a mirror reflecting the sitter s image. Initially this will not have bothered people, who were used only to seeing their mirror image in any case. it was very fragile. •perhaps most limiting of all, it was a once only system; what was needed was a means whereby copies of a photograph might easily be made.")
4
At that time some artists saw in photography a threat to their livelihood (see Artists and Photography ), and some even prophesied that painting would cease to exist. The Daguerreotype process, though good, was expensive, and each picture was a once-only affair. That, to many, would not have been regarded as a disadvantage; it meant that the owner of the portrait could be certain that he had a piece of art that could not be duplicated. If however two copies were required, the only way of coping with this was to use two cameras side by side. There was, therefore, a growing need for a means of copying pictures which daguerreotypes could never satisfy. Taken in 1839, this picture (Daguerreotype) of a boulevard gives the impression of empty streets, because with long exposures moving objects would not register. However, there was an exception when a man stopped to have his shoes shined, (see bottom left of the larger picture) and though he remains anonymous he may have the distinction of being the first person ever to have been photographed.
 of a boulevard gives the impression of empty streets, because with long exposures moving objects would not register. However, there was an exception when a man stopped to have his shoes shined, (see bottom left of the larger picture) and though he remains anonymous he may have the distinction of being the first person ever to have been photographed.")
5
The earliest photograph of a human figure on paper.
In England, William Talbot also experimented with the new art of photography. But he was going about things a bit differently. Instead of making positives on metal plates, Talbot made negatives on paper. While Talbot's pictures were not as clear as Daguerre's, they were reproducible. Talbot's originals were called "negatives" (the area most exposed to the light was the darkest); the pictures made from them were called "positives" (the area most exposed to the light was the brightest). Since the nineteenth century many people have worked hard to cut down exposure times and to develop new types of film. In the 1890s, George Eastman's roll-film camera made it possible to load a camera once and take a series of pictures. Today, we can load a pre-packaged roll of film into a camera in seconds. Thanks to one-hour photo processing, we can have our film developed soon after. Talbot, one of the inventors of photography, produced the first negatives on paper as early as He published his negative-positive process in 1839, but the materials were too slow and exposure times were too long to permit the photography of human beings (or anything else that moved). On September 23, 1840, Talbot invented the calotype process which worked by developing the latent image of a briefer exposure. On October 10, the inventor used this new process to make a small experimental portrait of his wife, Constance. Four days later, this first important calotype composition was executed. The negative was made in three minutes, according to a notation on another print that Talbot sent to Sir John Herschel (a print now in the Gernsheim Collection at the University of Texas.) The print shown here is on paper bearing the watermark "J. Whatman 1839." Its delicate tones of pink and mauve indicate it was stabilized with common salt rather than fixed with the "hypo" solution discovered by Herschel (and later universally adopted.) The image is kept in the dark and viewed only in subdued light. In Sun Pictures Catalogue Three (New York, H. P. Kraus, Jr., Inc., 1988), photographic historian Larry J. Schaaf observes: Talbot had recently been elected Sheriff of Wiltshire, and the magnificent livery of his footman was seen as an important way of expressing his status. Based solely on aesthetic and documentary appeal, this calotype is an impressive part of Talbot's oevre. The Footman takes on added significance, however, when we realize that it was made... just three weeks after Talbot had discovered his new process. References: Larrry J. Schaaf, The Photographic Art of William Henry Fox Talbot (Princeton University Press: 2000) pp H. Gernsheim, "Talbot's and Herschel's Photographic Experiments in 1839," Image, vol. 8, 1959, pp _______________________________________ Different, and in a sense a rival to the Daguerreotype, was the Calotype invented by William Henry Fox Talbot , which was to provide the answer to that problem. His paper to the Royal Society of London, dated 31 January 1839, actually precedes the paper by Daguerre; it was entitled "Some account of the Art of Photogenic drawing, or the process by which natural objects may be made to delineate themselves without the aid of the artist's pencil." He wrote: "How charming it would be if it were possible to cause these natural images to imprint themselves durably and remain fixed on the paper!" The earliest paper negative we know of was produced in August 1835; it depicts the now famous window at Lacock Abbey, his home. The negative is small (1" square), and poor in quality, compared with the striking images produced by the Daguerreotype process. By 1840, however, Talbot had made some significant improvements, and by 1844 he was able to bring out a photographically illustrated book entitled "The Pencil of nature." (See note HERE). Compared with Daguerreotypes the quality of the early Calotypes was somewhat inferior. (See comments on Claudet). However, the great advantage of Talbot's method was that an unlimited number of positive prints could be made (see also Brewster ). In fact, today's photography is based on the same principle, whereas by comparison the Daguerreotype, for all its quality, was a blind alley. The mushrooming of photographic establishments reflects photography's growing popularity; from a mere handful in the mid 1840s the number had grown to 66 in 1855, and to 147 two years later. In London, a favourite venue was Regent Street where, in the peak in the mid 'sixties there were no less than forty-two photographic establishments! In America the growth was just as dramatic: in 1850 there were 77 photographic galleries in New York alone. The demand for photographs was such that Charles Baudelaire ( ), a well known poet of the period and a critic of the medium, commented: "our squalid society has rushed, Narcissus to a man, to gloat at its trivial image on a scrap of metal." Talbot's photography was on paper, and inevitably the imperfections of the paper were printed alongside with the image, when a positive was made. Several experimented with glass as a basis for negatives, but the problem was to make the silver solution stick to the shiny surface of the glass. In 1848 a cousin of Nicephore Niépce, Abel Niépce de Saint-Victor, perfected a process of coating a glass plate with white of egg sensitised with potassium iodide, and washed with an acid solution of silver nitrate. This new ( albumen ) process made for very fine detail and much higher quality. However, it was very slow, hence the fact that photographs produced on this substance were architecture and landscapes; portraiture was simply not possible. The earliest photograph of a human figure on paper. . William Henry Fox Talbot (England, ): The Footman. Calotype, 6-3/8" x 8-1/4”, October 14, 1840
; the pictures made from them were called positives (the area most exposed to the light was the brightest). Since the nineteenth century many people have worked hard to cut down exposure times and to develop new types of film. In the 1890s, George Eastman s roll-film camera made it possible to load a camera once and take a series of pictures. Today, we can load a pre-packaged roll of film into a camera in seconds. Thanks to one-hour photo processing, we can have our film developed soon after. Talbot, one of the inventors of photography, produced the first negatives on paper as early as He published his negative-positive process in 1839, but the materials were too slow and exposure times were too long to permit the photography of human beings (or anything else that moved). On September 23, 1840, Talbot invented the calotype process which worked by developing the latent image of a briefer exposure. On October 10, the inventor used this new process to make a small experimental portrait of his wife, Constance. Four days later, this first important calotype composition was executed. The negative was made in three minutes, according to a notation on another print that Talbot sent to Sir John Herschel (a print now in the Gernsheim Collection at the University of Texas.) The print shown here is on paper bearing the watermark J. Whatman Its delicate tones of pink and mauve indicate it was stabilized with common salt rather than fixed with the hypo solution discovered by Herschel (and later universally adopted.) The image is kept in the dark and viewed only in subdued light. In Sun Pictures Catalogue Three (New York, H. P. Kraus, Jr., Inc., 1988), photographic historian Larry J. Schaaf observes: Talbot had recently been elected Sheriff of Wiltshire, and the magnificent livery of his footman was seen as an important way of expressing his status. Based solely on aesthetic and documentary appeal, this calotype is an impressive part of Talbot s oevre. The Footman takes on added significance, however, when we realize that it was made... just three weeks after Talbot had discovered his new process. References: Larrry J. Schaaf, The Photographic Art of William Henry Fox Talbot (Princeton University Press: 2000) pp H. Gernsheim, Talbot s and Herschel s Photographic Experiments in 1839, Image, vol. 8, 1959, pp _______________________________________. Different, and in a sense a rival to the Daguerreotype, was the Calotype invented by William Henry Fox Talbot , which was to provide the answer to that problem. His paper to the Royal Society of London, dated 31 January 1839, actually precedes the paper by Daguerre; it was entitled Some account of the Art of Photogenic drawing, or the process by which natural objects may be made to delineate themselves without the aid of the artist s pencil. He wrote: How charming it would be if it were possible to cause these natural images to imprint themselves durably and remain fixed on the paper! The earliest paper negative we know of was produced in August 1835; it depicts the now famous window at Lacock Abbey, his home. The negative is small (1 square), and poor in quality, compared with the striking images produced by the Daguerreotype process. By 1840, however, Talbot had made some significant improvements, and by 1844 he was able to bring out a photographically illustrated book entitled The Pencil of nature. (See note HERE). Compared with Daguerreotypes the quality of the early Calotypes was somewhat inferior. (See comments on Claudet). However, the great advantage of Talbot s method was that an unlimited number of positive prints could be made (see also Brewster ). In fact, today s photography is based on the same principle, whereas by comparison the Daguerreotype, for all its quality, was a blind alley. The mushrooming of photographic establishments reflects photography s growing popularity; from a mere handful in the mid 1840s the number had grown to 66 in 1855, and to 147 two years later. In London, a favourite venue was Regent Street where, in the peak in the mid sixties there were no less than forty-two photographic establishments! In America the growth was just as dramatic: in 1850 there were 77 photographic galleries in New York alone. The demand for photographs was such that Charles Baudelaire ( ), a well known poet of the period and a critic of the medium, commented: our squalid society has rushed, Narcissus to a man, to gloat at its trivial image on a scrap of metal. Talbot s photography was on paper, and inevitably the imperfections of the paper were printed alongside with the image, when a positive was made. Several experimented with glass as a basis for negatives, but the problem was to make the silver solution stick to the shiny surface of the glass. In 1848 a cousin of Nicephore Niépce, Abel Niépce de Saint-Victor, perfected a process of coating a glass plate with white of egg sensitised with potassium iodide, and washed with an acid solution of silver nitrate. This new ( albumen ) process made for very fine detail and much higher quality. However, it was very slow, hence the fact that photographs produced on this substance were architecture and landscapes; portraiture was simply not possible. The earliest photograph of a human figure on paper. . William Henry Fox Talbot (England, ): The Footman. Calotype, 6-3/8 x 8-1/4 , October 14,")
6
Film: Recording Light The chemical component in a traditional camera is film. Essentially, when you expose film to a real image, it makes a chemical record of the pattern of light. It does this with a collection of tiny light-sensitive grains, spread out in a chemical suspension on a strip of plastic. When exposed to light, the grains undergo a chemical reaction. Once the roll is finished, the film is developed -- it is exposed to other chemicals, which react with the light-sensitive grains. In black and white film, the developer chemicals darken the grains that were exposed to light. This produces a negative, where lighter areas appear darker and darker areas appear lighter, which is then converted into a positive image in printing. In 1727, Johann Heinrich Schulze had discovered that certain chemicals, especially silver halides, turn dark when exposed to light. The first attempt to use such chemicals to record the image of the camera obscura was made--unsuccessfully--by Thomas WEDGWOOD about 1800. Photographic film is essentially a thin plastic base coated with an emulsion. The emulsion is composed of gelatin within which tiny particles of light-sensitive salts have been suspended. The salts used are usually silver HALIDES, such as silver iodide. The stored reaction to light (after the film has been exposed in the camera) is called the latent image and can be seen only after the film has been processed, or developed (see FILM PROCESSING). A glass base may be coated with an emulsion for a special scientific or research purpose. The emulsion is made up of millions of silver salt crystals (called "silver halides"). When the film is exposed to light (as the picture is being taken) these crystals break down into black silver. If you tried to look at the film now, you wouldn't see much because the amount of silver created is very small. In the first step of the developing process, chemicals are used to enhance the images on the film. The developing chemicals break down more crystals into silver. Once the image is visible, the film must be treated so it is no longer sensitive to light. This is done with another chemical which converts the remaining silver halides into colourless salts. The film is then washed and dried. The photo is made by passing light through the negative onto light-sensitive paper. The process you started when you snapped a photo of Fido is complete. Color film has three different layers of light-sensitive materials, which respond, in turn, to red, green and blue. When the film is developed, these layers are exposed to chemicals that dye the layers of film. When you overlay the color information from all three layers, you get a full-color negative.
 is called the latent image and can be seen only after the film has been processed, or developed (see FILM PROCESSING). A glass base may be coated with an emulsion for a special scientific or research purpose. The emulsion is made up of millions of silver salt crystals (called silver halides ). When the film is exposed to light (as the picture is being taken) these crystals break down into black silver. If you tried to look at the film now, you wouldn t see much because the amount of silver created is very small. In the first step of the developing process, chemicals are used to enhance the images on the film. The developing chemicals break down more crystals into silver. Once the image is visible, the film must be treated so it is no longer sensitive to light. This is done with another chemical which converts the remaining silver halides into colourless salts. The film is then washed and dried. The photo is made by passing light through the negative onto light-sensitive paper. The process you started when you snapped a photo of Fido is complete. Color film has three different layers of light-sensitive materials, which respond, in turn, to red, green and blue. When the film is developed, these layers are exposed to chemicals that dye the layers of film. When you overlay the color information from all three layers, you get a full-color negative.")
7
The oldest known color photograph: taken by Louis Ducos du Hauron 1872
Before the Autochrome process was perfected in France, this photograph of a landscape in Southern France was taken. No, it is not hand-tinted. This is a color-photograph. (Note: It was published in a Time/Life Book entitled "Color" in 1972, "courtesey of George Eastman House, Paulus Lesser.") You are looking at the birth of color photography seven years after the American Civil War. 130 years ago this view of Angouleme, France, was created by a "subtractive" method. This is the basis for all color photography, even today. It was taken by Louis Ducos du Hauron who proposed the method in It was not until the 1930's that this method was perfected for commercial use. The oldest known color photograph: taken by Louis Ducos du Hauron 1872
 You are looking at the birth of color photography seven years after the American Civil War. 130 years ago this view of Angouleme, France, was created by a subtractive method. This is the basis for all color photography, even today. It was taken by Louis Ducos du Hauron who proposed the method in It was not until the 1930 s that this method was perfected for commercial use. The oldest known color photograph: taken by Louis Ducos du Hauron")
8
The Real First Photograph?
Some point to the picture in the Turin Shroud as being the first photograph. Whether the shroud dates back to the time of Jesus Christ, which many scholars discount, or whether it dates from around 1000AD, it does certainly show an image of a dead person.

9
Sir John Herschel What's in a Name?
As it turns out, the term photography describes the photographic process quite accurately. Sir John Herschel, a 19th century astronomer and one of the first photographers, came up with the term in The term is a combination of two Greek words -- photos meaning light and graphein meaning writing (or drawing). The term camera comes from camera obscura, Latin for "dark room." The camera obscura was actually invented hundreds of years before photography. A traditional camera obscura was a dark room with light shining through a lens or tiny hole in the wall. Light passed through the hole, forming an upside-down real image on the opposite wall. This effect was very popular with artists, scientists and curious spectators. There are two distinct scientific processes that combine to make photography possible. It is somewhat surprising that photography was not invented earlier than the 1830s, because these processes had been known for quite some time. It was not until the two distinct scientific processes had been put together that photography came into being. The first of these processes was optical. The Camera Obscura (dark room) had been in existence for at least four hundred years. There is a drawing, dated 1519, of a Camera Obscura by Leonardo da Vinci; about this same period its use as an aid to drawing was being advocated. The second process was chemical. For hundreds of years before photography was invented, people had been aware, for example, that some colours are bleached in the sun, but they had made little distinction between heat, air and light. * In the sixteen hundreds Robert Boyle, a founder of the Royal Society, had reported that silver chloride turned dark under exposure, but he appeared to believe that it was caused by exposure to the air, rather than to light. * Angelo Sala, in the early seventeenth century, noticed that powdered nitrate of silver is blackened by the sun. * In 1727 Johann Heinrich Schulze discovered that certain liquids change colour when exposed to light. * At the beginning of the nineteenth century Thomas Wedgwood was conducting experiments; he had successfully captured images, but his silhouettes could not survive, as there was no known method of making the image permanent.
. The term camera comes from camera obscura, Latin for dark room. The camera obscura was actually invented hundreds of years before photography. A traditional camera obscura was a dark room with light shining through a lens or tiny hole in the wall. Light passed through the hole, forming an upside-down real image on the opposite wall. This effect was very popular with artists, scientists and curious spectators. There are two distinct scientific processes that combine to make photography possible. It is somewhat surprising that photography was not invented earlier than the 1830s, because these processes had been known for quite some time. It was not until the two distinct scientific processes had been put together that photography came into being. The first of these processes was optical. The Camera Obscura (dark room) had been in existence for at least four hundred years. There is a drawing, dated 1519, of a Camera Obscura by Leonardo da Vinci; about this same period its use as an aid to drawing was being advocated. The second process was chemical. For hundreds of years before photography was invented, people had been aware, for example, that some colours are bleached in the sun, but they had made little distinction between heat, air and light. * In the sixteen hundreds Robert Boyle, a founder of the Royal Society, had reported that silver chloride turned dark under exposure, but he appeared to believe that it was caused by exposure to the air, rather than to light. * Angelo Sala, in the early seventeenth century, noticed that powdered nitrate of silver is blackened by the sun. * In 1727 Johann Heinrich Schulze discovered that certain liquids change colour when exposed to light. * At the beginning of the nineteenth century Thomas Wedgwood was conducting experiments; he had successfully captured images, but his silhouettes could not survive, as there was no known method of making the image permanent.")
10
Pinhole Images: The Linearity of Light
Pinhole images have been seen since the time of Aristotle. What he saw were images and shapes flickering through the tiny holes made between several leaves crossing, and wickerworks. Pinhole photography on the other hand is the capturing of those images and shapes using no lens. A tiny hole replaces the lens. Light passes through the hole and an image is formed in the back wall of the camera. The image is of course upside down because light travels in straight lines and therefore crosses at the aperture (hole). If an outdoor scene is seen, the sky is at the bottom and ground at the top. In Greece, Aristotle (fourth century B.C.) comments on pinhole image formation in his work Problems. In Book XV, 6, he asks:"Why is it that when the sun passes through quadri-laterals, as for instance in wickerwork, it does not produce a figure rectangular in shape but circular?” In Book XV, 11, he asks his readers: "Why is it that an eclipse of the sun, if one looks at it through a sieve or through leaves, such as a plane-tree or other broadleaved tree, or if one joins the fingers of one hand over the fingers of the other, the rays are crescent-shaped where they reach the earth? Is it for the same reason as that when light shines through a rectangular peep-hole, it appears circular in the form of a cone?” Aristotle found no satisfactory explanation to his observation; the problem remained unresolved until the 16th century.
. If an outdoor scene is seen, the sky is at the bottom and ground at the top. In Greece, Aristotle (fourth century B.C.) comments on pinhole image formation in his work Problems. In Book XV, 6, he asks: Why is it that when the sun passes through quadri-laterals, as for instance in wickerwork, it does not produce a figure rectangular in shape but circular In Book XV, 11, he asks his readers: Why is it that an eclipse of the sun, if one looks at it through a sieve or through leaves, such as a plane-tree or other broadleaved tree, or if one joins the fingers of one hand over the fingers of the other, the rays are crescent-shaped where they reach the earth Is it for the same reason as that when light shines through a rectangular peep-hole, it appears circular in the form of a cone Aristotle found no satisfactory explanation to his observation; the problem remained unresolved until the 16th century.")
11
The basic optical principles of the pinhole are commented on in Chinese texts from the fifth century BC. Chinese writers had discovered by experiments that light travels in straight lines. The philosopher Mo Ti was the first to record the formation of an inverted image with a pinhole or screen. Mo Ti was aware that objects reflect light in all directions, and that rays from the top of an object, when passing through a hole, will produce the lower part of an image. There is no further reference to the camera obscura in Chinese texts until the ninth century AD, when Tuan Chheng Shih refers to an image in a pagoda. Shen Kua later corrected his explanation of the image. Yu Chao-Lung in the tenth century used model pagodas to make pinhole images on a screen.

12
Alhazen The Arabian physicist and mathematician Ibn Al-Haitam, also known as Alhazen, experimented with images seen through the pinhole in the tenth century AD. He arranged three candles in a row and put a screen with a small hole between the candles and the wall. He noted that images were formed only by means of small holes and that the candle to the right made an image to the left on the wall. From his observations he deduced the linearity of light. In the following centuries the pinhole technique was used by optical scientists in various experiments to study sunlight projected from a small aperture. Alhazen, The Optics (Opticae Thesaurus...), Eusebius Episcopius & Nikolai, Basel, 1572, titlepage with examples of the application of optics.
, Eusebius Episcopius & Nikolai, Basel, 1572, titlepage with examples of the application of optics.")
13
Pinhole Images: The Camera Obscura
Camera Obscura from Athanasius Kircher's Ars Magna Lucis Et Umbra (The Great Art of Light and Shadow) Originally, camera obscuras were the size of rooms and thus take their name from the latin 'dark room' In the Renaissance and later centuries the pinhole was mainly used for scientific purposes in astronomy. But as time went by the pinhole image (now known as a camera obscura) was used more and more as a drawing aid for artists and painters. Even Leonardo da Vinci ( ) described the pinhole image in his Codex Atlanticus. The pinhole image had come of age, and was placed in a box, or room. Giovanni Battista della Porta ( ), a scientist from Naples, was long regarded as the inventor of the camera obscura because of his description of the camera obscura in the first edition of his Magia Naturalis (1558). His description has received much publicity, as did his camera obscura shows, but he was not the true 'inventor’ What appears to be the earliest ever illustration of the camera obscura is found in a book by Johannes De Fontana in The drawing shows a nun holding a vertically-shaped camera with an image on the inside. The image has been identified as a magic lantern by some but can only be attributed to the camera as the image is clearly on the inside. Magic lanterns projected their images.
 Originally, camera obscuras were the size of rooms and thus take their name from the latin dark room In the Renaissance and later centuries the pinhole was mainly used for scientific purposes in astronomy. But as time went by the pinhole image (now known as a camera obscura) was used more and more as a drawing aid for artists and painters. Even Leonardo da Vinci ( ) described the pinhole image in his Codex Atlanticus. The pinhole image had come of age, and was placed in a box, or room. Giovanni Battista della Porta ( ), a scientist from Naples, was long regarded as the inventor of the camera obscura because of his description of the camera obscura in the first edition of his Magia Naturalis (1558). His description has received much publicity, as did his camera obscura shows, but he was not the true inventor’ What appears to be the earliest ever illustration of the camera obscura is found in a book by Johannes De Fontana in The drawing shows a nun holding a vertically-shaped camera with an image on the inside. The image has been identified as a magic lantern by some but can only be attributed to the camera as the image is clearly on the inside. Magic lanterns projected their images.")
14
Camera Obscura: How it Works
As light reflects from the object in a straight line, Light from the top of the flower passes through the pinhole at an angle as does light from the bottom. As the light passes passes through the pinhole, the projected image appears upside down.

15
Pinhole cameras are small or large, improvised or designed with great care. Cameras have been made of sea shells, many have been made of oatmeal boxes, coke cans or any size of box. Cameras have been cast in plaster like a face mask, constructed from beautiful hardwoods built of metal with bellows and a range of multiple pinholes. Even cars have been used as pinhole cameras and rooms in large buildings. In fact the camera obscura effect (pinhole images seen within a camera) was first seen inside large rooms.
 was first seen inside large rooms.")
16
During the 19th century several large scale camera obscuras were built as places of education and entertainment. The meniscus lens, superior to the bi-convex lens, improved the quality of the the projected images. The showman Villanova performed scenes outside a room which had a small hole in one wall.Patrons sat inside and watched "cinema". The accompanying sounds heard outside matched the scenes viewed inside!

18
Several buildings or towers with camera obscuras remain today: The Camera Obscura at Royal Mile, Edinburgh; the Great Union Camera at Douglas, Isle of Man; the Clifton Observatory at Bristol, England; the camera obscura at Portmeirion, North Wales; the camera obscura at Santa Monica, California, and others. A few large scale camera obscuras have been built in the 20th century. The Giant Camera at Cliff House, San Francisco is scheduled for demolition at the time of this writing. A group is fighting to keep it from being destroyed.

19
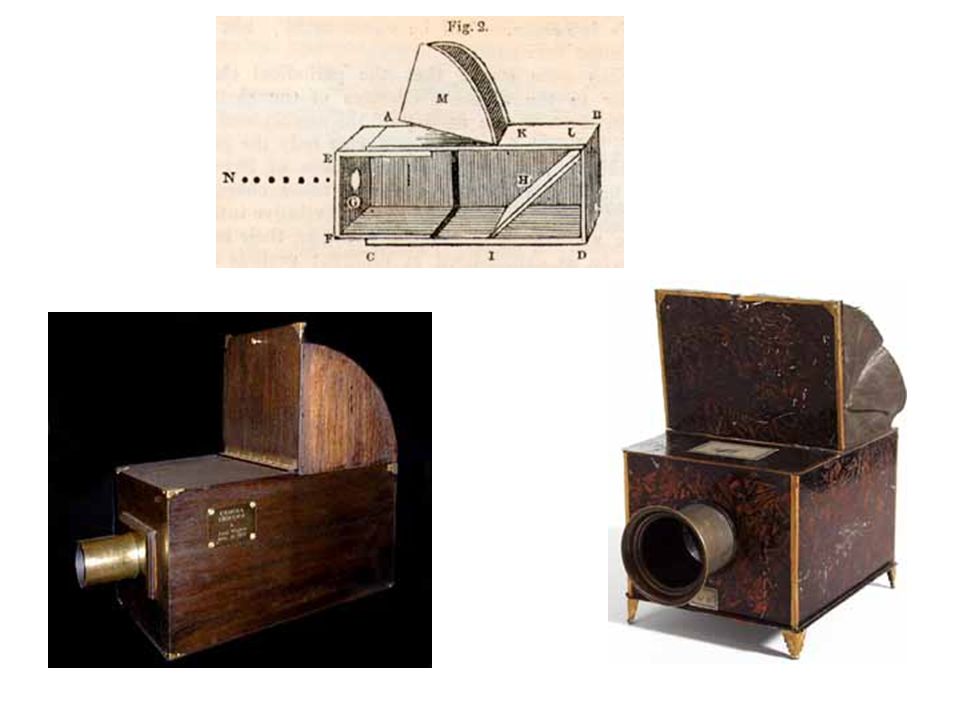
Portable Camera Obscuras

21
Pinhole images are softer and less sharp than pictures made using a lens. The images have nearly infinite depth of field and wide angle images remain absolutely rectilinear. On the other hand, pinhole images suffer from greater chromatic aberration than pictures made with a simple lens, and they tolerate little enlargement. Exposures are long, ranging from half a second to several hours. Images are exposed on film or paper - negative or positive; black and white, or color.

23
Pinhole method used to observe a Lunar Eclipse of the Sun.

24
A fully manual single-lens-reflex camera
How a Camera Works A fully manual single-lens-reflex camera The basic technology that makes all of this possible is fairly simple. A still film camera is made of three basic elements: an optical element (the lens), a chemical element (the film) and a mechanical element (the camera body itself). As we'll see, the only trick to photography is calibrating and combining these elements in such a way that they record a crisp, recognizable image. There are many different ways of bringing everything together. Here we'll look at a manual single-lens-reflex (SLR) camera. This is a camera where the photographer sees exactly the same image that is exposed to the film and can adjust everything by turning dials and clicking buttons. Since it doesn't need any electricity to take a picture, a manual SLR camera provides an excellent illustration of the fundamental processes of photography.
, a chemical element (the film) and a mechanical element (the camera body itself). As we ll see, the only trick to photography is calibrating and combining these elements in such a way that they record a crisp, recognizable image. There are many different ways of bringing everything together. Here we ll look at a manual single-lens-reflex (SLR) camera. This is a camera where the photographer sees exactly the same image that is exposed to the film and can adjust everything by turning dials and clicking buttons. Since it doesn t need any electricity to take a picture, a manual SLR camera provides an excellent illustration of the fundamental processes of photography.")
25
Bending Light The optical component of the camera is the lens. At its simplest, a lens is just a curved piece of glass or plastic. Its job is to take the beams of light bouncing off of an object and redirect them so they come together to form a real image -- an image that looks just like the scene in front of the lens. But how can a piece of glass do this? The process is actually very simple. As light travels from one medium to another it changes speed. Light travels more quickly through air than it does through glass, so a lens slows it down. When lightwaves enter a piece of glass at an angle, one part of the wave will reach the glass before another, and so will start slowing down first. This is something like pushing a shopping cart from pavement to grass, at an angle. The right wheel hits the grass first and so slows down while the left wheel is still on the pavement. Because the left wheel is briefly moving more quickly than the right wheel, the shopping cart turns to the right as it moves onto the grass. The effect on light is the same -- as it enters the glass at an angle, it bends in one direction. It bends again when it exits the glass because parts of the lightwave enter the air and speed up before other parts of the wave. In a standard converging, or convex lens, one or both sides of the glass curves out. This means rays of light passing through will bend toward the center of the lens on entry. In a double convex lens, such as a magnifying glass, the light will bend when it exits as well as when it enters. This effectively reverses the path of light from an object. A light source -- say a candle -- emits light in all directions. The rays of light all start at the same point -- the candle's flame -- and then are constantly diverging. A converging lens takes those rays and redirects them so they are all converging back to one point. At the point where the rays converge, you get a real image of the candle. In the next couple sections, we'll look at some of the variables that determine how this real image is formed. This effectively reverses the path of light from an object. A light source -- say a candle -- emits light in all directions. The rays of light all start at the same point -- the candle's flame -- and then are constantly diverging. A converging lens takes those rays and redirects them so they are all converging back to one point. At the point where the rays converge, you get a real image of the candle. In the next couple sections, we'll look at some of the variables that determine how this real image is formed.

26
Focus We saw in the last section that a real image is formed by light moving through a convex lens. The nature of this real image varies depending on how the light travels through the lens. This light path depends on two major factors: •The angle of the light beam's entry into the lens •The structure of the lens The angle of light entry changes when you move the object closer or farther away from the lens. You can see this in the diagram below. The light beams from the pencil point enter the lens at a sharper angle when the pencil is closer to the lens and a more obtuse angle when the pencil is farther away. But overall, the lens only bends the light beam to a certain total degree, no matter how it enters. Consequently, light beams that enter at a sharper angle will exit at a more obtuse angle, and vice versa. The total "bending angle" at any particular point on the lens remains constant.

27
Lens Shape and Image Size
In the last section, we saw that at any one point, a lens bends light beams to a certain total degree, no matter the light beam's angle of entry. This total "bending angle" is determined by the structure of the lens. A lens with a rounder shape (a center that extends out farther) will have a more acute bending angle. Basically, curving the lens out increases the distance between different points on the lens. This increases the amount of time one part of the light wave is moving faster than another part, so the light makes a sharper turn. Increasing the bending angle has an obvious effect. Light beams from a particular point will converge at a point closer to the lens. In a lens with a flatter shape, light beams will not turn as sharply. Consequently, the light beams will converge farther away from the lens. To put it another way, the focused real image forms farther away from the lens when the lens has a flatter surface. Increasing the distance between lens and the real image actually increases the total size of the real image. If you think about it, this makes perfect sense. Think of a projector: As you move the projector farther away from the screen, the image becomes larger. To put it simply, the light beams keep spreading apart as they travel toward the screen.
 will have a more acute bending angle. Basically, curving the lens out increases the distance between different points on the lens. This increases the amount of time one part of the light wave is moving faster than another part, so the light makes a sharper turn. Increasing the bending angle has an obvious effect. Light beams from a particular point will converge at a point closer to the lens. In a lens with a flatter shape, light beams will not turn as sharply. Consequently, the light beams will converge farther away from the lens. To put it another way, the focused real image forms farther away from the lens when the lens has a flatter surface. Increasing the distance between lens and the real image actually increases the total size of the real image. If you think about it, this makes perfect sense. Think of a projector: As you move the projector farther away from the screen, the image becomes larger. To put it simply, the light beams keep spreading apart as they travel toward the screen.")
28
The same basic thing happens in a camera
The same basic thing happens in a camera. As the distance between the lens and the real image increases, the light beams spread out more, forming a larger real image. But the size of the film stays constant. When you attach a very flat lens, it projects a large real image but the film is only exposed to the middle part of it. Basically, the lens zeroes in on the middle of the frame, magnifying a small section of the scene in front of you. A rounder lens produces a smaller real image, so the film surface sees a much wider area of the scene (at reduced magnification). Professional cameras let you attach different lenses so you can see the scene at various magnifications. The magnification power of a lens is described by its focal length. In cameras, the focal length is defined as the distance between the lens and the real image of an object in the far distance (the moon for example). A higher focal length number indicates a greater image magnification. A standard 50 mm lens doesn't significantly shrink or magnify the image. Different lenses are suited to different situations. If you're taking a picture of a mountain range, you might want to use a telephoto lens, a lens with an especially long focal length. This lens lets you zero in on specific elements in the distance, so you can create tighter compositions. If you're taking a close-up portrait, you might use a wide-angle lens. This lens has a much shorter focal length, so it shrinks the scene in front of you. The entire face is exposed to the film even if the subject is only a foot away from the camera. A standard 50 mm camera lens doesn't significantly magnify or shrink the image, making it ideal for shooting objects that aren't especially close or far away.
. Professional cameras let you attach different lenses so you can see the scene at various magnifications. The magnification power of a lens is described by its focal length. In cameras, the focal length is defined as the distance between the lens and the real image of an object in the far distance (the moon for example). A higher focal length number indicates a greater image magnification. A standard 50 mm lens doesn t significantly shrink or magnify the image. Different lenses are suited to different situations. If you re taking a picture of a mountain range, you might want to use a telephoto lens, a lens with an especially long focal length. This lens lets you zero in on specific elements in the distance, so you can create tighter compositions. If you re taking a close-up portrait, you might use a wide-angle lens. This lens has a much shorter focal length, so it shrinks the scene in front of you. The entire face is exposed to the film even if the subject is only a foot away from the camera. A standard 50 mm camera lens doesn t significantly magnify or shrink the image, making it ideal for shooting objects that aren t especially close or far away.")
29
Lenses in the Lens A camera lens is actually several lenses combined into one unit. A single converging lens could form a real image on the film, but it would be warped by a number of aberrations. One of the most significant warping factors is that different colors of light bend differently when moving through a lens. This chromatic aberration essentially produces an image where the colors are not lined up correctly. Cameras compensate for this using several lenses made of different materials. The lenses each handle colors differently, and when you combine them in a certain way, the colors are realigned. In a zoom lens, you can move different lens elements back and forth. By changing the distance between particular lenses, you can adjust the magnification power -- the focal length -- of the lens as a whole.

30
The Right Light •How much light is passing through the lens
It is important that we carefully control the film's exposure to light, or your picture will come out too dark or too bright. So how do you adjust this exposure level? You have to consider two major factors: •How much light is passing through the lens •How long the film is exposed The plates in the iris diaphragm fold in on each other to shrink the aperture and expand out to make it wider. To increase or decrease the amount of light passing through the lens, you have to change the size of the aperture -- the lens opening. This is the job of the iris diaphragm, a series of overlapping metal plates that can fold in on each other or expand out. Essentially, this mechanism works the same way as the iris in your eye -- it opens or closes in a circle, to shrink or expand the diameter of the lens. When the lens is smaller, it captures less light, and when it is larger, it captures more light.

31
The length of exposure is determined by the shutter speed
The length of exposure is determined by the shutter speed. Most SLR cameras use a focal plane shutter. This mechanism is very simple -- it basically consists of two "curtains" between the lens and the film. Before you take a picture, the first curtain is closed, so the film won't be exposed to light. When you take the picture, this curtain slides open. After a certain amount of time, the second curtain slides in from the other side, to stop the exposure. When you click the camera's shutter release, the first curtain slides open exposing the film. After a certain amount of time, the second shutter slides closed, ending the exposure. The time delay is controlled by the camera's shutter speed knob.

32
This simple action is controlled by a complex mass of gears, switches and springs, like you might find inside a watch. When you hit the shutter button, it releases a lever, which sets several gears in motion. You can tighten or loosen some of the springs by turning the shutter speed knob. This adjusts the gear mechanism, increasing or decreasing the delay between the first curtain opening and the second curtain closing. When you set the knob to a very slow shutter speed, the shutter is open for a very long time. When you set the knob to a very high speed, the second curtain follows directly behind the first curtain, so only a tiny slit of the film frame is exposed at any one time.

33
The ideal exposure depends on the size of the light-sensitive grains in the film. A larger grain is more likely to absorb light photons than a smaller grain. The size of the grains is indicated by a film's speed, which is printed on the canister. Different film speeds are suited to different types of photography ISO film, for example, is optimal for shots in bright sunlight, while 1600 film should only be used in relatively low light.

34
As you can see, there's a lot involved in getting the exposure right -- you have to balance film speed, aperture size and shutter speed to fit the light level in your shot. Manual SLR cameras have a built-in light meter to help you do this. The main component of the light meter is a panel of semi-conductor light sensors that are sensitive to light energy. These sensors express this light energy as electrical energy, which the light meter system interprets based on the film and shutter speed.

35
In the next section, we'll see how an SLR camera body directs the real image to the viewfinder before you take the shot, and then directs it to the film when you press the shutter button.

36
The introduction of the Kodak camera in 1888 brought about massive, permanent changes in the world of photography. The Kodak was preloaded at the factory with sufficient film for 100 exposures. When the roll was finished, the entire camera was returned to the factory in Rochester, N.Y., where the film was developed and printed and the camera reloaded. In a single stroke, George EASTMAN had created the class of amateur photographers, those who wanted to take pictures but were unwilling to deal with the darkroom machines of the photographic process. The sales motto "You press the button, we do the rest" accurately summed up the new system. In 1900 the marketing of Eastman's Kodak Brownie #1 popularized photography even further. At a cost of $1.00 for the camera and 10 cents per roll of film, the Brownie put a basic photographic system within reach of virtually everyone. The continuing improvements of sensitized film products were paralleled by the development of more sophisticated cameras. The first optical rangefinder became available in 1916, and a very high-speed lens, the Ernostar, which had an effective aperture of f/20, appeared on a compact camera in 1924, marking the beginning of the era of natural-light candid photography.

37
With the introduction in 1938 of the Super Kodak 620, complete automation of camera exposure systems moved a step closer to realization. A very costly snapshot camera, the Kodak 620 was the first to incorporate a completely automated method of exposure control. Only a few of these cameras were made before World War II stopped production, but the Super Kodak 620 indicated what was possible. After the war, miniaturized electronic components made automatic exposure systems commonplace on even the most inexpensive cameras. The process of automating most camera functions was completed in the late 1970s, when the first of what have come to be known as "point and shoot" cameras appeared on the market. These cameras, so simple to use that even beginners can take satisfactory pictures, now dominate the amateur market.

38
SLR vs. Point-and-Shoot
There are two types of consumer film cameras on the market -- SLR cameras and "point-and-shoot" cameras. The main difference is how the photographer sees the scene. In a point-and-shoot camera, the viewfinder is a simple window through the body of the camera. You don't see the real image formed by the camera lens, but you get a rough idea of what is in view. In an SLR camera, you see the actual real image that the film will see. If you take the lens off of an SLR camera and look inside, you'll see how this works. The camera has a slanted mirror positioned between the shutter and the lens, with a piece of translucent glass and a prism positioned above it. This configuration works like a periscope -- the real image bounces off the lower mirror on to the translucent glass, which serves as a projection screen. The prism's job is to flip the image on the screen, so it appears right side up again, and redirect it on to the viewfinder window.

39
When you click the shutter button, the camera quickly switches the mirror out of the way, so the image is directed at the exposed film. The mirror is connected to the shutter timer system, so it stays open as long as the shutter is open. This is why the viewfinder is suddenly blacked out when you take a picture. The mirror in an SLR camera directs the real image to the viewfinder. When you hit the shutter button, the mirror flips up so the real image is projected onto the film. In this sort of camera, the mirror and the translucent screen are set up so they present the real image exactly as it will appear on the film. The advantage of this design is that you can adjust the focus and compose the scene so you get exactly the picture you want. For this reason, professional photographers typically use SLR cameras.

40
instead of gears and springs.
These days, most SLR cameras are built with both manual and automatic controls, and most point and shoot cameras are fully automatic. Conceptually, automatic cameras are pretty much the same as fully manual models, but everything is controlled by a central microprocessor instead of the user. The central microprocessor receives information from the auto-focus system and the light meter. Then it activates several small motors, which adjust the lens and open and close the aperture. In modern cameras, this a pretty advanced computer system. Automatic point-and-shoot camera uses circuit boards and electric motors, instead of gears and springs.

41
A Digital (Filmless) Camera
The key difference between a digital camera and a film-based camera is that the digital camera has no film. Instead, it has a sensor that converts light into electrical charges. All the fun and interesting features of digital cameras come as a direct result of this shift from recording an image on film to recording the image in digital form. The image sensor employed by most digital cameras is a charge coupled device (CCD). Some low-end cameras use complementary metal oxide semiconductor (CMOS) technology. While CMOS sensors will almost certainly improve and become more popular in the future, they probably won't replace CCD sensors in higher-end digital cameras.
. Some low-end cameras use complementary metal oxide semiconductor (CMOS) technology. While CMOS sensors will almost certainly improve and become more popular in the future, they probably won t replace CCD sensors in higher-end digital cameras.")
42
The CCD is a collection of tiny light-sensitive diodes, which convert photons (light) into electrons (electrical charge). These diodes are called photosites. In a nutshell, each photosite is sensitive to light -- the brighter the light that hits a single photosite, the greater the electrical charge that will accumulate at that site. CCDs use a special manufacturing process to create the ability to transport charge across the chip without distortion. This process leads to very high-quality sensors in terms of fidelity and light sensitivity. CMOS chips, on the other hand, use completely normal manufacturing processes to create the chip -- the same processes used to make most microprocessors.

43
How the Digital Camera Captures Color
Unfortunately, each photosite is colorblind. It only keeps track of the total intensity of the light that strikes its surface. In order to get a full color image, most sensors use filtering to look at the light in its three primary colors. Once all three colors have been recorded, they can be added together to create the full spectrum of colors that you've grown accustomed to seeing on computer monitors and color printers.

44
There are several ways of recording the three colors in a digital camera. The highest quality cameras use three separate sensors, each with a different filter over it. Light is directed to the different sensors by placing a beam splitter in the camera. Think of the light entering the camera as water flowing through a pipe. A beam splitter would be like dividing an identical amount of water into three different pipes. Each sensor gets an identical look at the image, but because of the filters, they only respond to one of the primary colors. The advantage of this method is that the camera records each of the three colors at each pixel location. Unfortunately, cameras that use this method are both bulky and expensive.

45
A more economical and practical way to record the three primary colors from a single image is to permanently place a filter over each individual photosite. By breaking up the sensor into a variety of red, blue and green pixels, it is possible to get enough information in the general vicinity of each sensor to make very accurate guesses about the true color at that location. This process of looking at the other pixels in the neighborhood of a sensor and making an educated guess is called interpolation. (You'll learn more about pixels in the next section, but for now, think of one photosite as a single pixel.) The most common pattern of filters is the Bayer Filter Pattern. This pattern alternates a row of red and green filters with a row of blue and green filters. You may be surprised to find that the pixels are not evenly divided. In fact, there are as many green pixels as there are blue and red combined. This is because the human eye is not equally sensitive to all three colors. It's necessary to include more information from the green pixels in order to create an image that the eye will perceive as a "true color." The advantages of this method are that only one sensor is required and all the color information (red, green and blue) is recorded at the same moment. That means the camera can be smaller, cheaper and useful in a wider variety of situations. In other words, it makes it possible to create an affordable handheld digital camera. The raw output from a sensor with a bayer filter is a mosaic of red, green and blue pixels of different intensity. If you took a close look at Figure 5, you might be wondering how a digital camera can achieve its full advertised resolution if it takes 4 separate pixels to determine the color of a single pixel. Digital cameras use specialized demosaicing algorithms to convert the mosaic of separate colors into an equally sized mosaic of true colors. The key is that each colored pixel can be used more than once. The true color of a single pixel can be determined by averaging the values from the closest surrounding pixels.
![]()
Similar presentations


:>")


>")