Download presentation
Presentation is loading. Please wait.

2
The Turn of the Century In the early days of the web HTML was a pretty simple language for displaying basic text documents. You could use uppercase or lowercase letters for your tags, and you could leave off the closing,, tags for many elements. The rules were loose and simple, because the pages were plain and displayed only on monochrome monitors that couldn't even show pictures, colors, or fancy print styles.

3
History As the years went by, computers and monitors kept getting more sophisticated. In the mid 1990s, HTML went through a period sometimes referred to as the era of the browser wars. During that phase, software companies that were making the Web browsers were also making up their own HTML tags and attributes, as well as their own rules about how HTML should be written. You might create a page that looks great in one Web browser, say, Internet Explorer in Windows, but then you see your page in some other Web browser on someone else's computer, and it looks completely different—and not so good!

4
W3C By the late 1990s, professionals in the field were going back to the W3C asking for clearly defined standards so everyone could play by the same rules—and so a Web developer could create a page in one Web browser and not worry about it looking completely different in other Web browsers.

5
Deprecated Tags and Attributes Right about the turn of the century, we started seeing some cleaner, better HTML specs in what's now known as HTML 4.01, XHTML, and HTML5. The cleanup started by deprecating some tags and attributes that had found their way into the specs during the browser wars. The W3C determined that those tags and attributes weren't such a good idea, so they recommended phasing them out of the language. That's what deprecated means, "no longer recommended," and so you should avoid using them in pages you create now and in the future.

6
Deprecated TagsDeprecated Attributes (Note that align, height, and width are only partially deprecated.) align (deprecated for all but table cells) alink background bgcolor clear color compact face height (deprecated for all but the height of images) hspace language link noshade nowrap size text version vlink width (deprecated for all but the width of images and tables)
 align (deprecated for all but table cells) alink background bgcolor clear color compact face height (deprecated for all but the height of images) hspace language link noshade nowrap size text version vlink width (deprecated for all but the width of images and tables)")
7
Proper Nesting of Tags As originally defined, the HTML language didn't impose many rules about how we should organize tags. This ended up putting some extra burden on the user agents interpreting that code, making them do a lot of extra time-consuming processing in dealing with missing end tags or improperly nested tags. Starting with version 4 of HTML at about the turn of the century, the W3C started asking authors to properly nest, and close, all paired tags.

8
Nesting The... tags mark the beginning and end of a paragraph. The... tags mark two types of text: text that is spoken with emphasis by screen readers for the blind, and text shown in italics on the screen and printed page. We say the tags above are properly nested because the... tags are contained within (nested within) the... tags. That's good—just the way you want it. The wrong way to do it would be to put the closing tag for the em element outside the closing paragraph for the paragraph. The difference becomes more apparent if you envision lines connecting each opening tag with its closing tag.
 the... tags. That s good—just the way you want it. The wrong way to do it would be to put the closing tag for the em element outside the closing paragraph for the paragraph. The difference becomes more apparent if you envision lines connecting each opening tag with its closing tag..")
9
The Switch to XHTML Traditional HTML is based on SGML (Standardized Generalized Markup Language), which is heavily geared toward print documents commonly found in office environments. Someone suggested creating a version of HTML based on XML, which stands for eXtensible Markup Language. XML isn't specifically designed for displaying content on the screen. its main use is to help transfer data between computers that are otherwise incompatible. its rules of syntax, which define how you write the code, are very clear and well defined. The W3C reasoned that carrying those same rules over to HTML could help clean up some of the messiness and unpredictability that was hampering the programmers who were trying to create the newer user agents. And thus was born XHTML—eXtensible Hypertext Markup Language.

10
Differences The differences between traditional HTML and XHTML are very few. In fact, it's basically just four things: 1. Tags and attributes must appear in lowercase letters. 2. Closing tags are required for all tag pairs. 3. Empty tags end with /> rather than >. 4. XHTML documents must have one root element.

11
Spot the errors!

12
The errors The page isn't acceptable by today's standards. The uppercase letters in the tags (,, and so forth) aren't allowed. And it's not okay to leave off the closing and tags on the heading and paragraphs
 aren t allowed. And it s not okay to leave off the closing and tags on the heading and paragraphs.")
13
The vast majority of XHTML tags come in pairs. There are a few exceptions, and we call those exceptions empty tags. T They're empty in that there's no closing tag. The table below lists the most commonly used empty tags HTMLXHTMLPurpose Line break Shows a horizontal rule Shows a graphic image Links to an external file Provides information about the page

14
Doctype The last rule of XHTML is that every document must have exactly one root element. the whole page must be contained in... tags, just like the pages you've already created in this course. But there's actually one thing that goes above the first html tag—a doctype declaration that lets the user agent "know" your code is written to XHTML standards.

15
HTML5 In 2004, a group who called themselves WHATWG (Web Hypertext Application Technology Working Group) began thinking about ways to extend the Web to host more than just text and pictures. They started developing tags and technologies that would allow for better integration of video, audio, and more interactivity, without relying on plug-in players like Adobe Flash, commonly used to play certain kinds of videos on the web.

16
As the years went by, it became clear to the W3C that the two groups were duplicating some of their efforts. The point of having a group like the W3C define standards is so that there's just one standard that any Web developer can abide by to be sure his or her products will look and act the same across different brands and versions of user agents. The W3C decided that the solution was to merge the WHATWG and XHTML 2.0 efforts into one. They decided to dub the next developed language simply HTML5.

17
HTML 5 HTML5 is basically XHTML with some new tags from the WHATWG group. HTML5 is currently still a candidate specification. This means that the programmers who are creating the Web browsers and other user agents are adding some support for the new language to their products. And shortly after the proposed recommendation comes the W3C Recommendation, where the W3C puts their final stamp of approval on the spec. One would expect that to happen in 2022 or shortly thereafter.

18
HTML 5 As we discussed, HTML5 is essentially XHTML with some new tags added in. Like XHTML, an HTML5 page must start with <!DOCTYPE. But the first tags are much simpler than they are in XHTML. And a blank page in HTML5 (again, "blank" means that it contains all of the mandatory tags, but no content) looks like this:
 looks like this:.")
19
Viewing Other People's Code The code that defines how a page looks in a Web browser is called the page's source code. When you're out on the Web viewing other people's pages, you can take a look at the source code at any time. Get the mouse pointer on some neutral area of the page, such as the blank line between two paragraphs (not on a picture, and not on a link), and right-click that spot. Then, look for View Source (or a similar-looking option) on the shortcut menu that opens.
, and right-click that spot. Then, look for View Source (or a similar-looking option) on the shortcut menu that opens..")
20
CSS When you look at other peoples' source code, you'll likely see a lot of strange-looking code. Not all of it is HTML or XHTML. EveryWeb browser is capable of executing more than just HTML and XHTML. There are other languages they can use. CSS is an important one, because it's the language that lets you do your styling (centering, fonts, colors, and so forth).
..")
21
Introducing CSS Back in 1999 when the W3C started deprecating some tags and attributes, part of their motivation was to achieve separation of structure and presentation. In English, that has to do with separating the language that described what an element is from the language that described how it looks. The concept was already in widespread use in other forms of electronic publishing. People writing websites wanted to see a similar implementation for Web development

22
CSS In Web development, the language we use for structure is HTML (including XHTML). We use HTML tags to define what an element is (for example, a heading, a paragraph, an image, a table, a list). For the presentation side of things, we use another language called CSS (Cascading Style Sheets). In other words, we use CSS to describe how an element looks (like font, color, and centering).
. For the presentation side of things, we use another language called CSS (Cascading Style Sheets). In other words, we use CSS to describe how an element looks (like font, color, and centering)..")
23
CSS CSS isn't an alternative to, or a replacement for, HTML or XHTML. You still create your pages and define your elements using HTML (or XHTML), just as you've been doing since day one in this course. You use CSS in addition to that language to style the appearance of the elements that make up your page.
, just as you ve been doing since day one in this course. You use CSS in addition to that language to style the appearance of the elements that make up your page..")
24
CSS History The history of CSS is relatively simple compared to HTML. In 1996, the W3C published the Recommendation for CSS Level1 (often written as CSS1). It contained properties and values for basic things like fonts, colors, and text alignment. In 1998, CSS2 was released and included some new techniques for positioning elements on pages, as well as new properties for aural (audio) media to control the computer voice speaking the text out loud. Both CSS1 and CSS2 got off to a rocky start, as is often the case with new languages. Experience gained from practical use of those early versions led to CSS2.1, which is the version that's been in widespread use for nearly a decade now.
. It contained properties and values for basic things like fonts, colors, and text alignment. In 1998, CSS2 was released and included some new techniques for positioning elements on pages, as well as new properties for aural (audio) media to control the computer voice speaking the text out loud. Both CSS1 and CSS2 got off to a rocky start, as is often the case with new languages. Experience gained from practical use of those early versions led to CSS2.1, which is the version that s been in widespread use for nearly a decade now..")
25
CSS CSS3 is the next version of CSS that the W3C will release. It offers advanced features like rounded corners, drop shadows, and other features developers want in their site. Like HTML5, CSS3 is not a finished product yet. But like its predecessors, CSS3 is destined to become the premier style sheet language for web design.

26
CSS Syntax Like all computer languages, CSS follows certain rules of syntax. You basically define a style using this syntax: property:value In this syntax, property is any valid CSS property, and value is any acceptable value for that property. Notice that you use a colon (:) to separate the property from the value. You can put a space after the colon, if you like. Some developers type a space there to make the code a little easier to read.
 to separate the property from the value. You can put a space after the colon, if you like. Some developers type a space there to make the code a little easier to read..")
27
Inline Style There are a couple of places where you can put CSS property:value pairs. Using the inline style where put the property:value pair right inside the tag of the element you want to style, using a style= attribute.

28
In HTML, you use tags to define elements. Some tags allow you to use attributes that provide additional information to the tag. The attribute is a word inside the tag, followed by an equal sign and a value enclosed in quotation marks. The attribute we use to style a tag with CSS is the style= attribute. So the general syntax of the tag, with the style= attribute in it, looks like this:

29
CSS syntax The tag part represents any tag that you may want to apply a style to, like body, h1, h2, p, list, or ul. For a style= attribute, the value between the quotation marks is one or more CSS property:value pairs. If you want to use just one property:value pair, it goes between those quotation marks like this:

30
Multiple styles There are many styles to choose from, as you'll see shortly. You aren't limited to one property:value pair inside the style= attribute. You can use multiple property:value pairs, so long as you separate each pair with a semicolon (;).
..")
31
In the example there's an extra semicolon at the end of the property:value pairs. That one is optional. The code works the same with or without it. Many people type the semicolon at the end for this reason: If later they decide to add another property:value pair, the semicolon is already there—which makes it less likely that they'll forget to type it at that time. As with XHTML, the CSS property names and values are always lowercase. Since CSS is entirely separate from HTML, you can't use HTML tags or names as properties or values. You also can't just make up your own property names and values

32
Adding css inside the tag on that on your index.htm page, please insert an attribute that reads (exactly) style="text-align:center;" after the word body but still inside the > at the end of the tag.
 style= text-align:center; after the word body but still inside the > at the end of the tag.")
34
CSS3 and HTML5 Summary The W3C is the standards organization that defines all Web languages. The W3C produced HTML versions 1 through 4 between 1990 and 1999. XHTML, a version of HTML that borrows some syntactical rules from the XML language, has been around since the turn of the century. Most websites created in the 21st century are written in XHTML and use CSS for styling. Right now, most people are using XHTML and CSS2.1 to create their sites. HTML5 is the next major version of HTML that the W3C will release. CSS3 is the next major version of CSS that the W3C will release. Even though the specs, and browser support, for CSS3 and HTML5 are incomplete, both languages are rapidly gaining strength and the premier languages for web development, and even for some mobile app and desktop software development.

35
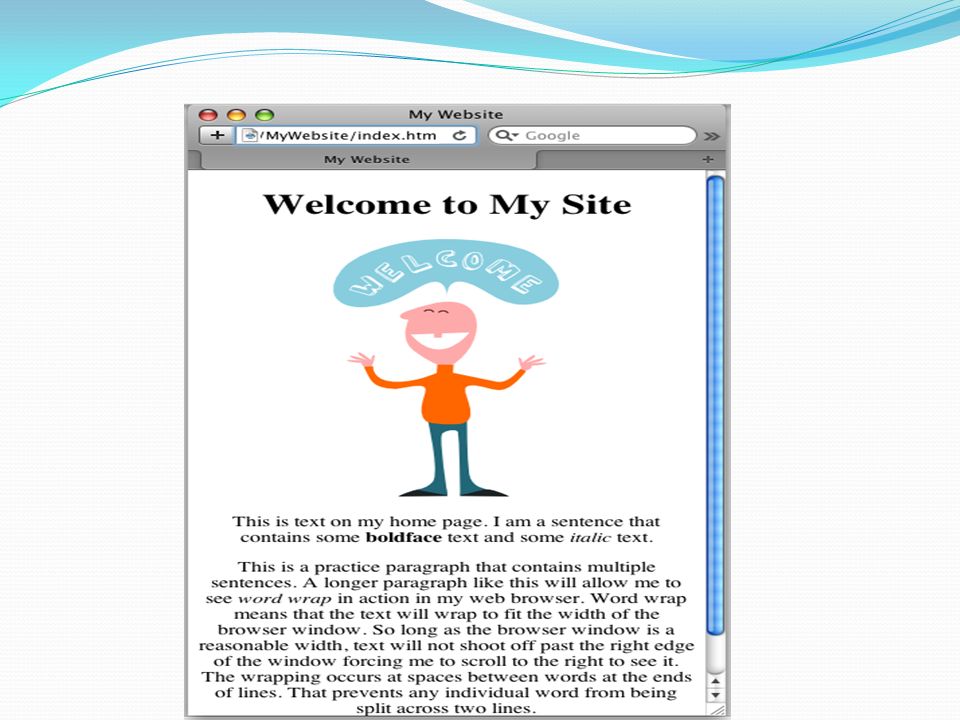
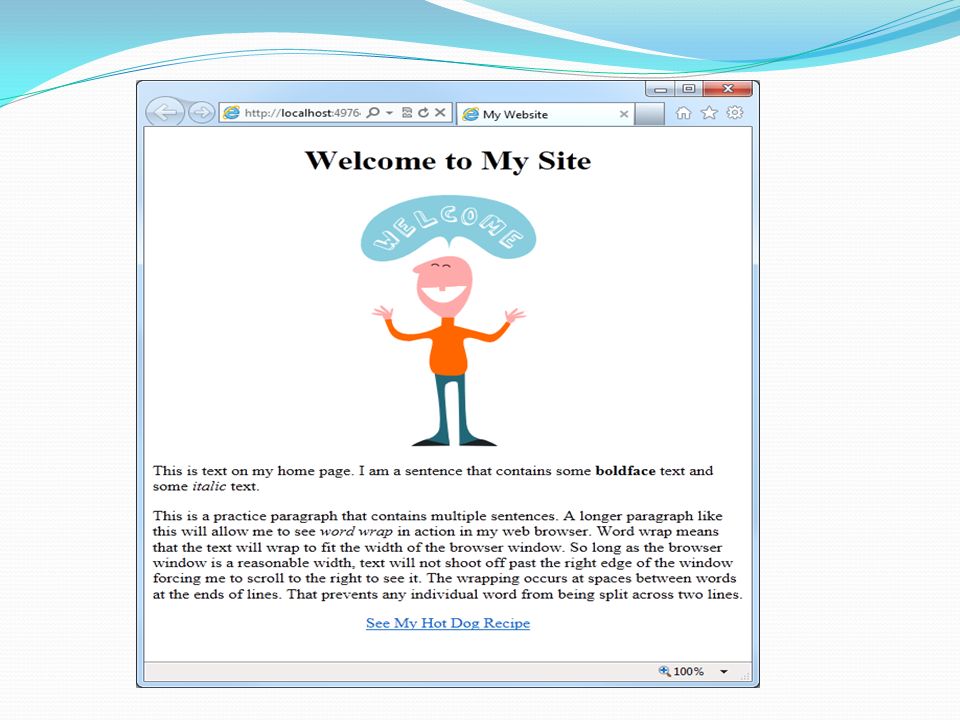
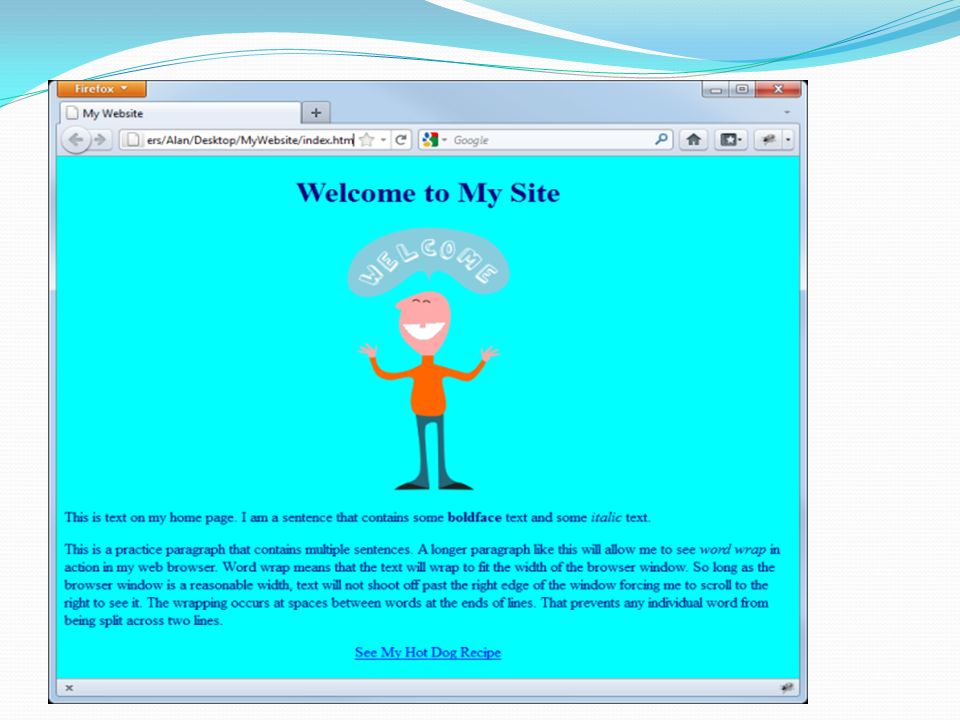
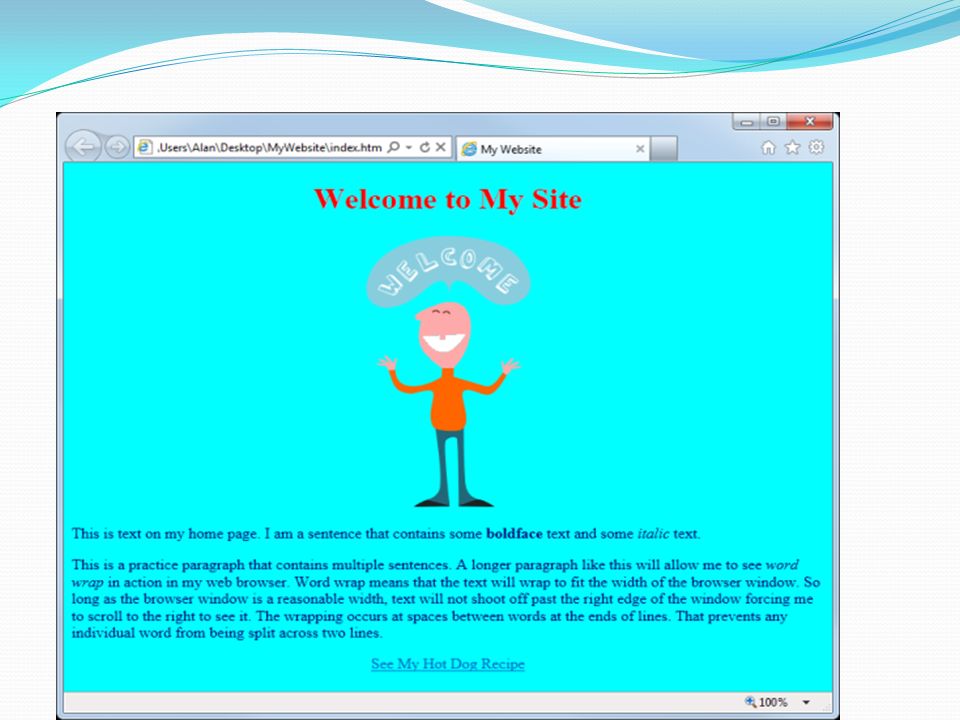
When Styles Conflict Suppose that you decide your page might look better if the text in the longer paragraphs (only) were left aligned. Could you use inline styles to left-align the text in those two paragraphs only? Let's try it and see. Follow these steps: Open index.htm for editing. Move the cursor between the p and > in the paragraph that starts "This is text on my home page." Insert a space and style="text-align: left" so the start of that paragraph looks like this: This is text on my home page. Now move the cursor down between the p and > that starts the paragraph that begins "This is a practice paragraph," and again insert a space and style="text-align: left;" Take a close look at your code, and verify that you did it correctly.

39
Conflicting style When conflicts like that arise, CSS resolves them with a clear, consistent, and common sense solution that we can state in a single sentence: When styles conflict, the one that's closest to the element being styled takes precedence. In other words, when styles conflict, the one that's closest to the tag being styled wins.

40
Inside out The text-align: left; in the tag is much closer to the paragraph that's being styled than the text-align: center way up in the tag. In fact, the text-align: left; is actually inside the tag that's being styled, which is as close as you can possibly get. So the text-align: left; wins over the text-align: center in each paragraph that contains the text-align: left;. Everything else on the page, though, will continue to obey the more general style defined in the body tag, which says all text should be centered.

42
The Text-Align Property So far, you've used the left and center values with the text-align property. There are actually four values you can use with text- align—left, right, center, or justify. In real life, you'd probably only use left or justify for paragraphs. The center and right options are best used for shorter lines of text like titles, columns of dates, or numbers in a table.

44
CSS Style Rules So far, you've seen an example of using a CSS inline style to center all of the text on a page. An inline style gets its name from the fact that it's in line with (actually, inside of) an HTML tag. Style rules are another way to apply CSS styling to a page. Unlike inline styles, you don't put style rules inside Web tags. With style rules, there's no style= attribute and no quotation marks. Instead, there's a selector and some curly braces.
 an HTML tag. Style rules are another way to apply CSS styling to a page. Unlike inline styles, you don t put style rules inside Web tags. With style rules, there s no style= attribute and no quotation marks. Instead, there s a selector and some curly braces..")
45
Selector Syntax The syntax for constructing a style rule looks like this: selector { property: value; }

46
Style Rules The placeholders in a style rule are as follows: selector: The type of element that the style applies to (matches the letters inside the tag that define the element in the page). property: Any CSS property. value: Any acceptable value for the property. The property: value pairs that you can use in a style rule are exactly the same as the property:value pairs that you can use in an inline style. A style rule is just a different way to apply the same properties and values that you can apply using inline styles.

47
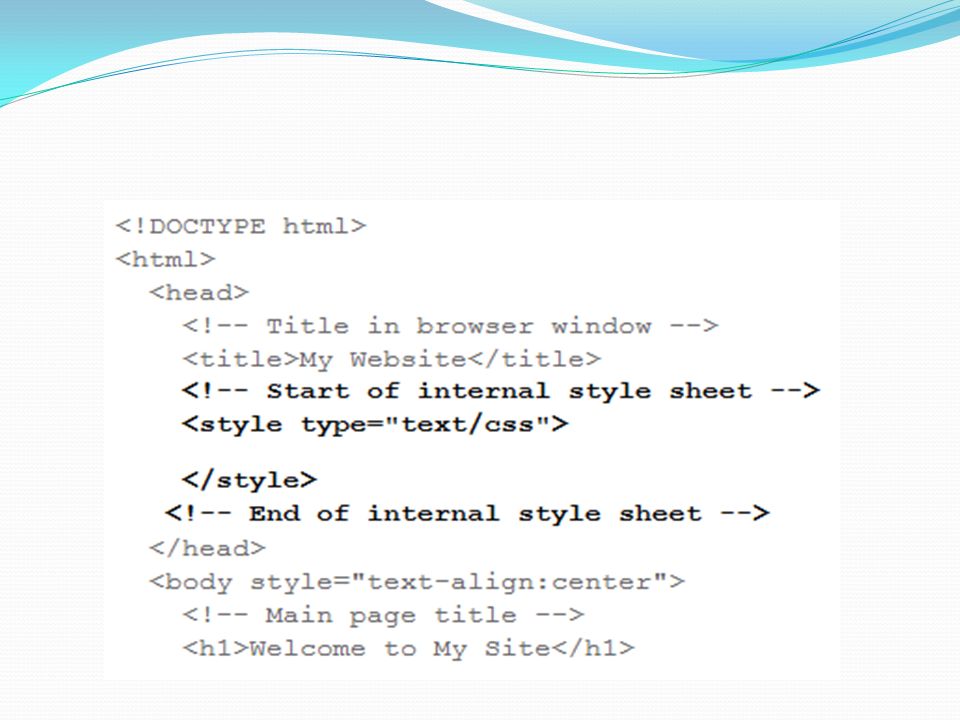
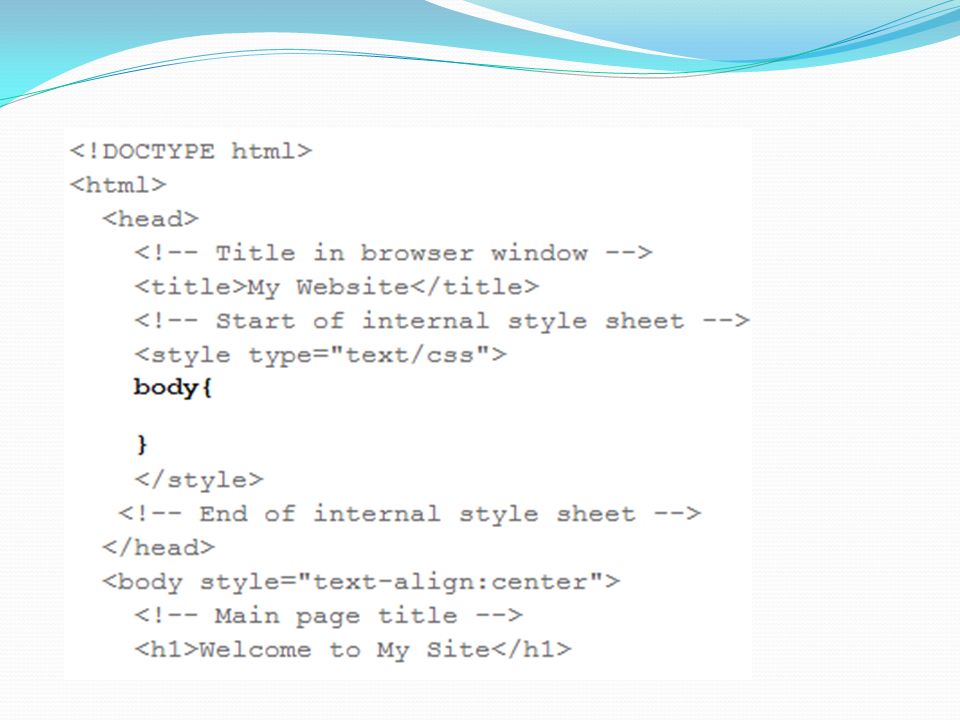
Creating an Internal Style Sheet An internal style sheet is one or more style rules inside a Web page. The style rules are metadata — stylistic information about the page. As such, an internal style sheet goes between the... tags in your page. You have to put them between the following HTML tags inside the head section:

48
Notice that there are no italic placeholders in those tags. You type them exactly as shown. The opening tag marks the start of the internal style sheet and lets the user agent know that what comes next is text that's written in the CSS language. The closing tag marks the end of the internal style sheet.

49
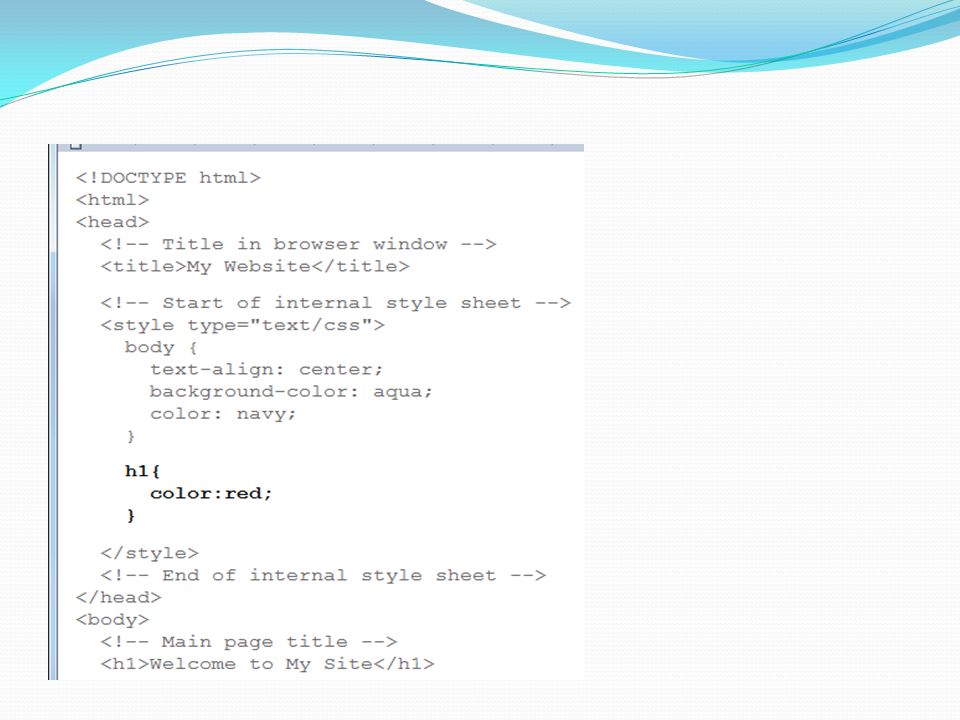
Adding internal style sheets To try it all out, we'll add an internal style sheet to index.htm. So here are the steps to follow: 1. Open index.htm for editing, using the same method you've been using throughout this course. 2. Put the cursor right after the tag, and press ENTER to start a new line. 3. Type and press ENTER to end that line. 4. Type and the press ENTER to end that line. 5. Press ENTER again to insert a blank line. 6. Type and press ENTER. 7. Type and press ENTER.

51
Now that we have the tags for defining an internal style sheet, we can add some style rules to that style sheet. We can start by defining a style rule for the page body. When we type a style rule for an element on a page, the selector for the style rule must match the word in the opening tag that defines the element on the page. We use a tag to mark the beginning of the body element on the page. We must use body as the selector in a style rule that's written to style the body element.

52
Also, when we write a style rule, we place an opening curly brace right after the element. And we use a closing curly brace to mark the end of the style rule. Here are the steps: 1. Put the cursor between the and tags. 2. Type body { 3. Press ENTER twice to end that line and insert a blank line. 4. Type } to end the style rule.

54
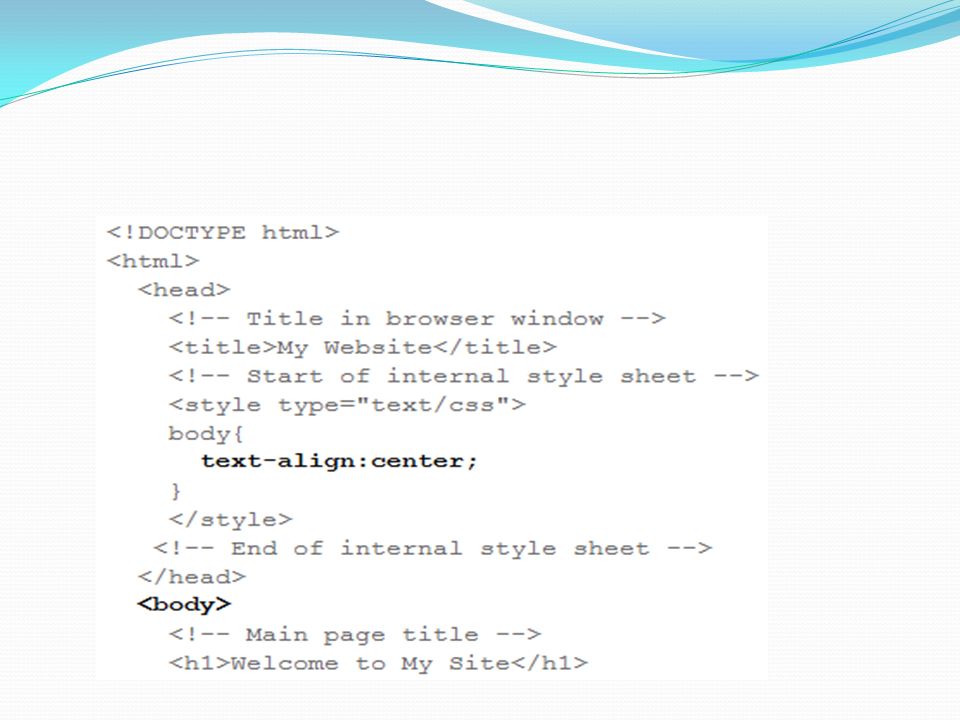
Outside our new style rule, we currently have an inline style to center text in the tag. We can define that in the style rule instead. There's no need to define it in both places, and there's no advantage to keeping the inline style in the body tag. Remove the blank space and style="text-align:center;" from the tag first. 1. We'll use a style rule to apply the centering. Here are the steps: 2. Delete the blank space and style="text-align: center;" from the tag to remove that inline style. 3. Put the cursor between the curly braces of the new body {} style rule, and type text-align:center; there (see image below).
..")
56
What changed? Stylistically, the page is still as it was before. The body element has text-align: center applied to it. So if you save the page and view it in a browser, everything will look exactly like it did before. There's no speed or other technical advantage to using the style rule or inline style, so you needn't concern yourself with that. We moved text-align: center to the style rule just to get some practice with other ways of doing things.

57
Adding Color With CSS Color is a great way to add some visual interest to your page. You can add color to your pages, using two CSS properties: Background-color: Allows you to define the background color of any element. Color: Allows you to define the foreground (text) color of any element.
 color of any element..")
58
Each property accepts one value. That value can be any one of the 16 color names listed below. Or it can be a color hex code—and there are a lot more hex codes than the 16 shown here:

59
Hex code vs color name The color names are nice, because they're familiar, easy to remember, and easy to type. The only disadvantage to the color names is that there are so few of them. If you stick to using only the color names, you're limited to using the 16 colors shown above. But if you use the hex codes, you have nearly unlimited color options. In fact, using hex codes extends your choices to more than 16 million different colors. The hex codes have no meaning to any normal person, and they're probably a little intimidating at first.

60
Hex Codes The hex codes aren't completely random. They're based on the fact that you can create just about any color (even white) by mixing the colors red, green, and blue.
 by mixing the colors red, green, and blue..")
61
The color hex code is six digits long. The first two digits (rr below) represent the amount of red. The second two digits (gg below) represent the amount of green. And the third two (bb below) represent the amount of blue. Rrggbb A pair of zeroes in any position means that color is completely excluded. So if all six digits are zero, as in 000000, that means there's no color at all. 000000 is the hex code for black, which is what you get when there are no colors at all.
 represent the amount of green. And the third two (bb below) represent the amount of blue. Rrggbb A pair of zeroes in any position means that color is completely excluded. So if all six digits are zero, as in , that means there s no color at all is the hex code for black, which is what you get when there are no colors at all..")
62
Full strength of a color is represented by ff, which is the hexadecimal equivalent of the number 256. Hexadecimal is a numbering system that uses 0, 1, 2, 3, 4, 5, 6, 7, 8, 9, a, b, c, d, e, f as characters, rather than just 0 through 9. It's fairly common in computers, because much of what happens in computers is done in bytes, which is 8 bits, or 2 8, which is 256.

63
The hex code ffffff means full-intensity red, plus full- intensity green, plus full-intensity blue. When you mix all three colors at full strength, you get white. But you might have noticed in the list of colors and hex codes in the image above, each hex code begins with a # character. So in code, you would actually type #ffffff rather than ffffff.

64
Let's look at a few more examples. The hex code #ff0000 means full-intensity red and none of the other two colors. So #ff0000 is the hex code for red. The hex code #00ff00 means no red or blue, but full- intensity green. And #00ff00 is the hex code for green. And #0000ff is the hex code for blue, because 0000 means no red or green, and the ff at the end means full-intensity blue.

65
Look them up Nobody knows the color hex codes by heart. There isn't even a place you can go to see them all, because there are more than 16 million of them, and that would require a huge Web page that would take a long time to download. Fortunately, there's no need to memorize them or see all 16 million at once. You can easily look them up on-the-fly right from your computer whenever you're online. One easy way to find the hex code for a color is to use an online color wheel like the one at this website: http://www.allprofitallfree.com/color-wheel.html. Just go to that site, put the mouse pointer on the color you want, and the hex code for that color appears in a little box on the page. http://www.allprofitallfree.com/color-wheel.html

66
CSS Properties to Apply Color To use a color, you have to apply it to a CSS property. To define the background color, use the background- color property and the following syntax: background-color: value To define the text color, use the color property with this syntax: color: value

67
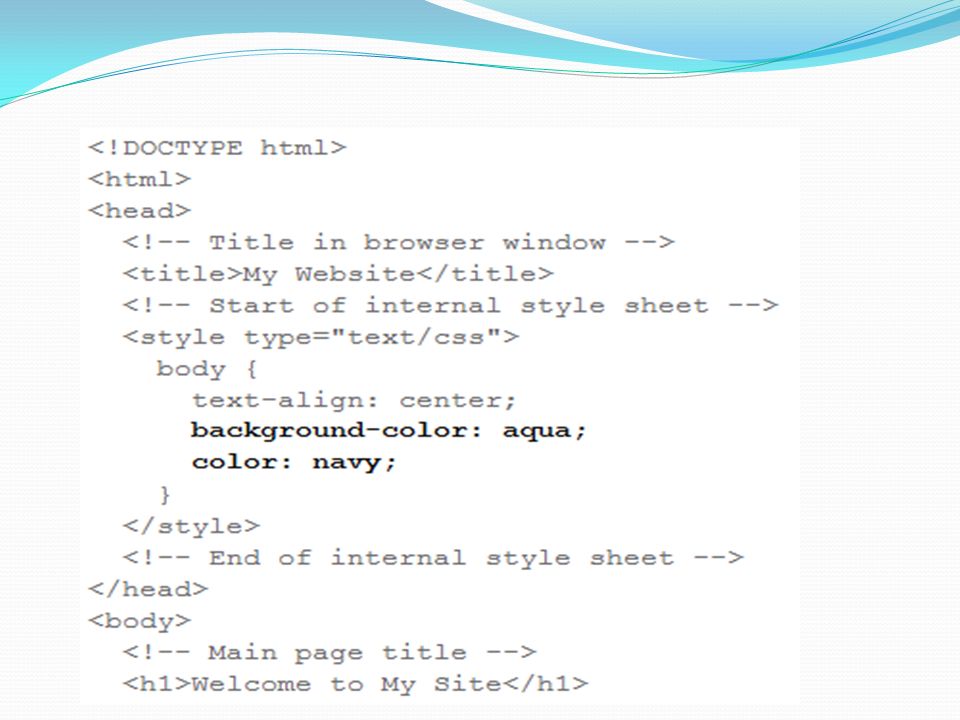
In both cases, replace value with one of the 16 acceptable color names, or any one of the 16.7 million color hex codes. Don't forget that when you use multiple CSS property: value pairs, you have to separate them with semicolons. So if you want to set the background color of the body element to aqua, and the text color to navy blue, follow these steps: 1. In index.htm, put the cursor just after text-align: center; and press ENTER to start a new line. 2. Type background-color: aqua; and press ENTER. 3. Type color: navy; (that last semicolon is optional, but it can't hurt to put it in, so it's already there should you decide to add more property: value; pairs later). 4. Make sure both new lines are inside the body {} style rule and spelled correctly, as below.
. 4. Make sure both new lines are inside the body {} style rule and spelled correctly, as below..")
70
tips If yours doesn't look right, check your spelling and syntax. Here are a few more tips: 1. Make sure you spelled the property names correctly. It's background-color (no blank spaces). And it's color for the text. You must use the U.S. spelling color, not colour). 2. Make sure you put a colon (:) between the property and the value. 3. Make sure you put a semicolon (;) between each property: value pair. 4. Make sure all three property: value pairs are inside the curly braces of the body {} style rule.
. And it s color for the text. You must use the U.S. spelling color, not colour). 2. Make sure you put a colon (:) between the property and the value. 3. Make sure you put a semicolon (;) between each property: value pair. 4. Make sure all three property: value pairs are inside the curly braces of the body {} style rule..")
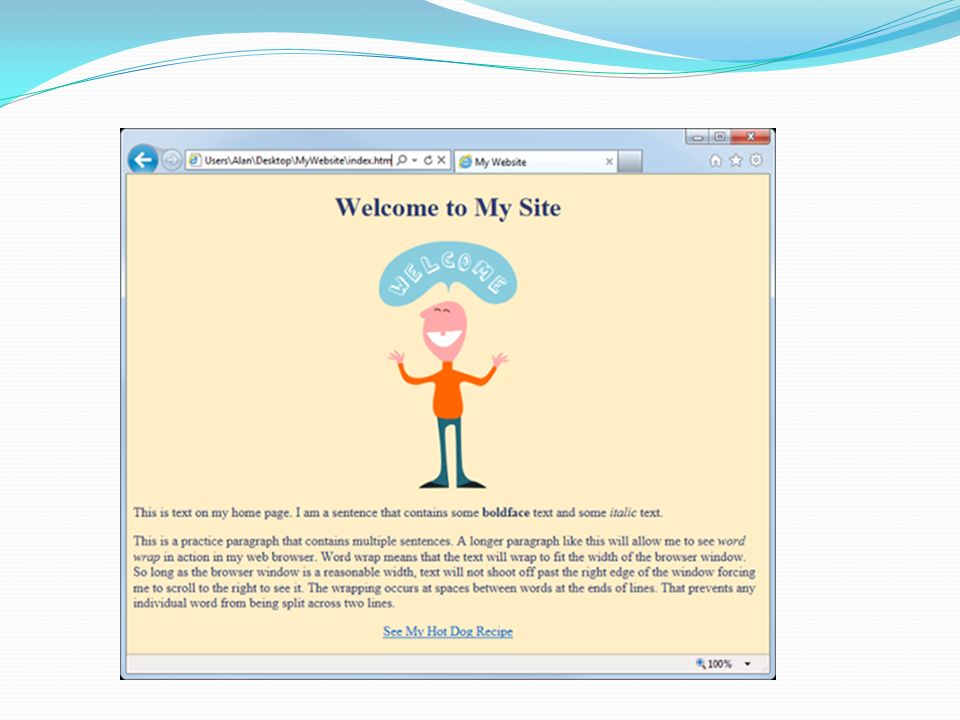
71
Once your code is working, feel free to be creative. For example, you can try reversing the colors, making the background color navy, and the color aqua. This is what your code would look like: body { text-align: center; background-color: navy; color: aqua; }

72
Troubleshooting Disappearing Text When you choose colors, it's important that you provide good contrast between your background color and text color. Otherwise, the text will be hard to read or invisible. For example, here's a fairly common mistake. Suppose you change your mind about those colors, go back into your page, and change the background-color to aqua, but then you don't do anything to the color. Now, the background-color and color are the same.

73
Try this body { text-align: center; background-color: aqua; color: aqua; }

75
Styling Headings you've styled the background color and the text color, you'll also want to style the color of your headings. To style headings, you need to create a style rule with a selector that matches the type of heading you want to style. For example, the first style rule we created used body as the selector to style the body element. To create a style rule for level-1 headings (which are defined by... tags), the selector will be h1 (the characters inside the first tag).
, the selector will be h1 (the characters inside the first tag)..")
76
Like the first style rule you created, this one needs to go in the internal style sheet. You can put as many style rules as you like between those tags—there's no maximum number. Also, like all style rules, this new one must have its own selector and curly braces. So to type it, follow these steps: 1. Click just past the closing curly brace for the body style rule. 2. Press ENTER a couple of times to start a new line, and add a blank line. 3. Type h1 { to start the style rule, and then press ENTER. 4. Type color: red; which will be the property and value we want to apply to the h1 elements. 5. Press ENTER, and then type } to end the style rule.

79
Using Hex Codes I used simple color names, because they're a lot easier to understand and they're a lot less intimidating than the color hex codes. But you don't need to limit your Web creations to those 16 colors. Any place where you can use one of those names, you can use the hex code instead. Use #ffeec6 as the body background color, and #2d3b71 as the body text color and the h1 text color.

81
CSS Summary Beyond the specifics and details, it's important to understand that when it comes to styling websites and other electronic documents, CSS is king. It has been for several years, and will be for many years to come. When style rules conflict, the one that's closest to the element being styled takes precedence. This means that you can set up some general styles that you apply to the body element. And then you can override them, if needed and as needed, for individual elements on the page. Inline styles are CSS styles that actually go inside an HTML tag using a style= attribute. A CSS style rule is a way of applying CSS outside the tags—and even outside the body of the page. A style rule consists of a selector, which describes what type of element the style rule styles. The selector is followed by a pair of curly braces that contain CSS property: value pairs that define how it's styled. The background-color property in CSS lets you define the background color of the page (or any other element). The color property allows you to color the text. For either property, you define a color using one of the 16 color names or a color hex code that defines the color as a mixture of red, green, and blue.
. The color property allows you to color the text. For either property, you define a color using one of the 16 color names or a color hex code that defines the color as a mixture of red, green, and blue..")
Similar presentations


 Lecture # 5 HyperText Markup Language (HTML) 1.>")

. Cascading Style Sheets With the explosive growth of the World Wide Web, designers and programmers quickly explored and reached.>")


>")


