Download presentation
Presentation is loading. Please wait.

1
Brian Schmidt Principles in Data Reduction

2
Producing “Good Data” Essential to have a good working instrument Essential to take all of the relevant calibration data Correct data reduction procedures for the data –Check constantly for errors –All data is not alike. Do what is appropriate for your data.

3
CCDs Linear Reasonable dynamic range (7 magnitudes) Superb Efficiency (90%) Low noise ( 4 counts per pixel) Sensitivity X-ray to 1100nm No colour discrimination (except in X-ray) Can be run as fast as 100Hz (but typically has 20- 120 second down time between exposures) Largest Astro CCDs are currently 16 Million pixels
 Superb Efficiency (90%) Low noise ( 4 counts per pixel) Sensitivity X-ray to 1100nm No colour discrimination (except in X-ray) Can be run as fast as 100Hz (but typically has second down time between exposures) Largest Astro CCDs are currently 16 Million pixels")
4
CCDs are the detector of choice in most situations Exceptions are where fast readout times are needed (photocounting preferred) And where backgrounds are extremely low (sometime photocounting devices preferred) Very large Fields (CCDs very expensive) where Photography has been used.
 And where backgrounds are extremely low (sometime photocounting devices preferred) Very large Fields (CCDs very expensive) where Photography has been used.")
5
Noise in Astronomical Detectors Poisson Noise in most situations Counts = photons detected within aperture or resolution element

6
SNR of two detectors

8
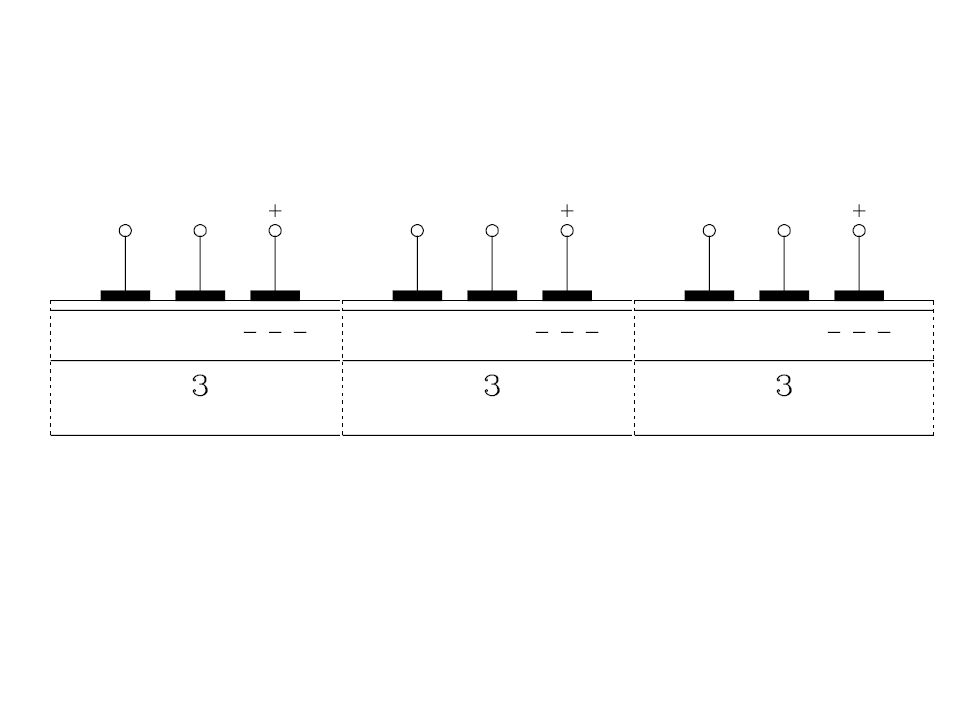
Glossary of CCD terms (from http://www.pha.jhu.edu/~cat/seminar.html)http://www.pha.jhu.edu/~cat/seminar.html gate A thin layer of metal or heavily doped polycrystalline attached to an electrode forms the gate. A bias voltage may be applied to the gate in order to change the shape of the underlying potential. oxide layer The ~0.1 micron thick oxide layer (usually SiO2) beneath the gate functions as the dielectric of the capacitor. The oxide is thickened to ~0.5 - 1.5 microns above the channel stops to insulate them from changes in the gate voltage. channel stop The function of the channel stop regions is to confine charge. They are made of heavily doped p-type materials with an extra thickness of oxide over top. This makes them relatively insensitive to voltages applied to the gate and thus an effective potential barrier. n-type buried channel Most modern CCDs have buried channels. A buried channel is created by the addition of a n-type layer (~1 micron thick) between the gate and the oxide. A n-type (negative) semi-conductor is one which has been doped with impurities of higher atomic number yielding an excess of free electrons in the conduction band. The effect of the n-type layer is to move the potential minimum back from the Si- SiO2 interface eliminating "fast surface states" which cause problems with charge transfer. The region where the signal charge collects, termed a channel, is within the n-type region. p-type substrate A p-type (positive) semi-conductor is one which is doped with with impurities of lower atomic number, resulting in "holes" in the valence states. The substrate is usually at least 15 microns thick. depletion region In the depletion region, electrons from the n-type region have combined with holes from the p-type region. The result is the establishment of a potential difference because the n-type region becomes positively charged, while the p-type region becomes negatively charged. When photons are absorbed in the depletion region they form electron-hole pairs. The electrons are attracted to the the n-type region. The holes diffuse away into the p-type region.
 beneath the gate functions as the dielectric of the capacitor. The oxide is thickened to ~ microns above the channel stops to insulate them from changes in the gate voltage. channel stop The function of the channel stop regions is to confine charge. They are made of heavily doped p-type materials with an extra thickness of oxide over top. This makes them relatively insensitive to voltages applied to the gate and thus an effective potential barrier. n-type buried channel Most modern CCDs have buried channels. A buried channel is created by the addition of a n-type layer (~1 micron thick) between the gate and the oxide. A n-type (negative) semi-conductor is one which has been doped with impurities of higher atomic number yielding an excess of free electrons in the conduction band. The effect of the n-type layer is to move the potential minimum back from the Si- SiO2 interface eliminating fast surface states which cause problems with charge transfer. The region where the signal charge collects, termed a channel, is within the n-type region. p-type substrate A p-type (positive) semi-conductor is one which is doped with with impurities of lower atomic number, resulting in holes in the valence states. The substrate is usually at least 15 microns thick. depletion region In the depletion region, electrons from the n-type region have combined with holes from the p-type region. The result is the establishment of a potential difference because the n-type region becomes positively charged, while the p-type region becomes negatively charged. When photons are absorbed in the depletion region they form electron-hole pairs. The electrons are attracted to the the n-type region. The holes diffuse away into the p-type region..")
9
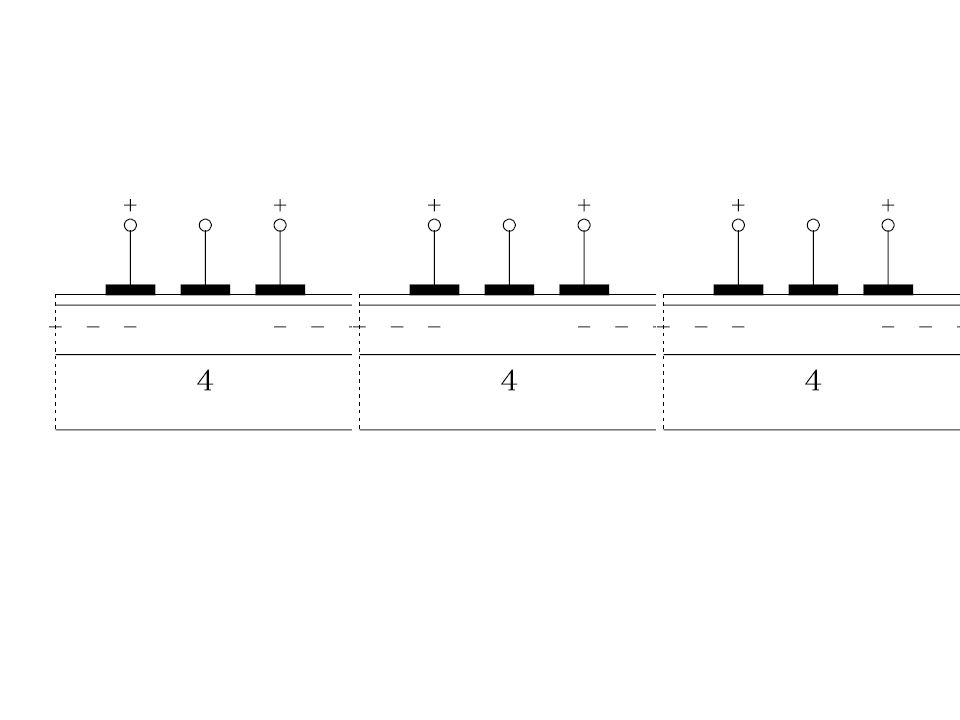
Traditionally, CCDs were illuminated on the front side, meaning the side with the gates. Many of the blue photons were absorbed by the relatively thick (0.5 micron) gates. Today it is possible to make back-side illuminated devices. In these devices the silicon substrate is thinned to ~15 microns and the gate side is mounted against a rigid surface. An enhancement layer is also added which creates an electric field that forces electrons toward the potential wells. Back-side illuminated devices have higher QE especially in the blue and UV portion of the spectrum.
 gates. Today it is possible to make back-side illuminated devices. In these devices the silicon substrate is thinned to ~15 microns and the gate side is mounted against a rigid surface. An enhancement layer is also added which creates an electric field that forces electrons toward the potential wells. Back-side illuminated devices have higher QE especially in the blue and UV portion of the spectrum..")
10
Optical depth of 1 for 1 micron photons is roughly 100 microns in Silicon (CCDs typically 15 microns thick) So red light travels straight through CCDs. Plus, whole CCD acts as a Fabry-Perot cavity and one gets fringing!

11
High-resistivity Thick CCDs The solution is to make the CCDs thicker than the absorption depth of the silicon, incident photons will then be absorbed on their first pass and reflection from the rear surface will be greatly reduced. Lincoln Labs and E2V have made 40 microns thick CCDs, LBL is experimenting with 100 micron thick CCDs. Standard silicon cannot be used for this process since it cannot sustain the high electric field throughout the full depth of the device that is so important for good QE. Instead a special grade of high-purity high-resistivity silicon must be used.

20
CCDs

27
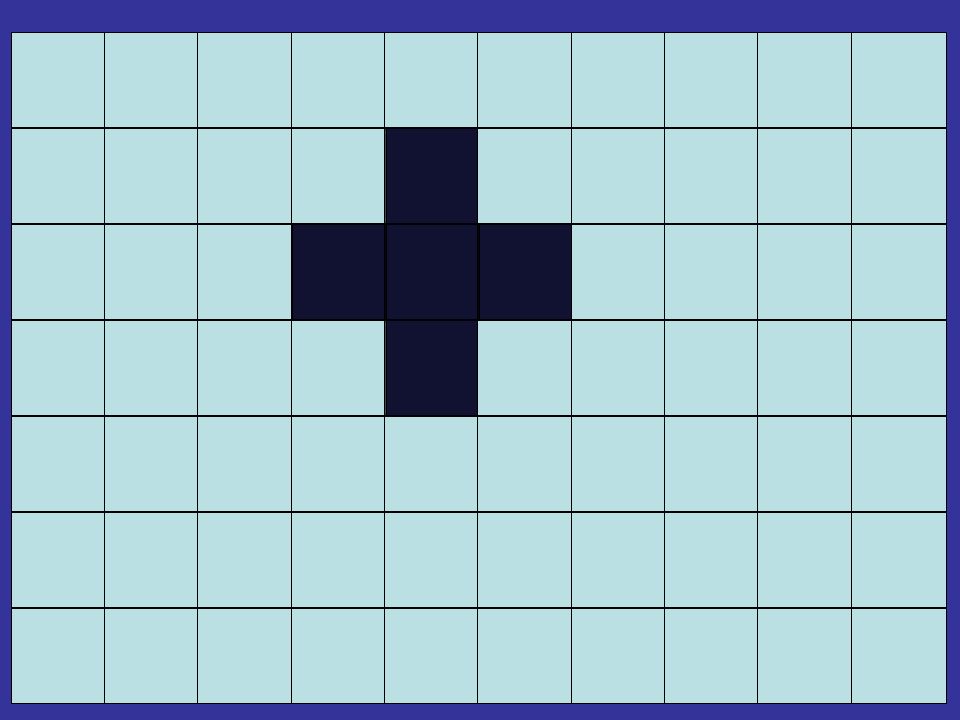
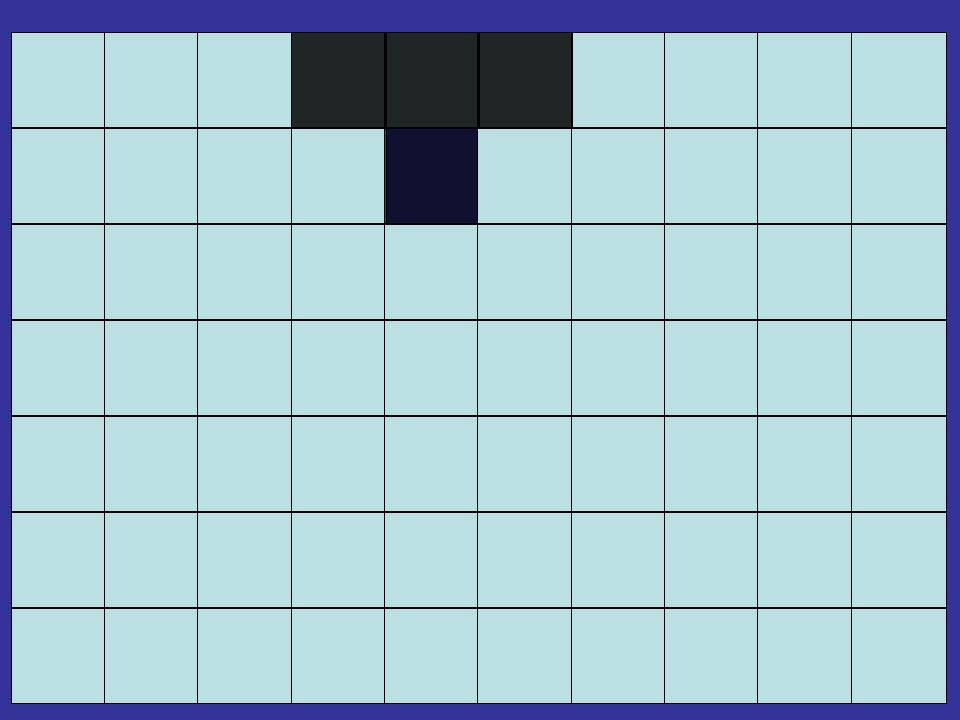
Charge Transfer Efficiency (CTE) Each transfer has the possibility of leaving some of the electrons behind. In a 2048x4096 pixel CCD, pixel 1,1 undergoes 4096 parallel transfers and 2048 serial transfer. If the parallel transfers are 99.99% efficient then pixels in last row lose 1-(.9999) 4096 =.334 of their charge relative to first row! Bad! CTEloss of charge 0.99990.336 0.999990.040 0.9999990.004 0.99999990.0004
 4096 =.334 of their charge relative to first row. Bad. CTEloss of charge")
28
http://www.ing.iac.es/PR/newsletter/news5/simon2.gif QE of Modern CCDs

29
Gain, Bias, Readnoise, Dark Current At the end of the Serial Register, the transferred electrons need to amplified to create a voltage which can be measured by our electronics (and which are converted typically by a 16 bit [0-65536] Analog to Digital converter) Gain: How many counts does each electron get (typically 1-8 e/ADU). Match so 65536->is where the CCD saturates (is not longer linear) Bias: When there is no charge, how many counts do we read. Readnoise: How many electrons of noise does the CCD amplifier add. (good CCDs now 4e-s, best are 1e-)) Dark Current: If CCDs are cold (<180K), they usually produce only a few electrons per hour per pixel. Warmer, they produce more.
![Gain, Bias, Readnoise, Dark Current At the end of the Serial Register, the transferred electrons need to amplified to create a voltage which can be measured by our electronics (and which are converted typically by a 16 bit [ ] Analog to Digital converter) Gain: How many counts does each electron get (typically 1-8 e/ADU).](http://images.slideplayer.com/21/6286626/slides/slide_29.jpg "Match so >is where the CCD saturates (is not longer linear) Bias: When there is no charge, how many counts do we read. Readnoise: How many electrons of noise does the CCD amplifier add. (good CCDs now 4e-s, best are 1e-)) Dark Current: If CCDs are cold (<180K), they usually produce only a few electrons per hour per pixel. Warmer, they produce more..")
30
Measuring the Gain Fe55 source: Fe-55 produces a 5.9 KeV soft X-ray. When this interacts with the CCD, 1620 electrons are generated in a volume much smaller than a pixel. Measure how many counts there are in each interaction, that tells us the # of ADUs per 1620 electrons. Very accurate at one input level, but not easy for the astronomer Take two images of the dome with lots of counts in them (30000 or so), subtract these, use the poisson noise to tell you how many electrons per ADU. Counts=ADU - BIAS
, subtract these, use the poisson noise to tell you how many electrons per ADU. Counts=ADU - BIAS.")
31
Measuring the Read Noise Take two BIAS images (0 second exposures) – only need one if the bias has no structure in it like any decent modern CCD system should provide! Readnoise is just measured from the std deviation of the BIAS image (or their difference) adjusted by the gain.
 adjusted by the gain..")
32
Measuring the Linearity In the lab, use a diode, and take different length exposures to see brightness of diode. or Under take gain test with several pairs of images at different light levels. Does the gain remain the same. or Take an image of a field of stars as twilight ascends/descends. Measure the aperture magnitude of the stars in increasing background light. Do the stars magnitude change as background increases.

33
Measuring the Charge Transfer Efficiency. Fe55 source: Fe-55 produces a 5.9 KeV soft X-ray. When this interacts with the CCD, 1620 electrons are generated in a volume much smaller than a pixel. Measure how many counts there are in each interaction as a function of position. that tells us the # of ADUs per 1620 electrons. Comparison in the Y direction tells you charge loss in parallel registers, Comparison in X direction tells you charge loss in serial registers. Again, for the technition. Look at Cosmic Rays or defects in your images, do they bleed in either the X, or Y direction. In a dense field on a photometric night, image a set of stars in the 4 corners of the chip and compare their photometry.

34
Atmospheric Refraction As stellar light passes through the atmosphere, it is refracted just as through a lens. Blue light is refracted more than red light. Like extinction, the amount of atmospheric refraction depends on the amount of air mass that light has to traverse. r is increased altitude due to refraction z is the zenith angle k is a constant which depends on wavelength, pressure (altitude), temperature, and humidity. k 3000 Å 63.4 5000 Å 60.6 11 59.6 40 59.3
, temperature, and humidity. k 3000 Å Å 1 ")
35
Differential Refraction At 1.5 airmasses, an image at 4000Å is displaced towards the zenith by 1.1” relative to the image at 6000Å. If you are trying to observe over this wavelength range using a 2 arcsec slit, you will suffer large amount of light-loss unless the slit happens to be aligned at the parallactic angle, i.e., the position angle on the sky that results in the slit being perpendicular to the horizon. Try to always observe at low airmasses. Rotate the spectrograph so that the slit is near the parallactic angle. Broad Blue filters are to be avoided when imaging (e.g. Gunn-g) at high airmass. Use Atmospheric Dispersion Compensator
 at high airmass. Use Atmospheric Dispersion Compensator.")
36
Atmospheric Extinction Extinction per airmass depends on wavelength, on altitude, and on the night. Mauna kea, for example as an average pressure which is 60% that at Sea Level. So to go to Asiago’s curve, should multiple Mauna Kea’s by 1.4.

37
Atmospheric Dispersion Compensator (ADC) Many large telescopes are with a ADC – typically a pair of ``Risley prisms", which rotate relative to each other and provide excellent atmospheric dispersion compensation. They can cause ghosting and scattered light, and chew up a lot of the light below 4000Å, but they do get rid of differential refraction.

38
Sky Brightness Days from New moonUBVRI 02222.721.820.919.9 321.522.421.720.819.9 7 21.621.420.619.7 1018.520.7 20.319.5 141719.52019.919.2

39
Sky Brightness

40
Sky transmission in Red Telluric Lines caused by molecules in atmosphere (O2, H20…) Do not scale linearly as airmass Observe smooth spectrum standard to remove
 Do not scale linearly as airmass Observe smooth spectrum standard to remove")
41
Telescopes Alt-Az –Orientation of image changes as telescope tracks, corrected by an image rotator –Choose rotator angle to orient image (N-E) or slit (parallactic or desired galaxy position) to desired angle Equatorial –Orientation of image typically fixed, but should choose angle so slit is at parallactic angle or to minimise galaxy gradient.
 or slit (parallactic or desired galaxy position) to desired angle Equatorial –Orientation of image typically fixed, but should choose angle so slit is at parallactic angle or to minimise galaxy gradient.")
42
Telescope Optics Each mirror surface looses about 8% of the light Each coated transmissive surface looses about 4% of the light Large glass correctors tend to remove UV (Fused Silica is the best)
")
43
Slit Spectrographs Classic long slit spectrograph is very simple (But orders overlap, so tough to get more than a factor of two in wavelength coverage) And hard to optimise system from 320nm- 1micron
 And hard to optimise system from 320nm- 1micron")
44
Double Beam Spectrograph Split light into two channels using a dichroic. Orders now do not overlap Can use Blue and Red optimised CCDs on either arm

45
Echelle Spectrograph Echelle Spectrographs use a highly dispersive grating which output many order. Orders are separated out by an additional grating (Cross-disperser) which moves the light as a function of wavelength and position.
 which moves the light as a function of wavelength and position..")
46
Integral Field Spectrographs Image slicer (or fiber pod) creates a series of slit spectra covering a 2-d piece of sky…
 creates a series of slit spectra covering a 2-d piece of sky…")
47
Taking a Spectrum Object Bright – center directly into slit Object Faint – offset from bright star Always good to take more than one spectrum of each object to remove Cosmic Rays Even better- define two places on the slit, take two spectra of each object (standards as well). Subtract the two images to remove most of the sky lines for each object. (not so useful if not photometric)
.")
48
Taking a spectrum Choosing slit size. As you increase your slit size, –you loose resolution, –increase the fraction of light of object landing on detector –Increase the background hitting the detector Typically we choose a slitsize about 1.5 FWHM of image seeing, unless we are trying to get absolute spectrophotometry (then need a larger slit)
.")
49
Nod and Shuffle –a. An observation is taken at a first position on the sky (position A), while guiding. –b. The shutter is closed, and charge is shuffled by +Y pixels. –c. The telescope is moved to a second position (position B). –d. The shutter is opened at position B and the observation is continued. –e. The shutter is closed and charge shuffled by –Y pixels. –f. The telescope is moved back to position A. –g. The procedure is iterated until the exposure is complete. The final exposure time is the product of the sub-integration time and the number of sub-integrations. Data taken at position A has sky spectrum taken at position B subtracted, removing very effectively, the sky lines.
, while guiding. –b. The shutter is closed, and charge is shuffled by +Y pixels. –c. The telescope is moved to a second position (position B). –d. The shutter is opened at position B and the observation is continued. –e. The shutter is closed and charge shuffled by –Y pixels. –f. The telescope is moved back to position A. –g. The procedure is iterated until the exposure is complete. The final exposure time is the product of the sub-integration time and the number of sub-integrations. Data taken at position A has sky spectrum taken at position B subtracted, removing very effectively, the sky lines..")
50
Calibration Data-Spectra Arc at the position of each object A smooth spectrum standard A spectral flux standard star Biases – 10 or so are usually sufficient Internal flats (quartz) – Make sure that you have lots of counts in the blue – You might need to take two exposure times – one where you saturate the red part of the spectrum Skyflat – Not that important, but useful if you are planning to use more than one position on the slit.
 – Make sure that you have lots of counts in the blue – You might need to take two exposure times – one where you saturate the red part of the spectrum Skyflat – Not that important, but useful if you are planning to use more than one position on the slit.")
51
Smooth Spectral Standards Smooth spectrum stars have basically no features (EG 131 is a flux standard and has no features) – a unique star in the sky
 – a unique star in the sky")
52
Flux Standards

53
Spectral Reductions Cadillac treatment requires –Bias frames –Dark Frames –Quartz Flats (removes high frequency CCD variations) at each object if fringing –Sky Flat (removes variations across slit) –Flux standard stars at several airmasses –Smooth spectrum standard stars at several airmasses –ARCs at each position of each object and standard star
 at each object if fringing –Sky Flat (removes variations across slit) –Flux standard stars at several airmasses –Smooth spectrum standard stars at several airmasses –ARCs at each position of each object and standard star")
54
Minimum observing Set to get good Spectral data Bias (Dark if required) ARC at each position Observe object a parallactic angle Smooth flux spectrum standard star at close to same airmass as your program object. (parallactic angle) –Or smooth spectrum+flux standard Quartz at position if fringing and flexture
 –Or smooth spectrum+flux standard Quartz at position if fringing and flexture.")
55
Imagers Imagers typically give a focal plane a the desired scale (arcseconds per pixel) and with some field size. The key to a good imager is no scattered light (telescope baffled), high throughput (little glass), well characterised filters, and good CCDs. Many imagers are parts of spectrographs (FORS), and while convenient, it ultimately hampers their performance compared to a dedicated instrument.
, high throughput (little glass), well characterised filters, and good CCDs. Many imagers are parts of spectrographs (FORS), and while convenient, it ultimately hampers their performance compared to a dedicated instrument..")
56
Taking an Image Point to object Do you need to guide (short exposure maybe not) How many counts do you need? SNR > 200 is a waste as photometry of SN is always dominated by other errors. But make sure you have several comparison stars with this type of SNR as well. Multiple exposure on different places on the chip are preferred over single long exposure – exception is U band if you are read noise limited.

57
Basic Calibration Data imaging Bias images (10) Standard stars (Landolt are easiest at present) –Covering colour range of your objects –Airmass range if photometric Twilight flats (>=3 in each filter > 10000 counts in each) (Dome flats are sometime useful) Dark images (>=3 of 1/2 hour each) Random data taken with instrument of pieces of uninteresting sky.
 Standard stars (Landolt are easiest at present) –Covering colour range of your objects –Airmass range if photometric Twilight flats (>=3 in each filter > counts in each) (Dome flats are sometime useful) Dark images (>=3 of 1/2 hour each) Random data taken with instrument of pieces of uninteresting sky.")
58
BASIC CCD reduction Most people find IRAF a good package to undertake their Basic CCD reduction. However, do not be scared to do it yourself! Iraf: imred.ccdred.ccdproc A good tutorial is available at iraf.noao.edu/iraf/web/tutorials/tutorials.html But do not necessarily believe this is the bible of data reduction

59
Data Reduction -BIAS Always take ~10 BIAS frames every night to assess the state of your instrument Determine trim area (area which has data you want) Determine position of Overscan Median 10 Bias frames together, subtract overscan from image (either a constant value for the whole image, or a fit value (as a function of y) as necessary. Look at the ZERO frame. Is just noise with Zero level? If so, you DO NOT need to apply it (instead simply subtract off the overscan from each image). If it has structure, then you will need to subtract this from every frame along with the overscan. Data overscan
. If it has structure, then you will need to subtract this from every frame along with the overscan. Data overscan.")
60
DATA Reduction - Flatfield Each pixel has a slightly difference response from each other intrinsic to the CCD (and due to the telescope + instrument), and this depends on colour, and somewhat on time. Typically one takes images of the twilight sky (pictures off the dome are also) – need 5000-40000 counts per image. U, B, Z, V, I, R is the best order to take your flats in in the evening (reverse order in morning). Depending on readout time of CCD, you may only be able to do a subset. Remove overscan/BIAS of all images. For each colour, measure the median value in a region near the centre of each image, and then scale each of the set so this middle region has a value of 1. Then Take median of each the set of sky flat images to create a flatfield for this colour. All data then first is trimmed, overscan subtracted, bias subtracted as necessary, and then is divided through by the flatfield. This is generally your reduced data… For spectra, need to use a lamp inside the spectrograph to get flatfield. But must remove the wavelength shape of the lamp before dividing.
 – need counts per image. U, B, Z, V, I, R is the best order to take your flats in in the evening (reverse order in morning). Depending on readout time of CCD, you may only be able to do a subset. Remove overscan/BIAS of all images. For each colour, measure the median value in a region near the centre of each image, and then scale each of the set so this middle region has a value of 1. Then Take median of each the set of sky flat images to create a flatfield for this colour. All data then first is trimmed, overscan subtracted, bias subtracted as necessary, and then is divided through by the flatfield. This is generally your reduced data… For spectra, need to use a lamp inside the spectrograph to get flatfield. But must remove the wavelength shape of the lamp before dividing..")
61
Imaging Illumination Correction/Fringes After flatfielding your data, it is often found that their remains a residual in the data. This is because the twilight and night sky are a bit different. Create superflat: Take all of your data that has been reduced to flatfield stage. Measure median value within a patch in the centre, and scale each image to a common value (e.g. divide the average value for all images by each images value). For each pixel, take median value over all images (removing some fraction of the top values to avoid print through). This requires >50 images to really work. Alternatively mask all objects out of each image, and only median the left over pixels in the stack of image. A well constructed Superflat image will have no stellar print through, and should reveal any imperfections in the twilight flat (illumination correction) and fringes.
. For each pixel, take median value over all images (removing some fraction of the top values to avoid print through). This requires >50 images to really work. Alternatively mask all objects out of each image, and only median the left over pixels in the stack of image. A well constructed Superflat image will have no stellar print through, and should reveal any imperfections in the twilight flat (illumination correction) and fringes..")
62
Illumination Correction Hopefully created superflat is essentially featureless. If it is not (and does not have fringes), then you can either divide all the data by this frame (if sufficient signal), or smooth the superflat by, for example, a 10 pixel gaussian, and divide through by this. NOTE: If you are observing in dense stellar fields, this isn’t going to work, it is impossible to get a superflat. If you are observing large galaxies, DO NOT put them in the same part of CCD each time, or you will not be able to make superflat. For spectra. Take an spectrum of the twilight sky. This should be uniform across the slit (but note the twilight sky is the spectrum of the sun, so need to look at each spectra line and fit the slit profile as a function of position on the CCD).
, then you can either divide all the data by this frame (if sufficient signal), or smooth the superflat by, for example, a 10 pixel gaussian, and divide through by this. NOTE: If you are observing in dense stellar fields, this isn’t going to work, it is impossible to get a superflat. If you are observing large galaxies, DO NOT put them in the same part of CCD each time, or you will not be able to make superflat. For spectra. Take an spectrum of the twilight sky. This should be uniform across the slit (but note the twilight sky is the spectrum of the sun, so need to look at each spectra line and fit the slit profile as a function of position on the CCD)..")
63
Fringe Correction- Imaging If you are observing in Z, I, and possibly R (or other filters beyond 700nm) the superflat may show fringing. Fringing is additive (imaging data) because it is caused by the narrow night sky lines + the transparency of the CCD at >700nm. Best is to fit a low order surface to the superflat and assume this is the illumination correction. You will divide this through each image. What remains is the fringe frame. Fringe frame needs to be scaled and subtracted from each image. Scaling to first order is exposure time, but improvement can be done by tweaking the scaling to minimize residuals in the image. Fringing depends on the night sky, and this is often not stable even across a night. Thick deep depletion devices have much less fringing than thin devices, and fringing gets worse as one moves to the red.
 because it is caused by the narrow night sky lines + the transparency of the CCD at >700nm. Best is to fit a low order surface to the superflat and assume this is the illumination correction. You will divide this through each image. What remains is the fringe frame. Fringe frame needs to be scaled and subtracted from each image. Scaling to first order is exposure time, but improvement can be done by tweaking the scaling to minimize residuals in the image. Fringing depends on the night sky, and this is often not stable even across a night. Thick deep depletion devices have much less fringing than thin devices, and fringing gets worse as one moves to the red..")
64
Fringing - Spectra Fringing is caused by the monochromatic light dispersed by the spectrograph to undergo interference within the CCD. Since everything is affected, works more as a multiplication effect. For spectra - - divide through by a smooth star, and ensure that you place the standard at the same place as your program objects. Challenging if spectrograph has lots of flexture. - if lots of flexture, take a internal flat after each program object and use this to flatfield each image – or ask for new spectrograph!

65
Shutter Correction - Imaging Shutter correction: Short exposures often have a different illumination than long exposures due to the shutter. median 20x1 second exposure of dome/sky (scale to same mean) Median 3x20s dome/sky (scale to same mean). Scale short and long image to same mean Shutter corr image = long/short Image correction to be multiplied through is –Shutterimage /(exptime), [assuming long image is perfect]
 Median 3x20s dome/sky (scale to same mean). Scale short and long image to same mean Shutter corr image = long/short Image correction to be multiplied through is –Shutterimage /(exptime), [assuming long image is perfect].")
66
Absolute Photometry Astronomers have developed a peculiar system of magnitudes as their reference system. Vega systems have !approximately! K x defined such that Vega has a magnitude of 0.03 in each band. AB magnitudes use F in units of ergs/cm 2 /s/Hz with Kx !approximately! Defined as -48.6. In reality, all systems are defined as the observed magnitudes of a set of standards. Landolt, Cousins, Gunn, etc, which themselves are attempted to be tied to a fundamental standard such as Vega, serious, or BD13….

67
Absolute Photometry at the Telescope Typically need a photometric night (unless you have standard stars on your CCD frame) Observe Standards over the relevant range of Airmasses, and range of Colours of your program stars. Find constants of the transformation of the form…

68
Absolute Photometry at the Telescope (2) For example, for V, the form of the transformation is, neglecting 2 nd order terms. Which we solve for constants K1-K3, by minimizing Where I have assumed that the observational uncertainty in each observation is the same

69
Common Errors Photometry (1) Most people observe at at too large a range of colour, or too large a range of Airmass, and then apply linear corrections on their program stars at neutral colour and low airmass. Bracket your program stars Airmasses and colours. If you must observe at 2 airmasses, use 2 nd order terms, and fit your equations for objects at high airmass only.

70
Common Errors Photometry (2) Landolt observed his stars in 14” radii. People often use smaller apertures of each star. Since, especially in redder bands, there are often fainter stars, mags are systematically off because of these non-included interlopers. Either use apertures matched to the standard star (thereby incurring skynoise), or cull all stars with interlopers as standards.
, or cull all stars with interlopers as standards..")
71
Aperture Photometry Aperture to maximise signal (r=0.75xFWHM theoretical best), but then subject to variations of PSF shape! Background fit in annulus around each star –Often this is largest source of error, especially if on complex galactic background Extend aperture to ∞ by determining mag difference between small and large apertures for bright stars (only for absolute photometry)
.")
72
PSF photometry Model shape of a star, and fit this to each object. For each star fit (X,Y, height of PSF, background). Collectively across several stars fit shape. –DAOPHOT (gaussian or other + sub-pixel residual) –DOPHOT (truncated power-series of a gaussian) For SN photometry applications, not so important to get PSF exactly right, so no disadvantage of purely analytic PSF. Extend PSF to ∞ aperture by determining mag difference between PSF mag and large apertures for bright stars (only for absolute photometry) Beware of variable PSFs
. Collectively across several stars fit shape. –DAOPHOT (gaussian or other + sub-pixel residual) –DOPHOT (truncated power-series of a gaussian) For SN photometry applications, not so important to get PSF exactly right, so no disadvantage of purely analytic PSF. Extend PSF to ∞ aperture by determining mag difference between PSF mag and large apertures for bright stars (only for absolute photometry) Beware of variable PSFs.")
73
Image subtraction For SN photometry, subtract off a template, and perform photometry (aperture or PSF) with a clean background. Match PSF with Drew Phillips Fourier-based convolution (implemented in IRAF) Alard-Lupton least squares (sum of 3 gaussians) Gal Yams – convolve each image with the other PSF. Getting subtractions to work perfectly in all situations is a bit of an art form.
 Alard-Lupton least squares (sum of 3 gaussians) Gal Yams – convolve each image with the other PSF. Getting subtractions to work perfectly in all situations is a bit of an art form..")
74
Intrapixel Sensitivity CCD pixels vary in sensitivity across the pixel by ~20%. If > 2 pixel fwhm stars, then pixel is fully illuminated, and average holds. If undersampled image (fwhm < 1.5 pixels), then brightness of stars depends on where they hit in pixel. Pixel to pixel, the nature of the sensitivity is very uniform. Do dithering with many exposures per field to mostly eliminate. To do better, model the shape of the pixel, and include it in the analysis. see Lauer, T 1999PASP..111.1434L
, then brightness of stars depends on where they hit in pixel. Pixel to pixel, the nature of the sensitivity is very uniform. Do dithering with many exposures per field to mostly eliminate. To do better, model the shape of the pixel, and include it in the analysis. see Lauer, T 1999PASP L.")
75
Imaging Gotcha’s Is your CCD linear? – test by observing stars in twilight Does your filter transform nicely to the standard system – one photometric night, takes lots of standards stars and really see how the equations work Does your Imager deliver uniform photometry across the focal plane –CTE problems (check CRs if really bad) –Scattered light mascquerading as Flatfield
 –Scattered light mascquerading as Flatfield.")
76
Ultimate Check for Photometry Determining the uniformity of your photometry as a function of position is hard. The best way to do it is to do a stellar flat – that is, check photometry of stars as a function of position. Take a series of exposures of a relatively dense field (e.g. R149 field is nice) – doesn’t need to be a standard field, doesn’t need to be photometric. Offset each exposure so as to place your favourite set of stars into 16 different parts of the chip. After fully flatfield, biased, fringed, etc., photometer all bright stars on each image. Find average magnitude offset for each image to bring it into consistency with the first image, and calculate average relative mag for each star. Make a table of X,Y,m-mave for each star on each image. Plot X/Y versus m-mave and look for residuals.
 – doesn’t need to be a standard field, doesn’t need to be photometric. Offset each exposure so as to place your favourite set of stars into 16 different parts of the chip. After fully flatfield, biased, fringed, etc., photometer all bright stars on each image. Find average magnitude offset for each image to bring it into consistency with the first image, and calculate average relative mag for each star. Make a table of X,Y,m-mave for each star on each image. Plot X/Y versus m-mave and look for residuals..")
Similar presentations


 telescopes fundamentally.>")

 AS3100 Lab. Astronomi Dasar I Prodi Astronomi 2007/2008 B. Dermawan.>")


. Based on Chapter 6 This material will be useful for understanding Chapters 7 and 10 on “Our planetary system” and “Jovian planet.>")


>")
 Getting our NIRF What do want to do? 1.Image a selected.>")


>")
 and CMOS (complementary metal oxide semiconductor) image sensors are two different.>")