Download presentation
Presentation is loading. Please wait.

1
Teaching Assistant: Roi Yehoshua roiyeho@gmail.com

2
Adding laser sensor to your URDF model Gazebo sensor and motor plugins Moving the robot with Gazebo Run gmapping with Gazebo (C)2014 Roi Yehoshua
2014 Roi Yehoshua")
3
In this section we are going to add a laser sensor to our r2d2 URDF model This sensor will be a new part on the robot First you need to select where to put it Then you need to add an appropriate sensor plugin that simulates the sensor itself (C)2014 Roi Yehoshua
2014 Roi Yehoshua")
4
We will first add a new link and joint to the URDF of the r2d2 robot For the visual model of the we'll use a mesh from the hokuyo laser model from the Gazebo models repository We will place the laser sensor at the center of the robot’s head Open r2d2.urdf and add the following lines before the closing tag (C)2014 Roi Yehoshua
2014 Roi Yehoshua")
6
(C)2014 Roi Yehoshua The new connects the inserted hokuyo laser onto the head of the robot. The joint is fixed to prevent the sensor from moving

7
Now copy the Hokuyo mesh file from the local Gazebo repository to r2d2_desciption package – If you don’t have hokuyo model in your local cache, then insert it once in Gazebo so it will be downloaded from Gazebo models repository (C)2014 Roi Yehoshua $ roscd r2d2_description $ mkdir meshes $ cp meshes $ cp ~/.gazebo/models/hokuyo/meshes/hokuyo.dae. $ roscd r2d2_description $ mkdir meshes $ cp meshes $ cp ~/.gazebo/models/hokuyo/meshes/hokuyo.dae.

8
Run r2d2.launch file to watch the hokuyo laser sensor in Gazebo (C)2014 Roi Yehoshua
2014 Roi Yehoshua")
9
In Gazebo you need to program the behaviors of the robot - joints, sensors, and so on. Gazebo plugins give your URDF models greater functionality and can tie in ROS messages and service calls for sensor output and motor input. For a list of available of plugins look at ROS Motor and Sensor PluginsROS Motor and Sensor Plugins (C)2014 Roi Yehoshua
2014 Roi Yehoshua.")
10
Plugins can be added to any of the main elements of a URDF -,, or. The tag must be wrapped within a element For example, adding a plugin to a link: (C)2014 Roi Yehoshua... plugin parameters...... plugin parameters...
2014 Roi Yehoshua... plugin parameters plugin parameters....")
11
(C)2014 Roi Yehoshua 0 0 0 0 0 0 true 40 720 1 -2.26889 2.2689 0.10 30.0 0.01 gaussian --> <!-- Noise parameters based on published spec for Hokuyo laser achieving "+-30mm" accuracy at range < 10m. A mean of 0.0m and stddev of 0.01m will put 99.7% of samples within 0.03m of the true reading. --> 0.0 0.01 0 0 0 0 0 0 true 40 720 1 -2.26889 2.2689 0.10 30.0 0.01 gaussian --> <!-- Noise parameters based on published spec for Hokuyo laser achieving "+-30mm" accuracy at range < 10m. A mean of 0.0m and stddev of 0.01m will put 99.7% of samples within 0.03m of the true reading. --> 0.0 0.01

12
The sensor parameter values should match the manufacturer's specs on your physical hardware Important params: – update_rate – number of times per second a new laser scan is performed within Gazebo – min_angle, max_angle – the scanner’s field of view – range – an upper and lower bound to the distance in which the cameras can see objects in the simulation (C)2014 Roi Yehoshua
2014 Roi Yehoshua")
13
In the real world, sensors exhibit noise, in that they do not observe the world perfectly. By default, Gazebo's sensors will observe the world perfectly To present a more realistic environment in which to try out perception code, we need to explicitly add noise to the data generated by Gazebo's sensors. For ray (laser) sensors, we add Gaussian noise to the range of each beam. You can set the mean and the standard deviation of the Gaussian distribution from which noise values will be sampled. (C)2014 Roi Yehoshua
 sensors, we add Gaussian noise to the range of each beam. You can set the mean and the standard deviation of the Gaussian distribution from which noise values will be sampled. (C)2014 Roi Yehoshua.")
14
/base_scan hokuyo_link /base_scan hokuyo_link Here you specify the file name of the plugin that will be linked to Gazebo as a shared object. The code of the plugin is located at gazebo_plugins/src/gazebo_ros_laser.cpp The topicName is the rostopic the laser scanner will be publishing to

15
(C)2014 Roi Yehoshua
2014 Roi Yehoshua")
16
The full range of the sensor: (C)2014 Roi Yehoshua
2014 Roi Yehoshua")
17
Make sure that the laser data is being published to /base_scan by using rostopic echo: (C)2014 Roi Yehoshua
2014 Roi Yehoshua")
18
To work with the robot model in ROS, we need to publish its joint states and TF tree For that purpose we need to start two nodes: – a joint_state_publisher node that reads the robot’s model from the URDF file (defined in the robot_description param) and publishes /joint_states messages – a robot_state_publisher node that listens to /joint_states messages from the joint_state_controller and then publishes the transforms to /tf. This allows you to see your simulated robot in Rviz as well as do other tasks. (C)2014 Roi Yehoshua
2014 Roi Yehoshua.")
19
Add the following lines to r2d2.launch: This allows you to see your simulated robot in Rviz as well as do other tasks. (C)2014 Roi Yehoshua
2014 Roi Yehoshua.")
20
First copy urdf.rviz from the urdf_tutorial package to r2d2_gazebo/launch directory – This rviz config file sets Fixed_Frame to base_link and adds a RobotModel display that shows the URDF model of the robot Then add the following line to r2d2.launch (C)2014 Roi Yehoshua $ roscd urdf_tutorial $ cp urdf.rviz ~/catkin_ws/src/r2d2_gazebo/launch $ roscd urdf_tutorial $ cp urdf.rviz ~/catkin_ws/src/r2d2_gazebo/launch
2014 Roi Yehoshua $ roscd urdf_tutorial $ cp urdf.rviz ~/catkin_ws/src/r2d2_gazebo/launch $ roscd urdf_tutorial $ cp urdf.rviz ~/catkin_ws/src/r2d2_gazebo/launch")
21
(C)2014 Roi Yehoshua
2014 Roi Yehoshua")
22
Now add a LaserScan display and under Topic set it to /base_scan (C)2014 Roi Yehoshua
2014 Roi Yehoshua")
23
Gazebo comes with a few built-in controllers to drive your robot already differential_drive_controller is a plugin that can control robots whose movement is based on two wheels placed on either side of the robot body. It can change the robot’s direction by varying the relative rate of rotation of its wheels and doesn’t require an additional steering motion. (C)2014 Roi Yehoshua
2014 Roi Yehoshua.")
24
The differential drive is meant for robots with only two wheels, but our robot has four wheels So, we have a problem with the movement, since it will not be correct For now, we will cause the controller to think the two wheels bigger than they are to make the movements less sharp. However, it is better to adjust the code of the differential drive to account for four wheels. (C)2014 Roi Yehoshua
2014 Roi Yehoshua.")
25
Add the following lines at the end of r2d2.urdf (C)2014 Roi Yehoshua true 100.0 left_front_wheel_joint right_front_wheel_joint 0.4 0.2 20 cmd_vel odom base_footprint true 100.0 left_front_wheel_joint right_front_wheel_joint 0.4 0.2 20 cmd_vel odom base_footprint
2014 Roi Yehoshua true left_front_wheel_joint right_front_wheel_joint cmd_vel odom base_footprint true left_front_wheel_joint right_front_wheel_joint cmd_vel odom base_footprint")
26
Important parameters: – wheelDiameter – should be equal to twice the radius of the wheel cylinder (in our case it is 0.035, but we will make the differential drive think they are bigger to make the robot more stable) – wheelSeparation – ths distance between the wheels. In our case it is equal to the diameter of base_link (0.4) – commandTopic is the rostopic where we need to publish commands in order to control the robot. (C)2014 Roi Yehoshua
 – commandTopic is the rostopic where we need to publish commands in order to control the robot. (C)2014 Roi Yehoshua.")
27
For the controller to publish the needed frames for the navigation stack, we need to add a base_footprint link to our URDF model The controller will make the transformation between base_link and base_foorprint and will also create another link called odom The odom link will be used later on with the navigation stack (C)2014 Roi Yehoshua
2014 Roi Yehoshua")
28
Add the following lines in r2d2.urdf after the definition of base_link: Gazebo/Blue Gazebo/Blue

29
Now we are going to move the robot using the teleop_twist_keyboard node. Run the following command: You should see console output that gives you the key-to-control mapping (C)2014 Roi Yehoshua $ rosrun teleop_twist_keyboard teleop_twist_keyboard.py
2014 Roi Yehoshua $ rosrun teleop_twist_keyboard teleop_twist_keyboard.py.")
30
(C)2014 Roi Yehoshua
2014 Roi Yehoshua")
31
In rviz, change the fixed frame to /odom and you will see the robot moving on rviz as well (C)2014 Roi Yehoshua
2014 Roi Yehoshua")
32
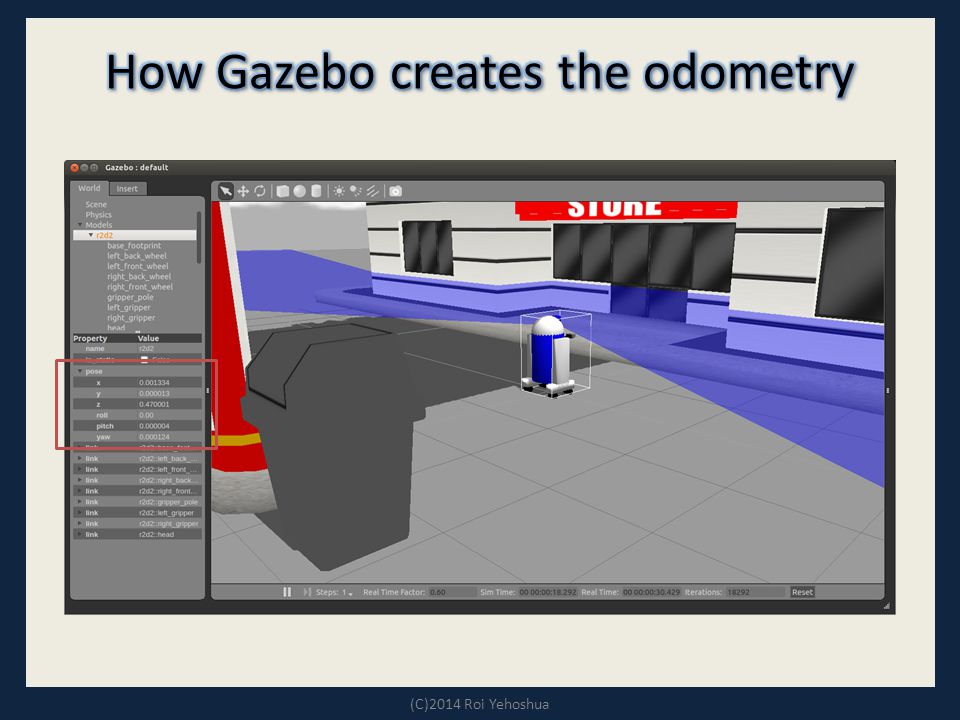
The differential drive publishes the odometry generated in the simulated world to the topic /odom Compare the published position of the robot to the pose property of the robot in Gazebo simulator (C)2014 Roi Yehoshua
2014 Roi Yehoshua")
34
To obtain some insight of how Gazebo does that, we are going to have a sneak peek inside the gazebo_ros_diff_drive.cpp file gazebo_ros_diff_drive.cpp (C)2014 Roi Yehoshua
2014 Roi Yehoshua")
35
The Load(...) function initializes some variables and performs the subscription to cmd_vel (C)2014 Roi Yehoshua // Load the controller void GazeboRosDiffDrive::Load(physics::ModelPtr _parent, sdf::ElementPtr _sdf) { this->parent = _parent; this->world = _parent->GetWorld(); // Initialize velocity stuff wheel_speed_[RIGHT] = 0; wheel_speed_[LEFT] = 0; x_ = 0; rot_ = 0; alive_ = true; … // ROS: Subscribe to the velocity command topic (usually "cmd_vel") ros::SubscribeOptions so = ros::SubscribeOptions::create (command_topic_, 1, boost::bind(&GazeboRosDiffDrive::cmdVelCallback, this, _1), ros::VoidPtr(), &queue_); } // Load the controller void GazeboRosDiffDrive::Load(physics::ModelPtr _parent, sdf::ElementPtr _sdf) { this->parent = _parent; this->world = _parent->GetWorld(); // Initialize velocity stuff wheel_speed_[RIGHT] = 0; wheel_speed_[LEFT] = 0; x_ = 0; rot_ = 0; alive_ = true; … // ROS: Subscribe to the velocity command topic (usually "cmd_vel") ros::SubscribeOptions so = ros::SubscribeOptions::create (command_topic_, 1, boost::bind(&GazeboRosDiffDrive::cmdVelCallback, this, _1), ros::VoidPtr(), &queue_); }
![The Load(...) function initializes some variables and performs the subscription to cmd_vel (C)2014 Roi Yehoshua // Load the controller void GazeboRosDiffDrive::Load(physics::ModelPtr _parent, sdf::ElementPtr _sdf) { this->parent = _parent; this->world = _parent->GetWorld(); // Initialize velocity stuff wheel_speed_[RIGHT] = 0; wheel_speed_[LEFT] = 0; x_ = 0; rot_ = 0; alive_ = true; … // ROS: Subscribe to the velocity command topic (usually cmd_vel ) ros::SubscribeOptions so = ros::SubscribeOptions::create (command_topic_, 1, boost::bind(&GazeboRosDiffDrive::cmdVelCallback, this, _1), ros::VoidPtr(), &queue_); } // Load the controller void GazeboRosDiffDrive::Load(physics::ModelPtr _parent, sdf::ElementPtr _sdf) { this->parent = _parent; this->world = _parent->GetWorld(); // Initialize velocity stuff wheel_speed_[RIGHT] = 0; wheel_speed_[LEFT] = 0; x_ = 0; rot_ = 0; alive_ = true; … // ROS: Subscribe to the velocity command topic (usually cmd_vel ) ros::SubscribeOptions so = ros::SubscribeOptions::create (command_topic_, 1, boost::bind(&GazeboRosDiffDrive::cmdVelCallback, this, _1), ros::VoidPtr(), &queue_); }](http://images.slideplayer.com/18/5668935/slides/slide_35.jpg "The Load(...) function initializes some variables and performs the subscription to cmd_vel (C)2014 Roi Yehoshua // Load the controller void GazeboRosDiffDrive::Load(physics::ModelPtr _parent, sdf::ElementPtr _sdf) { this->parent = _parent; this->world = _parent->GetWorld(); // Initialize velocity stuff wheel_speed_[RIGHT] = 0; wheel_speed_[LEFT] = 0; x_ = 0; rot_ = 0; alive_ = true; … // ROS: Subscribe to the velocity command topic (usually cmd_vel ) ros::SubscribeOptions so = ros::SubscribeOptions::create (command_topic_, 1, boost::bind(&GazeboRosDiffDrive::cmdVelCallback, this, _1), ros::VoidPtr(), &queue_); } // Load the controller void GazeboRosDiffDrive::Load(physics::ModelPtr _parent, sdf::ElementPtr _sdf) { this->parent = _parent; this->world = _parent->GetWorld(); // Initialize velocity stuff wheel_speed_[RIGHT] = 0; wheel_speed_[LEFT] = 0; x_ = 0; rot_ = 0; alive_ = true; … // ROS: Subscribe to the velocity command topic (usually cmd_vel ) ros::SubscribeOptions so = ros::SubscribeOptions::create (command_topic_, 1, boost::bind(&GazeboRosDiffDrive::cmdVelCallback, this, _1), ros::VoidPtr(), &queue_); }")
36
When a message arrives, the linear and angular velocities are stored in the internal variables to run some operations later: (C)2014 Roi Yehoshua void GazeboRosDiffDrive::cmdVelCallback(const geometry_msgs::Twist::ConstPtr& cmd_msg) { boost::mutex::scoped_lock scoped_lock(lock); x_ = cmd_msg->linear.x; rot_ = cmd_msg->angular.z; } void GazeboRosDiffDrive::cmdVelCallback(const geometry_msgs::Twist::ConstPtr& cmd_msg) { boost::mutex::scoped_lock scoped_lock(lock); x_ = cmd_msg->linear.x; rot_ = cmd_msg->angular.z; }
2014 Roi Yehoshua void GazeboRosDiffDrive::cmdVelCallback(const geometry_msgs::Twist::ConstPtr& cmd_msg) { boost::mutex::scoped_lock scoped_lock(lock); x_ = cmd_msg->linear.x; rot_ = cmd_msg->angular.z; } void GazeboRosDiffDrive::cmdVelCallback(const geometry_msgs::Twist::ConstPtr& cmd_msg) { boost::mutex::scoped_lock scoped_lock(lock); x_ = cmd_msg->linear.x; rot_ = cmd_msg->angular.z; }")
37
The plugin estimates the velocity for each motor using the formulas from the kinematic model of the robot in the following manner: (C)2014 Roi Yehoshua // Update the controller void GazeboRosDiffDrive::UpdateChild() { common::Time current_time = this->world->GetSimTime(); double seconds_since_last_update = (current_time - last_update_time_).Double(); if (seconds_since_last_update > update_period_) { publishOdometry(seconds_since_last_update); // Update robot in case new velocities have been requested getWheelVelocities(); joints[LEFT]->SetVelocity(0, wheel_speed_[LEFT] / wheel_diameter_); joints[RIGHT]->SetVelocity(0, wheel_speed_[RIGHT] / wheel_diameter_); last_update_time_+= common::Time(update_period_); } // Update the controller void GazeboRosDiffDrive::UpdateChild() { common::Time current_time = this->world->GetSimTime(); double seconds_since_last_update = (current_time - last_update_time_).Double(); if (seconds_since_last_update > update_period_) { publishOdometry(seconds_since_last_update); // Update robot in case new velocities have been requested getWheelVelocities(); joints[LEFT]->SetVelocity(0, wheel_speed_[LEFT] / wheel_diameter_); joints[RIGHT]->SetVelocity(0, wheel_speed_[RIGHT] / wheel_diameter_); last_update_time_+= common::Time(update_period_); }
![The plugin estimates the velocity for each motor using the formulas from the kinematic model of the robot in the following manner: (C)2014 Roi Yehoshua // Update the controller void GazeboRosDiffDrive::UpdateChild() { common::Time current_time = this->world->GetSimTime(); double seconds_since_last_update = (current_time - last_update_time_).Double(); if (seconds_since_last_update > update_period_) { publishOdometry(seconds_since_last_update); // Update robot in case new velocities have been requested getWheelVelocities(); joints[LEFT]->SetVelocity(0, wheel_speed_[LEFT] / wheel_diameter_); joints[RIGHT]->SetVelocity(0, wheel_speed_[RIGHT] / wheel_diameter_); last_update_time_+= common::Time(update_period_); } // Update the controller void GazeboRosDiffDrive::UpdateChild() { common::Time current_time = this->world->GetSimTime(); double seconds_since_last_update = (current_time - last_update_time_).Double(); if (seconds_since_last_update > update_period_) { publishOdometry(seconds_since_last_update); // Update robot in case new velocities have been requested getWheelVelocities(); joints[LEFT]->SetVelocity(0, wheel_speed_[LEFT] / wheel_diameter_); joints[RIGHT]->SetVelocity(0, wheel_speed_[RIGHT] / wheel_diameter_); last_update_time_+= common::Time(update_period_); }](http://images.slideplayer.com/18/5668935/slides/slide_37.jpg "The plugin estimates the velocity for each motor using the formulas from the kinematic model of the robot in the following manner: (C)2014 Roi Yehoshua // Update the controller void GazeboRosDiffDrive::UpdateChild() { common::Time current_time = this->world->GetSimTime(); double seconds_since_last_update = (current_time - last_update_time_).Double(); if (seconds_since_last_update > update_period_) { publishOdometry(seconds_since_last_update); // Update robot in case new velocities have been requested getWheelVelocities(); joints[LEFT]->SetVelocity(0, wheel_speed_[LEFT] / wheel_diameter_); joints[RIGHT]->SetVelocity(0, wheel_speed_[RIGHT] / wheel_diameter_); last_update_time_+= common::Time(update_period_); } // Update the controller void GazeboRosDiffDrive::UpdateChild() { common::Time current_time = this->world->GetSimTime(); double seconds_since_last_update = (current_time - last_update_time_).Double(); if (seconds_since_last_update > update_period_) { publishOdometry(seconds_since_last_update); // Update robot in case new velocities have been requested getWheelVelocities(); joints[LEFT]->SetVelocity(0, wheel_speed_[LEFT] / wheel_diameter_); joints[RIGHT]->SetVelocity(0, wheel_speed_[RIGHT] / wheel_diameter_); last_update_time_+= common::Time(update_period_); }")
38
And finally, it publishes the odometry data (C)2014 Roi Yehoshua void GazeboRosDiffDrive::publishOdometry(double step_time) { ros::Time current_time = ros::Time::now(); std::string odom_frame = tf::resolve(tf_prefix_, odometry_frame_); std::string base_footprint_frame = tf::resolve(tf_prefix_, robot_base_frame_); // getting data for base_footprint to odom transform math::Pose pose = this->parent->GetWorldPose(); tf::Quaternion qt(pose.rot.x, pose.rot.y, pose.rot.z, pose.rot.w); tf::Vector3 vt(pose.pos.x, pose.pos.y, pose.pos.z); tf::Transform base_footprint_to_odom(qt, vt); transform_broadcaster_->sendTransform(tf::StampedTransform(base_footprint_to_odom, current_time, odom_frame, base_footprint_frame)); // publish odom topic odom_.pose.pose.position.x = pose.pos.x; odom_.pose.pose.position.y = pose.pos.y;... odometry_publisher_.publish(odom_); } void GazeboRosDiffDrive::publishOdometry(double step_time) { ros::Time current_time = ros::Time::now(); std::string odom_frame = tf::resolve(tf_prefix_, odometry_frame_); std::string base_footprint_frame = tf::resolve(tf_prefix_, robot_base_frame_); // getting data for base_footprint to odom transform math::Pose pose = this->parent->GetWorldPose(); tf::Quaternion qt(pose.rot.x, pose.rot.y, pose.rot.z, pose.rot.w); tf::Vector3 vt(pose.pos.x, pose.pos.y, pose.pos.z); tf::Transform base_footprint_to_odom(qt, vt); transform_broadcaster_->sendTransform(tf::StampedTransform(base_footprint_to_odom, current_time, odom_frame, base_footprint_frame)); // publish odom topic odom_.pose.pose.position.x = pose.pos.x; odom_.pose.pose.position.y = pose.pos.y;... odometry_publisher_.publish(odom_); }
; } void GazeboRosDiffDrive::publishOdometry(double step_time) { ros::Time current_time = ros::Time::now(); std::string odom_frame = tf::resolve(tf_prefix_, odometry_frame_); std::string base_footprint_frame = tf::resolve(tf_prefix_, robot_base_frame_); // getting data for base_footprint to odom transform math::Pose pose = this->parent->GetWorldPose(); tf::Quaternion qt(pose.rot.x, pose.rot.y, pose.rot.z, pose.rot.w); tf::Vector3 vt(pose.pos.x, pose.pos.y, pose.pos.z); tf::Transform base_footprint_to_odom(qt, vt); transform_broadcaster_->sendTransform(tf::StampedTransform(base_footprint_to_odom, current_time, odom_frame, base_footprint_frame)); // publish odom topic odom_.pose.pose.position.x = pose.pos.x; odom_.pose.pose.position.y = pose.pos.y;... odometry_publisher_.publish(odom_); }.")
39
We will now integrate ROS navigation stack with our package First copy move_base_config folder from ~/ros/stacks/navigation_tutorials/navigation_stage to r2d2_gazebo package Add the following lines to r2d2.launch: (C)2014 Roi Yehoshua $ roscd r2d2_gazebo $ cp -R ~/ros/stacks/navigation_tutorials/navigation_stage/move_base_config. $ roscd r2d2_gazebo $ cp -R ~/ros/stacks/navigation_tutorials/navigation_stage/move_base_config.

40
(C)2014 Roi Yehoshua
2014 Roi Yehoshua")
41
Move the robot around with teleop to map the environment When you finish, save the map using the following command: You can view the map by running: (C)2014 Roi Yehoshua $ rosrun map_server map_saver $ eog map.pgm
2014 Roi Yehoshua $ rosrun map_server map_saver $ eog map.pgm")
42
(C)2014 Roi Yehoshua
2014 Roi Yehoshua")
43
Create a 3D model of a robot and move it around a simulated world in Gazebo using a random walk algorithm More details can be found at: http://u.cs.biu.ac.il/~yehoshr1/89-685/assignment3/assignment3.html http://u.cs.biu.ac.il/~yehoshr1/89-685/assignment3/assignment3.html (C)2014 Roi Yehoshua
2014 Roi Yehoshua")
Similar presentations