Download presentation
Presentation is loading. Please wait.

1
INTRODUCTION TO TINYOS 2.X AND NESC

2
Anatomy of TelosB Mote Limited computational and communication resources MSP430 16-bit microcontroller 10kB RAM 250 kbps, high data rate radio Sensors (temperature, humidity, light) Data collection and programming via USB interface 48kB of flash program memory IEEE 802.15.4 compliant A pair of AA batteries (4 days) http://www.willow.co.uk/TelosB_Datasheet.pdf
 Data collection and programming via USB interface 48kB of flash program memory IEEE compliant A pair of AA batteries (4 days)")
3
Typical WSN Application Periodic Data Collection Network Maintenance Triggered Events Detection/Notification Infrequently occurs Long Lifetime Months to Years without changing batteries Power management is the key to WSN success sleep wakeup processing data acquisition communication Power Time

4
TinyOS TinyOS is designed for the small, low-power microcontrollers motes have. MAIN AIM: saving power! 2 nd AIM: easy development of applications! TinyOS applications and systems, as well as the OS itself is written in nesC a dialect of C.

5
TinyOS Component-based architecture Event-driven operating system Developed for resource constrained wireless sensor networks Ultimately not limited by WSN’s. TinyOS, libraries, applications written in nesC NesC language A dialect of C Language with extensions for components Features a task scheduler Automatically puts the microcontroller to sleep when there is no code to execute Allows for concurrency Lets execution be split-phase

6
Software Challenges Power efficient Put microcontroller and radio to sleep Small memory footprint Non-preemptable FIFO task scheduling Efficient modularity Function call (event and command) interface between commands Application specific Concurrency-intensive operation Event-driven architecture No user/kernel boundary
 interface between commands Application specific Concurrency-intensive operation Event-driven architecture No user/kernel boundary")
7
TinyOS Component based architecture allows frequent changes while still keeping the size of code minimum. Event based execution model means no user/kernel boundary and hence supports high concurrency. It is power efficient as it makes the sensors sleep as soon as possible. Has small footprint as it uses a non-preemtable FIFO task scheduling.

8
What TinyOS provides Things to make writing applications easier: A component model which allows you to write small, reusable pieces of code and compose them into larger abstractions; application programming interfaces (APIs), services, component libraries and an overall component structure that simplify writing new applications and services.
, services, component libraries and an overall component structure that simplify writing new applications and services.")
9
COMPONENT BASED ARCHITECTURE

10
Component-Oriented Programming A nesC application consists of components Components can be reused Components can be replaced Components can be hardware or software

11
Component-Oriented Programming Object-Oriented Programming: Focuses on the relationships between classes that are combined into one large binary executable Component-Oriented Programming: Focuses on interchangeable code modules that work independently and don't require you to be familiar with their inner workings to use them.

12
nesC vs C and C++ Each non-abstract subclass of GraphicObject, such as Circle and Rectangle, must provide implementations for the methods of the abstract class GraphicObject. Components have only private variables. No inheritance.

13
Component-Oriented Programming File name and types in TinyOS: Module (suffixed with P.nc) Configuration (suffixed with AppC.nc) – At TOP level Configuration (suffixed with C.nc) – At Lower level Interface (suffixed with.nc) Collectively, a Configuration and a Module are combined to create a Component.
 Configuration (suffixed with AppC.nc) – At TOP level Configuration (suffixed with C.nc) – At Lower level Interface (suffixed with.nc) Collectively, a Configuration and a Module are combined to create a Component.")
14
Modules 1/3 Define functionality that make your application run. Provide interfaces to other modules. Use interfaces from other modules. Don’t care what’s behind the interface. Implement interface definitions Modules are like the IC’s on a circuit board that actually do something.

15
Modules 2/3 Each component is specified by an interface. A Component has: – Frame (internal states) e.g. variables, functions, etc. – Tasks (data processing) – Interface(s) (commands/events) Commands and Events are function calls
 e.g. variables, functions, etc. – Tasks (data processing) – Interface(s) (commands/events) Commands and Events are function calls.")
16
Modules 3/3 - Implementation Implementation of a module defines how the component works Application code All commands and events declared as provided in the interface MUST be implemented

17
Configurations Wire interfaces from several modules together. Wrap modules. Are implemented by connecting interfaces of existing components. Configurations are like a Printed Circuit Board, laying out wiring that connects modules together.

18
Interface: Commands/Events Define the interactions between modules Commands Implemented by the module providing the interface Called by the module using the interface Events Signaled by the module providing the interface Captured by the module using the interface Components either provide or use an interface Provide - All interface commands MUST be implemented for users to call Use - All interface events MUST be implemented for providers to signal

19
Interface Example The Provider (implementor) of this interface must implement the start and stop commands. The User of this interface, i.e., a components that invokes commands, must implement the event fired. Timer.nc * filename for a bidirectional interface interface Timer { command result_t start (char type uint32_t interval); command result_t stop(); event result_t fired(); }
; command result_t stop(); event result_t fired(); }.")
20
A HELLO-WORLD EXAMPLE

21
Component Diagram HelloC CONFIGURATION

22
HelloC Configuration configuration HelloC { } implementation { }

23
Component Diagram HelloC MODULE HelloP

24
HelloC Configuration configuration HelloC { } implementation { components HelloP; }

25
HelloP Module module HelloP { } implementation { }

26
Component Diagram HelloC FUNCTIONALITY HelloP void myFunctions() {…}
 {…}")
27
HelloP Module module HelloP { uses { interface Boot; interface Leds; } implementation { }

28
Boot Interface interface Boot { event void booted(); } Boot sequence provides one interface: Boot for signaling that the system has successfully booted TinyOS 2.x Boot Sequence http://www.tinyos.net/tinyos-2.x/doc/html/tep107.html
; } Boot sequence provides one interface: Boot for signaling that the system has successfully booted TinyOS 2.x Boot Sequence")
29
HelloP Module module HelloP { uses { interface Boot; interface Leds; } implementation { event void Boot.booted() { } USE an interface, CAPTURE all of its events! The HelloP module MUST implement the booted() event that is provided by the Boot Interface (see slide Interface: Commands/Events)
 event that is provided by the Boot Interface (see slide Interface: Commands/Events).")
30
Leds Interface interface Leds { command void led0On(); command void led0Off(); command void led0Toggle(); … command void set(uint8_t val); }
; command void led0Off(); command void led0Toggle(); … command void set(uint8_t val); }")
31
HelloP Module module HelloP { uses { interface Boot; interface Leds as MyLeds; interface Leds as MySecondLeds; } implementation { event void Boot.booted() { call Leds.led0On(); } Keyword “as” is used when multiple usages of an interface is required (similar to the “new” keyword of Java/c++)
 { call Leds.led0On(); } Keyword as is used when multiple usages of an interface is required (similar to the new keyword of Java/c++)")
32
Component Diagram HelloC INTERFACES HelloP Leds void myFunctions() {…} Boot
 {…} Boot")
33
Component Diagram HelloC HelloP Leds LedsC void myFunctions() {…} Boot MainC CONFIGURATIONS
 {…} Boot MainC CONFIGURATIONS")
34
HelloC Configuration configuration HelloC { } implementation { components HelloP, MainC, LedsC, SecondLedsC; // USES -> PROVIDES HelloP.Boot -> MainC.Boot; HelloP.MyLeds -> LedsC; HelloP.MySecondLeds -> SecondLedsC; }

35
Component Diagram HelloC HelloP Leds LedsC void myFunctions() {…} MainC Boot USES PROVIDES
 {…} MainC Boot USES PROVIDES")
36
RADIO COMMUNICATION

37
Split-Control 1/4 Because sensor nodes have a broad range of hardware capabilities, one of the goals of TinyOS is to have a flexible hardware/software boundary. In a split-phase operation the request that initiates an operation completes immediately. Actual completion of the operation is signaled by a separate callback.

38
Split-Control 2/4: Example 1 For example, to acquire a sensor reading with an analog-to-digital converter (ADC), software writes to a few configuration registers to start a sample. When the ADC sample completes, the hardware issues an interrupt, and the software reads the value out of a data register.

39
Split-Control 3/4: Example 2 Packet send method in Active Messages component. This is a long operation, involving converting the packets to bytes, then to bits and ultimately driving the RF circuits to send the bits, one by one. A call to a split-phase operation returns immediately

40
Split-Control 4/4 ComponentAComponentB call Interface.doSomething(); return SUCCESS; signal Interface.done();
; return SUCCESS; signal Interface.done();")
41
Radio Stacks Radio Hardware Transmit / Receive / Init CSMA / Acknowledgements ActiveMessage Message Queue Your Application Receive SplitControl AMSend

42
Main Radio Interfaces SplitControl Provided by ActiveMessageC AMSend Provided by AMSenderC Receive Provided by AMReceiverC

43
Setting up the Radio: Configuration configuration MyAppC { } implementation { components MyAppP, MainC, ActiveMessageC, new AMSenderC(0), // send an AM type 0 message new AMReceiverC(0); // receive an AM type 0 message MyAppP.Boot -> MainC; MyAppP.SplitControl -> ActiveMessageC; MyAppP.AMSend -> AMSenderC; MyAppP.Receiver -> AMReceiverC; }
, // send an AM type 0 message new AMReceiverC(0); // receive an AM type 0 message MyAppP.Boot -> MainC; MyAppP.SplitControl -> ActiveMessageC; MyAppP.AMSend -> AMSenderC; MyAppP.Receiver -> AMReceiverC; }")
44
Setting up the Radio: Module module MyAppP { uses { interface Boot; interface SplitControl; interface AMSend; interface Receive; } implementation { … }

45
Turn on the Radio event void Boot.booted() { call SplitControl.start(); } message_t sendbuf; event void SplitControl.startDone(error_t error) { call AMSend.send(AM_BROADCAST_ADDR,& sendbuf, sizeof(sendbuf)); } event void SplitControl.stopDone(error_t error) { } MyAppP.SplitControl -> ActiveMessageC; The SplitControl is connected to the ActiveMessageC (radio component of the mote) Destination addressPointer to send buffer Size of msg
 { call SplitControl.start(); } message_t sendbuf; event void SplitControl.startDone(error_t error) { call AMSend.send(AM_BROADCAST_ADDR,& sendbuf, sizeof(sendbuf)); } event void SplitControl.stopDone(error_t error) { } MyAppP.SplitControl -> ActiveMessageC; The SplitControl is connected to the ActiveMessageC (radio component of the mote) Destination addressPointer to send buffer Size of msg")
46
Send Messages event void AMSend.sendDone(message_t *msg, error_t error) { // Successful transmission }
 { // Successful transmission }")
47
Receive a Message event message_t *Receive.receive(message_t *msg, void *payload, uint8_t length) { call Leds.led0Toggle(); return msg; }
 { call Leds.led0Toggle(); return msg; }")
48
Payloads A message consists of: Header Payload Optional Footer

49
TinyOS message_t typedef nx_struct message_t { nx_uint8_t header[sizeof(message_header_t)]; nx_uint8_t data[TOSH_DATA_LENGTH]; nx_uint8_t footer[sizeof(message_footer_t)]; nx_uint8_t metadata[sizeof(message_metadata_t)]; } message_t;
![TinyOS message_t typedef nx_struct message_t { nx_uint8_t header[sizeof(message_header_t)]; nx_uint8_t data[TOSH_DATA_LENGTH]; nx_uint8_t footer[sizeof(message_footer_t)]; nx_uint8_t metadata[sizeof(message_metadata_t)]; } message_t;](http://images.slideplayer.com/15/4845368/slides/slide_49.jpg "TinyOS message_t typedef nx_struct message_t { nx_uint8_t header[sizeof(message_header_t)]; nx_uint8_t data[TOSH_DATA_LENGTH]; nx_uint8_t footer[sizeof(message_footer_t)]; nx_uint8_t metadata[sizeof(message_metadata_t)]; } message_t;")
50
Payloads : Use Network Types (MyPayload.h) #ifndef MYPAYLOAD_H #define MYPAYLOAD_H typedef nx_struct MyPayload { nx_uint8_t count; } MyPayload; enum { AM_MYPAYLOAD = 0x50, }; #endif
 #ifndef MYPAYLOAD_H #define MYPAYLOAD_H typedef nx_struct MyPayload { nx_uint8_t count; } MyPayload; enum { AM_MYPAYLOAD = 0x50, }; #endif")
51
Example: Filling out a Payload message_t sendbuf; void createMsg() { MyPayload *payload = (MyPayload *) call AMSend.getPayload(&sendbuf); payload->count = (myCount++); call AMSend.send(AM_BROADCAST_ADDR,& sendbuf, sizeof(sendbuf)); }
 { MyPayload *payload = (MyPayload *) call AMSend.getPayload(&sendbuf); payload->count = (myCount++); call AMSend.send(AM_BROADCAST_ADDR,& sendbuf, sizeof(sendbuf)); }")
52
Example: Receiving a Payload event void Receive.receive(message_t *msg, void *payload, uint8_t len) { MyPayload *payload = (MyPayload *) payload; call Leds.set(payload->count); return msg; }
 { MyPayload *payload = (MyPayload *) payload; call Leds.set(payload->count); return msg; }")
53
Tutorial Mote-mote radio communication Consider two nodes running the same application. Each node increments a counter and sends a message with the counter value over the radio. The receiver of the message displays the counter's three least significant bits on the three LEDs. http://docs.tinyos.net/index.php/Mote-mote_radio_communication

54
TINYOS 2.X INSTALLATION

55
Installing TinyOS 2.x 2 easy choices 1. On Ubuntu: http://docs.tinyos.net/index.php/Installing_TinyOS_2.1#Two- step_install_on_your_host_OS_with_Debian_packages 2. Running a XubunTOS Virtual Machine Image in VMware Player: a) On Ubuntu http://docs.tinyos.net/index.php/Running_a_XubunTOS_Virtual_Machine_Image_in_VMware_Player#Debian_Li nux_VMware_Player_Installation b) On Windows http://docs.tinyos.net/index.php/Running_a_XubunTOS_Virtual_Machine_Image_in_VMware_Player#Wi ndows_VMware_Player_Installation
 On Ubuntu nux_VMware_Player_Installation b) On Windows ndows_VMware_Player_Installation.")
56
PROGRAM A TELOSB MOTE

57
Blink Application It simply causes the LED0 to to turn on and off at 4Hz, LED1 to turn on and off at 2Hz, and LED2 to turn on and off at 1Hz. The effect is as if the three LEDs were displaying a binary count of zero to seven every two seconds. http://docs.tinyos.net/index.php/Getting_Started_with_TinyOS#Blink:_An_Example_Application

58
motelist

59
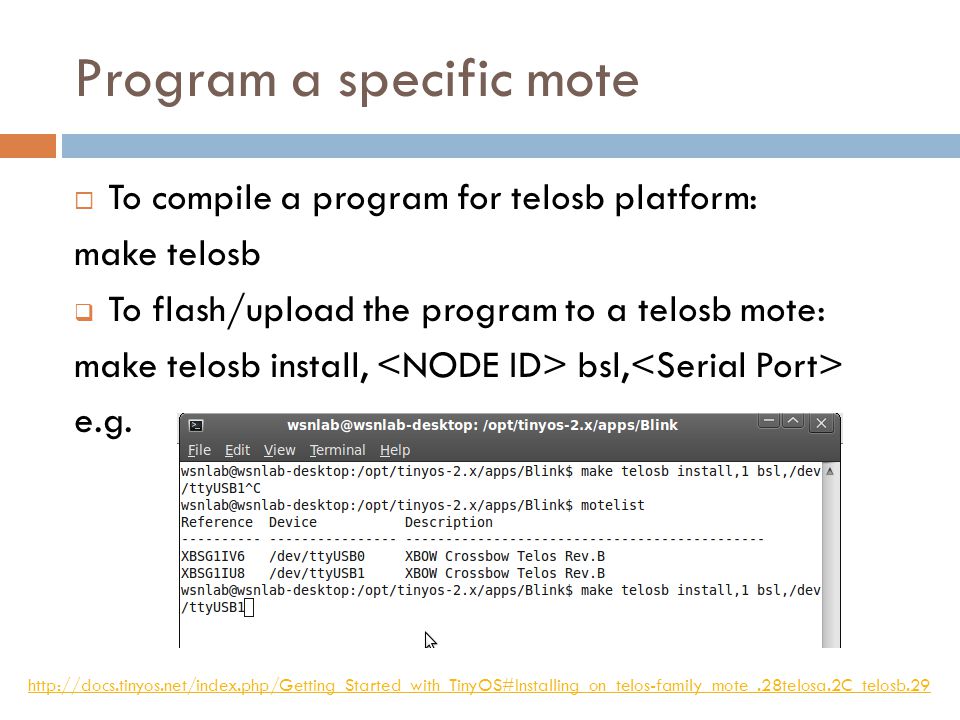
Program a specific mote To compile a program for telosb platform: make telosb To flash/upload the program to a telosb mote: make telosb install, bsl, e.g. http://docs.tinyos.net/index.php/Getting_Started_with_TinyOS#Installing_on_telos-family_mote_.28telosa.2C_telosb.29
60
Successful programming!

61
SenseWALL Protocol/algorithm implementation Experimental comparison, validation and evaluation Actuation etc …

62
Example Application 1/2 Consider a basic data-collection application. Nodes running this application periodically wake up, sample some sensors, and send the data through an ad hoc collection tree to a data sink.

63
Example Application 2/2 The four TinyOS APIs the application uses: low power settings for the radio, a timer, sensors, and a data collection routing layer.

64
References Για απορίες flip a coin (for load balancing, see LEACH): eustathi@ceid.upatras.gr (HEAD) eustathi@ceid.upatras.gr aggeloko@ceid.upatras.gr (TAIL) aggeloko@ceid.upatras.gr References TinyOS Wiki http://docs.tinyos.net/index.php/Main_Pagehttp://docs.tinyos.net/index.php/Main_Page TinyOS installation http://docs.tinyos.net/index.php/Installing_TinyOS_2.1.1http://docs.tinyos.net/index.php/Installing_TinyOS_2.1.1 TinyOS reference http://www.tinyos.net/tinyos-2.x/doc/pdf/tinyos-programming.pdfhttp://www.tinyos.net/tinyos-2.x/doc/pdf/tinyos-programming.pdf NesC reference http://nescc.sourceforge.net/papers/nesc-ref.pdfhttp://nescc.sourceforge.net/papers/nesc-ref.pdf TinyOS Tutorials http://docs.tinyos.net/index.php/TinyOS_Tutorialshttp://docs.tinyos.net/index.php/TinyOS_Tutorials Documentation and TEPs http://www.tinyos.net/tinyos-2.1.0/doc/http://www.tinyos.net/tinyos-2.1.0/doc/ TinyOS API http://www.tinyos.net/tinyos-2.1.0/doc/nesdoc/telosa/index.htmlhttp://www.tinyos.net/tinyos-2.1.0/doc/nesdoc/telosa/index.html
: (HEAD) (TAIL) References TinyOS Wiki TinyOS installation TinyOS reference NesC reference TinyOS Tutorials Documentation and TEPs TinyOS API")
Similar presentations


