Download presentation
Presentation is loading. Please wait.

1
MEM Excel Workshop Advanced Sorting Pivot Table Introduction 4.5.2012

2
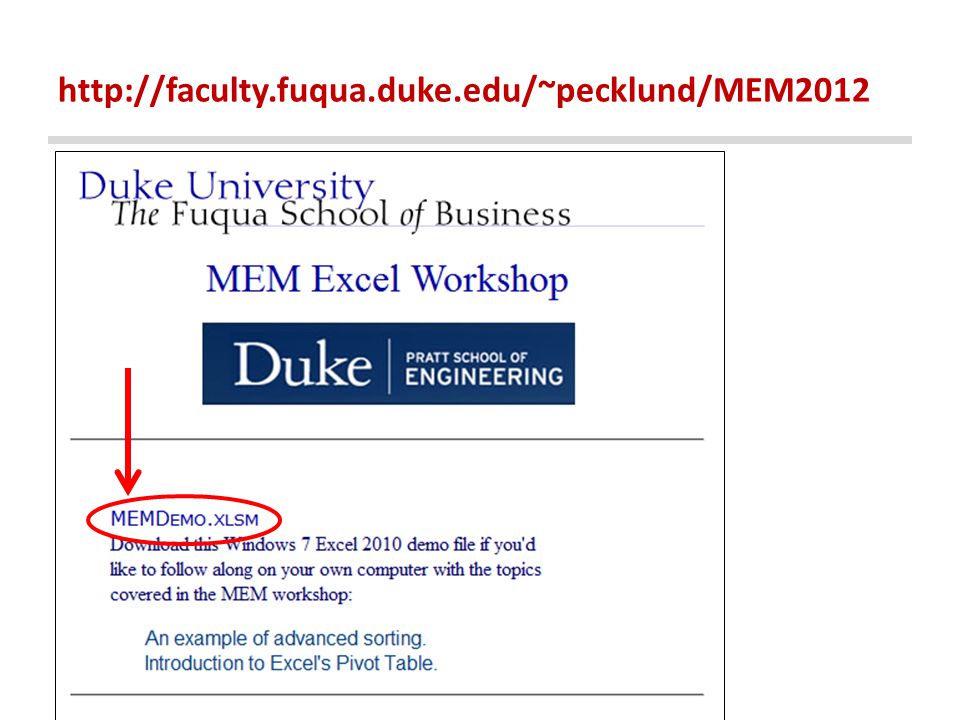
http://faculty.fuqua.duke.edu/~pecklund/MEM2012
4
Our workshop topics Excel 2010 running in a Windows environment. Advanced sorting techniques in Excel. An introduction to Pivot Table techniques. Material from INFORMATION MANAGEMENT, DEC483 A Duke MBA elective course.

6
What is structured data?

7
Unstructured data Human-friendly format. Excel-unfriendly format.

8
Structured data The same data as on the previous slide. Human-unfriendly format. Excel-friendly format.

9
A closer look Nothing is assumed!

10
4 characteristics of Excel structured data 1.The data is in a contiguous range; there are no entirely blank rows or columns. 2.First row contains column headers. 3.Each row is a record describing one item or transaction. (All cells in the row hold info about the same thing.) 4.Each column holds the same kind of data.
 4.Each column holds the same kind of data..")
11
Can you recognize Excel structured data? Five questions

12
1/5- Structured data?

13
2/5 - Structured data?

14
3/5 - Structured data?

15
4/5 - Structured data?

16
5/5 - Structured data?

17
Why structure is important Many Excel data management techniques require/look for structured data. SortSubtotal AutofilterPivot Table Advanced FilterDatabase Functions Group

18
Advanced Sorting Techniques in Excel 2010 Workshop topic 1 of 2

19
Excel has two sorting tools

20
There are lots of “sorting facts” Data can be sorted by row as well as by column. Custom sorts can be specified. Excel default sort order is: - smallest to largest numbers - special characters then alpha characters A-Z - FALSE before TRUE - Error values (all are equal) - Blanks With a descending sort, reverse all the above except blanks remain last.
 - Blanks With a descending sort, reverse all the above except blanks remain last..")
22
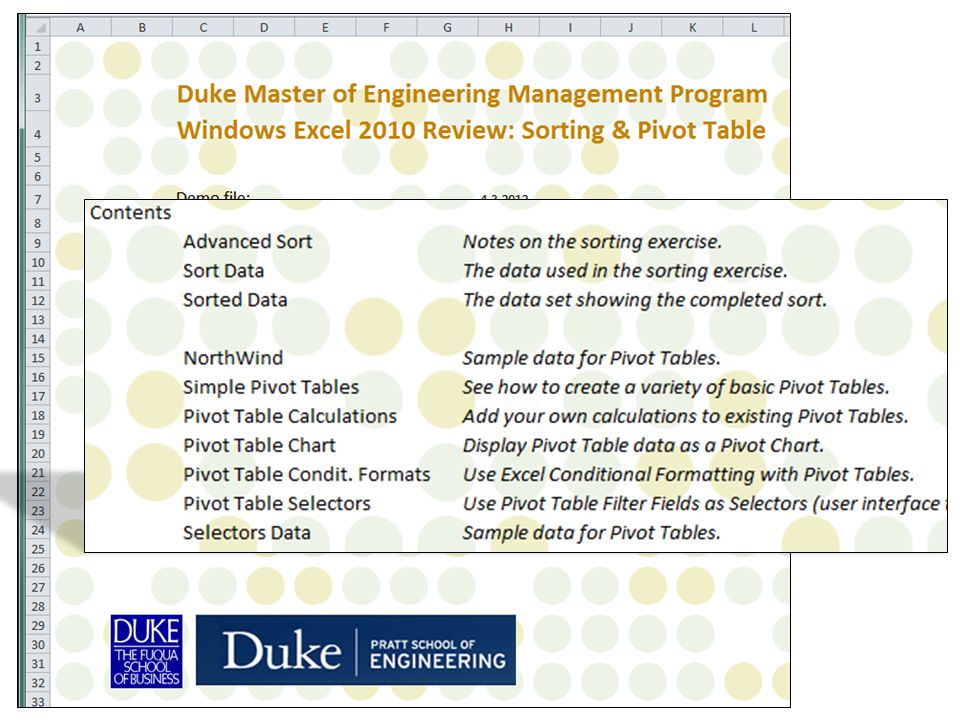
Our sample data to sort Worksheet: Sort Data About this data: - 967 records. - All from Arizona. - All fields but “Office Code” are straightforward. About this data: - 967 records. - All from Arizona. - All fields but “Office Code” are straightforward.

23
Task 1: Apply 4 sorts to the data 1.Region: Sort ascending. 2.Store Status: Sort in the order NEWVEN, then ESTAB, and then OLDESTAB. 3.Day: Sort by cell color (first purple, then blue, and then green). 4.Quantity: Sort by icon set (first yellow, then green, and then red). Most important Least important Sort the data using the Sort Dialog in this order:
. 4.Quantity: Sort by icon set (first yellow, then green, and then red). Most important Least important Sort the data using the Sort Dialog in this order:.")
24
Special: The Day & Quantity columns These two columns are conditionally formatted* to help the user distinguish the cell contents visually. Here: By cell color and by icon. * Home tab, Styles group, “Conditional Formatting” button

25
For this demo we use Excel’s Sort Dialog When using the Sort dialog, the first sort described is the dominant sort. As additional sorts are defined in the dialog, their location indicates their importance in the sort hierarchy. The most important sort is defined first and the least important sort is defined last.

26
The first sort: Region We immediately encounter a problem. Region (and Store Status) are “hidden” inside the Office Code field. The 3 elements of data in this column must be separated out before we can sort by region.
 are hidden inside the Office Code field. The 3 elements of data in this column must be separated out before we can sort by region..")
27
Data granulation Does each column hold data that is broken down into its smallest useful component? The Office Code field holds THREE components. no

28
The Office Code field and its 3 elements

29
Parse the REGION variables Use a combination of TEXT category functions from Excel’s function library? Sometimes the only solution. But not this time.

30
We can use an easier method because …the data to be parsed is all in a regular pattern. The regular pattern: There are 3 elements in each cell. Each element is separated from the next by a hyphen.

31
Digression: Range selection tips Select a column range of data: 1. Click the first cell in the column. 2. Depress the SHIFT key. 3. Click the END key. 4. Click the DOWN ARROW key. Select an entire range of data: 1. Click any cell in the range. 2. Depress the CONTROL and SHIFT keys. 3. Tap the asterisk (8 *) key. Use variations of this sequence to select rows, multiple rows, multiple columns, etc. There are other key combinations that accomplish the same thing.
 key. Use variations of this sequence to select rows, multiple rows, multiple columns, etc. There are other key combinations that accomplish the same thing..")
32
An easy way to parse the Office Code 1.Insert 2 empty columns to the right of Office Code. 2.Select all Office Code data values (not the header). 3.On the Data tab click the Text to Columns button.
. 3.On the Data tab click the Text to Columns button..")
33
Text to Columns Wizard

34
Set a hyphen as the delimiter

35
Text-to-Columns result Rename Office Code to Region. Add Population and Store Status headers. PopulationStore status

36
The Region sort specification Region is the first sort to specify in the “Sort” dialog. Specify it first: Excel will sort it last, after the other three sorts. Region

37
The 2 nd sort: Store Status Sort using this sort order: NEWVEN ESTAB OLDESTAB Store status How can a sort in this order be accomplished? The order we want is NOT A-Z or Z-A.

38
The 2 nd sort (Store Status) Solution Establish a custom sort order: NEWVEN ESTAB OLDESTAB Define an Excel custom list and then specify a sort by this custom list. Click the File tab and open the Excel options. Store status

39
Choose to “Edit Custom Lists…” Advanced Edit Custom Lists General

40
Enter the new list items

41
Add the 2 nd sort to the Sort dialog Select the custom list for this sort.

42
The third sort: By Day The Day column has conditional formatting applied. Conditional formatting is set in the “Styles” group on the HOME tab.

43
Day’s conditional formatting This is rule-based conditional formatting. Use the “Edit Rule…” button to make changes. Use “New Rule…” to add and “Delete Rule…” to delete.

44
Condit. format color assignments Last third of the month Middle third First third The Day falls in the: Use this color sort order: First color - Purple Second color - Blue Third color - Green

45
Add the 3 rd sort to the dialog It takes two levels to specify the third sort. BLUE is by default between On Top and On Bottom. Sort in the color order First: Purple Second: Blue Third: Green

46
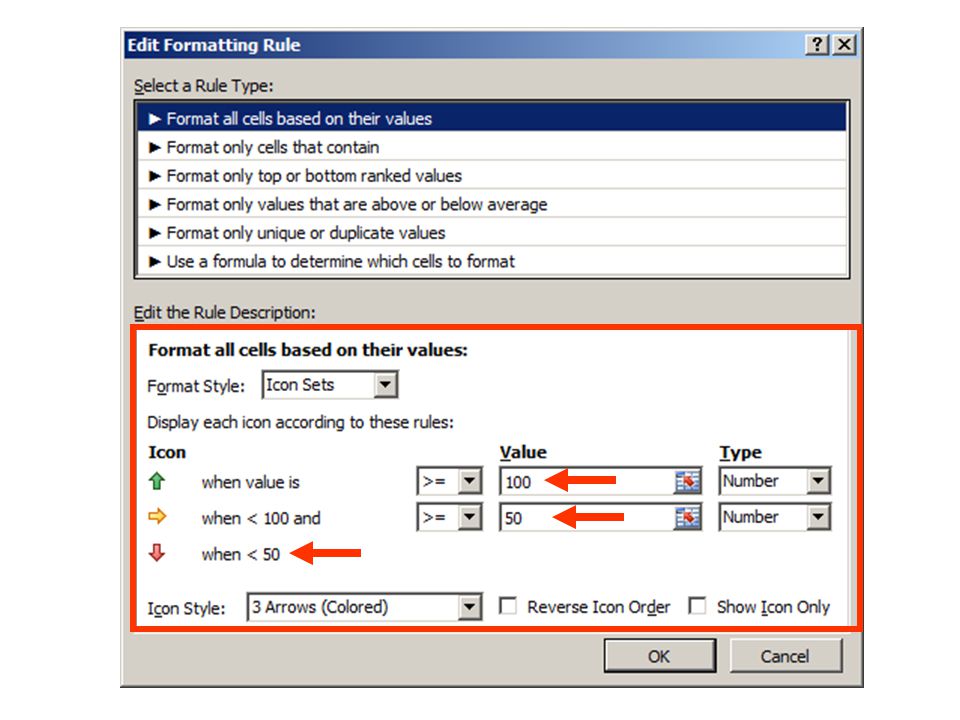
Add the 4 th and final sort: Quantity Quantity is conditionally formatted with an icon set.

48
2 levels are required for Quantity Icon set sort order First: Yellow Second: Green Third: Red

49
Finally: Execute the sort

50
Sort result A partial view of the sorted data.

51
Advanced sort take aways Make data fields as granular as you need them to be. (TEXT TO COLUMNS) Create your own custom sort orders. Sort by Values, Cell Color, Font Color, or Icon.
 Create your own custom sort orders. Sort by Values, Cell Color, Font Color, or Icon..")
52
Introduction to Excel’s Pivot Table Workshop topic 2 of 2

53
What is a Pivot Table?

54
Pivot Table Components (some are optional) At minimum: One row or column field and one value field. All other fields are optional.

55
Create a 2010 Pivot Table: Steps 1. On the “Insert” tab in the “Tables” group, click “PivotTable”. 2. Identify the source data. 3. Choose a location. continued

56
Create a Pivot Table, continued 4 Drag fields from the top of the Field List to the Field List layout area. Tip: If the Field List isn’t visible, click in the Pivot Table area, choose the “PivotTable Tools/Options” tab, find the “Show/Hide” group, and click “Field List”.

57
Our sample data

58
The worksheet in the demo file

59
We ask four questions about the NorthWind data and answer each question by building a Pivot Table. PIVOT TABLE DEMO

60
Question 1: Which item in the Condiments category has the worst sales?

61
Answer 1: Which item in the Condiments category has the worst sales? 1.Filter for the Condiments category only. 2.Sort Quantity values ascending.

62
To change the default Pivot Table Layout 1.Click in the Pivot Table. 2.Choose the “PivotTable Tools/Design” tab. 3.Find the “Layout” group and choose “Report Layout”. 4.Change from COMPACT to OUTLINE or TABULAR.

63
Question 2: Find the total quantity of Confections sold in 2008 and 2009?

64
Question 2 - Display the Confections category only by filtering “Row Labels” label. - Group dates by Year.

65
Part 2: Filter for 2 years only

66
Answer 2 The total quantity of Confections sold in 08 and 09

67
Question 3: In 2009 Quarter 1, which Seafood item sold the most units? - Change the default COMPACT layout to OUTLINE. - Group the Order Date field by both Years and Quarters. - Show the Seafood category only. - Limit Years to the last year (2009). - Limit the Quarter (Order Date) to 1. - Change the default COMPACT layout to OUTLINE. - Group the Order Date field by both Years and Quarters. - Show the Seafood category only. - Limit Years to the last year (2009). - Limit the Quarter (Order Date) to 1.
. - Limit the Quarter (Order Date) to 1. - Change the default COMPACT layout to OUTLINE. - Group the Order Date field by both Years and Quarters. - Show the Seafood category only. - Limit Years to the last year (2009). - Limit the Quarter (Order Date) to 1..")
68
In 2009 Quarter 1, Konbu was the seafood item that sold the highest quantity. Answer 3

69
Points to notice so far To change the location of items in a Pivot Table (pivot), drag header names in the Field List. Focus IN or OUT using the drop-down icons to the right of field label names. If a date field contains many specific dates, group them to make analysis easier.

70
Q&A 4: Find the max AND average quantities of Produce products sold by Peacock in 2009 Values displayed in rows.

71
Initial Pivot Table take aways Pivot Table creation. Basic filtering. Setting the Values field summary operation. Sorting. Managing Grand Totals for Rows & Columns & Subtotals. Date grouping. Stacking multiple summary calculations. Values field formatting.

72
We add a custom calculation to a Pivot Table. PIVOT TABLE DEMO

73
The worksheet in the demo file

74
Why create a custom calculation?

75
Create a custom calculated field Add a % Growth from Previous” Field

76
How to

77
Format the new field Format the % Growth from Previous field to display as percentages.

78
Custom calculation take aways The Pivot Table has built-in calculation options. If none of the built-in options suit you, build your own custom calculations.

79
View Pivot Table data graphically (as a chart). PIVOT TABLE DEMO
. PIVOT TABLE DEMO")
80
The worksheet in the demo file

81
Pivot Table/Chart take aways Create a Pivot Chart by clicking anywhere in a Pivot Table and inserting a chart. Changing the Pivot Table changes the chart and vice-versa.

82
End of MEM Excel Demo Notes

Similar presentations


 456-7890 University Name.>")


