Download presentation
Presentation is loading. Please wait.

1
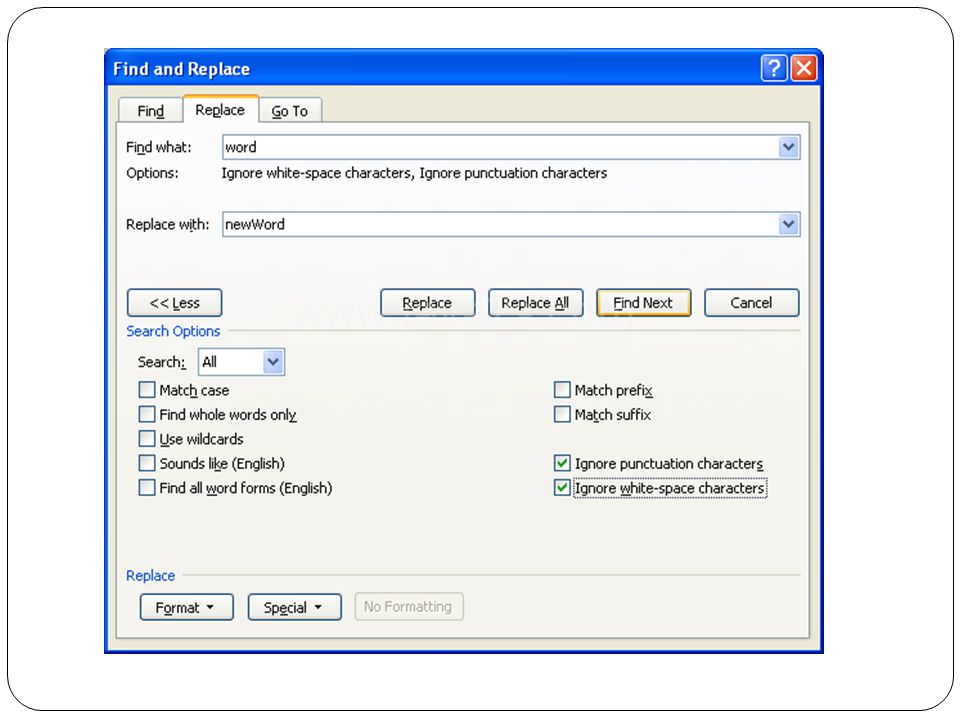
Find and Replace Text Find Text Find Text Click the Home ribbon’s Find button to display the Find and Replace dialog box. You can also press Ctrl + F to display the Find and Replace dialog box. Enter Search Text Enter Search Text Type the text you want to find in the search for text box. Start the search Start the search Click the Find Next button. Word searches from the current text cursor’s position in the document to the end of the file. Click the Find Next button. Word searches from the current text cursor’s position in the document to the end of the file. If word find the text it highlights it. If word find the text it highlights it. You may be able to see the highlighted text, but if not, you can move or close the find and replace dialog box to see the highlighted text. You may be able to see the highlighted text, but if not, you can move or close the find and replace dialog box to see the highlighted text. If you have clicked the Find All button instead of Find, Word would have highlighted all occurrences of any matching text in the document. If you have clicked the Find All button instead of Find, Word would have highlighted all occurrences of any matching text in the document. Type Replacement Text Type Replacement Text Instead of locating text, if you want word to replace the found text with something else, click the home ribbon’s replace button instead of the find button to display the Find and replace dialog box. Where you can put replacement text. Instead of locating text, if you want word to replace the found text with something else, click the home ribbon’s replace button instead of the find button to display the Find and replace dialog box. Where you can put replacement text.

3
Find and Replace Text Replace the Text Replace the Text Click the replace button to replace the next occurrence of the found text with your replacement text. Click the replace button to replace the next occurrence of the found text with your replacement text. Replace all occurrences: Replace all occurrences: Instead of replace, if you click the replace all button, word replaces all the matches with your replacement text throughout the document. Instead of replace, if you click the replace all button, word replaces all the matches with your replacement text throughout the document. Find previous Matches Find previous Matches Click more and select up before doing a find or replace operation if you want o find or replace from the current text cursor’s position back to the start of the document. Also many other options are available as showing picture such as search match case etc. Click more and select up before doing a find or replace operation if you want o find or replace from the current text cursor’s position back to the start of the document. Also many other options are available as showing picture such as search match case etc. Use wildcards option if you want to perform a wildcard search also you can find formatted text. Use wildcards option if you want to perform a wildcard search also you can find formatted text. Find: Ctrl + F Replace: Ctrl + H Go to : F5

4
Any single character ?s?t finds sat and set. Any string of characters *s*d finds sad and started. The beginning of a word <<(inter) finds interesting and intercept, but not splintered. The end of a word >(in)> finds in and within, but not interesting. Go to command use for navigation in document to locate pages, sections, footnote, bookmark etc.
 finds interesting and intercept, but not splintered. The end of a word >(in)> finds in and within, but not interesting. Go to command use for navigation in document to locate pages, sections, footnote, bookmark etc..")
5
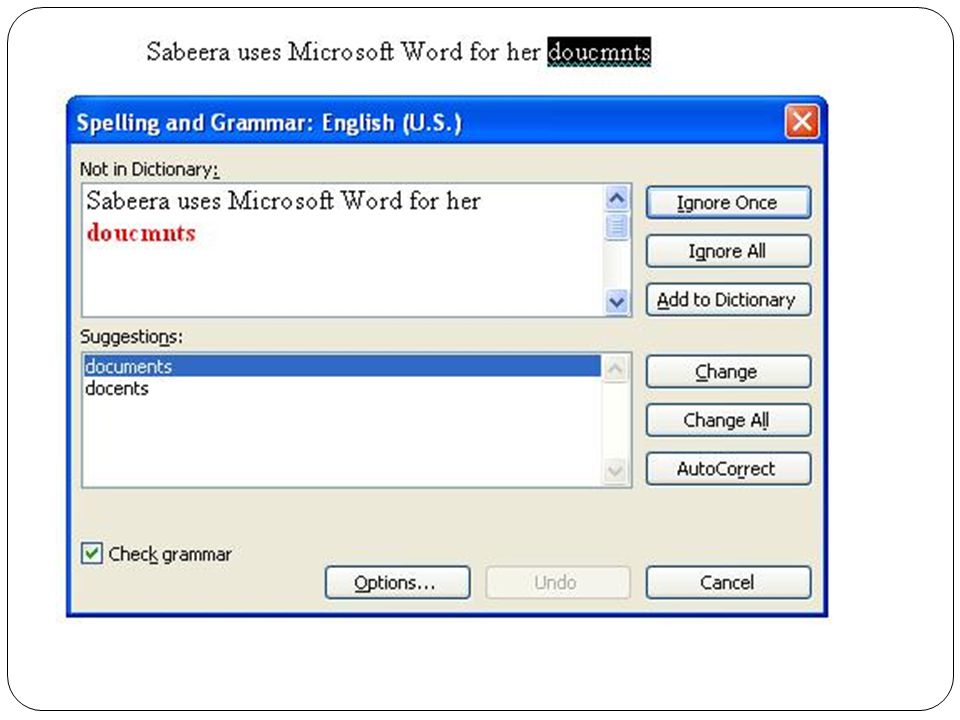
Check a document’s spelling and grammar By default, Microsoft Word checks spelling and grammar automatically as you type, using wavy red underlines to indicate possible spelling problems and wavy green underlines to indicate possible grammatical problems. 1. You can also check spelling and grammar all at once. 2. Check spelling and grammar automatically as you type Make sure automatic spelling and grammar checking are turned on. How? On the office button, click Options, and choose Proofing then click the Spelling & Grammar tab. Select the Check spelling and grammar check boxes. Type in the document. Right-click a word with a wavy red or green underline, and then select the command or the spelling alternative you want.

6
Check a document’s spelling and grammar You can use AutoCorrect to automatically correct spelling as you type, without having to confirm each correction. For example, if you type definately and then type a space or other punctuation, AutoCorrect automatically replaces it with "definitely." If Word finds a lowercase word, for example "london," that is listed in the main dictionary only with a different capitalization ("London"), the capitalization may be flagged or corrected automatically as you type. You can specify that Word not flag this capitalization by adding the lowercase form to a custom dictionary. Check spelling and grammar all at once This method is useful if you want to postpone proofing a document until after you finish editing it. You can check for possible spelling and grammatical problems, and then confirm each correction. Click the review ribbon tab to display the proofing options. Click spelling & grammar to check your document’s spelling and grammar. F7 is the short cut key for this. From dialog box many options are available such as ignore, add to dictionary, ignore all, change, change all etc. you can use it for spell and grammar check at once.
, the capitalization may be flagged or corrected automatically as you type. You can specify that Word not flag this capitalization by adding the lowercase form to a custom dictionary. Check spelling and grammar all at once This method is useful if you want to postpone proofing a document until after you finish editing it. You can check for possible spelling and grammatical problems, and then confirm each correction. Click the review ribbon tab to display the proofing options. Click spelling & grammar to check your document’s spelling and grammar. F7 is the short cut key for this. From dialog box many options are available such as ignore, add to dictionary, ignore all, change, change all etc. you can use it for spell and grammar check at once..")
8
There are 3 printing options available to you in Word 2007: Print Click the Microsoft Office Button, and then click Print. Keyboard shortcut To display the Print dialog box, press CTRL+P. Click the options that you want, such as the number of pages or which pages you want to print. Quick Print, To print without using the Print dialog box, click the Microsoft Office Button, point to the arrow next to Print, and then click Quick Print. Print Preview Print Preview will display how the document would look if you were to print it on paper, allowing you to check its presentation and layout. To do this Word zooms out just enough to get the whole page in its workspace. Print a document

9
click on Print or press Ctrl+P to see the print dialog box. You can specify different page ranges for example all mean all pages, 1,3 mean print first and third page, 5-12 mean print pages 5,6,7,8,9,10,11,12 also you can use 1,3,5-12. P1s3-p8s3(it print from page 1 section 3 up to page 8 section 3). Current page mean it print the current page where curer is. Page per sheet mean how many pages to be printed on single sheet (for example on A4, letter, legal etc.). Also there are option select printer, find printer, and a options button, number of copies selector etc. also there is properties button where you can set diff properties for example paper is a4 or letter size, portrait, landscape opt.
. Current page mean it print the current page where curer is. Page per sheet mean how many pages to be printed on single sheet (for example on A4, letter, legal etc.). Also there are option select printer, find printer, and a options button, number of copies selector etc. also there is properties button where you can set diff properties for example paper is a4 or letter size, portrait, landscape opt..")
10
Add a Bulleted List If you have lists of data, you may want to bullet them. Type a first Item Anytime you want to begin a new bulleted list, simply type an asterisk (*) followed by a space and then the first line of your list. Do this on a new line. So, to start your list, type an asterisk, a space, and then the text for the first item in your list. Word recognizes that you’re starting a bulleted list and converts the asterisk to a bullet symbol. Continue the List You won’t have to continue typing the asterisk after word recognizes that you're typing a list. Word converts your asterisk to the bullet item on the first line and puts a bullet at the start of your next line so that you can continue typing. You only need to worry about your list items, word takes care of the bullets and the indention. Indent the List When you want to create a sublists of bulleted items, press Tab or indent button/command from after the bullet appears. Word indents the item to create the indented list and uses a different bullet symbol for the indented sublist. Convert text into bulleted list Just typed items, just select them and convert to bulleted list by clicking the ribbon’s bullet button. End the List Press two time enter to end the list and start typing regular text.
 followed by a space and then the first line of your list. Do this on a new line. So, to start your list, type an asterisk, a space, and then the text for the first item in your list. Word recognizes that you’re starting a bulleted list and converts the asterisk to a bullet symbol. Continue the List You won’t have to continue typing the asterisk after word recognizes that you re typing a list. Word converts your asterisk to the bullet item on the first line and puts a bullet at the start of your next line so that you can continue typing. You only need to worry about your list items, word takes care of the bullets and the indention. Indent the List When you want to create a sublists of bulleted items, press Tab or indent button/command from after the bullet appears. Word indents the item to create the indented list and uses a different bullet symbol for the indented sublist. Convert text into bulleted list Just typed items, just select them and convert to bulleted list by clicking the ribbon’s bullet button. End the List Press two time enter to end the list and start typing regular text..")
11
Add a Numbered List If you have lists of data, you may want to number them. Type a first Item When you want to begin a numbered list, simply type a number followed by a period or closing parenthesis, such as 1. or 1), followed by a space and then the first line of your list. Do this on a new line. Word recognized that you’ve begun a numbered lsit and continues the numbering as you type. Continue the List You won’t have to continue typing the asterisk after word recognizes that you're typing a list. Word converts your asterisk to the number item on the first line and puts a number at the start of your next line so that you can continue typing. You only need to worry about your list items, word takes care of the bullets and the indention. Indent the List When you want to create a sublists of number items, press Tab or indent button/command from after the number appears. Word indents the item to create the indented list and uses a different number for the indented sublist. Convert text into bulleted list Just typed items, just select them and convert to Numbered list by clicking the ribbon’s number button. End the List Press two time enter to end the list and start typing regular text.
, followed by a space and then the first line of your list. Do this on a new line. Word recognized that you’ve begun a numbered lsit and continues the numbering as you type. Continue the List You won’t have to continue typing the asterisk after word recognizes that you re typing a list. Word converts your asterisk to the number item on the first line and puts a number at the start of your next line so that you can continue typing. You only need to worry about your list items, word takes care of the bullets and the indention. Indent the List When you want to create a sublists of number items, press Tab or indent button/command from after the number appears. Word indents the item to create the indented list and uses a different number for the indented sublist. Convert text into bulleted list Just typed items, just select them and convert to Numbered list by clicking the ribbon’s number button. End the List Press two time enter to end the list and start typing regular text..")
12
Multilevel lists A multilevel list shows the list items at different levels rather than at one level. You can pick a multilevel list style from the gallery, or you can create a new multilevel list style. Number’s list Bullets lists Multilevel list

13
Indent Command/button

14
Use a Theme Themes: Themes: Preset formatting choices that include fonts, colors, margins, and possibly extra elements such as borders. Theme apply to your entire document. Preset formatting choices that include fonts, colors, margins, and possibly extra elements such as borders. Theme apply to your entire document. Select page layout tab on the ribbon from theme group select built in theme, colors (also create new color combination for theme and save it), font style (also create new font style and save it), effects etc. Or save overall changes as a new theme.
, font style (also create new font style and save it), effects etc. Or save overall changes as a new theme..")
15
Use a Template Template: Template: A predefined document with styles and other formatting, such as columns and tables, that forms a model for new documents. A predefined document with styles and other formatting, such as columns and tables, that forms a model for new documents. Click on office button then click on new select template (for example from installed template) or create a new one and save it. Click on office button then click on new select template (for example from installed template) or create a new one and save it.
 or create a new one and save it. Click on office button then click on new select template (for example from installed template) or create a new one and save it..")
16
Use a Style Style: Style: A set of character and paragraph formats you can apply to text to change that text’s format details. A set of character and paragraph formats you can apply to text to change that text’s format details. 1. select the text for the style When you want to apply a predefined style to text, first select the text. 2. Display the available styles Go to Home tab, there is style group/box which contain predefined styles. 3. Select a style Go to Home tab then style group/box pick a style from predefined styles. 4. Apply styles word name each style that it supplies. From drop down arrow click on apply styles and select a style by name. such as for text or table. 5. Create your own style I. select text and save selection to style gallery II. Create new style go to home tab -> style group-> click on drop down arrow click on apply styles (a dialog box open) then click on style button (another dialog box open) then click on new style button. And define styles.
 then click on style button (another dialog box open) then click on new style button. And define styles..")
17
Create a cover page A cover page includes sample text that acts as placeholder text for your name and other relevant data. After inserting a cover page, you will need to change the placeholder text to reflect your own data. Request a cover page: Click insert ribbon’s cover page button. Word display a gallery that presents you with a scrolling list of cover page designs you can select from. Select cover page Select a cover page from the gallery that you want word to insert. Word insert that cover page at the beginning of your document Fill in your details. Fill in the cover page details with your own specifics. Create your own cover page Create your own page and select it and from cover page drop down select save selection to cover page gallery.

18
Insert graphics in your document Request a picture: To insert a graphics image from a file, first place your text cursor close to where you want the image to go. Then display the Insert gibbon and click picture. Locate a picture file on your computer. And click insert button. Adjust the size: Your picture is selected so that you can make adjustments. Whenever a pictue is selected, eight sizing handles appear around the picture that you can drag to increase or decrease the picture’s size. In addition, the Picture Tools ribbon appears, offering one-click access to many common graphics-related tasks. Place the Picture: If you want to embed the image inside text somewhere on the page, click the Position button to display the text wrapping positions where your picture can go. As you point to each option, word’s live preview mode shows you where the image will appear if you decide to click to choose that location.

19
Insert graphics in your document Insert a clip art gallery item+ request a specific image by search & change style: You can insert one of office’s gallery images instead of importing your own graphics image. Just click on clip art. A clip art task pane is open on left type in search box for example “symbol” and press go. From list of images choose your one. Or on clip art task pane from bottom select organize clip art and browse the desired images. A format tab is appear in the ribbon. Customize (change style) your image as you need. Add a picture Caption : click reference ribbon button and click insert caption button. And type caption. click exclude label from caption if you don’t want word to place a label such as figure 1.
 your image as you need. Add a picture Caption : click reference ribbon button and click insert caption button. And type caption. click exclude label from caption if you don’t want word to place a label such as figure 1..")
20
About the Rulers Word has two rulers: the horizontal ruler and the vertical ruler. Both of these rulers are onscreen guides that display measurement values so that you’ll know where on the page your text will appears. Horizontal ruler: A guide you can display across the top of your document that shows the horizontal position of text and graphics on the page. Vertical ruler: A guide you can display down the left side of your document that shows the vertical position of text and graphics on the page. In addition to showing margins and the page width, the horizontal ruler can display these items: Tab Stop (in tab selector box) Paragraph Indent Column (mean when you insert multicolumn rulers also display guides to columns.) Indent: The space between the left and right page margins and the current paragraph. Types of Paragraph Indent Left – margin Indent – an indentation of the left edge of all lines in a paragraph. Increasing the left-margin Indent moves the left edge of the paragraph closer to the document’s center. Right – margin Indent: an indentation of the right edge of all lines in a paragraph. In creasing the right – margin Indent moves the right edge of the paragraph closer to the document’s center. First– line Indent – A first line indent in a paragraph mean, only first line move towards center and remaining lines remains in their actual position. Hanging Indent – A hanging Indent in a paragraph mean, first line of paragraph remains in actual position but remain lines moves toward center.
 Paragraph Indent Column (mean when you insert multicolumn rulers also display guides to columns.) Indent: The space between the left and right page margins and the current paragraph. Types of Paragraph Indent Left – margin Indent – an indentation of the left edge of all lines in a paragraph. Increasing the left-margin Indent moves the left edge of the paragraph closer to the document’s center. Right – margin Indent: an indentation of the right edge of all lines in a paragraph. In creasing the right – margin Indent moves the right edge of the paragraph closer to the document’s center. First– line Indent – A first line indent in a paragraph mean, only first line move towards center and remaining lines remains in their actual position. Hanging Indent – A hanging Indent in a paragraph mean, first line of paragraph remains in actual position but remain lines moves toward center..")
21
About the Rulers If you format different paragraphs in your document differently from one another, the ruler will change to reflect those differences. In other words, if the first paragraph has a first-line indent, when you click any where within that paragraph, the ruler changes to the first line indent. In above example only first line indent is applied. Also it has two left stop.

22
About Paragraph Breaks(Show hide special Editing Character) Word’s nonprinting characters enable you to see the hidden element that word uses to determine where certain formatting should begin and end. You can enable this option by clicking on nonprinting characters button on home tab in ribbon. Or by short cut key. Examples of non-printing characters are Column breaks, Hidden text, Newline (break) characters, Page breaks,Paragraph marks, Section breaks, Spaces, Tabs etc. CTRL + SHIFT + *
 characters, Page breaks,Paragraph marks, Section breaks, Spaces, Tabs etc. CTRL + SHIFT + *.")
23
special Editing Character) Nonprinting Break Characters: it insert a line break in a paragraph but remaining lines still part of the paragraph. (Shift+Enter) Non printing paragraph mark: It shows the end of paragraph if you press Enter a new paragraph started.
 Non printing paragraph mark: It shows the end of paragraph if you press Enter a new paragraph started..")
24
About Paragraph Tabs Tab Stop: Controls the horizontal placement of text on a line. There are five types of word tab stops that are tab selector box.

25
In above example text: name is on left tab stop, text address in on right tab stop, on 32.90 decimal tab stop is applied. On text: company center tab stop is applied. Also there is a bar tab stop. If you double click on any tab stop a dialog box open you can also specify tab stop from here.

26
More commands on tab selector The final two options on the tab selector are actually for indents. You can click these and then click the ruler to position the indents, rather than sliding the indent markers along the ruler. Click First Line Indent, and then click the upper half of the horizontal ruler where you want the first line of a paragraph to begin. Click Hanging Indent, and then click the lower half of the horizontal ruler where you want the second and all following lines of a paragraph to begin.

27
Apply Character formatting You can format your text to modify the way it looks. Common character formatting styles are underline, boldface, and italicized text. Word offers several additional character formats such as double under line, strike through, double strike through etc. apply from font group on home tab in ribbon. Or click on launch button in font group to see additional formatting options. Or press CTRL + D Select text: select the text on which you required character formatting. Choose a Font (font face): select a font from font group on home tab in ribbon example arial. Choose a Font point size: select a font size from font group on home tab in ribbon example 12 Apply font color from font group Display the Font dialog box: click on launch button on font group or press CTRL + D for additional character formatting commands such as line spacing, character spacing, double underline, superscript, sub script, etc.
: select a font from font group on home tab in ribbon example arial. Choose a Font point size: select a font size from font group on home tab in ribbon example 12 Apply font color from font group Display the Font dialog box: click on launch button on font group or press CTRL + D for additional character formatting commands such as line spacing, character spacing, double underline, superscript, sub script, etc..")
28
Ctrl + D or click on launch button

29
Apply Paragraph Formatting You can format your text in a paragraph. You can change the format of entire paragraphs of text, such as the line spacing justification, and indentation of text. You can apply that format to selected paragraphs or to all the paragraphs in your document. Also you can apply indentation (first line indent, hanging indent, left and right indent) on selected paragraphs. JUSTIFICATION/alignment: Determines the paragraph text’s alignment in relation to the right and left margins. Their are four types of justification. Left-align :A left-aligned paragraph is considered normal. The left side of the paragraph is even and the right side is jagged. To left-align a paragraph, press Ctrl+L or click the Align Text Left button. This type of alignment is ragged right. Right-align : A right-aligned paragraph has its right margin even(equal). The left margin, however, is rough(rough). To right-align a paragraph, press Ctrl+R or click the Align Text Right button. This type of alignment is ragged left or flush right. Center-align :Centering a paragraph places each line in that paragraph in the middle of a page, with an equal amount of space to the line's right and left. To center a paragraph, press Ctrl+E or use the Center button. Justify : Full justification occurs when both the left and right sides of a paragraph are lined up flush with the page margins. To fully justify a paragraph, press Ctrl+J or click the Justify button.
 on selected paragraphs. JUSTIFICATION/alignment: Determines the paragraph text’s alignment in relation to the right and left margins. Their are four types of justification. Left-align :A left-aligned paragraph is considered normal. The left side of the paragraph is even and the right side is jagged. To left-align a paragraph, press Ctrl+L or click the Align Text Left button. This type of alignment is ragged right. Right-align : A right-aligned paragraph has its right margin even(equal). The left margin, however, is rough(rough). To right-align a paragraph, press Ctrl+R or click the Align Text Right button. This type of alignment is ragged left or flush right. Center-align :Centering a paragraph places each line in that paragraph in the middle of a page, with an equal amount of space to the line s right and left. To center a paragraph, press Ctrl+E or use the Center button. Justify : Full justification occurs when both the left and right sides of a paragraph are lined up flush with the page margins. To fully justify a paragraph, press Ctrl+J or click the Justify button..")
30
Set up page formatting You will often need to make format changes to your entire document. Perhaps you want to change the margins that word uses when you print your document. You may want to add a background color or even put a border around the document. The page layout ribbon contains word options that enable you to modify your document’s format. Any changes you make apply to all pages in your document. Display the page options: Select Page Layout ribbon to see your page-formatting options. From this ribbon, you can format you themes, set margins, insert page and section breaks, add line number, add background colors and watermarks and adjust the entire document's indentation and spacing. Adjust your margins :you can change margins from page setup group On the page layout tab on the ribbon. Margin’s such left, right, top, bottom Adjust paper size : from here you can adjust paper size, such as A4, Letter, Legal Set page orientation :you can also change the orientation of page such as Portrait to landscape.

31
Set up page formatting You will often need to make format changes to your entire document. Perhaps you want to change the margins that word uses when you print your document. You may want to add a background color or even put a border around the document. The page layout ribbon contains word options that enable you to modify your document’s format. Any changes you make apply to all pages in your document. Display the page options: Select Page Layout ribbon to see your page-formatting options. From this ribbon, you can format you themes, set margins, insert page and section breaks, add line number, add background colors and watermarks and adjust the entire document's indentation and spacing. Adjust your margins :you can change margins from page setup group On the page layout tab on the ribbon. Margin’s such left, right, top, bottom Adjust paper size : from here you can adjust paper size, such as A4, Letter, Legal Set page orientation :you can also change the orientation of page such as Portrait to landscape. Portrait Landscape

32
Create a Multicolumn Newsletter When you want to create newspaper-style columns – such as those that appear in newsletter and brochures—configure word to format your text with multiple columns. Column are created before or after typing the text. Type your document (if you want create columns after typing the text) Format your headline: you can insert a heading before the columns. Select the text for columns : select all the text that will be converted to multiple columns. This generally begins immediately following your headline. Convert it to columns: Go the page layout tab from page setup group click on columns command/button select one column, two column, three or click on more columns and specify as you required. Also there is option for a line between columns. You can move to next columns you by placing a column break (click your page layout tab and click the Breaks button to display the options and select column break). for navigation between columns you can use mouse or keyboard short cuts are Ctrl+up/down/right/left arrows. NOTE: ALSO YOU CAN use option insert section break and start a new section on same page or on next page after typing the text in columns After inserting columns, for typing regular text select from apply to drop down select option this point forward (but first you select one column layout). By applying above steps you can insert columns then regular text and so on.
 Format your headline: you can insert a heading before the columns. Select the text for columns : select all the text that will be converted to multiple columns. This generally begins immediately following your headline. Convert it to columns: Go the page layout tab from page setup group click on columns command/button select one column, two column, three or click on more columns and specify as you required. Also there is option for a line between columns. You can move to next columns you by placing a column break (click your page layout tab and click the Breaks button to display the options and select column break). for navigation between columns you can use mouse or keyboard short cuts are Ctrl+up/down/right/left arrows. NOTE: ALSO YOU CAN use option insert section break and start a new section on same page or on next page after typing the text in columns After inserting columns, for typing regular text select from apply to drop down select option this point forward (but first you select one column layout). By applying above steps you can insert columns then regular text and so on..")
33
Tables in ms word 2007 Words tables-creation power shines when you see how easily you can compose customized tables in word documents. Tables might contain numbers, text, graphics, or combinations of any of these. Each row and column intersection is called a cell. Tables: Collections of information organized in rows and columns. Cell: a row and column intersection in a word table. Navigation: you can use mouse for navigation in table cells or by keyboard using up/down/left/right arrows or by tab to move in next cell or shift+tab to move in previous cell. If you are in last cell of the table then you press tab a new row inserted. After you create a table, you can easily adjust its height and width by dragging one of the edges with your mouse. You can add and delete rows and columns, too. In addition you can apply formatting attributes to your table to add color, highlighting, special fonts, and other format attributes that make a dull table look good.

34
Create a Quick Table Quick Tables: a collection of predesigned tables such as calendars and two column lists that you can begin with. 1. Request a table 1. Click the Table button on your insert ribbon, and then click Quick Tables to display the scrolling list of built-in tables. 2. Choose a quick table 1. Scroll through the quick table list to find a table you want to insert into your document. 3. Insert the quick table 1. Click to select the quick table you want to use. Word inserts the table into your document at the current insertion point. 4. Format your quick table 1. Select the table style from the Table Styles section of your Design ribbon. As you point to each style, word updates your quick table to reflect that style’s format. Click to select one of the styles to apply it to your quick table. 5. Edit your quick table 1. Use word's table movement keys and formatting commands to adjust the data and format of your quick table.

35
Create a Table Quick Tables: a collection of predesigned tables such as calendars and two column lists that you can begin with. 1. Type to create a table You can easily create tables from your keyboard a simple example is you type the following and press enter. +----+-----+------+ Also you can type text using tab key then select it and use option convert text to tables from table command button. 2. Insert a premade table 1. Click the insert ribbon’s table button to display the grid of table cells. Drag your mouse over the grid to tell word the size of the table, in rows and columns that your want to insert. And then click. A table is inserted in your document. 3. Insert a table by specifying rows and columns 1. Click on insert ribbon tab, then click on tables and click insert table specify number of rows and columns click ok. Table is inserted into a document. Where is curser is blinking. 4. Draw to create a table 1. Instead of letting word insert your table, you can draw your table in the shape and size you want it to be. 2. Click where you want to create your table, and on the insert ribbon, click the tables group. Click the draw table button, and you’ll notice that your mouse cursor changes to a pencil. Simply you can draw a table as you can draw a table on paper with pencil. 5. Create a New Table Style 1. If you fine yourself creating the same style of table multiple times, and the style is different from the table styles that word's insert ribbon provides, you can create your own table style, select it and from quick table select save selection to quick table gallery and you can use it again and again later on in your document, it display.

36
Manage Tables You need to add more rows or columns in existing tables, you need to remove rows or columns,adjust the size of rows and columns or merge cells etc. 1. Resize the Columns 1. Adjusting a column’s size is extremely simple. Move your mouse pointer to an edge of the column you want to resize (increase/decrease the column width). The mouse pointer changes to a double arrow. Click the edge of the column and drag the column left or right. When you release the mouse, word resizes the column to its new size. Also you do above with rows. 2. Delete columns 1. Select a column you want to delete by clicking the top line of that column. Right-click and a menu appears. Select delete columns to delete the column from the table. Or select column by dragging then right click and delete the columns/cells. Same you can do with rows by selecting them. 3. Insert a column 1. Right click in table, and select insert then select insert column(right or left) / or row below/above. 4. Merge Cells : select cells then right click, after that select merge cell option.
. The mouse pointer changes to a double arrow. Click the edge of the column and drag the column left or right. When you release the mouse, word resizes the column to its new size. Also you do above with rows. 2. Delete columns 1. Select a column you want to delete by clicking the top line of that column. Right-click and a menu appears. Select delete columns to delete the column from the table. Or select column by dragging then right click and delete the columns/cells. Same you can do with rows by selecting them. 3. Insert a column 1. Right click in table, and select insert then select insert column(right or left) / or row below/above. 4. Merge Cells : select cells then right click, after that select merge cell option..")
37
Office Clip Board The Microsoft Office Clipboard allows you to copy up to 24 multiple text and graphical items from Office documents or other programs and paste them into another Office document/ or in same document. By using the Office Clipboard, you can arrange the copied items the way that you want in the document. The Office Clipboard works with the standard Copy and Paste commands. Just copy an item to the Office Clipboard to add it to your collection, and then paste it from the Office Clipboard into any Office document at any time. Up to 24 collected items stay on the Office Clipboard until you exit all Office programs or you delete the items from the Clipboard task pane. After you exit all Office programs, only the last item that you copied stays on the Office Clipboard. When you exit all Office programs and restart your computer, the Office Clipboard is cleared of all items. On the Home tab, in the Clipboard group, click the Clipboard Dialog Box Launcher.

Similar presentations