Download presentation
Presentation is loading. Please wait.

1
Procedures during Tracker Connection WPA meeting 3 rd December 2007, Michael Eppard, CERN Installation sequence Manpower needs for installation work

2
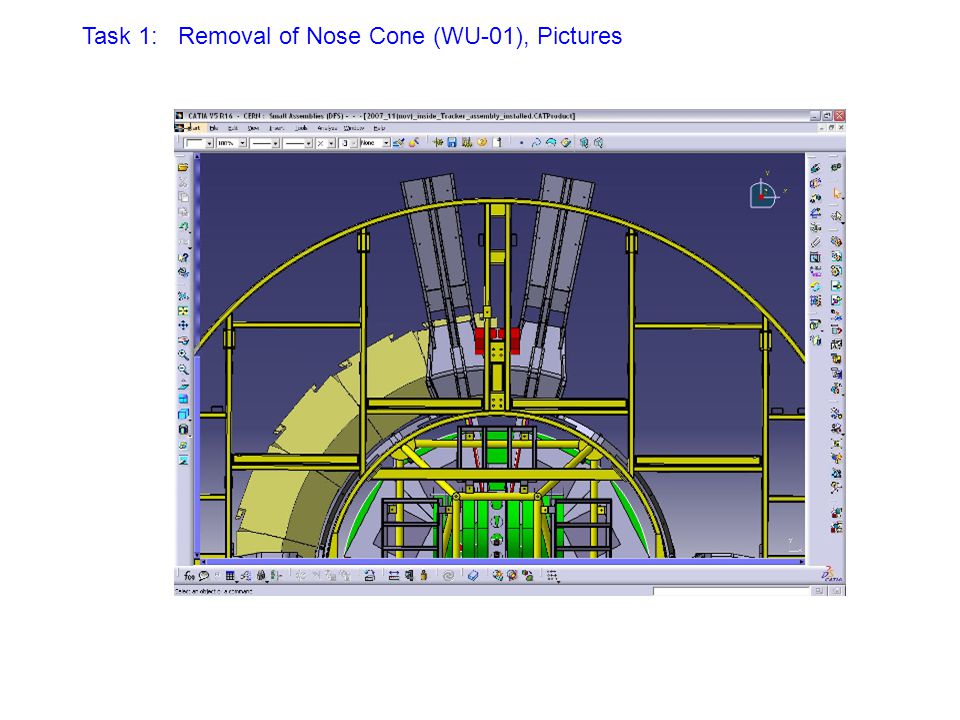
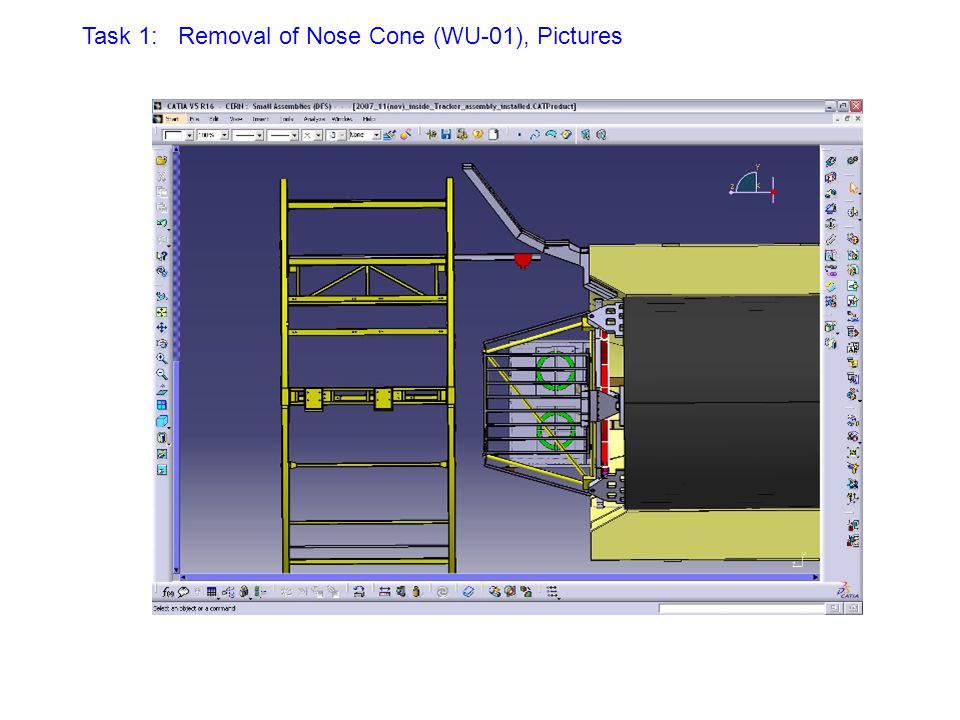
Tracker Connection Installation Sequence Task 1:Removal of cable bundles and nose cones (WU-01) Cable bundles on the Tracker nose cones will be removed and put temporarily in the Tracker service channels. The empty nose cones will be detached from the Tracker and lifted by a hoist that is attached to the Surkov frame. The lifting sling will be fixed on the nose cone above the center of gravity. The cone will be slightly lifted up and its fixation pins will be removed, the cone will be slid along the z axis. When the cone will be out of the optical fibre storage structure envelope, it will be lowered down on the main floor of the Surkov frame. The cones shall be removed from the Surkov frame using a counterweighted lifting beam.

3
Task 1:Removal of cable bundles (WU-01), Picture Cable bundles
, Picture Cable bundles")
4
Task 1:Removal of Nose Cone (WU-01), Pictures
, Pictures")
8
Tracker Connection Installation Sequence Task 2:Retraction Surkov frames and building scaffolding (WU-07) Both Surkov frames have to be moved out of the VT by 1 m in order to allow Tracker pipes installation. Between the Surkov frames and the face of the Tracker a standard scaffolding has to be built in order to allow proper access to the whoel Tracker service channels.

9
Tracker Connection Installation Sequence Task 3: Installation of Tracker optical fibres (WU-02) Installation of Tracker and Pixel optical fibres into their proper channels. Connection of Tracker and Pixel optical fibres to the multi-ribbon cables in PP1. Test of the optical connection with an OTDR.

10
Tracker Connection Installation Sequence Task 4: Connection of Tracker pipes (WU-03) Installation and connection of Tracker and Pixel cooling and gas pipes between Tracker and PP1. Leak testing of Tracker and Pixel cooling and gas pipes. Insulation of Tracker and Pixel cooling and gas pipes.

11
Task 4: Connection of Tracker pipes (WU-03) 1.Install male Lancasher fitting + first bend piece 2.Measure the correct length of the copper pipe end 3.Remove Lancasher fitting, cut the pipe and solder them together 4.Install the pipe definitively 5.Attach the pipe to the temporary mid-support (subsequent pipes attached to previous ones) 6.Cut the pipe to correct length 7.Solder the pipe with ceramic fitting 8.Clamp the pipe with support block (every 2 pipes) 9.Leak test with Argon (every 2 pipes)
 1.Install male Lancasher fitting + first bend piece 2.Measure the correct length of the copper pipe end 3.Remove Lancasher fitting, cut the pipe and solder them together 4.Install the pipe definitively 5.Attach the pipe to the temporary mid-support (subsequent pipes attached to previous ones) 6.Cut the pipe to correct length 7.Solder the pipe with ceramic fitting 8.Clamp the pipe with support block (every 2 pipes) 9.Leak test with Argon (every 2 pipes)")
12
2 layers of 9 mm Armaflex AF insulation, with joining tape In channels 1 and 2 must reduce insulation to allow space of cables. Where possible use 3 mm tape in addition Insulation of individual pipes at TK end is still to be studied: 3 mm tape? Tubular insulation? Task 4: Connection of Tracker pipes (WU-03): Insulation
: Insulation.")
13
Mid-path support with this element. During pipe installation use temporary support This support shall be slightly closer to optoribbons, to provide space for cables next to water pipe. This support shall also be a bit further away from the pipe bend, to ease insulation joint. Task 4: Connection of Tracker pipes (WU-03): Insulation
: Insulation.")
14
From mid-supports to PP1 use 18 mm insulation or 2 layers of 9 mm. Task 4: Connection of Tracker pipes (WU-03): Insulation
: Insulation.")
15
Inside PP1 use precut flat pieces, glued together Glued junction from tubular to rectangular section at PP1 entry Insulation of Y-section being done alreardy now! Task 4: Connection of Tracker pipes (WU-03): Insulation
: Insulation.")
16
Tracker Connection Installation Sequence Task 6: Installation of Tracker heating wires and cable combs (WU-04) Installation of heating wires into PP1 and special cooling channels. Installation of Tracker cable combs into PP1. connection 30 W/m heating cable, length ~7 m / standard PP1, Routed on outer surfaces of the pipe channel

17
Aluminium or plastic clamps and aluminium tape on top of the cable Heating cable follows the Y-piece (not present in this photo) Task 6: Installation of Tracker heating wires and cable combs (WU-04)
 Task 6: Installation of Tracker heating wires and cable combs (WU-04)")
18
Tracker Connection Installation Sequence Task 7: Installation of Tracker and Pixel cables (WU-05) Installation of Tracker and Pixel cables into their cable channels between Tracker and PP1. Connection of Tracker and Pixel cables in PP1.

19
Task 7: Installation of Tracker and Pixel cables (WU-05) Here we have installed 7 cooling pipes 40 multi-service cables This represents the biggest channel occupancy, which is 7 cooling pipes 38 multi-service cables 6 ctrl-cables (≈ 2 MS-cables) Channel sections 1-4 Channel section 5
 Here we have installed 7 cooling pipes 40 multi-service cables This represents the biggest channel occupancy, which is 7 cooling pipes 38 multi-service cables 6 ctrl-cables (≈ 2 MS-cables) Channel sections 1-4 Channel section 5")
20
Tracker Connection Installation Sequence Task 8: Installation of Tracker heating elements on bulkhead (WU-06) ??
")
21
The Working Model We will work in two shifts from 6:00-14:00 and 14:00-22:00. We will work 6 days a week (Monday – Saturday). There will be only one particular task performed per day per side (no task will span over two consecutive shifts). There will be always two teams working on the same side (four teams per shift). Team “Pipes” will consist of 14 technicians plus four supervisors. Team “Mechanics” will consist of 10 technicians plus six supervisors (for the differnet tasks). Team “Fibres” will consist of 10 technicians plus two supervisors. The total manpower is 34 technicians plus 12 supervisors all coming from CMS institutes. The maximum work force per shift is around 20 technicians plus their supervisors. The whole Tracker connection including all work units will last minimum 9 weeks.
. There will be only one particular task performed per day per side (no task will span over two consecutive shifts). There will be always two teams working on the same side (four teams per shift). Team Pipes will consist of 14 technicians plus four supervisors. Team Mechanics will consist of 10 technicians plus six supervisors (for the differnet tasks). Team Fibres will consist of 10 technicians plus two supervisors. The total manpower is 34 technicians plus 12 supervisors all coming from CMS institutes. The maximum work force per shift is around 20 technicians plus their supervisors. The whole Tracker connection including all work units will last minimum 9 weeks..")
Similar presentations


>")

 integration - Tools to develop.>")

 Install special support. b) Place the second bottom.>")


