Download presentation
Presentation is loading. Please wait.

1
Scalpel Handles No. 3 Most common No. 3
Tip of scalpel handle is prepared to receive a variety of differently shaped scalpel blades. No. 3

2
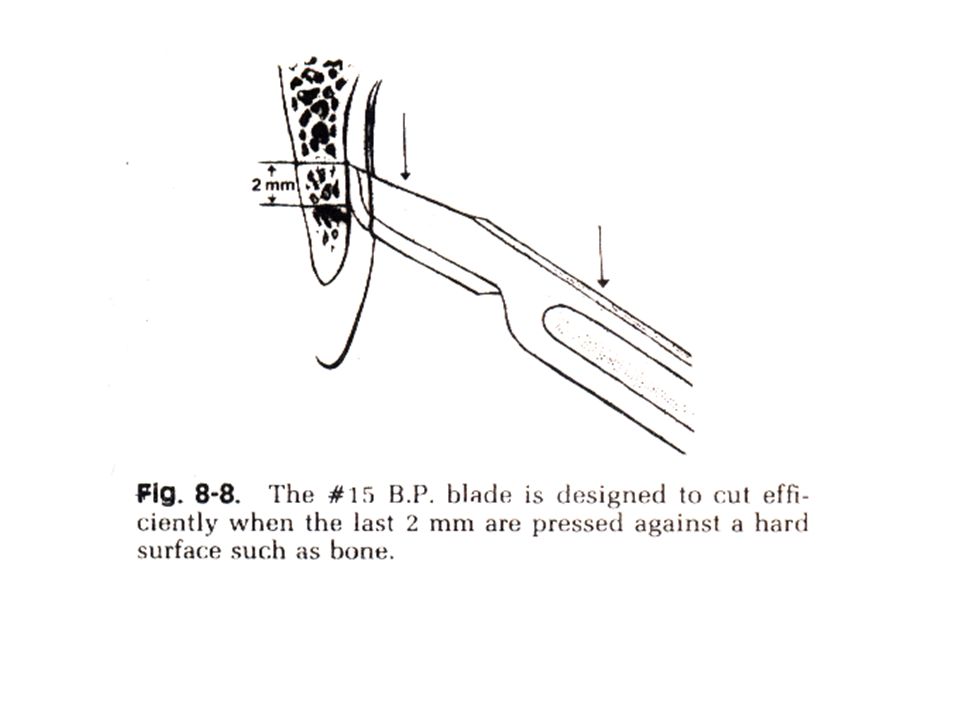
Bard Parker Scalpels NO. [15 ] is the most useable for mucoperiosteal tissues. [11] sharp pointed blade, for incision of an abscess [12] for flap in an inaccessible area. (maxillary tuberosity area). [10] for skin ( accessible areas).
![Bard Parker Scalpels NO. [15 ] is the most useable for mucoperiosteal tissues. [11] sharp pointed blade, for incision of an abscess.](http://slideplayer.com/slide/4411800/14/images/2/Bard+Parker+Scalpels+NO.+%5B15+%5D+is+the+most+useable+for+mucoperiosteal+tissues.+%5B11%5D+sharp+pointed+blade%2C+for+incision+of+an+abscess..jpg "[12] for flap in an inaccessible area. (maxillary tuberosity area). [10] for skin ( accessible areas).")
3
Holding scalpel by pen grasping
To allow maximum control.

4
Flap Lifters instruments used for elevating mucoperiosteum
The periosteal elevators are spoon-shaped instruments with a sharp cutting surface on a round edge.

5
Periosteal Elevators After incision, flap is reflected.
elevator has a sharp pointed end & a broader flat end. Pointed end reflect interdental papillae. Broad end to elevate tissues from bone. periosteal elevator elevate mucoperiosteal tissues away from the bone atraumatically, in one piece without perforations.

6
The attached gingiva and mucosa & periosteum are reflected in one piece without perforations.

7
Instruments for bone removal
Most commonly used instruments for removing bone are: Rongeurs. Drillers (bone burs). Chisel & mallet. Bone file.
. Chisel & mallet. Bone file.")
8
Bone forceps (Rongeurs)
Have sharp blades. Blades squeezed together by handles. Have a spring between handles, to allow for repeated cuts. Action is by cutting or pinching through the bone.

9
Types of Bone Crushers (Bone Rongeurs)
End & side cutting Rongeur Side Cutting Rongeur End Cutting Rongeur

10
The side/end cutting Rongeur
is inserted into the tissues to remove inter-radicular bone. To remove sharp edges of bone. By using multi bites.

11
Bone forceps is more practical for most oral surgical procedures [for removal of interradicular bone].
![Bone forceps is more practical for most oral surgical procedures [for removal of interradicular bone].](http://slideplayer.com/slide/4411800/14/images/11/Bone+forceps+is+more+practical+for+most+oral+surgical+procedures+%5Bfor+removal+of+interradicular+bone%5D..jpg "Bone forceps is more practical for most oral surgical procedures [for removal of interradicular bone].")
12
Surgical drillers (surgical burs)
Are sharp carbide burs (fissure or round). Used to remove cortical bone by making holes then connect them using fissure bur, under copious coolant water.
. Used to remove cortical bone by making holes then connect them using fissure bur, under copious coolant water.")
13
Disadvantages: Generation of excessive heat. Contraindicated with certain types of G.A. Advantages: Easy control. Safer, so indicated in maxilla. Useful in removing dense bone.

14
Bone Removal using surgical burs

15
Bone chisels & mallet Variable patterns
Unibevel. [monobevel] Grooved. Bibeveled For tooth section.

16
Used to remove bone. Success depend on sharpness. Chiselling Technique can be done by: Mallet driven chisel.Hand chisel. Electric automatic chisel ( impactor)
")
17
Advantages: clean & smooth cutting. Practical & safe when operating. Disadvantage: Needs great skill. Frighten patient. Contraindicated in maxilla

18
Bone chisels & mallet coated for shock absorbant & less noisy Mallet
Unibevel Osteotome

20
Bone File Used only for final smoothing of bone.
Usually double ended instrument. Teeth of bone file are arranged in such a fashion to remove bone on a pull stroke.

21
Bone file

22
Curettes is a double ended instrument used to remove soft tissue from bony defects such as small granulomatous tissues & cysts.

24
Tooth Division (Tooth Sectioning)
Can be performed alone or with bone removal. Using surgical burs & chisels. Tooth is divided along its vertical axis or at its neck. Mandibular teeth are sectioned in a buccolingual fashion, then elevated by elevators.

25
Sectioning of Maxillary Teeth
Maxillary teeth can be divided into 3 or more segments depending on root morphology using fissure burs in (T) or (Y) fashion. Then roots are elevated with elevators. Great care to avoid displacement into maxillary sinus.
 or (Y) fashion. Then roots are elevated with elevators. Great care to avoid displacement into maxillary sinus.")
26
Advantages of tooth sectioning
Minimize amount of bone removal. Promote healing. Save maximum the amount of alveolar bone. Save time. Reduce postoperative complications.

27
Technique of tooth division
Using surgical burs, unibevel chisel & straight elevators as an easy, simple & controlled technique. 1. Using burs to design the required cuts. 2. Use straight elevator to elevate the sectioned parts of tooth. Advantages: Saving time.

29
Rule no.2 : The incision should not cross an underlying bony defect that existed prior to surgery or is produced by surgery.

31
Poorly designed semilunar flap with incision crossing pathologic defect resulting in dehiscence.

32
Rule no.3: Vertical incisions should be made into the concavities between bony eminences.

33
Rule no.4 : The termination of the vertical incision at the gingival crest should be at the line angle of the tooth.

34
Rule no.5 : The vertical incision should not extend into the mucobuccal fold.

35
Rule no.6 : The base of the flap must always be wider than the width of the free edge.

36
2. ELEVATION Rule no.7 : The periosteum must be reflected as an integral part of the flap.

38
Tissue retractor must rest on bone and not impinge on soft tissue.
3.RETRACTION Rule no.8 : Tissue retractor must rest on bone and not impinge on soft tissue.

39
4. BONE REMOVAL: Rule no. 9 : In most cases bone is removed by burs.
Bone should be removed under copious irrigation with a sharp surgical bur. Bone could be removed by chisel & mallet, bone rongeurs, & bone files. In these cases these instruments should be sharp.

40
The flaps are trimmed of all necrotic tissue or tags.
6. WOUND DEBRIDEMENT Rule no.10 : The wound is prepared for closure by careful cleansing to remove debris, a major cause of post-operative infection. Pathological tissue, such as tooth follicle or sinus tracts is excised. The bone cavity edges are smoothened to finish without sharp projections The flaps are trimmed of all necrotic tissue or tags. Tooth chips and loose pieces of bone, not attached to periosteum, are removed from the wound which is then thoroughly irrigated with saline.

41
7. WOUND CLOSURE : Rule no. 11 :
All suturing begins by inserting the needle through the superficial surface of the unattached tissue before entering the inferior surface of the attached tissue .

42
Rule no. 12 : The needle should be inserted 2-3 mms from the edges of the flap to prevent tearing of the flap edges .

43
The fixed edge of the flap is better elevated
2-3 mms to facilitate the passage of the needle through the under surface of the flap.

44
Suturing of wound. Suture is initially wrapped
twice around the needle holder

45
The two ends of the suture are tightened to create a surgeon’s knot over the wound (double knot)
")
46
Safety knot, created by the single wrap of the
suture in the counterclockwise direction .

47
COMMON SUTURING TECHNIQUES
1. Interrupted suture

49
2. Continuous suture

50
Continuous simple suture. A. Diagrammatic illustration. B
Continuous simple suture. A. Diagrammatic illustration. B. Clinical photograph

51
3. Blanket suture

52
Continuous locking (blanket) suture
Continuous locking (blanket) suture. Wound margin approximation is achieved by successive loops
 suture. Wound margin approximation is achieved by successive loops.")
53
4.Horizontal interrupted mattress suture. A. Diagrammatic illustration. B. Clinical photograph

54
Horizontal continuous mattress suture. a)Diagrammatic illustration.
b) Clinical photograph. This type of suture is used where wound margins must coapt tightly(tissues with increased tension)
 Clinical photograph. This type of suture is used where wound margins must coapt tightly(tissues with increased tension)")
55
5.Vertical mattress suture, used for deep incisions

56
6. Sling suture uses the teeth for retention of the suture

57
Sling suture

58
Continuous sling suture repair

59
Suture removal : Usually from : 5-7 days for mucosa. 3-5 days for the skin.

60
Suture Needles Round. Cutting edge (atraumatic)
")
Similar presentations


 : An abnormal connection between the oral cavity and the maxillary sinus.>")


. All rights reserved. Oral and Maxillofacial Surgery Chapter 56 Copyright 2003, Elsevier Science (USA). All rights.>")
