Download presentation
Presentation is loading. Please wait.

1
Ramón Grado, CPP Managing Director, EMEA
IQinVision Training Ramón Grado, CPP Managing Director, EMEA

2
Megapixel Resolution Revolution
Welcome to the IQinVision Megapixel Technology Webinar - we appreciate your participation in today’s presentation. In consideration of your valuable time, and the challenges of webinars, we have endeavored to keep this presentation lively and informative – SO STAY WITH ME! GO to Next slide
![]()
3
Objective To further your curiosity into why we say that IQeye cameras are superior to the competition on the basis of: Total Cost of Ownership Image Optimization Features and Benefits

4
Agenda 1000 – Introduction to IQinVision, the camera line and megapixel cameras 1030 – Lenses for MP cameras 1130 – TCO, project design tools Pro Line cameras image optimization 1200 – Lunch 1245 – Extras: FTP, Telnet, cronscript, 1445 – Break 1500 – Anything goes, Q&A
![]()
5
About IQinVision Incorporated in 1998 – growing fast, 10th anniversary
Privately held corporation based in San Juan Capistrano, CA Eastern office in Lancaster, PA European operations in Utrecht, Netherlands Active in 60+ countries Spun out of engineering firm which specialized in networking and imaging technology Pioneering megapixel IP cameras since 1999 Committed to innovation and service excellence 2 Frost & Sullivan awards: Customer Value Enhancement 2006 and Excellence in Technology 2007 IQinVision is not a new comer to the business of IP cameras or even megapixel IP cameras. Since 1998, IQinVision has managed it’s business carefully to become a profitable world leader in our industry. We are growing fast and adding resources aggressively to maintain our market leardership. And this year we are celebrating our 10 year anniversary!! Headquartered in San Clemente, CA we also have an Eastern office in Lancaster, PA and we just opened an office in the Netherlands to service the growing needs of the European market. As an outgrowth of a network and imaging engineering firm, we have a mature, stable and proven technology We have been pioneering megapixel IP cameras since 1999 and lay claim to a number of industry “firsts” such as: The first Power-over-Ethernet and digital PTZ in 1999 and the worlds first megapixel IP camera developed for Philips in 2000 Our commitment to ongoing innovation and service excellence means you can count on us to provide cutting edge differentiated products and be there to support your needs. 2 Frost & Sullivan awards in 4 months: Customer Value Enhancement 2006 and Excellence in Technology 2007 As other manufacuturers follow us with megapixel products of their own, IQinVision will continue to develop new market valuable products and features GO to next slide Lancaster, PA

6
Leading with Innovation
1999 – First CMOS progressive scan 1999 – First Power-over-Ethernet 1999 – First digital pan/tilt/zoom 2000 – First megapixel IP camera 2003 – First HDTV images 2004 – First multi-megapixel IP cameras 2005 – First and only on-camera Digital Image Authentication 2007 – First all-weather multi-megapixel PoE network camera

7
Video Surveillance Goals
General Surveillance - live viewing High detail on recorded video not a priority Forensic – recognizable images People, vehicle type, license plates, details for accurate “after the fact” analysis High Detail – “evidentiary quality video” Currency, facial ID, license plates

8
Resolution Benefits Larger field-of-view More image detail
Evidenciary quality in surveillance Fewer cameras needed Less installation and maintence costs (TCO) Replace mechanical PTZ – never miss a thing. Higher results with smart IP video (Video Analytics)
 Replace mechanical PTZ – never miss a thing. Higher results with smart IP video (Video Analytics)")
9
Why Megapixel? Why not Megapixel?
![]()
10
Megapixel Resolution = Greater Digital Zoom Image Detail
What they have What they want If your video is unusable, why bother?
![]()
11
What they have What they want

12
Resolutions Compared IQeye 5.0 MP 2560x1920 IQeye 3.1 MP 2048x1535
PAL 720x576 VGA 640x480 CIF 352x288

13
Resolutions Compared

14
Camera Coverage w/ Forensic Detail
(131 pixels/m) VGA = 4.9m HD720p = 9.8m HD1080p = 14.6m 3Mpix = 15.5m Megapixel = fewer cameras so now that you know what coverage they need and where they need it, you can select the perfect camera or cameras for the application. This slide shows you how wide an area a camera can cover and provide Forensic Detail. The higher the resolution the greater area a camera coverage so depending on your application you may be able to use a lot fewer high res cameras which can save a lot of money 5Mpix = 19.5m 14
 VGA = 4.9m. HD720p = 9.8m. HD1080p = 14.6m. 3Mpix = 15.5m. Megapixel = fewer cameras so now that you know what coverage they need and where they need it, you can select the perfect camera or cameras for the application. This slide shows you how wide an area a camera can cover and provide Forensic Detail. The higher the resolution the greater area a camera coverage so depending on your application you may be able to use a lot fewer high res cameras which can save a lot of money. 5Mpix = 19.5m. 14.")
15
WANTS HIGH Detail Building PARKING LOT
They may WANT to have high detail coverage over their entire site, but do they have the budget for it? Probably not. The easy thing to do here would be to tell them to go with lower resolution cameras covering a wide area but is that really what they need? Its up to you to help them understand what they need and can afford. Even though they WANT to have the high detail, it may turn out that (change slides) 15
 15.")
16
NEEDS General Surveillance Building PARKING LOT Forensic Forensic
They may really need a lot less. Once you have helped the customer define what image quality they need and where they need it, you have eliminated two variables so now we are into basic number crunching. The most important number we need to crunch is storage and/or bandwidth because that will have a big impact on the system cost. Forensic 16

18
What Frame Rate do you NEED?
= # Images subject speed x fps coverage area Now you have determined what type of surveillance you need, what coverage you need and the optimal selection of cameras to cover your area, what frame rate do you need? It depends on 3 things, How many pictures do you want to capture of a subject while it is in the field of view. How fast are the subjects travelling at and last, how wide an area is the camera covering? How wide is the area? 18

19
10 frames captured 21 frames captured 32 frames captured
VGA 10 frames captured HD720p 21 frames captured HD1080p 32 frames captured 3MP 35 frames captured Perhaps this will illustrate this better. This slide shows how many images different cameras will capture with all other things being equal. As you can see (hit ENTER) a subject travelling at 16kph takes longer to get through a wider coverage area than a narrow one. The longer it takes, the more images you capture (hit ENTER). If you are covering a narrow area, you need higher fps to capture the same # of images when you are covering a wide area. So in this example, you could run a 5 MP camera at less than ¼ the frame rate as a VGA camera and still capture as many images GO to next slide 5MP 43 frames captured 19
 a subject travelling at 16kph takes longer to get through a wider coverage area than a narrow one. The longer it takes, the more images you capture (hit ENTER). If you are covering a narrow area, you need higher fps to capture the same # of images when you are covering a wide area. So in this example, you could run a 5 MP camera at less than ¼ the frame rate as a VGA camera and still capture as many images. GO to next slide. 5MP. 43 frames captured. 19.")
20
Digital Pan/Tilt/Zoom
Lets you virtually move around a large image using a smaller viewing window No moving parts Capture everything, all the time Multiple simultaneous control

21
Digital Pan/Tilt/Zoom – how it works
Quality zoom made possible by using Downsampling from multi-megapixel images Digital Zoom Factor 1X source 8:1 view Digital Zoom Factor 2X source 4:1 view Digital Zoom Factor 4X source 2:1 view Digital zoom uses two methods to resize source images for viewing. Downsample is used when the source resolution is larger than the viewing window, and is a lossless zoom. Upsample is used when the source is smaller, and quality degrades after one or two steps. Powerful, high quality digital zoom is made possible by using downsampling from multi-megapixel source images. Digital Zoom Factor 8X source 1:1 view Digital Zoom Factor 16X source 1:2 view Digital Zoom Factor 32X source 1:4 view

22
IQeye Digital PTZ How much zoom do you need? IQeye DPTZ 3.1 Megapixel
IQeye 2 Megapixel IQeye hdtv Digital d1 Digital cif
![]()
23
The Megapixel Myths..... 1 Megapixel cameras are using too much storage Megapixel cameras are bandwidth killers!!! Megapixel cameras are expensive 2 3
![]()
24
The Megapixel Myths...too much storage
45KB 40KB 57KB 36KB Total 178KB with 4 Cameras
![]()
25
One IQ702 - 2.0 Megapixel IP Camera
The Megapixel Myths...... 140KB One IQ Megapixel IP Camera
![]()
26
Time for a little Paradigm shift… Full Motion Video vs
Time for a little Paradigm shift… Full Motion Video vs Hi Resolution Forensic imaging Standard resolution - full motion video “its comfortable” 640 x 480 = YouTube! Megapixel resolution - forensic Imaging for meaningful investigations 1600 x 1200 = Identify faces/license plates So this is the basic principle. Full motion for live viewing. Looks better live. No stomach ache. My experience tells me 2-5 fps is best. Therefore let’s look at It’s the Frame, NOT the Frame Rate!

27
Megapixel cameras…are bandwidth killers
Full Motion Video vs Hi Resolution Forensic Imaging 640 x 20fps = 6.4 Mbit/sec 1600 x 5fps = 5.6 Mbit/Sec OR… using IQeye digital cropping 1600 x 5fps = 2.96 Mbit/Sec So the MESSEGE here is to slow down and get more useful pixels on target Keep in mind we ONLY record on motion and IQ cameras can deliver multiple streams at independent resolutions and frame rates. How do we arrive at the 1600 x 600 resolution?? Let’s take a look . . .
![]()
28
Network & Storage Performance
Speeds and feeds: Resolution 1.3M 1280 x 1024 2.0M 1600 x 1200 3.1M 2048 x 1536 5M 2560 x 1920 Avg. file size (Kbits) 100,000 140,000 225,000 400,000 Bandwidth utilization (Kbits/sec) 1 FPS 800,000 1,120,000 1,800,000 3,200,000 5 FPS 4,000,000 5,600,000 9,000,000 8,000,000 MAX (IQ700) 24,000,000 (30 fps) 22,400,000 (20 fps) 21,600,000 (12 fps) 32,000,000 (10 fps) Images/Gigabyte 10,000 7,000 5,000 3000 * All figures are approximates * File size can vary greatly with image complexity and compression settings
 100, , , ,000. Bandwidth. utilization. (Kbits/sec) 1 FPS. 800,000. 1,120,000. 1,800,000. 3,200, FPS. 4,000,000. 5,600,000. 9,000,000. 8,000,000. MAX. (IQ700) 24,000,000. (30 fps) 22,400,000. (20 fps) 21,600,000. (12 fps) 32,000,000. (10 fps) Images/Gigabyte. 10,000. 7,000. 5, * All figures are approximates. * File size can vary greatly with image complexity and compression settings.")
29
Storage and Bandwidth Calculator

30
CCTV Camera = 4:3 Aspect Ratios IQeye smart cameras can be custom tailored
Same file size, twice the information Megapixel can actually save BW and storage! CCTV Wasted Video

31
Proper Camera & Lens Selection

32
The IQeye 4 Series VGA to 2 MP resolution Power-over-Ethernet
Simple interface Simple installation Includes lens and mount Competitively priced

33
New IQeye 4 Mini Dome

34
The IQeye700/750 Series 1.3 to 5 MP including 720p and 1080p HD
On-Camera recording options with IQrecorder Great low-light performance IQ vcam 64 up to independent streams Alarm I/Os, CF card, analog output PoE (<2.5W) input 12 – 24 VDC, 12V AC Image cropping Digital backlight compensation Video motion detection Privacy zones Analytics ready
 input 12 – 24 VDC, 12V AC. Image cropping. Digital backlight compensation. Video motion detection. Privacy zones. Analytics ready.")
35
The IQeye SentinelTM Series
IP66/NEMA 5 (-22°F/-30°C to +122°F/50°C) < 6 watts total power, 12-24V AC or DC IEEE 802.3af PoE compliant Installer-friendly Supports wall, ceiling or parapet mounting methods
 < 6 watts total power, 12-24V AC or DC. IEEE 802.3af PoE compliant. Installer-friendly. Supports wall, ceiling or parapet mounting methods.")
36
The IQeye AllianceTM Series
VGA to 5.0 MP resolution H.264 with audio option 3-axis gimbal Vandal-resistant Low-profile Industry-first pivoting hinged shroud

37
The IQeye510 Camera (EOL in 2010)
Global shutter Wide dynamic range, up to 100dB Wide VGA resolution (752 x 480) Up to 60+ fps
 Up to 60+ fps.")
38
The IQeye511 Camera 1.3 mp or 720p Competitively priced
Low-profile package IQfocus utility Aux power

39
IQeye – Key Features Mature/stable network operating system
Multi-megapixel resolution (1.3, 2.0,3.1,5.0) Powerful browser-based image management Image cropping, exposure window, privacy mask, motion zones LIGHTGRABBERTM – lowlight enhancement Snapshot and AVI maker - site survey tools Live digital PTZ CMOS progressive scan Analog-out – focus tool CF media slot On-camera recording/playback SW On-camera image authentication IEEE 802.3af PoE compliant NVR friendly
 Powerful browser-based image management. Image cropping, exposure window, privacy mask, motion zones. LIGHTGRABBERTM – lowlight enhancement. Snapshot and AVI maker - site survey tools. Live digital PTZ. CMOS progressive scan. Analog-out – focus tool. CF media slot. On-camera recording/playback SW. On-camera image authentication. IEEE 802.3af PoE compliant. NVR friendly.")
40
The IQeye700/750 Series 5th & 6th Generation IQeye Smart Cameras
LIGHTGRABBERTM II enhanced low-light technology Simultaneous hi/low res streams Public View Port™ analog output CF slot for on-camera recording IP + analog alarm IO 1,2,3 & 5 megapixel color Real-time at full resolution Available on-camera recording/playback software Available on-camera digital authentication

41
IQeye750 Day/Night Series
6th Generation IQeye Smart Camera All the features of the IQeye700 series with true day/night performance

42
IQ700 & 750 (day/night) Series
High-performance multi-megapixel cameras up to 30 images/second up to 20 images/second up to 12 images/second up to 10 images/second Multi-user digital PTZ with Resolution-on-Demand™ Multi-stream low BW and + high resolution Image cropping, include/exclude exposure windows Available on-camera recording/playback software Available on-camera digital authentication

43
CF slot for on-camera recording
IP + Analog Alarm IO

44
IQ700 & 750 Series – cont’d 12-24 V DC, 24V AC and/or PoE
Public View Port™ Analog output CF media slot Alarm I/O Lens format: 1/2” CS Lowlight sensitivity: .2 lux; < 0.09 (day/night) Power consumption: < 3 watts Operating temp: - 20 to 50C CF slot for on-camera recording IP + Analog Alarm IO
 Power consumption: < 3 watts. Operating temp: - 20 to 50C. CF slot for on-camera recording. IP + Analog Alarm IO.")
45
7xx Series vs........ 5xx Series Hardware

46
7xx Series vs........ 5xx Series Hardware What’s the difference?
Sensor Size 7x2, 7x3, 7x5 = ½” sensor 711 and 51x – 1/3” sensor Analog Output 7xx = Full Time 5xx = IQfocus Only I/O Port 7xx = Yes 5xx = No On-board Recording Options 7xx = Onboard Compact Flash (CF) Storage Option 5xx = No Onboard Storage Option Shutter 511, 7xx = Rolling Shutter 510 = Global Shutter Rolling vs Global Shutter
 Storage Option. 5xx = No Onboard Storage Option. Shutter. 511, 7xx = Rolling Shutter. 510 = Global Shutter. Rolling vs Global Shutter.")
47
Standard IQeye Features
Stable, proven operating system Powerful image management/optimization controls Snapshot and AVI maker – site survey tools Digital image cropping, privacy zones Digital backlight compensation/spot metering Multi-zone motion detection Multi-user digital pan/tilt/zoom LIGHTGRABBERTM low-light performance Low power consumption + Power-over-Ethernet CMOS progressive scan sensors Industrial design, interchangeable lens

48
IQeye Sentinel Series All-weather megapixel IP camera
Too many cool things to remember Based on the popular 700 series line Super easy to install Redundant environmental protection Amazingly versatile Unique efficient glass de-fogging technology Robust. Attractive. Full-featured. Based on the popular 700 Series line 1.3 to 5 Megapixel, Regular and Day/Night IQfocus utility, Alarm I/O Super-easy to install Everything about the design focused on fast and simple installation Requires only one tool – and we give you that Powered by single Cat 5 with 802.3af POE, <6 watts total to power the whole unit Both hands free for most of the installation Redundant environmental protection J-box, camera case, lens lens cover – independently sealed IP66/NEMA 5 (-22°F/-30°C to +122°F/50°C) Amazingly versatile Wall mount, ceiling mount, parapet mount with NO additional adapters Sunshield is easily adjustable and removable
![]()
49
IQeye Sentinel Series Technical Specifications
Available for entire IQ700/750 family up to 5Mpix IP66/NEMA 5 (-22°F/-30°C to +122°F/50°C) < 6 Watts total power, 12-24VDC, 24VAC IEEE 802.3af PoE compliant IQfocus utility, Alarm I/O Supports wall, ceiling or parapet mounting methods
 < 6 Watts total power, 12-24VDC, 24VAC. IEEE 802.3af PoE compliant. IQfocus utility, Alarm I/O. Supports wall, ceiling or parapet mounting methods.")
50
Sentinel Series Easy Installation
Install Junction Box Make Connections Close Junction Box Adjust Camera Position Remove Lens Cover Set FOV and Focus Close Lens Cover DONE! Rattle through the steps and go to the next slides if you want to show greater detail PRIMARY MESSAGE: installs go smoothly and quickly. Also discuss ALL CABLES CAPTIVE. No exposed cables in the installation. Reference camera catalogs All major required tools for installation (3mm Allen Wrench, Punch Down Tool) are included!
 are included!")
51
Sentinel Series ease-of-installation
STEP 1: INSTALL JUNCTION BOX Determine how you want the Junction Box mounted (see photos): Ceiling Mount Wall Mount Parapet Mount Install the Junction Box using supplied 2” slotted hex screws (we even threw in a mounting hole template in the box) Hang the camera on either side hanger 1 2 Note that we clearly labeled everything on the PCB board and even have an easy to read labeling diagram on the back side of the cover to make it easy to identify all connections. The screw terminals on the center I/O and power strip are clearly labeled in large letters and don’t require a watchmaker’s screwdriver to loosen and tighten VERY easy to tell which connectors are used from cables coming from the wall, and which connections are from cables coming from the camera 3
: Ceiling Mount. Wall Mount. Parapet Mount. Install the Junction Box using supplied 2 slotted hex screws (we even threw in a mounting hole template in the box) Hang the camera on either side hanger Note that we clearly labeled everything on the PCB board and even have an easy to read labeling diagram on the back side of the cover to make it easy to identify all connections. The screw terminals on the center I/O and power strip are clearly labeled in large letters and don’t require a watchmaker’s screwdriver to loosen and tighten. VERY easy to tell which connectors are used from cables coming from the wall, and which connections are from cables coming from the camera. 3.")
52
Sentinel Series ease-of-installation
INSTALL JUNCTION BOX (cont.) Feed PoE CAT 5 Cable through right side Heyco fitting Use supplied punch down tool to connect CAT 5 or crimp a CAT 5 connector onto the cable and plug it in Ethernet via RJ-45 or punch down Note that the junction box is so well sealed that merely seating the cover on the box seals it. No torquing of the screws is needed. It just works. Installation Hangers on both sides Twin Heyco sealed connectors
 Feed PoE CAT 5 Cable through. right side Heyco fitting. Use supplied punch down tool to. connect CAT 5 or crimp a CAT 5. connector onto the cable and plug. it in. Ethernet via RJ-45. or punch down. Note that the junction box is so well sealed that merely seating the cover on the box seals it. No torquing of the screws is needed. It just works. Installation Hangers on both sides. Twin Heyco sealed connectors.")
53
Sentinel Series ease-of-installation
STEP 2: MAKE CONNECTIONS Connect the pre-wired CAT 5 connector from the camera to the labeled “camera side” connector Connect the 8 pin Aux/IO connector from the camera to the labeled “camera side” connector STEP 3: CLOSE JUNCTION BOX Close the box using the 3mm hex tool we include! Both hands free to work on camera through 90% of the installation Hanger works regardless of configuration or side (Ceiling, Wall, or Parapet) Perhaps demonstrate this by leaving it on the hanger and tilting it in different directions. Emphasize that the same 3mm tool is used to open/close the box, adjust the camera position, and even to open the lens cover
 Perhaps demonstrate this by leaving it on the hanger and tilting it in different directions. Emphasize that the same 3mm tool is used to open/close the box, adjust the camera position, and even to open the lens cover.")
54
Sentinel Series ease-of-installation
STEP 4: ADJUST CAMERA POSITION STEP 5: REMOVE LENS COVER Using the 3mm hex tool, loosen the two screws on the front of the lens cover Slide the lens cover out and let it drop on its captive leashes STEP 6: SET FOV AND FOCUS Using the IQfocus port and any analog test monitor, adjust field of view and focus Again, same tool to open the lens cover Speak about the glass defogging technology here, speak to the fact that the leashed shroud allows full use of both hands while setting field of view and focusing

55
Sentinel Series ease-of-installation
STEP 7: CLOSE LENS COVER STEP 8: DONE! Entire installation, including mounting the Junction Box, takes less than 20 minutes Note that the tool used to open/close the junction box is the same one used to do all wall adjustments, and it’s even the same one used to adjust and remove/install the sun shield. Note that it’s designed to look cool with or without the sun shield, and that the sun shield is very easy to adjust and put on or take off.

56
You may wonder why IQ waited so long to come out with a dome…it wasn’t for a lack of Asian manufacturers wanting to make one for us. It’s because, like everything else at IQ, we wanted to do it right. Welcome to the IQeye Alliance Road Show.

57
Performance End Users Want
Vandal-resistant Low-profile Surface mount TRUE 3-axis gimbal Pivoting shroud Concealed electronics Exclusive multi-megapixel rated lens When we were designing the Alliance dome we looked at a lot of domes from a lot of manufacturers and it seemed most were designed for the consumer market. They were plastic, some had thin bubbles and could be pretty awkward to install. It was pretty apparent that they were more concerned with cutting out manufacturing costs than designing a truly solid product. At IQinVision we know that if we design products that save time & money on installations and can stand the test of time, our customers will be satisfied today and for a long time to come. So what differentiates the IQeye Alliance? First, lets take a look at the hardware. The IQeye Alliance is aluminum with a GE Lexan bubble that can take quite a shot (video clip of baseball bat shot). It’s low profile design makes it inconspicuous but not covert. The entire camera was designed to be surface mounted so you get that “flush mount” look without having to cut into the ceiling. Also, it is designed with a true 3-axis gimbal that allows you to position it in a wide variety of mounting applications very easily. With a lot of the domes we looked at, you had to adjust to the camera then align the shroud, if they weren’t optimized you had to start again which was frustrating. The Alliance’s pivoting shroud solves that problem, just optimize the field of view and focus the picture and the shroud will snap perfectly in place, we’ll demonstrate this in a minute. We also knew that sometimes light could reflect off the electronics so we installed a black plastic cover over the electronics to eliminate reflection making it difficult to see which way the camera is pointing even though it is a clear bubble. The clear bubble also means better low-light performance. The power and network activity within the Alliance will go out a minute after power-up. Last on this slide, we have designed a custom megapixel board mount lens for the Alliance. We have seen other companies put really cheap lenses on a megapixel camera and let me tell you, you can really make a megapixel image look bad with a lens that is not rated for the camera. It is like putting bike tires on a Ferrari.
. It’s low profile design makes it inconspicuous but not covert. The entire camera was designed to be surface mounted so you get that flush mount look without having to cut into the ceiling. Also, it is designed with a true 3-axis gimbal that allows you to position it in a wide variety of mounting applications very easily. With a lot of the domes we looked at, you had to adjust to the camera then align the shroud, if they weren’t optimized you had to start again which was frustrating. The Alliance’s pivoting shroud solves that problem, just optimize the field of view and focus the picture and the shroud will snap perfectly in place, we’ll demonstrate this in a minute. We also knew that sometimes light could reflect off the electronics so we installed a black plastic cover over the electronics to eliminate reflection making it difficult to see which way the camera is pointing even though it is a clear bubble. The clear bubble also means better low-light performance. The power and network activity within the Alliance will go out a minute after power-up. Last on this slide, we have designed a custom megapixel board mount lens for the Alliance. We have seen other companies put really cheap lenses on a megapixel camera and let me tell you, you can really make a megapixel image look bad with a lens that is not rated for the camera. It is like putting bike tires on a Ferrari.")
58
Simplicity Integrators Appreciate
VGA, 1.3 MP and 2 MP models IQcameo-64 independent streams Available with H.264/audio IQfocus and full-time analog video CMOS, PoE Alarm I/O SD card storage for IQrecorder Now let’s look at some other features: First, the Alliance is available in 640x480, 1.3 and 2 megapixel models. The Alliance is a multi-stream camera with our latest IQcameo feature which we’ll show you later. Every IQeye including the Alliance delivers MJPEG images which is the standard for high-quality images. But the Alliance will also be the first IQeye camera to deliver H.264 images simultaneously at up to D1 resolution which is great for remote viewing where bandwidth is a concern. The Alliance actually has TWO analog video outputs. One is a full-time VGA analog output which is great for real-time monitoring or things like Public View Monitors. The other is mounted inside the bubble, and can be used for setting field-of-view and focusing the camera so you don’t have to go to a PC. The IQeye Alliance is almost identical in performance to our popular IQeye700 series, it has alarm I/Os, on-camera recording capability, and like all IQeye cameras is PoE. The Alliance also uses CMOS Progressive Scan which is very low power, so in that sense we are “green”. It also includes standard IQeye features such as digital image cropping, exposure zones, privacy masking, the list goes on.

59
Technical Specs Bubble diameter 4.6” Weight 27.5 oz (about 1.6 lbs)
<2.5W power, 12-24V DC, 24V AC 0°- 40° C temperature range Now for the boring stuff: Read through the specs. 5.7” 3.8”

60
IQeye Alliance Installation Demo
Remove from box Unscrew dome bubble cover Un-snap camera from mounting plate Install mounting plate Make connections Snap camera back into mounting plate Make camera adjustments Re-install dome bubble cover About 25 minutes start-to-finish!!! Demo the Alliance install Also demo the CAMEO functionality.

61
Video recording options
Dedicated PC with NVR software – Robust enterprise-wide system DVR with IP video input - New models coming with megapixel support Network server - IQeye software with existing server or NAS On-Camera Recording- IQ300 & IQ7xx series or IQevent recording system

62
NVR Compatible with all the industry leaders

63
Lenses 101 The basics (and some advanced)
Focal Length and Field-of-view width F-Stop – fast and slow lenses Megapixel rating and spot size Lens format vs Imager format “Day/Night” lenses – IR correction Manual Iris vs.... Auto-Iris vs Fixed Iris C-mount, CS-mount, board-mount

64
CS-mount & C-Mount lenses
There are two mount standards They look the same and both have a 1” thread The difference is the distance from the lens to the sensor when installed on the camera CS-Mount distance is 17.5mm C-Mount distance is 12.5mm

65
Sensor Size and Lens Format
IQeye cameras are available with a 1/3” or ½” sensor size Lenses are manufactured to match these sizes

66
Focus, Zoom and Iris adjustments
Focus adjustment is marked with ‘Near’ and ‘Far’ or ‘N’ and Adjustment for the iris is marked with an ‘O’ and ‘C’ or ‘Open’ and ‘Closed’ Typical adjustment for the Field of view is marked with the mm ranges.

67
Sensor Size and Lens Format
If the lens format is smaller than the sensor size then you will get dark corners or a “Port Hole” effect

68
Sensor Size and Lens Format
Larger lens formats can be used on cameras with smaller sensor sizes. NOTE: The field-of-view will be smaller (more telephoto) because the images captured by the lens is outside the sensor.
 because the images captured by the lens is outside the sensor.")
69
What should be considered in a lens?
Megapixel-rated lenses are recommended Manual or fixed iris supported CS mount C/CS adapter required for C-mount lenses 1/2-inch or 1/3-inch formats IR corrected for day/night cameras Low f-stop

70
Lenses 101 Focal Length and Field-of-view width
All lenses have a focal length Focal length is the distance between the imager and the forward optics of the lens Focal length is either fixed or varifocal Fixed = never changes Varifocal = adjustable Integrators prefer varifocal because they are adjustable in the field Fixed focal lenses generally offer better performance than varifocal Fewer optics = better performance The longer the focal length, the more telephoto the image will be and the higher the F-Stop will be and vise-versa Imager Focal Length

71
Lenses 101 Focal Length and Field-of-view width
Shorter Focal Length – 4.5mm Imager Shorter Focal Length = Wider Field of View and less zoom

72
Lenses 101 Focal Length and Field-of-view width
Longer Focal Length – 13mm Imager Longer Focal Length = Narrower Field of View but more zoom

73
Lenses 101 F-Stop, Fast and Slow Lenses
The term “F-Stop” is also referred to as “lens speed” Simply put, the lower the lens F-Stop, the more efficient it is at letting light in Each of these steps is half the light of the previous step: f/1, f/1.4, f/2, f/2.8, f/4, f/5.6, f/8, f/11, f/16, f/22 F-Stop rating on a varifocal lens is the rating for the widest setting. It’s F-Stop at the lens’s telephoto setting is usually much higher (slower)
")
74
Lenses 101 Focal Length and F-Stop
Because telephoto by its nature is taking in a smaller field of view, it’s also taking in less light. Telephoto lenses have a higher F-Stop rating than Wide angle lenses. This is very important in low light applications i.e. a camera may have a “0.2” lux rating, but if it has a lens with a F2.8 rating, it’s only letting in 1/8 the available light, so it will be darker (more noisy)
")
75
Lenses 101 Megapixel Rating and Spot Size
All lenses have some sort of resolution rating, even if the manufacturer doesn’t publish it. This rating is referred to interchangeably as: TV Line Rating (old school) Resolution (i.e. 1.3 Megapixel, 5 Megapixel, etc.) Spot size (the smaller the better) Most of the time, that rating is the lens center rating Lenses tend to lose resolution toward the edges Manufacturer ratings tend to be unreliable Some lenses that aren’t even megapixel “rated” perform very well on megapixel cameras Some lenses that have a megapixel rating don’t do as well as claimed
![]()
76
Lenses 101 Megapixel Rating and Spot Size
Some things to keep in mind Lens ratings are only a guideline i.e. our V7 is the best glass on the market but is only officially rated at 3 MP, but works great on our 5 MP cameras Lens performance is subjective What you think looks great and vivid might look blurry to somebody else. In the end we can only guide customers to make the right lens choice Great camera plus really cheap lens = bad image Some customers buy our cameras but then pair them with inexpensive standard resolution lenses, then complain to us about fuzzy images IQinVision strenuously qualifies EVERY lens we sell and offer kits that best pair our lenses with the appropriate camera(s) Learn your lenses – you should know automatically which lenses work best (and worst) with which cameras.
![]()
77
Lenses 101 Lens format vs........ Imager format
Imagers come in different size formats i.e. 1/2”, 1/3”, 1/4”, 1/6” etc. Today, all IQinVision cameras are either 1/2” or 1/3” format So do lenses i.e. 2/3”, 1/2”, 1/3”, etc. Today, all IQinVision lenses are either 1/2” or 1/3” format Matchups Matching the format of the lens with the imager is ideal However you can put a bigger lens on a smaller imager: This uses more of the len’s “sweet spot” But it will make the images more telephoto Also since the lens is gathering more light than is actually hitting the imager, in effect this raises the F-Stop (slower lens) Putting a smaller format lens on a larger format imager is bad You will get vignettes on the corners of the image.
 Putting a smaller format lens on a larger format imager is bad. You will get vignettes on the corners of the image.")
78
Lenses 101 IR Corrected “Day/Night” lenses
Infrared (IR) light bends more quickly than visible light Lenses that have poor or no IR correction will show blurry images Imager Infrared Light Visible Light
 light bends more quickly than visible light. Lenses that have poor or no IR correction will show blurry images. Imager. Infrared Light. Visible Light.")
79
Lenses 101 IR Corrected “Day/Night” lenses
IR Corrected lenses correct the IR light bend so it focuses on the same point as visible light NOTE: You can use IR corrected lenses on non-day/night cameras with no ill effects Imager Infrared Light Visible Light

80
Lenses 101 Manual Iris vs........ Auto iris vs....... Fixed Iris
What is an iris? A fixed or adjustable diaphragm that allows more or less light to hit the sensor. Three types Manual – Has to be adjusted manually by the installer during setup Auto iris – Powered, mechanical iris that adjusts as light conditions change Fixed – Set by the lens manufacturer and is not adjustable Six-bladed camera iris

81
Lenses 101 Manual Iris vs........ Auto iris vs....... Fixed Iris
Is Auto iris better? Auto iris lenses were invented for three reasons: CCD sensors have poor dynamic range and one of the ways to counter this is to close the iris during bright conditions Bright sunlight can damage CCD sensors Older analog cameras that do not contain advanced digital signal processing like IQeye cameras could not compensate well for changing lighting conditions Auto iris lenses have some weaknesses MUCH lower life expectancy than manual iris lenses (and when they break, they break closed) They can cause “strobing” or “hunting” Auto iris lens
 They can cause strobing or hunting Auto iris lens.")
82
Lenses 101 C, CS and Board Mount
Most of our traditional cameras are “CS” mount They will accept CS mount lenses They will accept C mount lenses that have the appropriate C to CS mount adapter Some of our cameras are Board mount All of our board cameras come with the appropriate lens already, there is no “no lens” option Alliance is an example C mount lens with C to CS mount adapter Board Mount Lens

83
Cameras 101 Parts of a camera Analog Imaging Sensor
Digital Signal Processor DA Converter Imaging Sensor Parts of a camera Analog Imaging Sensor Digital to Analog Converter Digital Signal Processor Power Board and Connectors Coax Connector I/O Connector(s) Auto iris connector Lens Power/IO Board with Coax Connector, I/O Connector, Power Connectors and Auto Iris Connector Video leaves camera in analog form, uncompressed and ready to serve
 Auto iris connector. Lens. Power/IO Board with Coax Connector, I/O Connector, Power Connectors and Auto Iris Connector. Video leaves camera in analog form, uncompressed and ready to serve.")
84
Corporate Network or Internet
CCTV/DVR Analog Monitor Analog Cameras DVR COAX Corporate Network or Internet

85
Analog vs Digital Simulated Analog Wave Form Time

86
Corporate Network or Internet
IP Video/NVR Network Storage Local Viewing Station IP Camera CAT-5 Corporate Network or Internet

87
Analog vs Digital Zoom in - Simulated Analog Wave Form Time

88
Analog vs Digital Digital Sampling of Analog Wave Time

89
Analog vs Digital Raw Digital Sample Time

90
Compression Compressed vs........ Not compressed Compression types
MJPEG MPEG-4 H.264

91
Compression MJPEG (IQinVision) Intraframe compression
Oldest form of streaming compression Series of snapshots Each frame is individually compressed Considered superior image quality, particularly in applications with a lot of movement Most practical compression today for megapixel Relatively large file sizes compared to MPEG-4 and H.264

92
Compression MPEG-4 Interframe compression “Temporal” compression
I-Frame or “Key” frame is similar to MJPEG frame Next several frames measure changes to I-Frame, these are called reference or “R” frames I-Frames are same size as MJPEG frames, but R-frames can be MUCH smaller Supports audio synch (MJPEG does not) Inefficient and prone to errors in areas of high movement Very processor intensive, difficult to do effectively with Megapixel sensors
 Inefficient and prone to errors in areas of high movement. Very processor intensive, difficult to do effectively with Megapixel sensors.")
93
Compression H.264 Interframe compression
Also a form of “Temporal” compression, in fact it’s really the layer 10 standard of MPEG, or MPEG-10 Less prone to errors in high motion, more capable of compressing megapixel resolutions VERY processor intensive, both in compression and decompression Few or no NVRs support H.264 today, but it is considered the future of temporal compression There is no magic bullet compression. Each has its own strengths and weaknesses

94
Neither is better than the other. It depends on the application
CCD vs CMOS CMOS Sensors (what IQinVision uses) CMOS = Complimentary Metal-Oxide Semiconductor Cheaper to manufacturer in Megapixel resolution than CCD Natively higher Wide Dynamic Range (wait, what’s that?) Requires less power Most digital cameras and cell phone cameras use CMOS CCD (what most standard res cameras use) CCD = Charge-Coupled Device Most Security cameras use CCD sensors Tend to over-saturate reds/greens, but then again, that’s what customers are used to Better low-light sensitivity More expensive to produce Consumes more power than CMOS Neither is better than the other. It depends on the application
 CMOS = Complimentary Metal-Oxide Semiconductor. Cheaper to manufacturer in Megapixel resolution than CCD. Natively higher Wide Dynamic Range (wait, what’s that ) Requires less power. Most digital cameras and cell phone cameras use CMOS. CCD (what most standard res cameras use) CCD = Charge-Coupled Device. Most Security cameras use CCD sensors. Tend to over-saturate reds/greens, but then again, that’s what customers are used to. Better low-light sensitivity. More expensive to produce. Consumes more power than CMOS. Neither is better than the other. It depends on the application.")
95
Total Cost of Ownership (TCO)
Cost to select Cost to acquire Cost to remove legacy system Cost to install new system Cost to make systems work together Cost to train employees on use of new system (both current and future ee’s) Cost to maintain system Cost to expand system Cost to remove and dispose of system
 Cost to maintain system. Cost to expand system. Cost to remove and dispose of system.")
96
Typical Turnkey Project Profile
Technology is only 10% to 15% of the Project! Engineering and Commissioning 20 to 25% Peripherals 15 to 20% Integral’s Technology 10 to 15% Warranty 3 to 5% Installation 25 to 40% Profit 5 to 10%

97
Image Optimization Selecting the correct camera
Selecting the correct compression type Using Pro Line features: Lightgrabber® Telnet access

98
How IQeye LIGHTGRABBERTM Works

99
How IQeye LIGHTGRABBERTM Works
Old School Frame Integration On older analog cameras, the cameras had two take 2 or more frames of video, add them together and then send out a single frame Very hard to control blur Each frame was independently white balanced, so the combining of frames often made for odd coloring in changing scenes Very limited exposure control Effects of gain (graininess) combined as frames added together
 combined as frames added together.")
100
How IQeye LIGHTGRABBERTM Works
What do they do? Our LIGHTGRABBER feature deliver performance that rivals the best day/night cameras in the industry. How do they work? They dynamically adjust each IQeye in real-time for sensitivity and motion using advanced digital frame integration and signal processing to achieve optimal image quality in any lighting situation. Where are they found? Controls are either on the Image tab on firmware versions earlier firmware and on the Setup/Basic tab on firmware 2.9/2 and later.

101
How IQeye LIGHTGRABBERTM Works
Earlier than 2.9/2 – “Image” tab 2.9/2 and Later – “Setup” tab

102
How IQeye LIGHTGRABBERTM Works
IQeye LIGHTGRABBER increases signal gain and exposure time to create brighter images in otherwise dark fields of view. Though IQeye LIGHTGRABBER can significantly increase the brightness of a dark field of view, there are tradeoffs: Increasing the gain also increases the noise or “graininess” of an image. Increasing the exposure time means objects that are moving in the image may be blurred.

103
How IQeye LIGHTGRABBERTM Works
Glossary of Terms Gain – Amplifying the signal. This makes an image look brighter, but also amplifies the “noise” in the image Exposure – This is the amount of time that the pixels are allowed to gather light before they send out a reading to the processor. Just like a regular camera, the longer you leave the shutter open, the more light comes in. Exposure is normally measured in “Hertz” where 30hz means a full second (30 FPS), so 1hz = 1/30th of a second, 15hz = 15/30 (1/2) a second, etc. Frame rate – This is the number of frames per second that a camera produces, such as 1 fps, 2 fps, 5 fps, etc. Frame Integration – Reference to an analog technology that took two or more frames and added them together before transmission. LIGHTGRABBERTM – IQinVision feature that uses a combination of Gain and Exposure to improve low light performance.
, so 1hz = 1/30th of a second, 15hz = 15/30 (1/2) a second, etc. Frame rate – This is the number of frames per second that a camera produces, such as 1 fps, 2 fps, 5 fps, etc. Frame Integration – Reference to an analog technology that took two or more frames and added them together before transmission. LIGHTGRABBERTM – IQinVision feature that uses a combination of Gain and Exposure to improve low light performance.")
104
How IQeye LIGHTGRABBERTM Works
IQeye LIGHTGRABBER has four different settings Disabled – IQ LIGHTGRABBER functionality disabled 1x - Only the gain function is increased. Images may look noisier and grainier*, but not blurrier than if it was disabled. 2x - Gain is increased, and exposure time is slowed to 15 Hz (.067 seconds). This will also slow the maximum frame rate to 15 fps. 4x - Gain is increased, and exposure time is slowed to 7.5 Hz (.133 seconds). This will also slow the maximum frame rate to 7.5 fps. *If conditions are bright enough, the gain will not increase and images won’t look grainy
. This will also slow the maximum frame rate to 15 fps. 4x - Gain is increased, and exposure time is slowed to 7.5 Hz (.133 seconds). This will also slow the maximum frame rate to 7.5 fps. *If conditions are bright enough, the gain will not increase and images won’t look grainy.")
105
How IQeye LIGHTGRABBERTM Works
Other stuff you should know - When activated, IQeye LIGHTGRABBERTM will override the camera’s frame rate. Example 1: If the camera’s max frame rate is set to 30fps and IQeye LIGHTGRABBER is set to 2x, when it gets dark enough IQeye LIGHTGRABBER will reduce the frame rate to 15 fps. Example 2: If the camera’s max frame rate is set to 30fps and IQeye LIGHTGRABBER is set to 4x, when it gets dark enough IQeye LIGHTGRABBER will reduce the frame rate to 7.5 fps.

106
How IQeye LIGHTGRABBERTM Works
IQeye LIGHTGRABBER Disabled Image is dark Moving objects are not blurry Image is slightly grainy because of normal gain adjustments No fps change

107
How IQeye LIGHTGRABBERTM Works
IQeye LIGHTGRABBER – 1X Only Gain is affected, no exposure adjustment. Image is a little brighter Image is a little more grainy than usual Moving objects are only slightly blurred No fps change

108
How IQeye LIGHTGRABBERTM Works
IQeye LIGHTGRABBER – 2X More Gain, and some Exposure increase Image is brighter Image is a quite grainy Moving objects are blurry 15 fps maximum

109
How IQeye LIGHTGRABBERTM Works
IQeye LIGHTGRABBER – 4X Exposure time is doubled Image is much brighter Image is grainy, but not as much as 2X Moving objects are very blurry 7.5 fps maximum

110
How IQeye LIGHTGRABBERTM Works
IQeye LIGHTGRABBER – 4X – Bright Field of View IQeye LIGHTGRABBER turns itself off in bright conditions. Gain and exposure settings are not modified by LIGHTGRABBER Moving objects show no blur No perceivable graininess No fps change

111
Support IQU Development Cameras FAQs Design Tools

112
Development Cameras Hostname Type IP address
devcam1 IQ devcam2 IQ devcam3 IQ devcam4 IQ devcam5 IQ devcam6 IQ devcam7 IQ devcam8 IQ devcam9 IQ devcam10 IQ040S devcam11 IQ041S devcam12 IQ042S devcam13 IQA20S Hostname Type IP address devcam14 IQA22S devcam15 IQA23S devcam16 IQA25S devcam17 IQ devcam18 IQ devcam19 IQ devcam20 IQ devcam21 IQ devcam22 IQD40S devcam23 IQD41S devcam24 IQD42S devcam25 IQ732N Devcam26 IQ541S

113
Top 10 What is the default username & password for an IQeye camera? Username: root Password: system

114
Top 10 2. How do I reset the IQ4, IQ3xx, IQ5xx, and IQ7xx Series cameras back to factory defaults? 1) Remove power from the camera. 2) Locate the NVR/Reset button on the back of the camera. IQ4 Series – Small hole left of the Ethernet port. IQ3xx -- Small hole between the Ethernet and trigger connectors. IQ5xx -- Small hole above the power connector. IQ7xx -- Small hole between the Ethernet and power connectors. 3) Using a straightened paper clip, push and hold the NVR/Reset button. You should be able to feel the button depress. 4) While continuing to hold the NVR/Reset button, apply power to the camera. Keep the reset button pressed for 10 seconds. 5) Release the button and give the camera extra time to re-boot.
 Remove power from the camera. 2) Locate the NVR/Reset button on the back of the camera. IQ4 Series – Small hole left of the Ethernet port. IQ3xx -- Small hole between the Ethernet and trigger connectors. IQ5xx -- Small hole above the power connector. IQ7xx -- Small hole between the Ethernet and power connectors. 3) Using a straightened paper clip, push and hold the NVR/Reset button. You should be able to feel the button depress. 4) While continuing to hold the NVR/Reset button, apply power to the camera. Keep the reset button pressed for 10 seconds. 5) Release the button and give the camera extra time to re-boot.")
115
Top 10 3. How do I reset my IQeye Sentinel & IQeye Alliance Series cameras back to factory default? 1) Locate the “Factory” & Reboot” buttons in the power / data back box. 2) Press and hold the “Factory” button. 3) Press the “Reboot” button for 2-3 seconds and release. 4) Continue to hold the “Factory” button for 10 seconds. 5) Release the “Factory” button and give the camera extra time to re-boot.
 Locate the Factory & Reboot buttons in the power / data back box. 2) Press and hold the Factory button. 3) Press the Reboot button for 2-3 seconds and release. 4) Continue to hold the Factory button for 10 seconds. 5) Release the Factory button and give the camera extra time to re-boot.")
116
Top 10 4. What type of CF (Compact Flash) media does the IQeye 7xx series cameras support? The CF (Compact Flash) media slot on the IQeye 7xx series camera supports both Type I or Type II CF media. Type I media is typically flash memory, and Type II media is typically Microdrives.
 media does the IQeye 7xx series cameras support The CF (Compact Flash) media slot on the IQeye 7xx series camera supports both Type I or Type II CF media. Type I media is typically flash memory, and Type II media is typically Microdrives.")
117
Top 10 5. What type of SD (Secure Digital) media does the IQeye Alliance Series dome cameras support? The SD media slot on the Alliance series cameras supports SDHC (Secure Digital High Capacity) media. This media is typically 4GB in capacity or higher.
 media does the IQeye Alliance Series dome cameras support The SD media slot on the Alliance series cameras supports SDHC (Secure Digital High Capacity) media. This media is typically 4GB in capacity or higher.")
118
Top 10 6. How can I record an H.264 stream without an NVR? To record an H.264 stream with audio you must use a third party capture software solution, such as VideoLan Player. VLC allows you to request the RTSP stream. VideoLan can be downloaded for free at A technical tip walk-through is also available in the Tech Tips section on this page.

119
Top 10 7. Can IQrecorder record H.264 stream? IQrecorder will not record the H.264 stream. IQrecorder will only record the MJPEG image stream from the IQeye cameras.

120
Top 10 8. Why will the lens not focus? When a lens will not focus on an IQeye camera you want to check the type of lens being installed. There are two types of lens mounts, C-mount and CS-mount. All IQeye cameras use a CS lens mount, and can accommodate either a CS-mount of C-mount lens. If a C-mount lens is being installed it will require a C-to-CS adapter. A C-to-CS adapter is a 5mm spacer that threads onto the camera to provide the appropriate spacing between the lens and the camera so the lens can focus. Note: All C-mount lenses shipped from IQinVision include the C-to-CS adapter ring.

121
Top 10 9. Are IQeye cameras sensitive to infrared light? IQeye cameras use color Megapixel, Wide VGA, or VGA image sensors. An infrared cut filter is placed in front of the image sensor for accurate color reproduction. Therefore IQeye cameras with a permanent infrared cut filer will not be sensitive to infrared light. IQeye cameras with a movable Infrared cut filter will be sensitive to Infrared light with a wavelength of nm. IQeye offers the IQ75x and Sentinel series cameras with true day/night functionality ensuring infrared sensitivity with black and white video at night.

122
Top 10 10. How do I initiate a telnet session? 1) Open a command prompt. 2) Type 'telnet <camIP> 3) At Username> root 4) At Local2_> su (short for Super User) 5) At Password> <root password> - default is 'system' 6) Local _2 >> Double carat indicates we are logged on with priveleges.
 Open a command prompt. 2) Type telnet <camIP> 3) At Username> root 4) At Local2_> su (short for Super User) 5) At Password> <root password> - default is system 6) Local _2 >> Double carat indicates we are logged on with priveleges.")
123
Camera & Lens Selection
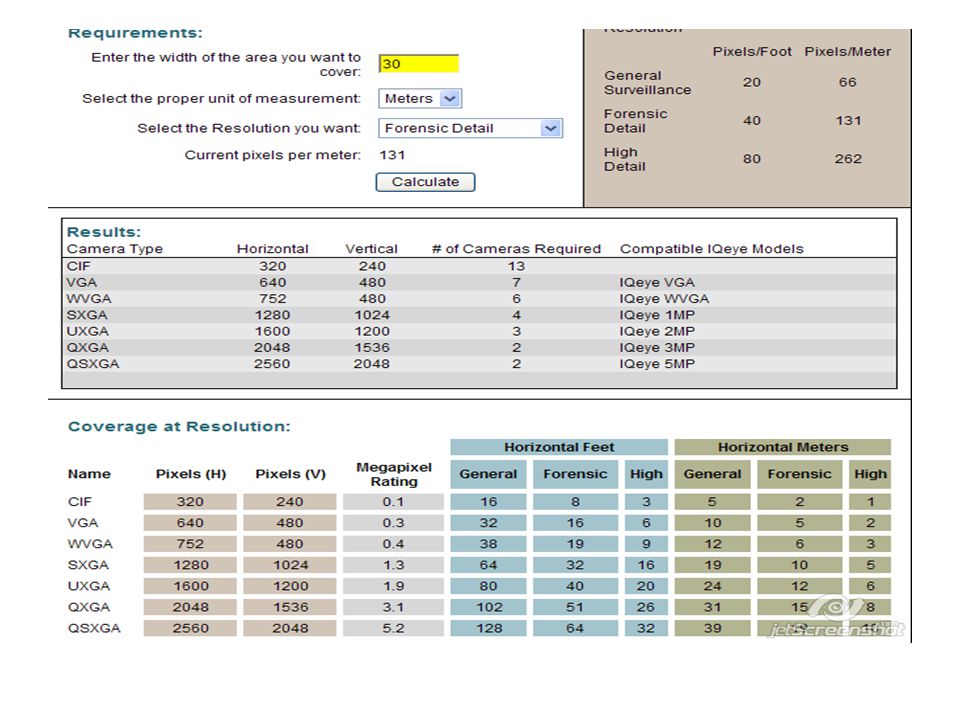
(Image Detail, Horizontal FOV, Distance) To select the proper camera/lense combination you must first decide what image detail you want. To recognize faces or read a license plate you need at least 40 pixels/foot (131 pixels/meter)
 To select the proper camera/lense combination you must first decide what image detail you want. To recognize faces or read a license plate you need at least 40 pixels/foot (131 pixels/meter)")
124
Pixels/foot How much is enough?
![]()
125
Pixels/foot How much is enough?
![]()
126
Telnet Telnet enables access to the advance functionality of the camera To initiate a telnet session Open a command prompt Type: telnet <Cam IP> At the Username prompt type: root At the Local_2> type: su (short for Super User) At the password prompt type the administrative password for the root username (the default is ‘system’). Note: when typing in the password, the characters will not appear as you type. You will now see a Local_2>> (the double carat indicates that we are logged into the camera with privileges)
 At the password prompt type the administrative password for the root username (the default is ‘system’). Note: when typing in the password, the characters will not appear as you type. You will now see a Local_2>> (the double carat indicates that we are logged into the camera with privileges)")
127
Troubleshooting with Telnet
Netstat Shows the current IP’s connected to the camera Handy for seeing what IP’s are accessing the camera. Great for checking if too many simultaneous connections to the camera are causing network bottlenecks

128
Telnet Initiate a telnet session Login to the camera via. telnet

129
Telnet Apropos The Apropos command contains commands for the specified keyword If the keyword cannot be found, the display will output will state ‘nothing appropriate’ You can think of this command as asking ‘where do I start’?

130
Telnet Help The Help command will display all of the commands that are currently available for that string. A ? Can also be used to represent ‘help’ You can think of the ‘help’ and ‘?’ as asking ‘what comes next’?

131
Telnet Set, Save, Define commands Set Save Define
This command changes the parameters value immediately, but not permanently. This is a good command to use for experimentation, without changing any permanently stored parameters Save This command is used after the ‘set’ command to save it into permanent memory. This is used after you have determined that you want to keep the ‘set’ entry permanently Define This command changes the parameter permanently, but not immediately. You will need to reboot to see the change. Note: not all ‘Set’ commands have a corresponding ‘Save’command. Define may need to be used to set certain parameters. To determine which parameters have been saved to permanent memory use the ‘List’ command. We will cover this next.

132
Telnet List vs........ Save commands List Show
This command will display the permanent settings in the camera (those made by the ‘Define’ command) Show This command will display the current settings in the camera (those made by the ‘set’ command, but not permanently ‘saved’ or ‘defined’)
 Show. This command will display the current settings in the camera (those made by the ‘set’ command, but not permanently ‘saved’ or ‘defined’)")
133
Troubleshooting with Telnet
Show Version Shows the current software/hardware versions of the camera Very handy for determining what version of firmware is running

134
Troubleshooting with Telnet
Show Server Counters Shows the counter values of the camera Handy for seeing camera uptime (since last reboot) and network failures. Also displays the cameras MAC address
 and network failures. Also displays the cameras MAC address.")
135
Troubleshooting with Telnet
Show IP Shows Statistics about the network configuration of the camera Handy for seeing the IP, netmask and gateway Also shows time protocol characteristics

136
Troubleshooting with Telnet
Netstat Shows the current IP’s connected to the camera Handy for seeing what IP’s are accessing the camera. Great for checking if too many simultaneous connections to the camera are causing network bottlenecks

137
Troubleshooting with Telnet
Show Image Shows the image parameters Handy for checking settings like Shutter Speed, JPEG Quality, Max FPS setting, current light level

138
Cronscripts A cronscript configures the camera to perform tasks at specified times and dates. The commands are held in a file called ‘crontab’ (no file extension). This is stored locally on the cameras /Flash/ directory. The files holds the commands (based off of telnet commands), along with the time parameters on when to execute the given commands. Each task will contain time/date fields, along with corresponding command. You can use comma’s and dashes in the time/date field. You can use * as a wildcard to tell the camera to disregard that field You can use the # symbol in a line, to tell the script to ignore the entire line. This is beneficial to add a description to the cronscript
. This is stored locally on the cameras /Flash/ directory. The files holds the commands (based off of telnet commands), along with the time parameters on when to execute the given commands. Each task will contain time/date fields, along with corresponding command. You can use comma’s and dashes in the time/date field. You can use * as a wildcard to tell the camera to disregard that field. You can use the # symbol in a line, to tell the script to ignore the entire line. This is beneficial to add a description to the cronscript.")
139
Cronscripts Time fields (from left to right). Minute (0-59)
Hour (0-23) Day of the month (1-31) Month of the year (1-12) Day of the week (0-6 with 0=Sunday)
 Day of the month (1-31) Month of the year (1-12) Day of the week (0-6 with 0=Sunday)")
140
Cronscripts Example Script

141
Exposure Settings Explained
The exposure settings will optimize only for the pixels inside of the exposure window Average will optimize for both the brightest and the darkest pixels inside of the exposure window ClipAverage will ignore the brightest and darkest pixels inside of the exposure window, and optimize for the median of the pixels. This is IQeye’s default exposure setting DarkDetect will optimize for the darkest pixels inside of the exposure window PeakDetect will optimize for the brightest pixels inside of the exposure window

142
Rolling Shutter versus Global Shutter
Exposes the entire imager at once (simultaneously). The entire frame is exposed and gathers light. After the shutter speed has passed the sensor stops gathering light and turn the light into an image. There is no physical shutter that covers / uncovers the sensor – its all accomplished via timing. In real-time the global shutter process happens at 1/60th of a second. ROLLING SHUTTER The rolling shutter exposes different portions of the frame a t different points in time. There is no physical moving shutter. Different portion of the sensor is sensitive to light at different moments in time. The rolling shutter process proceeds down the sensor until the entire frame is exposed. In real time the rolling shutter takes 1/60 of a second. IQ511 – IQ700 / 750 IQ800 / 850 (Sentinel) IQ510 IQeye510
. The entire frame is exposed and gathers light. After the shutter speed has passed the sensor stops gathering light and turn the light into an image. There is no physical shutter that covers / uncovers the sensor – its all accomplished via timing. In real-time the global shutter process happens at 1/60th of a second. ROLLING SHUTTER. The rolling shutter exposes different portions of the frame a t different points in time. There is no physical moving shutter. Different portion of the sensor is sensitive to light at different moments in time. The rolling shutter process proceeds down the sensor until the entire frame is exposed. In real time the rolling shutter takes 1/60 of a second. IQ511 – IQ700 / 750. IQ800 / 850 (Sentinel) IQ510. IQeye510.")
143
IQCameo Example

144
vSMAC and IQCameo What is vSMAC and what are the features?
Video System Management And Control Multi-Stream Low and High resolution motion video Independent frame rate and resolution per stream Regions of interest (IQCameo) 64 virtual camera streams Odd aspect ratio support
 64 virtual camera streams. Odd aspect ratio support.")
145
vSMAC - Benefits Minimal CPU Utilization Bandwidth friendly
Store Hi-resolution /show thumbnail Have more cameras per CPU Bandwidth friendly Transmit hi-resolution only on motion Transmit metadata only Recall from replay buffer only if motion Efficient for Analytics Down-sampling of images Y data only – no artifacts Support more cameras per analytics server

146
Questions?

Similar presentations


 regardless of their total pixel count and.>")
>")

