Download presentation
Presentation is loading. Please wait.

1
Suctioning and Airway Management
Module 7 Suctioning and Airway Management

2
More common causes are:
Abnormal increase in respiratory secretions can result from a variety of conditions More common causes are: Lung or bronchial infections Central nervous depression Exposure to anesthetic gases In newborns saliva & amniotic fluid which babe cannot expectorate Premature babes may have absent or decreased cough reflex

3
In a conscious, alert adult the cough reflex is activated and secretions expectorated
Others must rely on suctioning to carry out this function

4
Definitions Artificial airway = inserted to maintain patent air passage for those whose airway has become or may become obstructed Loss of consciousness, facial or oral trauma, copious resp secretions, resp distress Most common: Oropharyngeal, nasopharyngeal, endotracheal and tracheostomy

5
Indications for Airways
prevent or relieve upper airway obstruction decrease aspiration facilitate secretion removal provide closed system for positive pressure mechanical ventilation

6
The types of Artificial Airways

7
Oropharyngeal Airway Curved plastic device inserted through the mouth & positioned in the posterior pharynx to move tongue away from the palate and open the airway Usually for short term use in unconscious pt. May also be used along with an oral endotracheal tube NOT USED with recent oral trauma, surgery or loose teeth Does NOT protect against aspiration

9
To insert Oropharyngeal Airway, directions on p. 1283

11
Nasopharyngeal Airway (nasal trumpet)
Made of soft rubber or a plastic tube Inserted thru nose into posterior pharynx Facilitates frequent nasopharyngeal suctioning To be used with EXTREME caution with pts with anticoagulants or bleeding disorders Size should be slightly smaller than diameter of nostril and slightly longer than distance from tip of nose to earlobe Check nasal mucous for irritation or ulceration

12
Nasopharyngeal airway in place

13
Endotracheal tube Flexible tube inserted through mouth or nose into tracheal beyond the vocal cords Then acts as artificial airway Allows for deep tracheal suction & removal of secretions Permits mechanical ventilation Inflated balloon seals of trachea so aspiration from GI tract CANNOT occur Generally inserted in emergencies and by physician or specially trained nurses. Not intended for long term use as maintaining placement difficult

14
Orotracheal insertion easiest as done under direct visualization
Endotracheal tube Orotracheal insertion easiest as done under direct visualization Disadvantages are increased oral secretions, more discomfort, difficulty with tube stabilization & inability of pt to talk Nasotracheal is more comfortable to pt & easier to stabilize. Disadvantage is blind insertion required and there is possibility of pressure necrosis of nasal airway, sinusitis & otitis media

16
Endotracheal tube Endotracheal tubes vary according to length, inner diameter, type of cuff & number of lumens Usual sizes = 6.0, & 9.0mm Most cuffs are high volume, low pressure with self sealing inflation valves (or cuff may be of foam rubber) Most are single lumen. But there are dual lumen lumen tubes that can be used to ventilate each lung independently
 Most are single lumen. But there are dual lumen lumen tubes that can be used to ventilate each lung independently.")
17
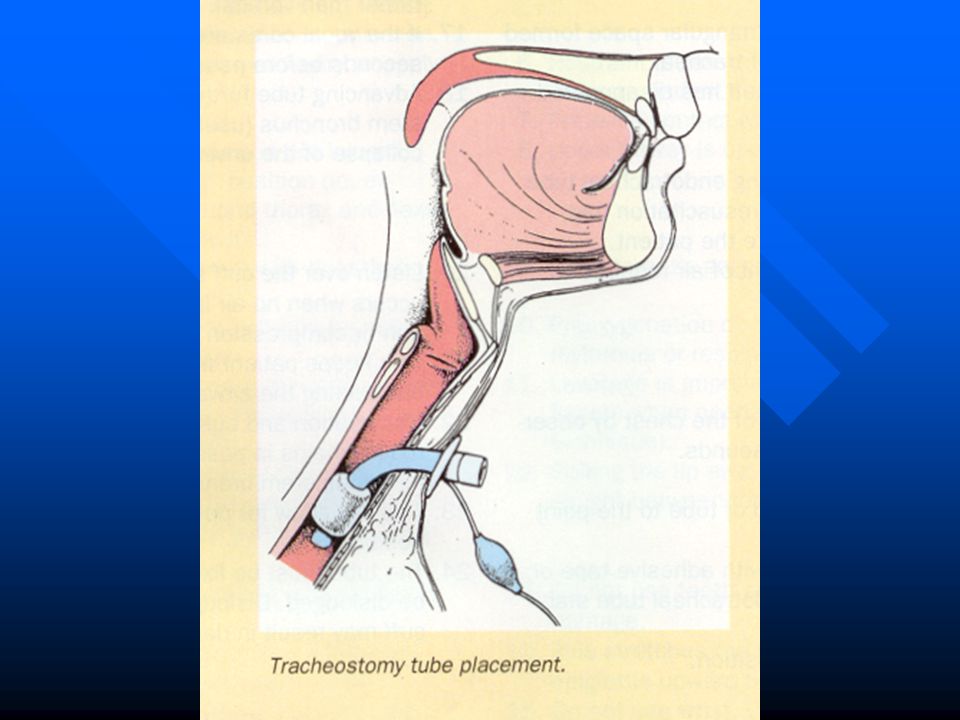
Tracheostomy tube Firm curved artificial airway inserted directly into trachea at level of 2nd or 3rd tracheal through through surgical incision Permits mechanical ventilation Facilitates secretion removal Can be used long term Bypasses the upper airway defenses therefore increases susceptibility to infection Covered in Next Module

19
Nursing Responsibilities with airways
maintain correct tube placement maintain proper cuff inflation maintain & monitor ventilation status (including oxygenation & acid-base balance) providing mouth care fostering communication & comfort
 providing mouth care. fostering communication & comfort.")
20
Suctioning

21
Mobilization of secretions
Goal of airway clearance techniques is to improve clearance secretions thereby decreasing obstruction of airways Secretions can be Removed by Coughing Suctioning Suctioning may be necessary if clt has difficulty handling their secretions or when an airway is in place

22
Suctioning Is aspirating secretions through a catheter connected either to a suction machine or wall suction outlet. Primary Suctioning Techniques are: Oropharyngeal Nasopharyngeal Orotracheal Nasotracheal Suction of an artificial airway

23
Suction catheters Are either (pic in kozier p. 1288)
Open tipped (more effective with thick plugs but can pull at tissues) or Whistle tipped (less irritating to resp tissues) Most have thumb port to control suction (cover to start suction) Catheter attached to tubing which then attaches to collection chamber Suction controlled by a gauge
 or. Whistle tipped (less irritating to resp tissues) Most have thumb port to control suction (cover to start suction) Catheter attached to tubing which then attaches to collection chamber. Suction controlled by a gauge.")
24
Sizes of suction catheters
#12 to #18 Fr for adults #8 to #10 Fr for children #5 to #8 Fr for infants

25
Suction Catheters

26
The Yankauer Yankauer is a rigid plastic catheter with 1 large & several small eyelets through which mucous enters when suction is applied Used for oral suction Patients themselves can be taught to use this suction method

27
Used primarily for oral suctioning
Yankauer Used primarily for oral suctioning

28
How much pressure? Depends on if wall or portable unit is used…
Wall Unit Portable Unit Adult: mm Hg Adult: mm Hg Child: mm Hg Child: mm Hg Infant: mm Hg Infant: 2-5 mm Hg

29
Gurgling sounds during respirations
Procedure 47-4 in Kozier on p Suctioning oropharyngeal & nasopharyngeal cavities Note clinical signs indicating need for suctioning: Restlessness Gurgling sounds during respirations Adventitious breath sounds when chest auscultate Change in mental status Change in skin color Change in rate & pattern of resps Change in pulse rate & rhythm

30
Oropharyngeal & Nasopharyngeal suctioning
Oropharynx = extends behind mouth from the soft palate above the level of the hyoid bone & contains the tonsils Nasopharnyx = is located behind the nose & extends to level of soft palate Used when clt able to cough effectively but is then unable to clear secretions by expectorating or swallowing secretions Suctioning done after pt has coughed Done only until pt able to expectorate own secretions

31
All of the techniques are based on common principles:
Oropharynx & tracheal considered sterile, therefore STERILE technique required Mouth is considered clean therefore suctioning of oral secretions should be performed AFTER suctioning of the oropharynx & trachea If oropharynx & nasopharnyx to be suctioned, use separate sterile catheter for each Frequency of suctioning determined upon assessment (via auscultation & inspection)
")
32
Overview of procedure DO NOT apply suction during insertion (causes trauma to mucous membranes) While performing the suction, apply finger over port to start suction action. Rotate catheter gently Suction attempts should last only seconds Allow second intervals between attempts Flush catheter with sterile water or saline in between attempts Relubricate (with water soluble) with each attempt
 with each attempt.")
33
Notice thumb not covering hole Now hole is covered

34
Evaluation Compare client's respiratory assessments before & after suctioning. Ask client if breathing is easier & if congestion is decreased. Observe client's technique & compliance with suctioning procedures.

35
Record and Report Record respiratory assessments before and after suctioning. Size of catheter used. Route, amount, consistency, and color of secretions obtained. Frequency of suctioning. Client's response.

36
Dangers of suctioning Hypoxemia = insufficient oxygen in blood can result if suction maintained without breaks (therefore no longer than 15secs) Vagal nerve stimulation (vagovagal reflex) stimulation of the vagus nerve by reflex in which irritation of the larynx or trachea results in slowing of the pulse reate Mucosal damage – using suction while inserting a catheter can cause trauma to the mucousa Microatelectasis – is an early manifestation of O2 toxicity Aspiration – safety for semi conscious (on their side) conscious should in semi fowlers with head turned to side Infection – follow protocol for sterile procedure microatelectasis = Microscopic collapse of alveoli that does not involve the airways and may not appear on radiographic examination. Diffuse microatelectasis, an early manifestation of O2 toxicity and the adult and neonatal respiratory distress syndromes, produces dyspnea; rapid, shallow respirations; arterial hypoxemia; decreased lung compliance; and reduced lung volume. Auscultation of the lungs may be normal, or crackles, rhonchi, or wheezes may be heard. Other manifestations depend on the cause of the acute lung injury and the severity of accompanying hemodynamic and metabolic derangements and organ system failure. Copyright 1997 by F.A.Davis Company
 stimulation of the vagus nerve by reflex in which irritation of the larynx or trachea results in slowing of the pulse reate. Mucosal damage – using suction while inserting a catheter can cause trauma to the mucousa. Microatelectasis – is an early manifestation of O2 toxicity. Aspiration – safety for semi conscious (on their side) conscious should in semi fowlers with head turned to side. Infection – follow protocol for sterile procedure. microatelectasis = Microscopic collapse of alveoli that does not involve the airways and may not appear on radiographic examination. Diffuse microatelectasis, an early manifestation of O2 toxicity and the adult and neonatal respiratory distress syndromes, produces dyspnea; rapid, shallow respirations; arterial hypoxemia; decreased lung compliance; and reduced lung volume. Auscultation of the lungs may be normal, or crackles, rhonchi, or wheezes may be heard. Other manifestations depend on the cause of the acute lung injury and the severity of accompanying hemodynamic and metabolic derangements and organ system failure. Copyright 1997 by F.A.Davis Company.")
37
Deep suctioning Tracheal or ‘deep suctioning’ often done by resp therapist, critical care nurse In tracheal suction the catheter is introduced past the glottis deep into the trachea Necessary when clt has pulmonary secretions but is unable to cough and does NOT have an artificial airway

38
Orotracheal & Nasotracheal Suctioning
Catheter passed thru nose or mouth into trachea Nose is preferred route as minimally stimulates gag reflex Similar to nasopharyngeal except catheter extended further to suction trachea ENTIRE PROCEDURE CANNOT TAKE MORE THAN 15 SECS (no O2 reaches lungs during suctioning) Pt should be allowed to rest (unless in resp distress) between passes of catheter and O2 mask/cannula replaced between passes
 Pt should be allowed to rest (unless in resp distress) between passes of catheter and O2 mask/cannula replaced between passes.")
39
AIRWAY MANAGEMENT: SUCTIONING
Verify nursing intervention using physician's order or nursing care plan. Observe for signs and symptoms of excess secretions in the oral cavity and productive cough without expectoration. Assess lung sounds for labored breathing, restlessness/irritability, color, unilateral breath sounds, and oxygen saturation. Assess client's understanding of procedure and feeling of congestion to indicate that the oral cavity or lower airway needs suctioning.

40
Preparation for all types of suctioning.
Fill basin or cup with approximately 100 ml of sterile water. Connect one end of connecting tubing to suction machine. Check that equipment is functioning properly by suctioning a small amount of water from basin. Turn suction device on. Set regulator to appropriate negative pressure: wall suction, 80 to 120 mm Hg; portable suction, 7 to 15 mm Hg for adults.

42
Oropharyngeal suctioning
Attach suction catheter to connecting tubing. Remove oxygen mask if present. Insert catheter into client's mouth (no suction). With suction applied, move catheter around mouth, including pharynx and gum line, until secretions are cleared. Encourage client to cough, and repeat suctioning if needed. Replace oxygen mask if used.
. With suction applied, move catheter around mouth, including pharynx and gum line, until secretions are cleared. Encourage client to cough, and repeat suctioning if needed. Replace oxygen mask if used.")
43
Oropharyngeal suctioning …cont’d
Suction water from basin through catheter until catheter is cleared of secretions. Place catheter in a clean, dry area for reuse with suction turned off or within client's reach, with suction on, if client is capable of suctioning self. Discard water if not used by client. Clean basin or dispose of cup. Remove gloves and dispose.

44
Video on Suctioning covers:
Oropharyngeal Nasopharyngeal Nasotracheal

45
Nasotracheal suctioning
Prepare suction catheter. Open suction kit or catheter using aseptic technique. If sterile drape is available, place it across client's chest. Do table. Be careful not to touch inside of sterile basin not allow suction catheter to touch any nonsterile surfaces. Unwrap or open sterile basin and place on bedside. Fill with about 100 ml sterile normal saline (NS).
.")
46
Nasotracheal suctioning…
Apply sterile glove to each hand (or nonsterile glove to nondominant hand & sterile glove to dominant hand) Attach nonsterile suction tubing to sterile catheter, keeping hand holding catheter sterile. Secure catheter to tubing aseptically. Coat distal 6 to 8 cm (2 to 3 inches) of catheter with water-soluble lubricants. Remove oxygen delivery device, if present, with nondominant hand. Use dominant hand to insert catheter into nares during inspiration without applying suction . Do not force catheter.
 Attach nonsterile suction tubing to sterile catheter, keeping hand holding catheter sterile. Secure catheter to tubing aseptically. Coat distal 6 to 8 cm (2 to 3 inches) of catheter with water-soluble lubricants. Remove oxygen delivery device, if present, with nondominant hand. Use dominant hand to insert catheter into nares during inspiration without applying suction . Do not force catheter.")
47
Nasotracheal suctioning…
Insert catheter approximately 16 cm (6½ inches) in adults. Apply intermittent suction by placing and releasing nondominant thumb over vent of catheter. Slowly withdraw catheter while rotating it back and forth with suction on for as long as 10 to 15 seconds. Replace oxygen device, if applicable. Rinse catheter and connecting tubing by suctioning water from the basin until tubing is clear. Dispose of catheter and remaining saline in basin.
 in adults. Apply intermittent suction by placing and releasing nondominant thumb over vent of catheter. Slowly withdraw catheter while rotating it back and forth with suction on for as long as 10 to 15 seconds. Replace oxygen device, if applicable. Rinse catheter and connecting tubing by suctioning water from the basin until tubing is clear. Dispose of catheter and remaining saline in basin.")
48
Endotracheal or tracheostomy tube suctioning
Prepare suction catheter. Aseptically open suction kit or catheter. If sterile drape is available, place it across client's chest. Unwrap or open sterile basin and place on bedside table. Be careful not to touch inside of sterile basin. Fill with about 100 ml sterile NS.

49
Endotracheal or tracheostomy tube suctioning
Apply sterile glove to each hand (or apply nonsterile glove to nondominant hand & sterile glove to dominant hand). Attach nonsterile suction tubing to sterile catheter, keeping hand holding catheter sterile. Check that equipment is functioning properly by suctioning small amounts of saline from basin. Hyperinflate and/or hyperoxygenate client before suctioning, using manual resuscitation bag or sigh mechanism on mechanical ventilator. Open swivel adapter, or, if necessary, remove oxygen or humidity delivery device with nondominant hand.
. Attach nonsterile suction tubing to sterile catheter, keeping hand holding catheter sterile. Check that equipment is functioning properly by suctioning small amounts of saline from basin. Hyperinflate and/or hyperoxygenate client before suctioning, using manual resuscitation bag or sigh mechanism on mechanical ventilator. Open swivel adapter, or, if necessary, remove oxygen or humidity delivery device with nondominant hand.")
50
Endotracheal or tracheostomy tube suctioning
Without applying suction and using dominant thumb and forefinger, gently but quickly insert catheter into artificial airway (best to time catheter insertion with inspiration) until resistance is met or client coughs, then pull back 1 cm. Apply intermittent suction by placing and releasing nondominant thumb over vent of catheter, and slowly withdraw catheter while rotating it back and forth between dominant thumb and forefinger. The maximum time catheter may remain in airway is 10 seconds. Encourage client to cough.
 until resistance is met or client coughs, then pull back 1 cm. Apply intermittent suction by placing and releasing nondominant thumb over vent of catheter, and slowly withdraw catheter while rotating it back and forth between dominant thumb and forefinger. The maximum time catheter may remain in airway is 10 seconds. Encourage client to cough.")
51
Endotracheal or tracheostomy tube suctioning
Close swivel adapter or replace oxygen delivery device. Encourage client to deep breathe. Some clients respond well to several manual breaths from the mechanical ventilator or resuscitation bag. Rinse catheter and connecting tube with NS until clear. Use continuous suction. Assess client's cardiopulmonary status for secretion clearance and complications. Repeat secretions. Allow adequate time (at least 1 full minute) between suction passes for ventilation and reoxygenation.
 between suction passes for ventilation and reoxygenation.")
52
Endotracheal or tracheostomy tube suctioning
Perform nasopharyngeal and oropharyngeal suctioning to clear upper airway of secretions. After these suctionings are performed, catheter is contaminated; do not reinsert into endotracheal tube (ET) or tracheostomy tube. Disconnect catheter from connecting tube. Roll catheter around fingers of dominant hand. Pull glove off inside out so that catheter remains in glove. Pull off other glove in same way. Discard into appropriate receptacle. Turn off suction device. Place unopened suction kit on suction machine or at head of bed.
 or tracheostomy tube. Disconnect catheter from connecting tube. Roll catheter around fingers of dominant hand. Pull glove off inside out so that catheter remains in glove. Pull off other glove in same way. Discard into appropriate receptacle. Turn off suction device. Place unopened suction kit on suction machine or at head of bed.")
Similar presentations


 – Oral-tracheal – Naso-tracheal Tracheostomy (trach) 1.>")

 SUCTION.>")


