Download presentation
Presentation is loading. Please wait.

1
Basic Unity Scripting/Programming & Components

2
Scripting/programming

3
Scripting Overview Scripting inside Unity consists of attaching custom script objects called behaviors to game objects. In C#, subclass MonoBehaviour (note spelling) to implement behaviors. Different functions inside the script objects are called for certain events.
 to implement behaviors. Different functions inside the script objects are called for certain events.")
4
Scripting Overview Scripting inside Unity consists of attaching custom script objects called behaviors to game objects. To make this association, simply drag the script from the Project window to the object in the Hierarchy window. (If a dialog appears that says “Losing prefab” then choose “continue.”)
")
5
Scripting Overview Different functions inside the script objects are called on certain events. Most frequently used (overridden): void Update ( ) This function is called before rendering a frame. This is where most game behavior code goes, except physics code. void FixedUpdate ( ) This function is called once for every physics time step. This is the place to do physics-based game behavior. You can also define (override) event handlers. These all have names starting with On, (i.e. OnCollisionEnter). See MonoBehaviour class documentation.
 This function is called before rendering a frame. This is where most game behavior code goes, except physics code. void FixedUpdate ( ) This function is called once for every physics time step. This is the place to do physics-based game behavior. You can also define (override) event handlers. These all have names starting with On, (i.e. OnCollisionEnter). See MonoBehaviour class documentation.")
6
Basic C# Script using UnityEngine; using System.Collections; public class NewBehaviourScript : MonoBehaviour { // Use this for initialization void Start ( ) { } // Update is called once per frame void Update ( ) { NewBehaviourScript is a subclass of MonoBehaviour. Class name, NewBehaviourScript, must match file name, NewBehaviourScript.cs.
 { } // Update is called once per frame void Update ( ) { NewBehaviourScript is a subclass of MonoBehaviour. Class name, NewBehaviourScript, must match file name, NewBehaviourScript.cs.")
7
Don’t use ctors! “Using the constructor when the class inherits from MonoBehaviour, will make the constructor to be called at unwanted times and in many cases might cause Unity to crash.”

8
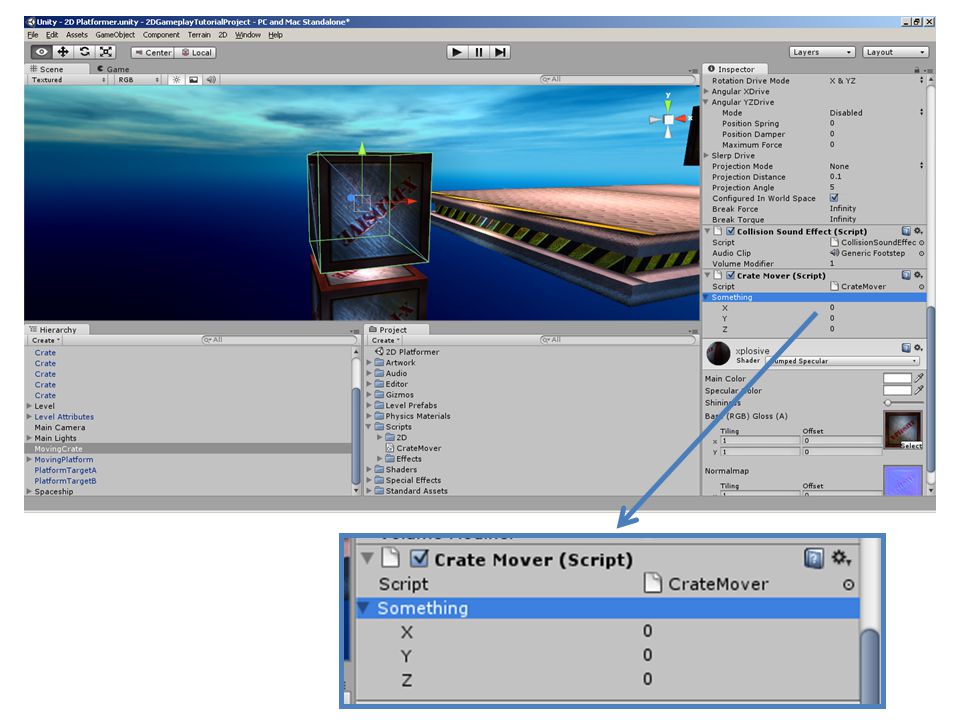
Basic C# Script using UnityEngine; using System.Collections; public class NewBehaviourScript : MonoBehaviour { public Vector3 something; // Use this for initialization void Start ( ) { } // Update is called once per frame void Update ( ) { Public member variables will appear in the Unity UI (once an associate between the script and an object has been made). Private, protected, and public const do not.
 { } // Update is called once per frame void Update ( ) { Public member variables will appear in the Unity UI (once an associate between the script and an object has been made). Private, protected, and public const do not.")
10
Components (http://unity3d. com/support/documentation/Components/index

11
Unity Components Animation components Asset components
Audio components Physics components The GameObject Image effect scripts Settings managers Mesh components Network group Particle components Rendering components Transform component UnityGUI group Wizards

12
Animation Components Animation Animation Clip
stores all animation data that can be used for animated characters or simple animations

13
Asset Components Assets are the models, textures, sounds and all other “content” files from which you make your game. Audio Clip Cubemap Texture Flare Font Material Meshes Movie Texture Render Texture Text Asset Texture 2D

14
Audio Components These Components implement sound in Unity.
Audio Listener Add this to a Camera to get 3D positional sound. Audio Source Add this Component to a GameObject to make it play a sound. Audio Effects (PRO only)
")
15
Physics Components Box Collider Capsule Collider Character Controller
Character Joint Configurable Joint Constant Force Fixed Joint Hinge Joint Mesh Collider Physic Material Rigidbody Sphere Collider Spring Joint Interactive Cloth Skinned Cloth Wheel Collider

16
Physics Components Unity uses the PhysX engine from nvidia.
See for demos, and for developers info.

17
The GameObject GameObjects are containers for all other Components.
All objects in your game are inherently GameObjects. GameObjects do not add any characteristics to the game by themselves. They are containers that hold Components, which implement actual functionality. For example, a Light is a Component which is attached to a GameObject. an empty game object

18
Image Effect Scripts This group handles all Render Texture-based fullscreen image postprocessing effects. They add a lot to the look and feel of your game without spending much time on artwork. But they are only available with Unity Pro!

19
Image Effect Scripts Blur image effect Bloom and flares image effect
Color correction curves image effect Color correction image effect Contrast enhance image effect Contrast stretch image effect Crease image effect Depth of field image effect Edge blur image effect Edge detection image effect Edge detect normals image effect Fisheye image effect Glow image effect Grayscale image effect Motion blur image effect Noise image effect Sepia tone image effect Screen Space Ambient Occlusion (SSAO) image effect Sun shafts image effect Twirl image effect Vignetting image Effect Vortex image effect
 image effect. Sun shafts image effect. Twirl image effect. Vignetting image Effect. Vortex image effect.")
20
Settings Managers Audio Manager Input Manager Network Manager
Physics Manager Player Settings Quality Settings Render Settings Tag Manager Time Manager Most can be accessed via Edit Project Settings <manager>.

21
Settings Managers Audio Manager

22
Settings Managers Input Manager

23
Settings Managers Network Manager

24
Settings Managers Physics Manager

25
Settings Managers Player Settings
Player Settings is where you define various parameters (platform specific) for the final game that you will build in Unity.
 for the final game that you will build in Unity.")
26
Settings Managers Quality Settings

27
Settings Managers Render Settings fog off (right), and fog on (below)
, and fog on (below)")
28
Settings Managers Tag Manager
The Tag Manager allows you to set up Layers and Tags (Edit->Project Settings->Tags). Tags are used to quickly find objects from scripts, utilizing the Tag name. Layers can be used to cast rays, render, or apply lighting to certain groups of objects only.
. Tags are used to quickly find objects from scripts, utilizing the Tag name. Layers can be used to cast rays, render, or apply lighting to certain groups of objects only.")
29
Settings Managers Time Manager Fixed Timestep Maximum Allowed Timestep
A framerate-independent interval that dictates when physics calculations and FixedUpdate() events are performed. Maximum Allowed Timestep A framerate-independent interval that caps the worst case scenario when frame-rate is low. Physics calculations and FixedUpdate() events will not be performed for longer time than specified. Time Scale The speed at which time progress. Change this value to simulate bullet-time effects. A value of 1 means real-time. A value of .5 means half speed; a value of 2 is double speed.
 events are performed. Maximum Allowed Timestep. A framerate-independent interval that caps the worst case scenario when frame-rate is low. Physics calculations and FixedUpdate() events will not be performed for longer time than specified. Time Scale. The speed at which time progress. Change this value to simulate bullet-time effects. A value of 1 means real-time. A value of .5 means half speed; a value of 2 is double speed.")
30
(End settings managers – back to components)
")
31
Mesh Components 3D Meshes are the main graphics primitive of Unity. Various components exist in Unity to render regular or skinned meshes, trails or 3D lines. Mesh Filter Mesh Renderer Skinned Mesh Renderer Text Mesh

32
Network Group Network View
Network Views are the gateway to creating networked multiplayer games in Unity. They are simple to use, but they are extremely powerful. You can learn and discover the fundamental concepts in the Network Reference Guide.

33
Particle Components Particle Systems are used to make clouds of smoke, steam, fire and other atmospheric effects. Particle systems in Unity work by using one or two textures, and drawing them many times, creating a chaotic effect. They are 2D in Unity.

34
Particle Components Ellipsoid Particle Emitter Line Renderer
Mesh Particle Emitter Particle Animator Particle Renderer Trail Renderer Particle Collider

35
Particle Components Ellipsoid Particle Emitter
The Ellipsoid Particle Emitter spawns particles inside a sphere. Use the Ellipsoid property below to scale & stretch the sphere.

36
Particle Components Line Renderer
The Line Renderer takes an array of two or more points in 3D space and draws a straight line between each one. A single Line Renderer Component can thus be used to draw anything from a simple straight line, to a complex spiral. The line is always continuous; if you need to draw two or more completely separate lines, you should use multiple GameObjects, each with its own Line Renderer. The Line Renderer does not render one pixel thin lines. It renders billboard lines that have width and can be textured. It uses the same algorithm for line rendering as the Trail Renderer.

37
Particle Components Mesh Particle Emitter
The Mesh Particle Emitter emits particles around a mesh. Particles are spawned from the surface of the mesh, which can be necessary when you want to make your particles interact in a complex way with objects.

38
Particle Components Particle Animator
Particle Animators move your particles over time, you use them to apply wind, drag & color cycling to your particle systems.

39
Particle Components Particle Renderer
The Particle Renderer renders the Particle System on screen.

40
Particle Components Trail Renderer
The Trail Renderer is used to make trails behind objects in the scene as they move about.

41
Particle Components Particle Collider
The World Particle Collider is used to collide particles against other Colliders in the scene.

42
Particle Components Once again, they are 2D in Unity.
See for examples of 3D particle systems. Also see for Intel’s parallel 3D particle systems (2 videos: demo and discussion).
.")
43
Rendering Components This group contains all Components that have to do with rendering in-game and user interface elements. Lighting and special effects are also included in this group. Camera Flare Layer GUI Layer GUI Text GUI Texture Halo Halo Layer Lens Flare Light Lightmapping Projector Skybox

44
Rendering Components Camera
Cameras are the devices that capture and display the world to the player. By customizing and manipulating cameras, you can make the presentation of your game truly unique. You can have an unlimited number of cameras in a scene. They can be set to render in any order, at any place on the screen, or only certain parts of the screen.

45
Rendering Components Camera
Two-player display created with Normalized Viewport Rectangle

46
Rendering Components Camera
perspective (left) and orthographic/parallel (right)
 and orthographic/parallel (right)")
47
Rendering Components Camera Render texture
This feature is only available for Unity Advanced licenses. It will place the camera's view onto a Texture that can then be applied to another object. This makes it easy to create sports arena video monitors, surveillance cameras, reflections etc. A Render Texture used to create a live arena-cam below.

48
Rendering Components Flare Layer
The Flare Layer Component can be attached to Cameras to make Lens Flares appear in the image. By default, Cameras have a Flare Layer already attached.

49
Rendering Components GUI Layer
A GUI Layer Component is attached to a Camera to enable rendering of 2D GUIs. When a GUI Layer is attached to a Camera it will render all GUI Textures and GUI Texts in the scene. GUI Layers do not affect UnityGUI in any way. You can enable and disable rendering GUI in a single camera by clicking on the check box of the GUI Layer in the Inspector.

50
Rendering Components GUI Text
GUI Text displays text of any font you import in screen coordinates.

51
Rendering Components GUI Texture
GUI Textures are displayed as flat images in 2D. They are made especially for user interface elements, buttons, or decorations. Their positioning and scaling is performed along the x and y axes only, and they are measured in Screen Coordinates, rather than World Coordinates.

52
Rendering Components Halo
Halos are light areas around light sources, used to give the impression of small dust particles in the air.

53
Rendering Components Halo Layer
The Halo Layer can be attached to Cameras to make Halo objects appear in the image. It has no properties of its own.

54
Rendering Components Lens Flare
Lens Flares simulate the effect of lights refracting inside camera lens. They are used to represent really bright lights or, more subtly, just to add a bit more atmosphere to your scene.

55
Rendering Components Light
Lights will bring personality and flavor to your game. You use lights to illuminate the scenes and objects to create the perfect visual mood. Lights can be used to simulate the sun, burning match light, flashlights, gun-fire, or explosions, just to name a few.

56
Rendering Components Light ex. point light

57
Rendering Components Light
Point lights can have cookies (i.e., a cubemap texture with alpha channel). This Cubemap gets projected out in all directions.
. This Cubemap gets projected out in all directions.")
58
Rendering Components Light
Spot lights only shine in one direction, in a cone. They are perfect for flashlights, car headlights or lamp posts. They are the most expensive on the graphics processor.

59
Rendering Components Light
Spot lights can also have cookies - a texture projected down the cone of the light. This is good for creating an effect of light shining through the window.

60
Rendering Components Light
Directional lights are used mainly in outdoor scenes for sun & moonlight. The light affect all surfaces of objects in your scene. They are the least expensive on the graphics processor.

61
Rendering Components Light
Directional Light projecting a cloud-like cookie texture. A cookie is a great way to add some quick detail to large outdoor scenes. You can even slide the light slowly over the scene to give the impression of moving clouds.

62
Rendering Components Lightmapping
Advanced features such as bumpmapping and “baked in” or realtime shadows.

63
Rendering Components Projector
Projectors allow you to project an arbitrary Material on all objects that intersect its frustum. A Projector is used to create a Blob Shadow for this Robot (below).
.")
64
Rendering Components Skybox
Skyboxes are a wrapper around your entire scene that display the vast beyond of your world.

65
Transform Component This group is for all Components that handle object positioning outside of Physics. Transform

66
UnityGUI Group UnityGUI is the GUI creation system built into Unity. It consists of creating different Controls, and defining the content and appearance of those controls. GUI Skin GUISkins are a collection of GUIStyles that can be applied to your GUI. Each Control type has its own Style definition. Skins are intended to allow you to apply style to an entire UI, instead of a single Control by itself. GUI Style GUI Styles are a collection of custom attributes for use with UnityGUI. A single GUI Style defines the appearance of a single UnityGUI Control.

67
Wizards Unity has a simple wizard that lets you create your own ragdoll in no time. You simply have to drag the different limbs on the respective properties in the wizard. Then select create and Unity will automatically generate all Colliders, Rigidbodies and Joints that make up the Ragdoll for you. Ragdoll Wizard

Similar presentations