Download presentation
Presentation is loading. Please wait.

1
WELCOME EF 105 Fall 2006

2
1.USING SOLVER 2. MAKING Templates 3. Links 4. Scenarios Working with ForecastW08.xls Week 08: Topics

3
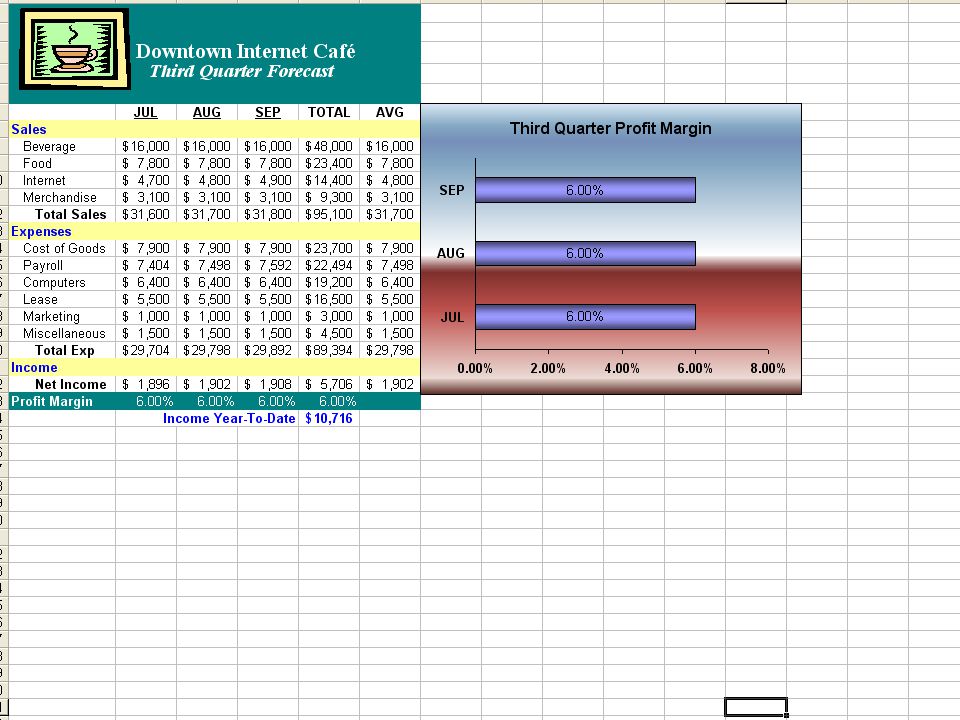
1.USING SOLVER a)Concept 1: Solver is a tool that is used to perform what-if analysis to determine the effect of changing values in two or more cells, called adjustable cells, on the target cell. 1)Solver works backward from the result using a formula to find the numbers. 2)Solver can produce three types of reports: Answer, Sensitivity, and Limits. Display the Third Quarter Sheet b)Choose:Tools/Solver to open the Solver Parameters dialog box.
Solver works backward from the result using a formula to find the numbers. 2)Solver can produce three types of reports: Answer, Sensitivity, and Limits. Display the Third Quarter Sheet b)Choose:Tools/Solver to open the Solver Parameters dialog box..")
5
c)The Solver Parameters dialog box lets you specify the three parameters necessary to complete the command: 1)The Set Target Cell text box lets you enter the cell reference of the cell containing the formula you want to solve. 2)The Equal To options let you set the target cell for: The highest possible value (Max), The lowest possible value (Min), An amount equal to a specified value in the Value of text box. - Select:Value of. - Type:Your goal (e.g.,.13).
The Equal To options let you set the target cell for: The highest possible value (Max), The lowest possible value (Min), An amount equal to a specified value in the Value of text box. - Select:Value of. - Type:Your goal (e.g.,.13)..")
6
Note: If the dialog box is in the way, use the mouse pointer to drag it to another area. 3)The By Changing Cells text box lets you specify the cells that need to be adjusted to meet the goal. In this example, the cells will consist of the salary values located in cells B15:D15. d)Click: Solve to recalculate the formula in the target cell so you can see the values required to meet your goal. 1)The calculated values are displayed in the worksheet cells, and the Solver Results dialog box is displayed.
The By Changing Cells text box lets you specify the cells that need to be adjusted to meet the goal. In this example, the cells will consist of the salary values located in cells B15:D15. d)Click: Solve to recalculate the formula in the target cell so you can see the values required to meet your goal. 1)The calculated values are displayed in the worksheet cells, and the Solver Results dialog box is displayed..")
7
2)You can select either of two options: Select:Keep Solver Solution to retain the recalculated values. Select:Restore Original Values to replace the calculated results with the original values. 3)The Solver Results dialog box also lets you create a report of the Solver solution. To create a report of the answer and exit the Solver Results dialog box: Select:Reports/Answer. Click:. The status bar displays the message “Forming Answer Report.”
The Solver Results dialog box also lets you create a report of the Solver solution. To create a report of the answer and exit the Solver Results dialog box: Select:Reports/Answer. Click:. The status bar displays the message Forming Answer Report. .")
8
4)The report is briefly displayed before you are returned to the active worksheet. 5)A new sheet is created and labeled Answer Report. If there is more than one Answer Report, the sheets will be labeled sequentially: Answer Report 1, Answer Report 2, etc. 2.CREATING A WORKBOOK TEMPLATE a) Concept 2: Workbook Template 1)A workbook template is a workbook that contains pre-designed worksheets that can be used as a pattern when creating other similar sheets in new workbooks. This saves the user time by not having to retype constant information such as headings or fixed numerical data.
A new sheet is created and labeled Answer Report. If there is more than one Answer Report, the sheets will be labeled sequentially: Answer Report 1, Answer Report 2, etc. 2.CREATING A WORKBOOK TEMPLATE a) Concept 2: Workbook Template 1)A workbook template is a workbook that contains pre-designed worksheets that can be used as a pattern when creating other similar sheets in new workbooks. This saves the user time by not having to retype constant information such as headings or fixed numerical data..")
9
2)Once a template is created, it can be saved using the template file format, which assigns the extension.xlt to the file. 3)When you open a template file, Excel opens a copy and gives it a temporary file name. 4)When you save the revised copy, Excel displays the Save As dialog box so you can give the worksheet a new file name. b)Before creating a template from an existing workbook, it should be edited. 1)Select the Answer Report 1 sheet. 2)Choose:Edit/Delete Sheet. 3)Select the Year sheet. 4)Delete the year from the subtitle. 5)Select the First Quarter through Fourth Quarter sheets. 6)Replace desired values with 0.
When you open a template file, Excel opens a copy and gives it a temporary file name. 4)When you save the revised copy, Excel displays the Save As dialog box so you can give the worksheet a new file name. b)Before creating a template from an existing workbook, it should be edited. 1)Select the Answer Report 1 sheet. 2)Choose:Edit/Delete Sheet. 3)Select the Year sheet. 4)Delete the year from the subtitle. 5)Select the First Quarter through Fourth Quarter sheets. 6)Replace desired values with 0..")
11
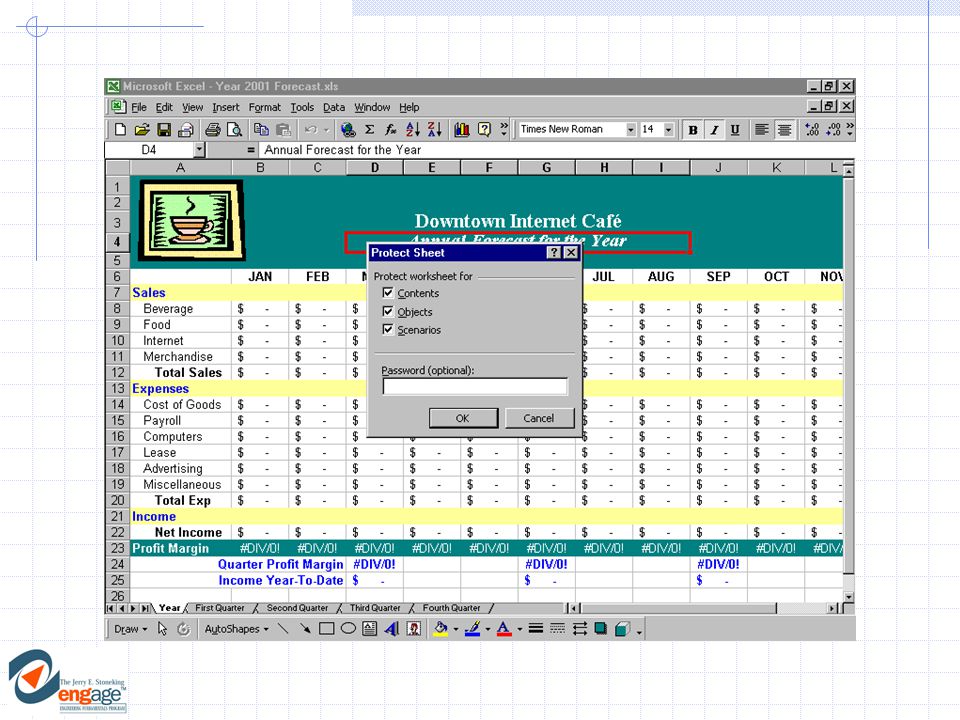
3.PROTECTING THE WORKSHEET (Pages EX4-11 – EX4-14) a)Concept 4: Worksheet Protection 1)To prevent cell contents from being altered or cleared, you can protect a worksheet or cells that you do not want changed. Cells that are locked will remain unchanged, while other cells remain unlocked so they can be modified. First, you unlock the cells that can be changed, and then you protect the rest of the worksheet. 2)In addition to protecting a worksheet, you can protect an entire workbook in two ways: Protecting the workbook structure prevents a user from inserting, deleting, hiding, un-hiding, or renaming sheets. Protecting the workbook windows prevents a user from moving, sizing, or closing workbook windows.
In addition to protecting a worksheet, you can protect an entire workbook in two ways: Protecting the workbook structure prevents a user from inserting, deleting, hiding, un-hiding, or renaming sheets. Protecting the workbook windows prevents a user from moving, sizing, or closing workbook windows..")
13
3)Adding a password prevents unauthorized users from turning off protection and modifying the worksheet. b)When you want to allow entry into some but not all cells in a worksheet, you unlock the cells you want to be able to modify before protecting the worksheet: 1)Select:The cells you want to be able to change (e.g., D4:E10). 2)Choose:Format/Cells. 3)Click:The Protection tab in the Format Cells dialog box. 4)Clear the Locked option box. 5)Click:.
When you want to allow entry into some but not all cells in a worksheet, you unlock the cells you want to be able to modify before protecting the worksheet: 1)Select:The cells you want to be able to change (e.g., D4:E10). 2)Choose:Format/Cells. 3)Click:The Protection tab in the Format Cells dialog box. 4)Clear the Locked option box. 5)Click:..")
14
6)To protect the rest of the worksheet: Choose:Tools/Protection/Protect Sheet. c)To unprotect the data-entry areas of several quarter sheets: 1)Select:The First through Fourth Quarter sheets. 2)Select appropriate cells. 3)Choose:Format/Cells. 4)Clear the Locked option box in the Protection folder.
To unprotect the data-entry areas of several quarter sheets: 1)Select:The First through Fourth Quarter sheets. 2)Select appropriate cells. 3)Choose:Format/Cells. 4)Clear the Locked option box in the Protection folder..")
16
6)For multiple worksheets, each sheet must be protected individually: Select:Ungroup from the sheet tab shortcut menu. Choose:Tools/Protection/Protect sheet. Click:. d) Test the protection by trying to change entries: 1) Enter a character in cell B6. A warning dialog box displays to indicate a locked cell. 2)Enter a character in cell B8. The entry is accepted, indicating an unlocked cell. 3)Click: to clear the message. e)To save the workbook as a template file:
 Test the protection by trying to change entries: 1) Enter a character in cell B6. A warning dialog box displays to indicate a locked cell. 2)Enter a character in cell B8. The entry is accepted, indicating an unlocked cell. 3)Click: to clear the message. e)To save the workbook as a template file:.")
18
1)Choose:File/Save As. 2)Enter the file name and select Template from the Save As Type list box. 4.USING A WORKBOOK TEMPLATE a)To use a template: 1)Choose:File/New. 2)Open the General tab. 3)Select:Forecast Template. 4)Click: and enter a new subtitle in cell D4. b)Excel automatically opens the Save As dialog box to prevent the template from being overwritten. 5)Enter the desired file name.
To use a template: 1)Choose:File/New. 2)Open the General tab. 3)Select:Forecast Template. 4)Click: and enter a new subtitle in cell D4. b)Excel automatically opens the Save As dialog box to prevent the template from being overwritten. 5)Enter the desired file name..")
20
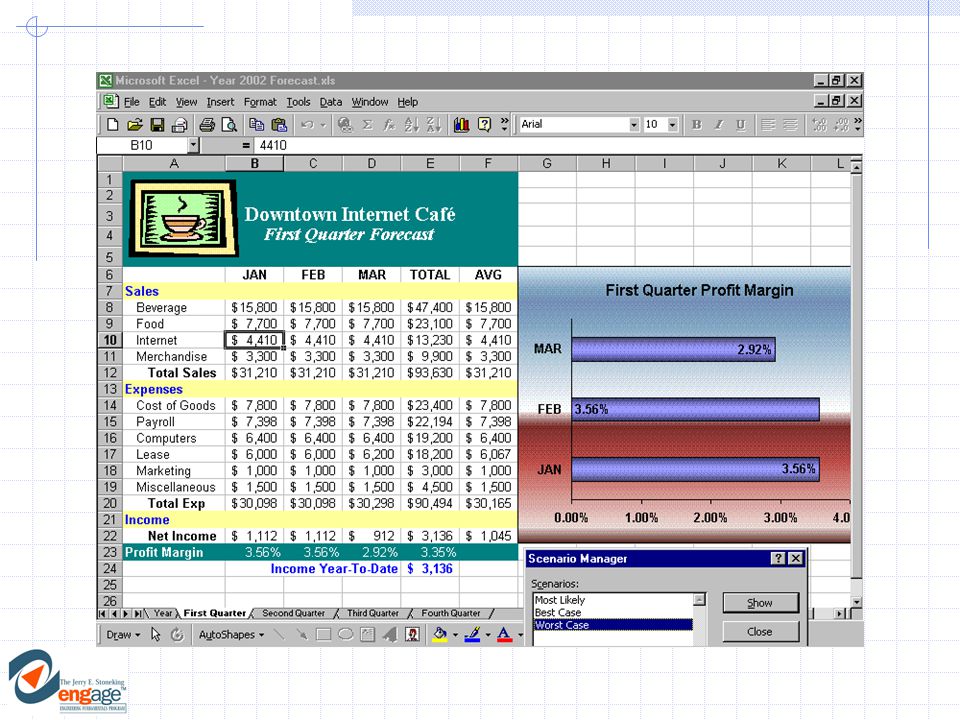
7.CREATING SCENARIOS a)Concept 6: Scenario is a named set of input values that you can substitute in a worksheet to see the effects of a possible alternative course of action. 1)They are designed to help forecast the outcome of various possible actions. 2)Create and save groups of scenario values on a worksheet and switch to any scenario to view the result. 3)Create reports in separate sheets that summarize created scenarios. b)To use the Scenario Manager to create different scenarios and insert them into the workbook:
They are designed to help forecast the outcome of various possible actions. 2)Create and save groups of scenario values on a worksheet and switch to any scenario to view the result. 3)Create reports in separate sheets that summarize created scenarios. b)To use the Scenario Manager to create different scenarios and insert them into the workbook:.")
22
1)Move to cell B10. Note: Click to reduce the dialog box and select the range from the worksheet. Click on cell D17 while holding down [Ctrl] to select the nonadjacent cell. 2 )Choose:Tools/Scenarios. c)Use the dialog box to add, delete, and edit scenarios. 1)Click:. 2)Type:Most Likely in the Scenario Name text box. 3)Specify the range B10:D10 and cell D17 as the changing cells in the Changing Cell text box.
Choose:Tools/Scenarios. c)Use the dialog box to add, delete, and edit scenarios. 1)Click:. 2)Type:Most Likely in the Scenario Name text box. 3)Specify the range B10:D10 and cell D17 as the changing cells in the Changing Cell text box..")
23
d)To add a comment to clarify the data in the scenario: 1)Click:In the Comment text box. 2)Enter the desired text and click. 3)Click: to accept that formulas will be replaced as values. e)Use the Scenario Values dialog box to enter values that will vary for different scenarios. Accept the Most Likely scenario. f)Use the Scenario Manager dialog box to create a best-case scenario. Enter:The name in the Scenario Name text box.
Enter the desired text and click. 3)Click: to accept that formulas will be replaced as values. e)Use the Scenario Values dialog box to enter values that will vary for different scenarios. Accept the Most Likely scenario. f)Use the Scenario Manager dialog box to create a best-case scenario. Enter:The name in the Scenario Name text box..")
26
3)Enter a new comment and click twice. 4)Enter a value (6125) into the changing cells ($C$10) and ($D$10) text boxes. g)Use the Scenario Manager dialog box to create a worst-case scenario: 2)Enter:The name in the Scenario Name text box. 3)Enter a new comment. 4)Enter the values for the changing cells. Note: Move the Scenario Manager box if the chart does not update. This refreshes the window.
Enter a value (6125) into the changing cells ($C$10) and ($D$10) text boxes. g)Use the Scenario Manager dialog box to create a worst-case scenario: 2)Enter:The name in the Scenario Name text box. 3)Enter a new comment. 4)Enter the values for the changing cells. Note: Move the Scenario Manager box if the chart does not update. This refreshes the window..")
29
8.USING SCENARIOS a)Select Worst Case in the Scenario Manager dialog box. b)The worksheet displays worst-case values and the chart reflects the change in monthly profit margins.
The worksheet displays worst-case values and the chart reflects the change in monthly profit margins..")
32
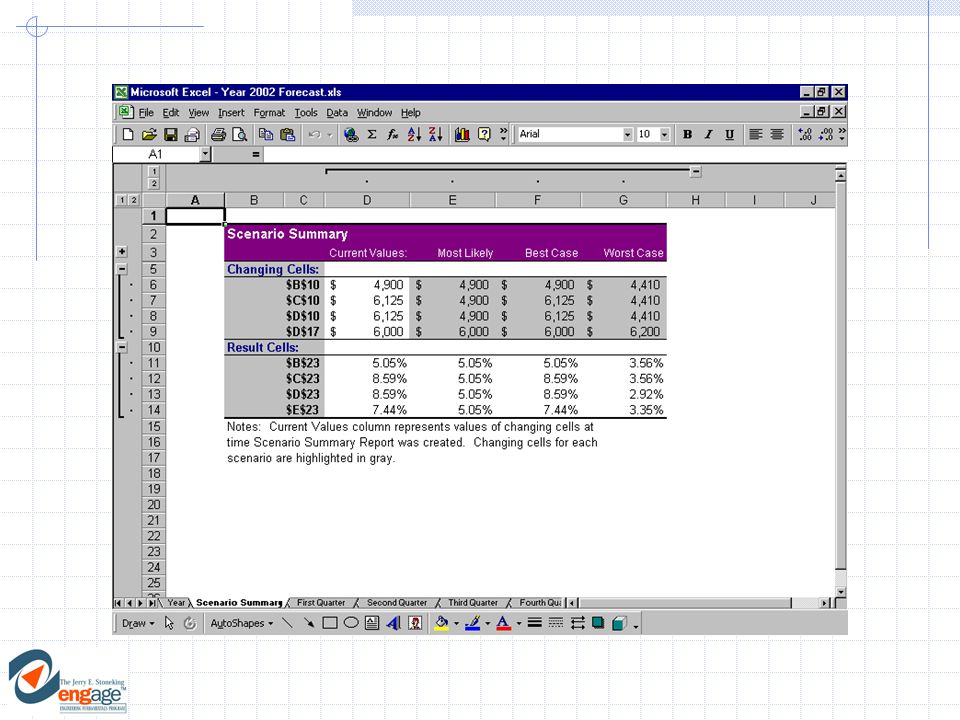
9.CREATING A SCENARIO REPORT a)Create a summary report as a way to evaluate scenarios. 1)Move Scenario Manager dialog box to row 5. 2)Specify the range containing the profit margin values as the results you want summarized. A separate Scenario Summary report is created and displayed in a separate sheet.
Move Scenario Manager dialog box to row 5. 2)Specify the range containing the profit margin values as the results you want summarized. A separate Scenario Summary report is created and displayed in a separate sheet..")
34
10.CREATING AND MODIFYING 3-D SHAPES a)Use 3-D shapes to add emphasis. To create a text box: 1)Click: Text Box and click anywhere under the Notes text. 2)Select font size, font style, and alignment. 3)Enter appropriate text. 4)Change the text box border and resize the text box. 5)Click: (3-D) and select a 3-D effect. 6)Select a fill color from the drop-down menu. b)Open the and select 3-D Settings. 1)Use the 3-D Settings toolbar to experiment with lighting and 3-D color. 2)Close the toolbar.
Click: Text Box and click anywhere under the Notes text. 2)Select font size, font style, and alignment. 3)Enter appropriate text. 4)Change the text box border and resize the text box. 5)Click: (3-D) and select a 3-D effect. 6)Select a fill color from the drop-down menu. b)Open the and select 3-D Settings. 1)Use the 3-D Settings toolbar to experiment with lighting and 3-D color. 2)Close the toolbar..")
35
4-34

36
11.DELETING AND MOVING OBJECTS a)To delete the 3-D text box: 1)Select The object. 2)Press [Delete] key. b)Drag the 3-D object to the desired location.
Press [Delete] key. b)Drag the 3-D object to the desired location..")
38
Practice Do Week08 Exercises

Similar presentations


 with Excel>")


 Excel Lessons 1, 2 and 3 Press Space bar to Advance Frame.>")
