Download presentation
Presentation is loading. Please wait.

1
Vampire Murder Lab Where’s Kristen Stewart?

2
Disclaimer The third (of three) lessons in our sixth unit is devoted to DNA technology, including the electrophoresis process in this lab. However, timing of this lab means we need to start it before we get to the lesson. To avoid repetition, I’ll give you the basics of electrophoresis here, and we’ll cover it again from a slightly different perspective in that third lesson. For lab report purposes, while we will do the procedure now, the report won’t be due till after the in-class lesson. Use this PowerPoint as reference.

3
Electrophoresis Basics Look at anyone else in this classroom right now. – Your DNA is over 99% the same. However, as you know, there are still some differences. Those differences can allow us to compare two samples of DNA and determine whether they are from the same individual or not.

4
Electrophoresis Basics The problem: How do we “highlight” those differences? The answer lies in restriction enzymes. Restriction enzymes slice DNA molecules into pieces by making cuts at specific base sequences. – Restriction enzymes are types of nuclease enzymes. Once the DNA molecule has been chopped up, there will be fragments of DNA of varying lengths. – If two DNA samples have the same size fragments, they are probably from the same person. Get it?

5
Restriction Enzyme Example Here’s a sample of unknown DNA from a crime scene, cut with restriction enzymes: Suppose police bring in a suspect, take a DNA sample, and cut it up with the same enzyme: Clearly these are not the same DNA sequences. 10 kb11 kb28 kb4 kb 13 kb27 kb13 kb

6
Restriction Enzyme Example Obviously, if two samples of DNA are the same, the same restriction enzyme will produce the same size fragments. FYI, the “kb” unit from the last slide is kilobases – shorthand for units of 1000 base pairs. – So 14 kb is 14,000 kilobases, for example.

7
Electrophoresis Basics Here’s the thing…just because we cut the DNA up doesn’t mean we’ll be able to actually see how big each fragment is. We’ll need to separate the fragments, and that’s where another useful component of the DNA structure comes in handy: – DNA is negatively charged.

8
Electrophoresis Basics Because DNA is negatively charged, it will move in the presence of an electric current. – In other words, if you pass a current through a sample of DNA, it will move toward the positive side. – Here’s where electrophoresis comes in.

9
Electrophoresis Basics In gel electrophoresis, a sample of DNA that has been cut with restriction enzymes is loaded into a well (hole) in an agarose gel rectangle. A current is passed through it. DNA fragments move toward the positive terminal (anode). – Smaller pieces move quickly and longer distances. – Larger pieces move slowly and shorter distances. Here’s an example…
. – Smaller pieces move quickly and longer distances. – Larger pieces move slowly and shorter distances. Here’s an example….")
10
Gel Electrophoresis: Uses Suppose the leftmost well in the gel to the left is loaded with a DNA sample from a crime scene. The others are loaded with DNA samples from criminals. Whodunit? – “I always knew Blanch couldn’t be trusted.” Unknown DNA from scene SylvesterHorace Maurice Blanch

11
Preparation As you might guess, a lot of preparation goes into the process: – Digestion (cutting with restriction enzymes) requires incubation. – Dye needs to be added to the gel to see how far the DNA fragments move. – DNA needs to be stained to be visible after it has moved through the gel. – A standard should also be used to allow measurement of DNA fragment sizes.

12
Standard Since DNA tested in electrophoresis is, by nature, unknown, we have no reference point to judge how big the fragments are. For this reason, a standard is usually added. It’s a sample of DNA whose fragment sizes are known. We can use mathematical calculations to determine the size of our fragments by comparing them to the size of the standard fragments. – More on calculations later.

13
Now then…your case. In 2001, a 90-year-old Welsh woman was stabbed 22 times and dismembered by an individual that drank blood from her heart. – This is a real case. Cue the newspaper article. DNA was plentiful at the scene. It’s your job to use the DNA from the crime scene and compare it to the DNA of several suspects to determine which one is the likely culprit.

14
The Procedure Each lab table has a class copy of the procedure. Be sure to read ahead before performing each step. You can reference a copy of this procedure online. Don’t be shy – ask me if you need help. Lastly, remember that the due date will be adjusted as the remainder of the unit falls into place.

15
The Procedure: Overall This lab is divided into three days and thus three large-scale segments: Day 1 – Casting gels. – DNA digestion. Day 2 – Loading gels. – Running electrophoresis. Day 3 – Reading/analyzing results. Divide and conquer! Assign these jobs to your group members.

16
The Procedure: Day 1 Cast a gel: [Mr. G – show this stuff] – Using masking tape and an index card, seal both ends of a gel tray. The index cards are known as “dams.” Cut the index card down to size as closely as possible – folding it will lead to leaks. – Call Mr. G over. He will use a pipet to “caulk” the sides of the tray using a thin layer of gel so nothing leaks out when you fill it.

17
The Procedure: Day 1 Pour liquid agarose gel into the tray until it’s half-full (or half-empty if you’re a pessimist). – Got a leak? Stop pouring and wait for the gel you’ve already poured to solidify. – Resume pouring. It seals itself. Quickly put the comb into the tray at the position closest to the dam (either side) before the gel solidifies. Give the gel between 10 and 20 minutes to solidify.
 before the gel solidifies. Give the gel between 10 and 20 minutes to solidify..")
18
The Procedure: Day 1 When the gel has turned a little cloudy or opaque, it’s ready. Bring the entire assembly (called a cassette) to me. – I’ll store it overnight.
 to me. – I’ll store it overnight..")
19
The Procedure: Day 1 Perform an enzyme digestion: – The restriction enzyme is in a tube labeled ENZ and is kept on ice. – Which enzymes are in it? A mix of EcoRI and PstI. Say, “Eco R-one” and “PST-one.” We’ll talk more about these in class.

20
The Procedure: Day 1 There are also some microtubes that are color-coded: – Green Tube: Crime scene sample of DNA. – Blue Tube: Suspect 1 – Orange Tube: Suspect 2 – Violet Tube: Suspect 3 – Pink Tube: Suspect 4 – Yellow Tube: Suspect 5 They already contain DNA samples.

21
The Procedure: Day 1 First, you’ll add the enzyme mix in 10 μL aliquots to the bottom of each of the tubes. – Use a micropipette. – These are not disposable pipets, but they use disposable tips to transfer very small amounts of liquid. – IMPORTANT: Use a different tip for each transfer to prevent contamination. Demonstrate it, Mr. G. – IMPORTANT: Keep the box of tips closed when not in use. http://www.monobind.com/site/images/Newsletter/Spring%202011%20MB%20Company%20Spotlight-web.htm?height=600&

22
Pause: Reading a Micropipette You will be using micropipettes that are adjustable (but turning the dial) between 2 and 20 μL. – There are 1000 μL (microliters) in 1 mL. Here’s how to read the dial: Eject the disposable tip with the “eject” button. 2 0 4 = 20.4 μL 0 0 7 = 0.7 μL 0 8 6 = 8.6 μL
 in 1 mL. Here’s how to read the dial: Eject the disposable tip with the eject button = 20.4 μL = 0.7 μL = 8.6 μL.")
23
Pause: Using a Micropipette Push the pipette onto a sterile tip. – Don’t touch the tips with your hands. Push down the plunger before putting the tip into the sample. – Notice you can push the plunger down to two “stop positions.” – The first stop position is easy to reach. – To get to the second stop position, you need to push a bit harder on the plunger. – Use the first stop position to get your sample.

24
Pause: Using a Micropipette Let go of the plunger. – Watch as the sample is aspirated (drawn) into the tip. – Got a bubble? It’s a bad draw. In this case, push the plunger back down and try again. Move the pipette over your target. – Push the plunger down to the second stop position. That’s pipette-speak for “all the way down.”
 into the tip. – Got a bubble. It’s a bad draw. In this case, push the plunger back down and try again. Move the pipette over your target. – Push the plunger down to the second stop position. That’s pipette-speak for all the way down. .")
25
The Procedure: Day 1 Shake the samples or use a vortex to mix. Put the tubes in a mini centrifuge and run it for a few seconds. – The centrifuge only has an on-off switch. No speeds. Turn the centrifuge off and wait for it to stop spinning. Then (and only then), open the lid and take out your sample.
, open the lid and take out your sample..")
26
Back to The Procedure: Day 1 So now you have a mix of DNA and enzymes that cut up DNA, all in the bottom of the tube. – We need to centrifuge it to ensure that the enzymes come in contact with the DNA. We want the enzymes to work well. What should we do to increase enzyme activity? – Heat it…but only gently!

27
The Procedure: Day 1 Label a foam test tube holder with your group’s names. Float the tubes (in the test tube holder) in the water bath, which is set to 37 °C. – At this time, the enzymes are digesting the DNA and cutting it into fragments. At the end of class, move the tubes to the refrigerator in the prep room. Day 1 is now done. Spend some time updating your notebooks.
 in the water bath, which is set to 37 °C. – At this time, the enzymes are digesting the DNA and cutting it into fragments. At the end of class, move the tubes to the refrigerator in the prep room. Day 1 is now done. Spend some time updating your notebooks..")
28
The Procedure: Day 2 Your digested DNA samples have been on “pause” since last class in the fridge. Start the process up again by running them in the centrifuge to bring all the liquid in the tubes down to the bottom. So that you can see the samples as you place them into the wells, add 5 μL of loading dye to each tube. – Loading dye is labeled “LD.” – It’s literally dye to help in loading the samples, hence the name. Shake or vortex, then run in the centrifuge. Your samples are now ready. 0 5 0

29
The Procedure: Day 2 Carefully pull the comb out of the gel. Carefully remove the dams from the sides of the tray. This needs to be done SLOWLY. In case you missed that line, I said, “This needs to be done SLOWLY.” SLOWLY!

30
The Procedure: Day 2 Carefully lay your gel in the electrophoresis chamber. – IMPORTANT: Red is positive; black is negative. Lay your gel in such a way that the gel wells are closest to the black terminal. – Remember, the DNA will move AWAY from black. Get the DNA size marker (labeled M) from the ice box.
 from the ice box..")
31
Wait, what? DNA size marker? In order to analyze an electrophoresis gel and determine the size of the DNA fragments, you need to run a known sample of DNA through the gel. This is going to be our standard. We can compare the size of our fragments to the size of the standard and get a rough estimate of how many bases long they are.

32
The Procedure: Day 2 Now that your DNA has been digested by the restriction enzyme mix and dyed, it’s time to load it into the gel. As with the preparation, use a separate pipet tip for each. Steady your arm, then carefully load Lane 1 with 10 μL of DNA size marker. – The pipet tip should extend no more than halfway into the well. – Use a separate tip for each sample. – Demonstrate it, Mr. G. 1 0 0

33
The Procedure: Day 2 Do the same for the other 6 DNA samples (crime scene and suspects), except use 20 μL. Remember, keep your arm steady. Once loading is done, fill the electrophoresis chamber with 0.25x TAE buffer. – This buffer carries the electric current between the terminals. – You should fill the chamber to just above the gel. – Don’t pour the buffer directly onto the gel. Use a funnel to pour into a graduated cylinder, then pour into the chamber. 2 0 0

34
The Procedure: Day 2 Close the chamber lid – it only closes one way. Plug the cable… …into the power source. – There are power sources at every other lab table, so you may need to move. – Each power source can accommodate up to four chambers.

35
The Procedure: Day 2 How do you set the voltage? – You want it to be at 150 V. This one is at 300 V. – Push the “minus” button to lower the voltage.

36
The Procedure: Day 2 How do you turn it on when you’re ready? – Make sure it’s plugged in. Then, push “Run.” – Need to stop? Push the “Stop” button.

37
The Procedure: Day 2 How do you know when you’re done? – When a visible band of loading dye has reached just over halfway through the gel, TURN THE MACHINE OFF. You can stop it temporarily if you need to turn off one gel but keep others running. – Unplug chambers that are done running.

38
The Procedure: Day 2 Remove the gel tray and carefully slide the gel out of the tray and into a staining tray. Add 120 mL of DNA stain (called Fast Blast) to the tray. – The stain will help us visualize and measure the results, since DNA is naturally colorless. – The dye is positively charged and will bind to the negative DNA. – Note that the stain will also stain you. Be careful. Day 2 is now done. Spend some time updating your notebooks.
 to the tray. – The stain will help us visualize and measure the results, since DNA is naturally colorless. – The dye is positively charged and will bind to the negative DNA. – Note that the stain will also stain you. Be careful. Day 2 is now done. Spend some time updating your notebooks..")
39
The List of Shameful “Do Not” DO NOT orient the gel in the electrophoresis chamber backwards. – The DNA should start on the negative (black) side of the chamber, otherwise it will be pulled backwards on the gel and you get poopy results. You will also receive the ire of me. DO NOT tear your gel when removing the comb or dams. – Your wells will not be intact, causing the DNA to mix. DO NOT tear the well with the pipet tip. – If you do, it will cause the DNA to go under the gel and ruin the results for that lane.
 side of the chamber, otherwise it will be pulled backwards on the gel and you get poopy results. You will also receive the ire of me. DO NOT tear your gel when removing the comb or dams. – Your wells will not be intact, causing the DNA to mix. DO NOT tear the well with the pipet tip. – If you do, it will cause the DNA to go under the gel and ruin the results for that lane..")
40
The Procedure: Day 3 Pour off the staining liquid (if necessary) into a bottle. – This stuff can be reused, so don’t dispose of it. Destain your gel by washing it several times in warm tap water with agitation in between. – Pour in warm water. – Swirl. – Pour out water. – Repeat. As you wash, the gel will become lighter (but never clear), and over time the bands will become sharper. – Even after you’re done washing.
, and over time the bands will become sharper. – Even after you’re done washing..")
41
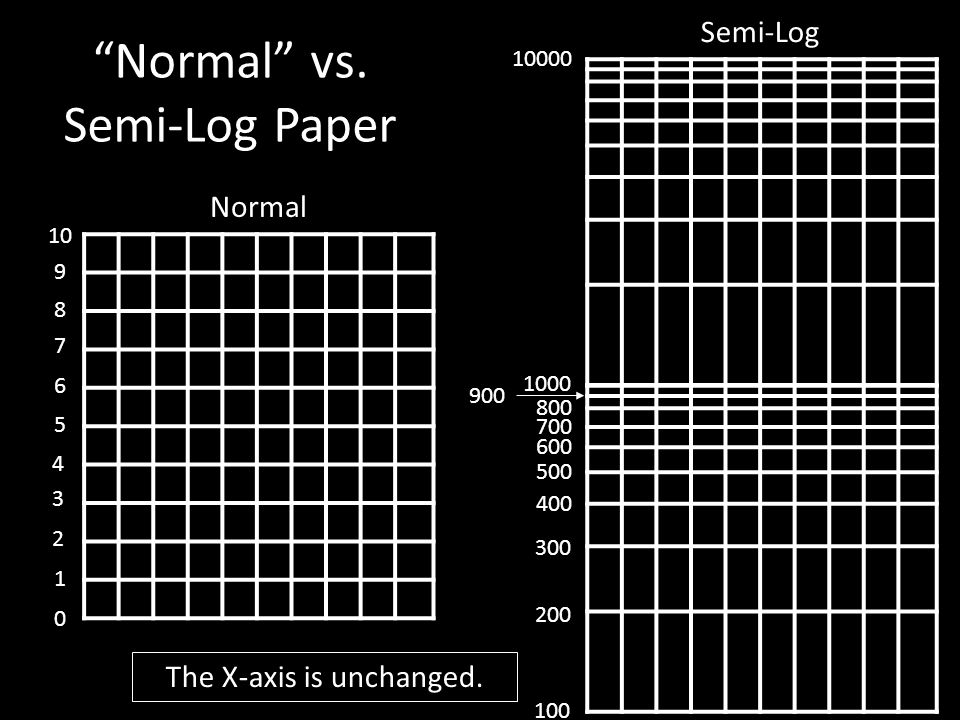
The Procedure: Day 3 Perform the Quantitative Analysis as described in the lab instructions sheet. For this you’ll need semi-logarithmic (semi- log) graph paper. Why semi-log paper? – DNA moves in exponential proportion to its size. How is semi-log paper different? It’s all in the increments. – Let’s take a look at both graphing and your gels.
 graph paper. Why semi-log paper. – DNA moves in exponential proportion to its size. How is semi-log paper different. It’s all in the increments. – Let’s take a look at both graphing and your gels..")
42
Reading Gels Ideal Gel http://www.mun.ca/biology/scarr/gel_electrophoresis.gif Direction of DNA Movement

43
Reading Gels http://www.egusd.net/florinhigh/haugen/GELLAB/content/bin/images/large/100_9003.jpg Your Gel?

44
Identifying Bands Let’s take a look at that last electrophoresis gel as an example. How many bands do you see in this lane?

45
Identifying Bands I could reasonably make a case for five. Here’s how: Band

46
Double Bands? Suppose you get something like this: When you get an extra-thick band, thicker than your others, it’s probably actually two bands close together. – Measure both. And speaking of measurements… Double Band

47
How to Measure Measure from the well to the band. – Use millimeters!

48
“Normal” vs. Semi-Log Paper Normal Semi-Log 10 9 0 8 7 6 5 4 3 2 1 The X-axis is unchanged. 100 1000 10000 200 300 400 500 600 700 800 900
49
How to Graph The distance traveled is a function of the size of the fragments. Normally that would mean putting the fragment size on the X-axis, but this time we’re going to flip it. – Plot “Distance in mm” across the bottom. – Plot “Size in Base Pairs” across the left side. Be careful to use proper logarithmic units.

50
100 1000 10000 0 Distance Traveled (mm) Size (base pairs) 5 10 15 20
 Size (base pairs)")
51
About the Standard The DNA you loaded into the “DNA Size Marker (M)” lane is known DNA. – “Known” meaning we know exactly how many fragments there will be, and how big they are. From your instructions, our sample will break into six fragments of the following sizes: – 23,130 bp (base pairs) – migrates shortest distance – 9,416 bp – 6,567 bp – 4,361 bp – 2,322 bp – 2,027 bp – migrates longest distance
 – migrates shortest distance – 9,416 bp – 6,567 bp – 4,361 bp – 2,322 bp – 2,027 bp – migrates longest distance.")
52
About the Standard Let’s add a lane to our gel: the standard. Blanch is still the criminal, but now we can approximate fragment sizes. Unknown DNA from scene SylvesterHorace Maurice Blanch DNA Size Marker

53
About the Standard Since we know the fragment sizes, let’s label them*. Now let’s use the standard (or the marker, whatever) to estimate Blanch’s DNA fragment sizes. Blanch DNA Size Marker 23,130 bp 9,416 bp 6,567 bp 4,361 bp 2,322 bp 2,027 bp *not to scale ~9500 bp ~6600 bp ~2200 bp ~2100 bp ~1900 bp Electrophoresis!
 to estimate Blanch’s DNA fragment sizes. Blanch DNA Size Marker 23,130 bp 9,416 bp 6,567 bp 4,361 bp 2,322 bp 2,027 bp *not to scale ~9500 bp ~6600 bp ~2200 bp ~2100 bp ~1900 bp Electrophoresis!.")
54
Plotting the Standard But it gets better: We can mathematically estimate the fragment sizes. Since we know the size of the fragments in the standard… – And by the way, a standard is sometimes called a ladder. …we can plot the distances those fragments traveled on the graph and make a curve with them. – The curve should look “vaguely exponential.” – I’ll plot a sample one on the next slide.

55
100 1000 10000 0 Distance Traveled (mm) Size (base pairs) 5 10 15 20
 Size (base pairs)")
56
Your Data Suppose your smallest fragment traveled a total of 20 mm. How many base pairs in length is the fragment? To approximate its length, find 20 mm across the X-axis, then find the length that corresponds with that point on the standard curve. – Here’s what I mean…

57
100 1000 10000 0 Distance Traveled (mm) Size (base pairs) 5 10 15 20 1500
 Size (base pairs)")
58
Conclusions So the DNA fragment in question is about 1500 base pairs in length. You can use this method to compare the crime scene DNA with that of the suspects to find a match and quantitatively describe the fragment sizes. For your notebook: – Identify the fragment sizes for only the perpetrator/crime scene using the size marker lane.

59
Where to get the data? While you’ll do your own measuring (remember, millimeters), a sample data table is in the lab instructions found as a class copy on your desk or available online. That’s where you can get the data points for the standard. Note: If you really don’t see six bands for the size marker, it’s usually better to start with band 2. – Confused? Ask Mr. G.
, a sample data table is in the lab instructions found as a class copy on your desk or available online. That’s where you can get the data points for the standard. Note: If you really don’t see six bands for the size marker, it’s usually better to start with band 2. – Confused. Ask Mr. G..")
60
The Lab Notebook Polish this lab off by completing it as an informal lab report in your notebooks. The usual guidelines apply, but the lab instructions document includes a series of questions that should be answered as well. Note that you will also be explaining the logic behind each step you include in the procedure section of your report. Don’t worry about getting the right suspect. – There are no points associated with being right/wrong. – Just explain yourself and you’ll be fine.

Similar presentations


 2. There are.>")
 in an electrical field.>")


