Download presentation
Presentation is loading. Please wait.

1
Kingston Photographic Club
Restoring Old Photographs

2
Repairing torn or cracked photos can take a long time if you approach it in the wrong way. Often the result still shows tell-tale signs of the repair if you're not careful. I will be using Photoshop Elements to show how it can best be done. Full Photoshop has almost identical techniques, while programs like Paint Shop Pro have quite similar tools and methods. With Photoshop Elements, the whole process involves just a few simple actions – but you need to follow some basic rules and be prepared to spend some serious time on the project. Anyone can seamlessly restore torn photos, to regain that precious memory or moment. This tutorial deals with removing cracks and blemishes from an image and how to recolour faded old photographs.

3
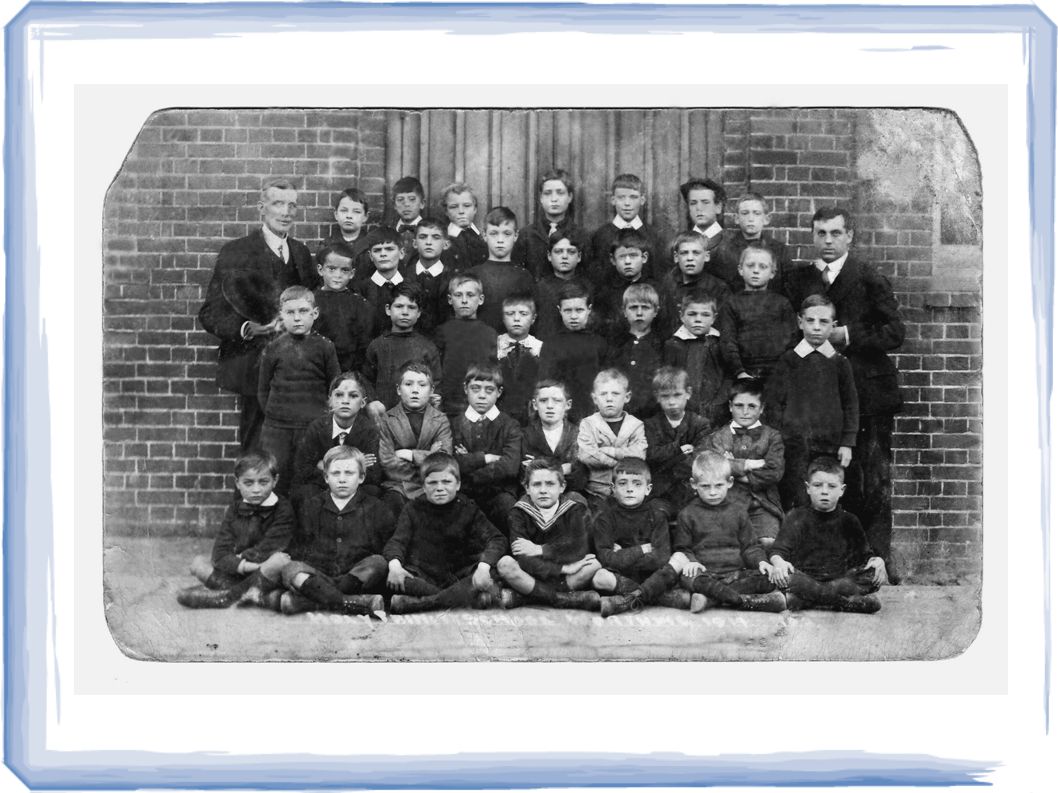
Getting Started Firstly, open up your image in Photoshop/Elements. My example involves an old black and white photograph that also has a lot of marks and scratches. The image is shown below. The photograph dates from 1914 and shows my father and his school friends – a particularly scruffy and undernourished bunch! I have also displayed a large close-up of the worst parts.

4
Before Working On the Picture
See how much you can improve the image by the use of a Levels Adjustment, but do not sharpen the image. The Tools I use three main tools when repairing cracks and marks. The 'Spot Healing Brush Tool', the 'Clone Stamp Tool' and the 'Blur Tool'. The toolbar icons for these tools: Erasing Small Marks and Blemishes The easiest place to start with damaged images is erasing the minor problems. Not only is it a quick way to get started, you very quickly get the sense that you're making progress, which is always nice! On the image above, I began by fixing the two most prominent blemishes in the sky. The easiest way to remove marks like these is with the 'Spot Healing Brush Tool'.

5
To begin, select the tool, and glance up at the options bar
To begin, select the tool, and glance up at the options bar. First ensure that 'Proximity Match' is selected in the 'Type' drop down box. Then pick a suitable brush size for the mark you wish to repair. Zoom in close. Using the tool could not be more simple thanks to Photoshop Elements! Simply click and drag over the mark, just like rubbing on a stain-remover, and then let go! Photoshop Elements will then use the surrounding area to intelligently 'Make up' the part of the image which is missing. The image below left illustrates how the tool is used. The two images right show the before and after views of the area repaired (which came from the bottom left of the main image):
:")
6
An Important Note About Size
It's worth pausing at this point to mention something about the size of images you repair. You may have noticed from the close-ups, that this picture had been scanned at a very large size and high resolution by using the 'Fine' settings on the scanner. This is always best when repairing photographs, for a very simple reason. As we have just seen with the heal tool, a lot of the repairs we will be making involve Photoshop just 'making up' image data. The more image data present to begin with, the more 'intelligent' Photoshop is when inventing data through guesswork. For this reason, when you repair a torn photo, or remove scratches or other damage using Photoshop, always try to do so at the highest resolutions available, and then you can shrink the image after repairs if necessary.

7
Repairing the Major Damage
Back to our repairs. The heal tool is a wonderful invention. Sometimes it doesn't get things right first time, but if it makes things worse rather than better, all you have to do is hit 'Undo', and then try again. By altering your angle slightly, or the area which you ask it to alter, you can usually achieve a good result. Some damage is just too major to repair using this method though. Tape marks and cracks, for example. Without the tape, the heal tool could probably cope with removing the crack, but as it is there is no 'good' image data for the tool to work from. The best it can do is to duplicate the tape, which we consider to be damage itself! This is shown below:

8
So what can we do when Photoshop can't find the right image data
So what can we do when Photoshop can't find the right image data? We find it ourselves!!! Luckily, this is made relatively easy by Photoshop, using the 'Clone Stamp Tool'. This tool gives us the ability to duplicate image data from one part of the image to another, again just by clicking and dragging. First select the tool, and then decide two things. Where you want to copy image data from, and where you want to put it. To select the source, hold the 'Alt' key down, and click somewhere on your image. The destination will be a point relative to the source, and will be set by the next place you click. From now on, when you click and drag, image data will be pasted under your cursor from the other area of the image that you specified. This is a slightly difficult concept to imagine (and explain!), and so if you have never used the clone tool before, I advise you to go and experiment with it now for a bit, until you are used to how it functions. The basic idea now is to replace the damaged area of the image with more natural data from elsewhere. There are some important settings on the clone tool that will help you achieve much more natural results.
, and so if you have never used the clone tool before, I advise you to go and experiment with it now for a bit, until you are used to how it functions. The basic idea now is to replace the damaged area of the image with more natural data from elsewhere. There are some important settings on the clone tool that will help you achieve much more natural results.")
9
Clone Tool Settings Clone Tool Options
The Clone Tool has a reasonably large number of settings, visible in the options bar at the top of the screen. Discussing all of these in great detail is beyond the range of this article, but I will briefly cover a few, because they have such a big effect on how good your repairs look. Pictured below are the settings I used for my clone tool during this tutorial: Clone Tool Options The first option is the brush shape which the tool uses. Almost without fail, I use a soft edged circular brush. If you use a hard edged brush, it tends to be very obvious where you have cloned data, because the edges are solid. A soft edged brush gives a gradual transition between the original image and the repairs you make. The size of the brush should be adjusted according to where you are working. Generally the bigger the better, but don't use a brush so big that you overwrite data which you want to keep.

10
The next important setting, possibly the most important of them all, is the Opacity setting. I rarely leave this set to the default 100%, for the same reason that I rarely use a hard edged brush. Using a lower opacity may mean that you have to go over an area several times with the tool, but it gives you that smooth transition which stops your repairs sticking out like a sore thumb. The downside of this is that you can make a blurry repair area made up of several 'imprints' of neighbouring areas. The image below illustrates these issues. The bottom left hand corner uses a hard edged brush, and the top left hand corner uses 100% opacity. In both images, it is clear where the image was cloned. The image on the right shows the smooth transition we want with a soft edged brush of 60-70% opacity. As for the other options, the mode should almost always be set to 'Normal', and 'Aligned' should always be ticked for our purposes. 'Use All Layers' is a rarely used feature And it can be ignored for this job.

11
But My Repair Still Looks Obvious!
So you've attacked your rip with the clone tool? Made sure you were using the best Source spot to copy image data from? Sometimes even the best repairs still stick out a little. Time to put the last weapon in our arsenal to work! The 'Blur Tool'... Most users will have made use of this tool before, but basically it does what it says on the tin. Blurs things. If an area of your image looks a little bit suspect, and the clone tool has left some edges or other marks, gently blur the mark until it merges into the background. The same settings apply as with the clone tool. It is generally best to use a soft edged brush, with an opacity anywhere between 10% and 80% depending on the mark you're repairing, and how delicate that part of the image is. Feel free to blur a bit, review it, and then undo it if it hasn't improved things. The approach we're taking here is very much a 'light touch' one. Finally, don't be scared to use appropriate brush sizes. I use the blur tool at 30% strength, and a size of 400px when repairing the sky in my example. If a very big or very small brush is needed, don't be afraid to use it.

12
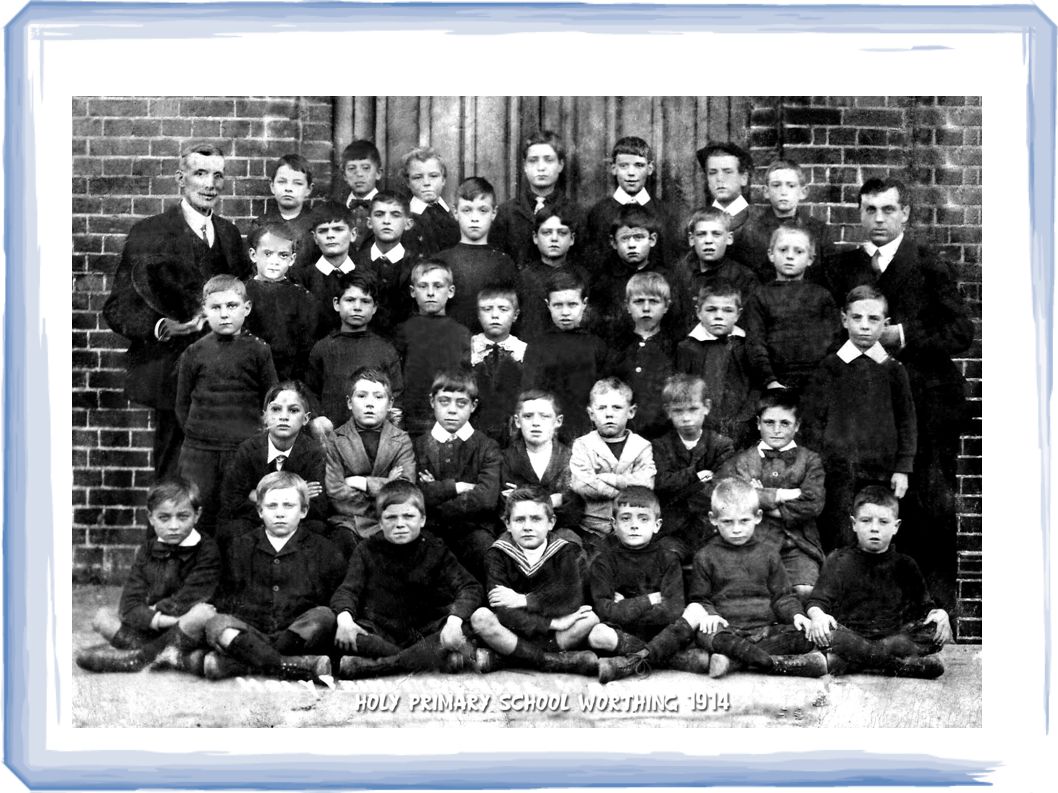
Final Touches After the major damage is repaired, take some time to apply any final changes. The image still had a border round it from where it had been scanned in, and was heavily discoloured. You can find out how to recolour faded images in another presentation, coming soon to a Photo Club near you! Once you're happy with your image, you're free to use it however you want! Replace that torn photo from the album, or simply use it as your desktop wallpaper! What's important is that you now have the skills to repair unwanted image data in any picture you come across! It's not just repairing torn photos, you can remove anything undesirable from your pictures! There's always that object which just sneaks into the side of the photograph when you're not looking. Now you can get rid of it!

13
A Review To help summarize this tutorial, I've included step by step images of my example. The next four slides show the image the picture at each stage of the repair. 1 - Original Image 2 – Levels Adjustment applied, Minor Blemishes Removed (Spot Healing) 3 - Major Damage Repaired (Clone Tool, Some Copy and Paste areas, some Blur) 4 – Final Levels and Sharpen, Denoise, more Blur as required.
 3 - Major Damage Repaired (Clone Tool, Some Copy and Paste areas, some Blur) 4 – Final Levels and Sharpen, Denoise, more Blur as required.")
18
Restoring old photos to their former glory...
Repairing old photos which have faded used to be a challenge! Professionals would spend hours matching colour palettes and adjusting levels, but no longer! Photoshop Elements makes old photo repair simple! Just alter a slider or two, and it will do all the hard work for you. Getting Started Firstly, open up your discoloured old photo. The example image I am using is shown here:

19
Next, we will change the editor to 'Quick Fix' mode
Next, we will change the editor to 'Quick Fix' mode. This is a special section of Photoshop Elements dedicated to making complex image alterations both simple, and easy to 'tweak' until you are completely happy. Click on the 'Quick Fix' button in the top right hand corner of the editor, shown below: Once you are in this mode, you should see your image in the middle of the screen. There are several different ways you can view the image, and these can be changed by the 'View' drop down box in the bottom left hand corner. When attempting to restore old photos, I like to see both the before and after view at the same time. To do this, select 'Before and After (Portrait)' from the drop down box. This is pictured below:
 from the drop down box. This is pictured below:")
20
When attempting to restore old photos, I like to see both the before and after view at the same time. To do this, select 'Before and After (Portrait)' from the drop down box. This is pictured below: Restoring the Colour To begin restoring the colour, drag the 'Smart Fix' slider to the middle. The slider is located under the first tab on the right of the screen, reading 'General Fixes'. It is shown in the image highlighting the 'Quick Fix' button above. The image should now look roughly correct, but now we can fine-tune the repair a little. Moving the slider to the right will emphasize more the blue and green colours. Moving the slider to the left will increase the red and yellow colours.

21
Only you know how the photo should look, Photoshop isn't that clever
Only you know how the photo should look, Photoshop isn't that clever! (Yet). Adjust the slider by very small distances until the color looks just how you want it. When you are happy, click the tick icon at the top of the 'General Fixes' tab. This will accept the changes.
. Adjust the slider by very small distances until the color looks just how you want it. When you are happy, click the tick icon at the top of the General Fixes tab. This will accept the changes.")
22
Multiple Smart Fixes For some photos, repeating this process twice can yield even better results! Below, the example photo is shown before any changes, then after two Smart Fixes. As you can see, the second repair brought a little extra colour and contrast into the image, which improved it again.

23
The Other Settings As you will have seen, there are several other sliders which can be altered. It is possible to use these sliders to improve your old photo in just the same way as the Smart Fix slider, but...... Nine times out of ten Photoshop gets it looking great just with the first slider. You will only very rarely need to use the other sliders to fix an image, but just in case you do, here's a quick summary: The 'Lighting' tab contains sliders which alter the brightness and contrast of an image. If your photo is very poorly lit, for example it was taken in a dark room with no flash, sometimes these sliders can be used to bring out detail. The 'Colour' sliders can be used to change the atmosphere of an image. For example the temperature slider can make an image from a cold, damp cloudy day look like a warm summer sunset! The 'Sharpen' slider is great for photographs which use very old inks, and have blurred over time. It can help to further define the edges of a slightly fuzzy object.

24
Repair a Blurred Photo Bringing the blur back into focus... Blurred pictures are annoying! It's one of the most common problems photographers have, but one of the hardest to correct after the photograph has been taken! The Basic Principle If you've used Photoshop or Photoshop Elements for a while now, you may have noticed two terms that walk hand in hand. 'Blurring' and 'Sharpening'. Basically, sharpening an image is the opposite of blurring it. Photoshop Elements provides many different ways to sharpen an image. To start with there's the 'Sharpen Tool', found near the bottom of your tool palette. This allows you to sharpen just a certain area of a picture, using an appropriate brush shape and size. If you're sharpening the whole image, you can use the filters in the 'Sharpen' category under the 'Filter' menu. These include 'Sharpen', 'Sharpen More', and 'Sharpen Edges'. Additionally, if you like to correct photos in 'Quick Fix' mode, there is a sharpen slider available in that section for you to use.

25
A 'Quick' Example Over-Sharpening
For a 'manageable' level of blur, open the photo in Photoshop Elements, and switch to 'Quick Fix' mode: The 'Sharpen' slider is the furthest one down on the right hand side by default. By dragging it around two thirds of the way along, I was able to reduce the blurring effect on my photo. Over-Sharpening Unfortunately, sharpening is a rather in-exact art, and carries a danger with it. Because of the way it works, it is all-too-easy to 'over-sharpen' an image, causing very unattractive results. This is especially common when using the sharpen tool on a high strength setting.

26
Severe Blurring Full Edit
In cases where images are extremely blurred, it may be impossible to repair them effectively. Full Edit Elements has other methods of Sharpening – 'High Pass Filter', 'Unsharp Mask' and 'Adjust Sharpness'. While not at all complex, these techniques are applied in the 'Full Edit' mode and I suggest a study of a good book about Elements before trying them. Don't forget that a badly focused picture just cannot be turned into a technically brilliant one just by sharpening, whether using Elements, Photoshop or any other software – if the technical quality, particularly the sharpness, is poor then you will only risk over-sharpening and introducing more problems than you started with.

27
Camera Shake Shutter Speed
To avoid blurring, photos should always be taken when the camera is stationary. If you find that your hands shake when you are taking photos, find something to rest the camera, or your body, on. Ideally this would be a tripod, but if there is not one available, look for walls or other surfaces. If no surface is available, try leaning up again something, or putting your elbows by your side, to steady your arms and reduce camera-shake. Shutter Speed Another way to reduce blurring is to increase the shutter speed of your camera. If your camera allows you to manually set the shutter speed, it is useful to remember that on high shutter speeds, blurring is usually dramatically reduced. Unfortunately the reverse is also true. Using slow shutter speeds, perhaps to compensate for bad light, blur is dramatically increased. Ensure that the camera is perfectly still on low shutter speeds.

28
Bad Light Apart from shutter speed, photos are usually more prone to blurring in bad light anyway. Auto-Focus systems generally require light and contrast to be able to do their job properly. If you are taking photos inside, ensure you use a flash if light is fading. When outside, the best tactic is once again a perfectly still camera. If in Doubt... If you are struggling to take a particular image, the only other advice is to take lots of pictures! On a digital camera there can be a reasonably large variation between repeat shots. The more pictures you take, the more chance you stand of getting at least one good one!

Similar presentations


. Before we get started… - These are only very simple explanations - I could be wrong! - Mainly aimed at digital users.>")
 follow the hyperlinks to navigate to the specified Topic or Figure.>")


