Download presentation
1
The Metalworking Lathe
Unit 58 Metalwork Technology and Practice

2
Lathe Operation Principle
Lathes operate on the principle of a cutting tool removing metal as it is being fed into a revolving work piece. (Fig 58-2 pg. 451)
")
3
Kinds of Lathes Manually Operated Lathe: Used to make single parts and small quantities of multiple parts or for repair of worn parts. Screw Machines and Turret Lathes: Used for production runs of a few hundred parts. Numerically Controlled and CNC: Used for short but rapid production runs. These are replacing the Manual Lathes. Automatic Lathes: Used for production runs of thousands identical parts Vertical Turret Lathes: Used to machine parts of a large diameter.

4
Sizing Lathes Lathes come in various sizes
Lathes are sized by the swing and bed length. Swing: Is the largest diameter work piece that can be turned on the machine. The swing is measured by the distance from the center point of the chuck to the bottom of the bed. Multiply this measurement times two to reach the largest diameter stock that can be turned. The bed is measured from front to the back of the machine. (See Fig pg 453)
")
5
Lathe Examples 7” x 12” Lathe 13” x 40” Lathe

6
Lathe Main Parts Bed: The main frame upon which the machine is built.
Headstock: Always on the left hand side of the bed. This contains the drive mechanisms of the lathe (motor). This part will accept different chucks. Tailstock: Always clamped to the right side on the lathe bed. This part moves on the bed. This part will accept live centers, dead centers, drill chucks, tapered shank drills, and reamers. Both headstock and tailstock contain spindles.
. This part will accept different chucks. Tailstock: Always clamped to the right side on the lathe bed. This part moves on the bed. This part will accept live centers, dead centers, drill chucks, tapered shank drills, and reamers. Both headstock and tailstock contain spindles.")
7
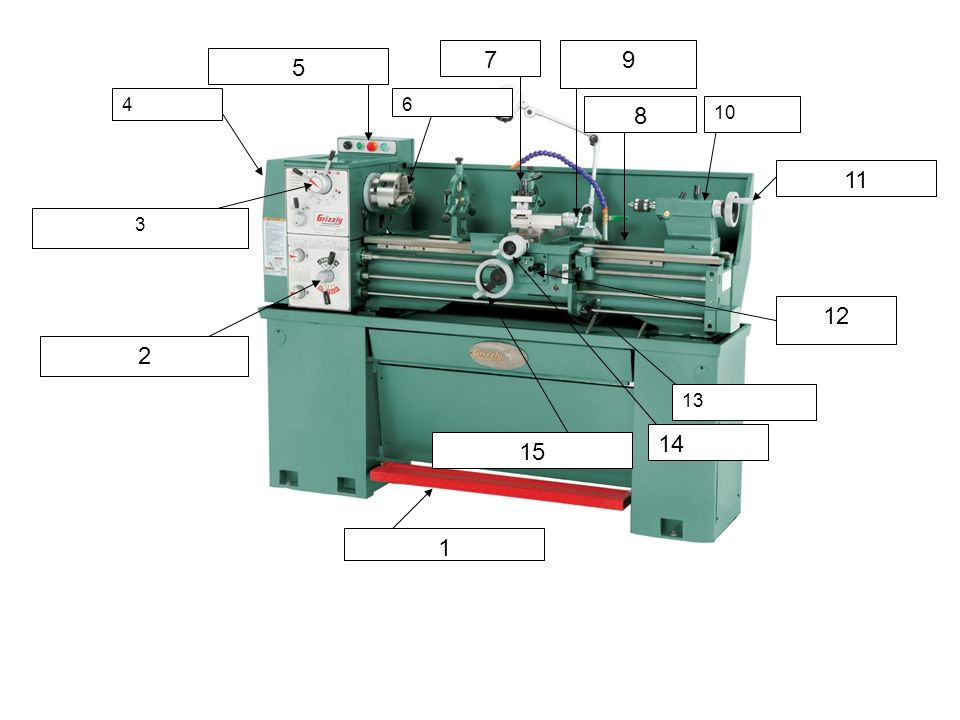
7 9 5 4 6 8 10 11 3 12 2 13 14 15 1
8
Headstock Drive System
Belt Driven: This is the most common upon older lathes. A V-belt will drive all the moving parts off the electric motor. Gear Driven: A series of gears operate the moving parts V-belt and Manual-shift systems require the operator to change speeds by changing the belts to different pulleys. Lever-shift systems and variable speed drive systems allow the operator to change speeds by the movement of a lever.

9
Tool Post Compound Rest Knob Main Power Switch Headstock Chuck Bed ways Tailstock Tailstock Handle Speed Change Levers Power Feed Clutch Feed Change Levers Friction Clutch Cross Slide Carriage Hand Wheel Emergency Foot Stop

10
Carriage Feed Longitudinal Feed: When the tool is fed along the work, parallel with the bed. Turning Boring Cross Feed: When the tool is fed across the end of the work piece. Facing (See Fig pg. 456)
")
11
Carriage Control (See Fig. 58-20 pg. 457)
Apron Handwheel: Used for manual longitudinal movement. Cross-feed Knob: Used to move the cross slide in and out manually. Compound Rest: Holds the toolholder and cutting tool that is mounted on the cross- slide which is fed manually with the compound-rest knob.

12
Tool Post Compound Rest Knob Main Power Switch Headstock Chuck Bed ways Tailstock Tailstock Handle Speed Change Levers Power Feed Clutch Feed Change Levers Friction Clutch Cross Slide Carriage Hand Wheel Emergency Foot Stop

13
Lathe Safety

14
Safety Precautions Always wear safety glasses
Do not wear loose clothing or long sleeves Short sleeves are recommended Never wear a ring or watch Rings and watches can get caught in revolving work or lathe parts If metal objects would fall on the hand this would cause the ring to bend or break. Removing a bent ring is painful!!!

15
Safety Precautions Know your lathe parts
Not knowing what certain levers do and how they operate could can be dangerous Know where your emergency shut down switches are located at Do not operate a lathe without the designed safety features Stop the lathe then shut off the power when checking measurements and removing stock from chuck or spindle

16
Safety Precautions Do not attempt to measure revolving parts
If the machine is equipped, use the emergency foot stop to stop the lathe. Never try to stop the lathe by hand!!! Never use a rag or paper towel to clean the parts while they are revolving in the lathe Make sure that all parts are secured tightly in the lathe before starting. Parts could fly out if they are not.

17
Safety Precautions The chuck key is always part of your hand while installing parts into the chuck. Never remove your hand from the chuck key until all parts are secured properly and the chuck key has been placed in its designated location. If the lathe is started with the chuck key in place the following could happen The chuck key could fly out and injure someone or hit the lights The chuck key could become jammed against the lathe bed, damaging the wrench, lathe bed, chuck, and lathe spindle

18
Safety Precautions Keep the floor free from grease, oil, metal cutting tools, and work pieces No horseplay Remove the metal chips / shavings from the lathe with a chip brush. Never use a cloth or your hands. Move the carriage out of the way or down the bed while polishing, filing, cleaning, and when making adjustments to the work.

19
Methods of Holding Workpieces in a Lathe
Unit 59 Metalwork Technology and Practice

20
Spindle Noses Headstock Spindle: Where all work piece holding devices are attached to and driven by. Three types of spindle noses: Threaded Spindle Nose: Accommodates chucks and face plates. Cam-Lock Spindle Nose: Notched rods attached to the back of the chuck are aligned with holes on the spindle face. Long Taper Key-Drive Spindles: The chuck is placed so that the key on the spindle nose lines up with the keyway in the chuck. See Fig. 59-1, 59-2, and 59-3)
")
21
Lathe Chucks Five Kinds of Lathe Chucks:
Four Jaw Three Jaw Collet Spindle Step (See Fig 59-4, 59-5, 59-6, 59-7, 59-8, and 59-9 on pgs. 461, 462, and 463) To install and remove a chuck follow the instructions laid out in section 59-3 on pgs 462 and 463
 To install and remove a chuck follow the instructions laid out in section 59-3 on pgs 462 and 463.")
22
LATHE CUTTING TOOLS, TOOLHOLDERS, CUTING SPEEDS, AND FEED SELECTION
UNIT 60 Metalwork Technology and Practice

23
Tool Bits Defined: Cutting tools for lathes Types of Tool Bits
Left Hand Turning Tool Left Hand Facing Tool Right Hand Turning Tool Right Hand Facing Tool Round Nose Round Nose Turning Tool Threading Tool Boring Tool Cut-Off Tool Inside Turning Tool

24
Lathe Tool Composition
High Speed Steel Cast Alloys Cemented Carbide Ceramics Cubic Boron Nitride Diamond Lathe Cutting Tool Bits

25
Cutting Tool Terms Cutting Edge: The part that does the cutting
Side Cutting Edge End Cutting Edge Face: Top Tool Surface Flank: Side of the tool below the side cutting edge Nose: Point of the tool Nose Angle: Angle formed by the side cutting edge and the end cutting edge Nose Radius: The dimension of the arc that forms a round nose Shank: Body of the tool

26
Cutting Tool Terms (cont.)
Side Cutting Edge: The angle formed by the side cutting edge End Cutting Edge: The angle formed by the end cutting edge Side Relief: The angle between the tool flank and the original side of the tool End Relief: The angle between the end of the tool and a line drawn 90 degrees to the base of the toolholder

27
Cutting Tool Terms (cont.)
Left hand cutting tool: Has cutting edge on the right Right hand cutting tool: Has cutting edge on the left

28
ToolHolders The NCWHS lab uses a multiple tool post, tool holder system. The tool bit is inserted into a block where four tool bits can be utilized Lathe Tool Post Systems


 SeaTech 4-H ROV teams, developed the following placards, which he attaches to the tools in.>")


