Download presentation
Presentation is loading. Please wait.

1
May 3, 2012 CloudStack Integration UI and API Customization and Integration CloudStack Developer On Ramp

2
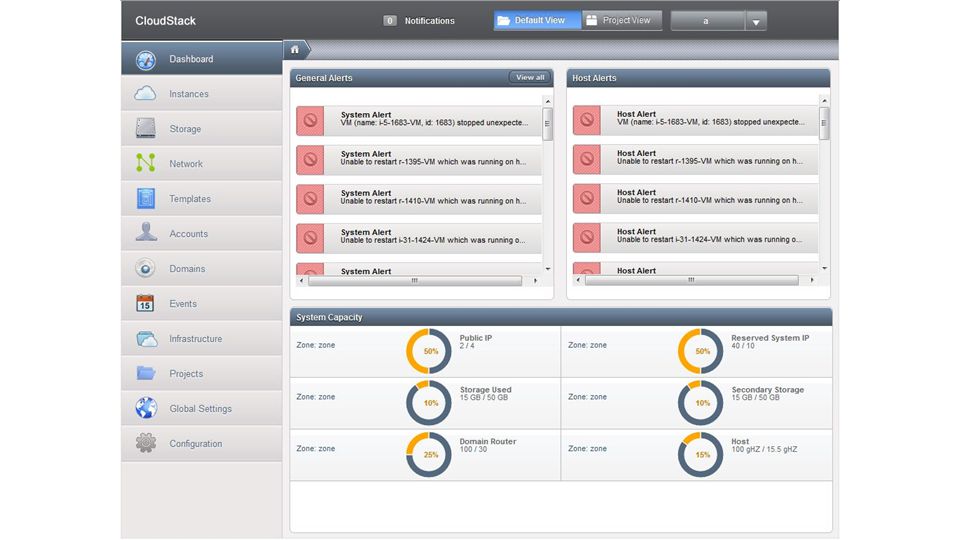
What you will learn 2 How to customize the CloudStack 3.0.x user interface Showcase changes specific in the CSS to alter the look and feel of CloudStack Showcase an example of how to add your own side navigation Dealing with Cross Site Request Forgery (CSRF) Simple Single Signon Localization
 Simple Single Signon Localization")
3
What you will learn Working with the API Session Based Auth vs API Key Auth How to sign a request with apiKey/secretKey Asynchronous commands Response Format Pagination Q&A

4
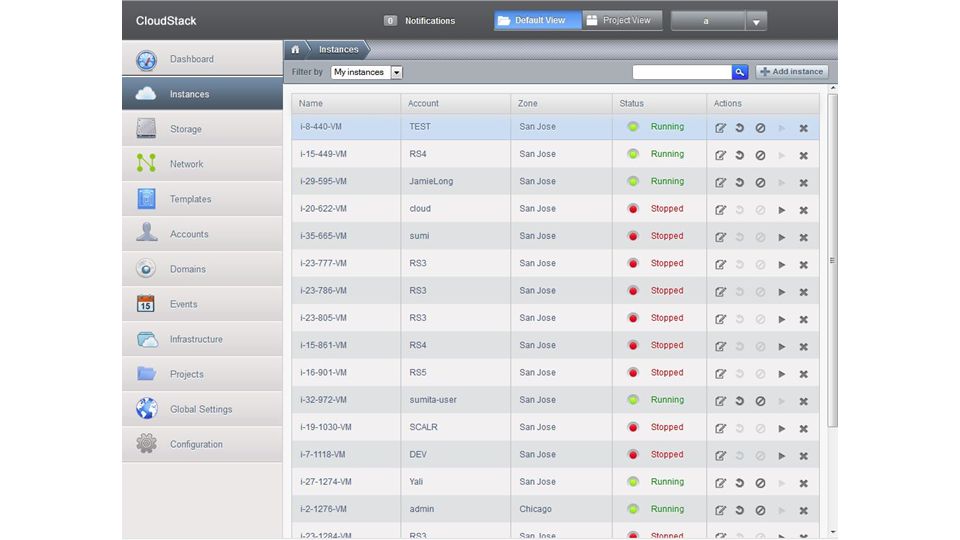
Customizing the CloudStack User Interface Editing the CSS Localization

7
Editing the Logo, Navigation, and Title backgrounds #header div.logo { background: url("../images/logo.png") no-repeat scroll 0 center transparent; float: left; height: 47px; margin: 4px 0 0 19px; position: relative; width: 170px; } #navigation ul li { background: url("../images/bg-nav-item.png") repeat-x scroll 0 0 transparent; cursor: pointer; height: 50px; text-shadow: 0 1px 1px #FFFFFF; }.dashboard.admin.dashboard-container.top { background: url("../images/ bg-breadcrumb.png") repeat-x scroll \0 -1px transparent; border-radius: 7px 7px 0 0; color: #FFFFFF; float: left; margin: 0 0 9px; padding: 4px 4px 8px; width: 100%; }
 no-repeat scroll 0 center transparent; float: left; height: 47px; margin: 4px px; position: relative; width: 170px; } #navigation ul li { background: url( ../images/bg-nav-item.png ) repeat-x scroll 0 0 transparent; cursor: pointer; height: 50px; text-shadow: 0 1px 1px #FFFFFF; }.dashboard.admin.dashboard-container.top { background: url( ../images/ bg-breadcrumb.png ) repeat-x scroll \0 -1px transparent; border-radius: 7px 7px 0 0; color: #FFFFFF; float: left; margin: 0 0 9px; padding: 4px 4px 8px; width: 100%; }")
10
Editing the tables, status icons, and buttons table tbody td, table th, table tbody td { border-right: 1px solid #BFBFBF; clear: none; color: #495A76; font-size: 12px; min-width: 88px; overflow: hidden; padding: 9px 5px 8px 0; vertical-align: middle; background-color: #f2f0f1 } div.list-view td.state.on span { background-image: url("../images/sprites.png"); background-position: 1px -460px; background-repeat: no-repeat; color: #008000; } div.button.add { background: url("../images/gradients.png") repeat scroll 0 -98px transparent; border-left: 1px solid #808080; border-radius: 4px 4px 4px 4px; border-right: 1px solid #808080; color: #4A5A6D; cursor: pointer; float: right; font-size: 11px; font-weight: bold; height: 12px; left: 0; margin: 0 14px 0 0; padding: 5px 7px 5px 6px; position: relative; text-shadow: 0 1px 1px #DEE5EA; top: 5px; }
; background-position: 1px -460px; background-repeat: no-repeat; color: #008000; } div.button.add { background: url( ../images/gradients.png ) repeat scroll 0 -98px transparent; border-left: 1px solid #808080; border-radius: 4px 4px 4px 4px; border-right: 1px solid #808080; color: #4A5A6D; cursor: pointer; float: right; font-size: 11px; font-weight: bold; height: 12px; left: 0; margin: 0 14px 0 0; padding: 5px 7px 5px 6px; position: relative; text-shadow: 0 1px 1px #DEE5EA; top: 5px; }")
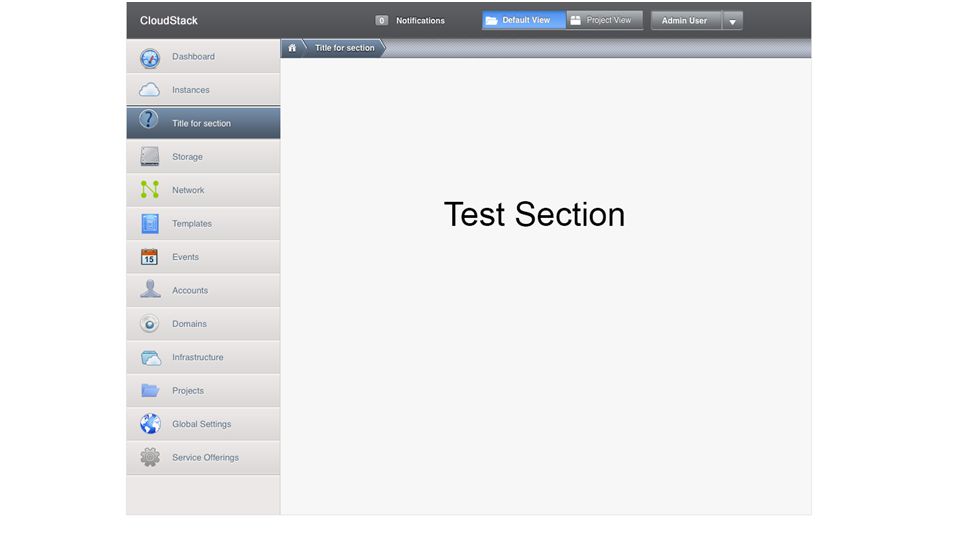
13
Adding navigation buttons and functionality 1. Go to /ui/scripts/cloudStack.js 3. Add a new section to the array: sections: { /** * Dashboard */ dashboard: {}, //'dashboard-user': {}, instances: {}, storage: {}, network: {}, templates: {}, events: {}, accounts: {}, domains: {}, system: {}, projects: {}, 'global-settings': {}, configuration: {}, // New section testSection: {} } 2. Find the sections array: sections: { /** * Dashboard */ dashboard: {}, //'dashboard-user': {}, instances: {}, storage: {}, network: {}, templates: {}, events: {}, accounts: {}, domains: {}, system: {}, projects: {}, 'global-settings': {}, configuration: {} }

14
Adding navigation buttons and functionality 4. Open /ui/index.jsp. Create HTML somewhere in the 'template' div to contain your HTML content, which will be drawn in the browser pane: Test section 5. Enclose a function in 'testSection', which returns a jQuery object containing your template code, and whatever other content you wish to be shown: sections: { /** * Dashboard */ dashboard: {}, //'dashboard-user': {}, instances: {}, storage: {}, network: {}, templates: {}, events: {}, accounts: {}, domains: {}, system: {}, projects: {}, 'global-settings': {}, configuration: {}, // New section testSection: { title: 'Title for section', show: function(args) { return $('#template.testSection- tmpl').clone(); }
 { return $( #template.testSection- tmpl ).clone(); }.")
15
Adding navigation buttons and functionality 6. Add the section to the pre-filter, so that it isn't filtered out for the admin account: -- sectionPreFilter: function(args) { if(isAdmin()) { return ["dashboard", "instances", "storage", "network", "templates", "accounts", "domains", "events", "system", "global-settings", "configuration", "projects"]; }, sectionPreFilter: function(args) { if(isAdmin()) { return ["dashboard", "instances", "storage", "network", "templates", "accounts", "domains", "events", "system", "global-settings", "configuration", "projects", // New section "testSection"]; },...
 { if(isAdmin()) { return [ dashboard , instances , storage , network , templates , accounts , domains , events , system , global-settings , configuration , projects ]; }, sectionPreFilter: function(args) { if(isAdmin()) { return [ dashboard , instances , storage , network , templates , accounts , domains , events , system , global-settings , configuration , projects , // New section testSection ]; },....")
16
Adding navigation buttons and functionality 7. (optional) Add an icon for your new section in the CSS, either at the bottom of /ui/css/cloudstack3.css or in your own CSS file under /ui/css folder. Make sure the size of the icon is ~32x32 pixels: #navigation ul li.testSection span.icon { background: url('../images/testSection-icon.png') no-repeat 0px 0px; }
 Add an icon for your new section in the CSS, either at the bottom of /ui/css/cloudstack3.css or in your own CSS file under /ui/css folder. Make sure the size of the icon is ~32x32 pixels: #navigation ul li.testSection span.icon { background: url( ../images/testSection-icon.png ) no-repeat 0px 0px; }.")
19
Cross Site Request Forgery (CSRF) Type of malicious exploit of a website whereby unauthorized commands are transmitted from a user that the website trusts. Unlike cross-site scripting (XSS), which exploits the trust a user has for a particular site, CSRF exploits the trust that a site has in a user's browse What does CS do to prevent this? After execution of the login command you will get two session variables JSESSIONID – default cookie SESSIONKEY – random token that is passed along every API request -http:// ?sessionkey= &…
, which exploits the trust a user has for a particular site, CSRF exploits the trust that a site has in a user s browse What does CS do to prevent this. After execution of the login command you will get two session variables JSESSIONID – default cookie SESSIONKEY – random token that is passed along every API request - sessionkey= &….")
20
Simple Single Signon http:// ?command=login&username=XXX&domainid=NNN×tamp= YYY&signature= You do not need to pass in the API Key The four parameters that must be passed in for the login command are domainId, username, timestamp, and signature security.singlesignon.key security.singlesignon.tolerance.millis SAML?

21
Localization Support for Japanese and Simplified Chinese Takes advantage of the Java ResourceBundle to do localization Simply create a /WEB-INF/classes/resources/messages_.properties Server side vs Client side processing

22
API

23
Session-based Auth vs API Key Auth CloudStack supports two ways of authenticating via the API. Session-based Auth Uses default Java Servlet cookie based sessions Use the “login” API to get a JSESSIONID cookie and a SESSIONKEY token All API commands require both cookie and token to authenticate Has a timeout as configured within Tomcat API Key Auth Works similarly to AWS API Requires a bit more coding to generate the signature All API commands require a signature hash

24
SIGNING REQUEST WITH API KEY / SECRET KEY Step 1: commandString = command name + parameters + api key URL encode each field-value pair within the commandstring Step 2: Lower case the entire commandString and sort it alphabetically via the field for each field-value pair. sortedCommandString : apiKey=vmwijj…&command=createvolume&diskofferingid=1&name=smallvolume=zoneid=1 Step 3: Take the sortedCommandString and run it through the HMAC SHA-1 hashing algorithm (most programming languages offer a utility method to do this) with the user’s Secret Key. Base64 encode the resulting byte array in UTF-8 so that it can be safely transmitted via HTTP. The final string produced after Base64 encoding should be SyjAz5bggPk08I1DE34lnH9x%2f4%3D
 with the user’s Secret Key. Base64 encode the resulting byte array in UTF-8 so that it can be safely transmitted via HTTP. The final string produced after Base64 encoding should be SyjAz5bggPk08I1DE34lnH9x%2f4%3D.")
25
Asynchronous Commands Starting with 3.0, in your standard CRUD (Create, Read, Update, Delete) of any first class objects in CloudStack, CUD are automatically asynchronous. R is synchronous. Rather than returning a response object, it will return a job ID. If it is a “Create” command, it will also return the object ID. With the job ID, you can query the async job status via the queryAsyncJobResult command. The queryAsyncJobResult response will return the following possible job status code: 0 - Job is still in progress. Continue to periodically poll for any status changes. 1 - Job has successfully completed. The job will return any successful response values associated with command that was originally executed. 2 - Job has failed to complete. Please check the tag for failure reason code and for the failure reason.

26
RESPONSE FORMAT CloudStack supports two formats as the response to an API call. The default response is XML. If you would like the response to be in JSON, add &response=json to the Command String. Sample XML Response: 192.168.10.141 2009-09-18T13:16:10-0700 4 WC true Sample JSON Response: { "listipaddressesresponse" : { "allocatedipaddress" : [ { "ipaddress" : "192.168.10.141", "allocated" : "2009-09- 18T13:16:10-0700", "zoneid" : "4", "zonename" : "WC", "issourcenat" : "true" } ]

27
Pagination Using the page and pagesize parameter page defines the current cursor to the list pagesize defines the number of items per request Pagesize is limited by the administrator Sample: listVirtualMachines&page=1&pagesize=500 listVirtualMachines&page=2&pagesize=500

28
Q&A

Similar presentations


 Miftahul Huda. CSS Navigation MENU It's truly remarkable what can be achieved through CSS, especially with navigation menus.>")
 a color name - like red“ Example h1.>")


